Table of Contents
Advertisement
Quick Links
Advertisement
Table of Contents

Subscribe to Our Youtube Channel
Related Manuals for maxxess eMAX-LP2500


Summary of Contents for maxxess eMAX-LP2500
- Page 1 INTELLIGENT CONTROLLER Installation Guide and Specifications This device complies with FCC Part 15, Class A Specifications. The device meets CE Specifications, and is RoHS Certified. February 2019 This device is UL 294 Recognized.
-
Page 2: Table Of Contents
Paragraph Title Page No. General …………………………………………………………………………………………….. 3 eMAX-LP2500 Hardware ……………………………………………….……………………...… 3 eMAX-LP2500 Wiring and Setup …………………….……………………………………...… 4 Bulk Erase Configuration Memory ……………………………………………………………. 5 Input Power, Cabinet Tamper, UPS Fault Wiring …………………..……………………….. 6 Communication Wiring …………………………………………………………………………. 6 Memory and Real Time Clock Backup Battery …………………………………………...… 7 Status LEDs ………………………………………………………………..……………………. -
Page 3: General
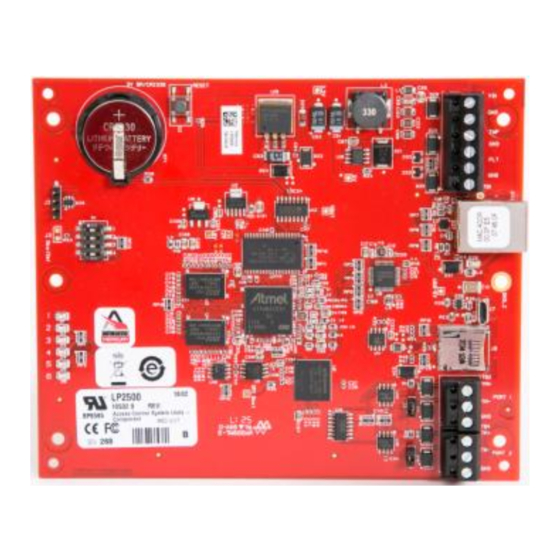
General: The eMAX-LP2500 is an IP Network-based Intelligent Area Controller that provides local transaction processing & decision making, transaction/event reporting, and local database storage for the eMAX hardware platform and the Maxxess eAXxess and eFusion Access Control Systems. The eMAX-LP2500 Host communication is via the on-board 10-BaseT/100Base-TX Ethernet port, or the Micro USB port (2.0) with an optional Micro USB to Ethernet adapter. -
Page 4: Emax-Lp2500 Wiring And Setup
Wiring and Setup: CONNECTION CONNECTION TB1-1 TB3-1 Power Fault SIO Port 1 TB1-2 TB3-2 Input (2-wire RS-485) TR- (B) See note 1 TB1-3 TB3-3 Cabinet TR+ (A) See note 1 TB1-4 TB4-1 Tamper Input SIO Port 2 TB1-5 TB4-2... -
Page 5: Bulk Erase Configuration Memory
2. Apply power to the eMAX-LP2500 board. LED 1 on for up to 15 seconds while board boots up. 3. After the eMAX-LP2500 boots up, watch for LEDs 1 & 2 and 3 & 4 to alternately flash at a 0.5 second rate. -
Page 6: Input Power, Cabinet Tamper, Ups Fault Wiring
Input Power, Cabinet Tamper, and UPS Fault Wiring: The eMAX-LP2500 requires 12 to 24 Vdc power. Locate power source as close to the unit as possible. Connect power with minimum of 18 AWG wire. Connect the GND signal to earth ground in ONE LOCATION... -
Page 7: Memory And Real Time Clock Backup Battery
OFF = No Link, ON = Good Link (Green LED), Flashing = Ethernet Activity IT Security When installing the eMAX-LP2500, it is important to ensure that it is done in a secure manner. Upon installation, the user accounts to the web configuration page should be created with secure passwords, and that all DIP switches are in the off position for the normal operating mode. -
Page 8: 10. Specifications
5 in. (127 mm) W x 6 in. (152.4 mm) L x 1 in. (25 mm) H Weight: 4.1 oz. (115 gm) nominal UL294, 6 edition Performance Levels: Feature Level Standby Power Endurance Line Security Destructive Attack These specifications are subject to change without notice. February, 2019 eMAX-LP2500-Man Page 8 of 14... -
Page 9: Warranty And Liability
This product is not intended for, nor is rated for operation in life-critical control applications. Maxxess Systems is not liable under any circumstances for loss or damage caused by or partially caused by the misapplication or malfunction of the product. Maxxess Systems liability does not extend beyond the purchase price of the product. -
Page 10: Appendix A - Configuring The Emax-Lp Controllers
First Click on “ Details “, which will tell you that your PC does not recognize the Web Pages’s Security Certificate. This is Normal. Then click on “ Go on to the webpage “. February, 2019 eMAX-LP2500-Man Page 10 of 14... - Page 11 Login using username ‘admin’ and password’ password’. The following message will appear if you FAILED to turn Switch #1 to ON, or if 5 minutes have elapsed since turning switch #1 to ON. February, 2019 eMAX-LP2500-Man Page 11 of 14...
- Page 12 Browse to the Users link and add a user. If the new user details are ever lost, the controller dipswitch S1 may be used to re-enable the default user. Click on the Network page to configure the IP parameters February, 2019 eMAX-LP2500-Man Page 12 of 14...
- Page 13 Configure the required IP Address, Subnet Mask, Default Gateway (as applicable) for the eMAX-LP2500. If using Redundant host communication, you will need to configure the Interface 2 (NIC2) parameters. To SAVE, Click on “Accept” button, then select the ‘Apply Settings’ button...
- Page 14 If you wish to proceed, check both of the check boxes, then click on the “Yes” box to proceed. You should see a message that “The Board is Restarting”. And a selection box to CLOSE the window. February, 2019 eMAX-LP2500-Man Page 14 of 14...
Need help?
Do you have a question about the eMAX-LP2500 and is the answer not in the manual?
Questions and answers