Table of Contents
Advertisement
Available languages
Available languages
Quick Links
ASSEMBLY INSTRUCTIONS
TABLE OF CONTENTS
Before you Begin
Hardware Included
Package Contents
Assembly
BEFORE YOU BEGIN
Review the parts in the box with the contents outlined
in our Hardware Included section of this manual. If
any part is missing or damaged, contact our customer
support before performing any assembly.
To ensure no damage to the product occurs, assemble
the cabinet on a soft surface such as carpet, a towel or
the cardboard packaging.
HARDWARE INCLUDED
SHELF PIN
x18
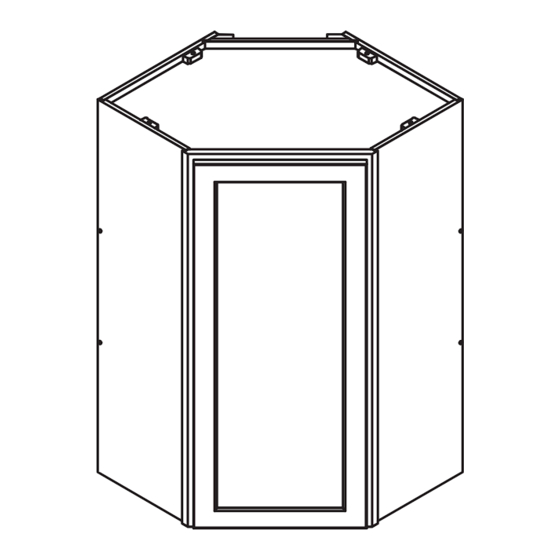
Model # WA2442(L/R)
Finish: White, Gray
Page 1
Page 1
Page 2
Page 2
1" CSK SCREW
x12
Thank you for your purchase! Have
questions or need help? Please call
our customer service 8:30 a.m. - 5 p.m.,
CST, Monday - Friday.
1.833.748.4846
Support@magickwoods.com
Door Adjustment
Care and Cleaning
Warranty
5 MM BUMPER
x2
Français : page 10
Español: página 19
Page 7
Page 8
Page 8
TOOLS REQUIRED
FOR ASSEMBLY
5/8" CSK SCREW
x4
1
Advertisement
Table of Contents

Subscribe to Our Youtube Channel
Related Manuals for Magick Woods Elements WA2442L


Summary of Contents for Magick Woods Elements WA2442L
- Page 1 ASSEMBLY INSTRUCTIONS Français : page 10 Español: página 19 Thank you for your purchase! Have questions or need help? Please call our customer service 8:30 a.m. - 5 p.m., Model # WA2442(L/R) CST, Monday - Friday. Finish: White, Gray 1.833.748.4846 Support@magickwoods.com TABLE OF CONTENTS Before you Begin...
- Page 2 PACKAGE CONTENTS Part # Description Qty. LEFT-HAND & RIGHT-HAND GABLE TOP & BOTTOM BACK PANEL ASSEMBLY SHELF FRAME & DOOR ASSEMBLY LEFT-HAND & RIGHT-HAND SIDE BACK PANEL HELPFUL HINT: Use painter's tape to temporarily label components as shown in the diagram for easy assembly. ASSEMBLY Step 1 Insert the shelf pins in your preferred locations as per the illustration.
- Page 3 Step 2 Assemble the cabinet parts as per the illustration. Using a Phillips Head screwdriver, rotate the connector clockwise to fasten into place. Ensure all connectors are locked into place before moving the cabinet. Step 3 Add the left-side back panel to the cabinet box as shown in the illustration. Using a Phillips Head screwdriver, rotate the connector clockwise to fasten into place.
- Page 4 Step 4 1. Slightly tilt and insert the shelves into the cabinet as shown on the diagram. 2. Press shelves in a downward direction to lock them into place. 3. Before inserting the shelves into the cabinet, ensure the finished front edge is on the door side. PRESS TO FIX ANGLE INSERT SHELF...
- Page 5 Step 6 Insert the back panel assembly as shown in the drawing. Step 7 Using a Phillips Head screwdriver, secure the back panel and left/right side back panel with 1" and 5/8" CSK screws as shown in the illustration. Be careful not to over-tighten as this may damage the product.
- Page 6 Step 8 Stand the cabinet upright. Using a Phillips Head screwdriver, secure the left and right gable with 1" CSK screws as shown in the illustration. Be careful not to over-tighten as this may damage the product. 1" CSK SCREW Step 9 Place the bumpers on the door as shown.
- Page 7 DOOR ADJUSTMENT If you need to adjust your door front/back, up/down or left/right, please follow the below instructions. Front/Back Adjustment Up/Down Adjustment Left/Right Adjustment Need assistance? Contact us at 1.833.748.4846.
- Page 8 CARE AND CLEANING • For normal cleaning, use a soft damp cloth. Dry the surface after wiping. • Use a mild soap and water solution, with most of the water squeezed from the cloth. • For items tougher to clean, you can use most general-purpose household cleaners. •...
- Page 9 What This Warranty Does Not Cover: This warranty does not cover any problems or damage which result from improper transportation, improper installation, mishandling, misuse, abuse, neglect, abnormal use, commercial use, improper maintenance, unauthorized repairs, accidents, or acts of God, such as hurricanes, fire, earthquakes or floods. The warranty and any applicable implied warranties do not cover incidental or consequential damages arising from any defects in the product such as labor charges for installation or removal of the product or any associated products.
-
Page 10: Table Of Contents
INSTRUCTIONS POUR L’ASSEMBLAGE Nous vous remercions de votre achat! Si vous avez des questions ou avez besoin d’aide : Veuillez communiquer Modèle Nº WA2442(L/R) avec notre service à la clientèle entre Fini : Blanc, Gris 8 h et 17 h (HNE), du lundi au vendredi. 1 833 748.4846 Support@magickwoods.com TABLE DES MATIÈRES... -
Page 11: Contenu De L'emballage
CONTENU DE L’EMBALLAGE Nº de pièce Description Qté. PANNEAU GAUCHE ET PANNEAU DROIT HAUT ET BAS ENSEMBLE DE PANNEAU ARRIÈRE TABLETTE ENSEMBLE CADRE ET PORTE PANNEAUX ARRIÈRE LATÉRAUX GAUCHE ET DROIT CONSEIL UTILE : utilisez du ruban adhésif de peintre pour étiqueter temporairement les composants comme indiqué... - Page 12 Étape 2 Assemblez les pièces de l’armoire, tel qu’il est illustré. À l’aide d’un tournevis cruciforme, faites tourner le raccord dans le sens des aiguilles d’une montre pour le fixer. Assurez-vous que tous les raccords sont verrouillés en place avant de déplacer l’armoire. Étape 3 Fixez le panneau arrière latéral gauche au caisson d’armoire, tel qu’il est illustré.
- Page 13 Étape 4 1. Inclinez légèrement les tablettes et insérez-les dans l’armoire, comme le montre l’illustration. 2. Appuyez sur les tablettes pour les fixer en place. 3. Avant d’insérer les tablettes dans l’armoire, assurez-vous que le bord avant fini se trouve du côté...
-
Page 14: Vis À Tête
Étape 6 Insérez l’ensemble de panneaux arrière tel que le démontre l’illustration. Étape 7 À l'aide d'un tournevis à tête Phillips, fixez le panneau arrière et le panneau arrière gauche/droit avec des vis à tête fraisée de 1 po et 5/8 po, tel qu’il est illustré. Prenez soin de ne pas trop serrer les vis, car vous risqueriez d’endommager l’article VIS À... - Page 15 Étape 8 Placez l’armoire en position verticale. À l’aide d’un tournevis cruciforme, fixez les panneaux gauche et droit avec des vis à tête fraisée de 1 po, tel qu’il est illustré. Prenez soin de ne pas trop serrer les vis, car vous risqueriez d’endommager l’article. VIS À...
-
Page 16: Réglage Des Portes
RÉGLAGE DES PORTES Si vous devez déplacer votre porte vers le haut ou vers bas, vers la droite ou la gauche, ou vers l’avant ou l’arrière, veuillez suivre les instructions ci-dessous. Réglage avant/arrière Réglage haut/bas Réglage gauche/droite Vous avez besoin d’aide? Communiquez avec nous au 1 833 748-4846. -
Page 17: Entretien Et Nettoyage
ENTRETIEN ET NETTOYAGE • Pour nettoyer l’article normalement, utilisez un linge doux et humide. Séchez la surface après l’avoir essuyée. • Utilisez une solution d’eau et de savon doux et essorez le linge pour extraire la majorité de l’eau. • Pour les articles plus difficiles à... - Page 18 de bois sont naturelles et inévitables. Par ailleurs, il nous est impossible de représenter parfaitement les couleurs des articles dans les documents imprimés. Il serait donc préférable que vous voyiez des articles en présentation pour faire votre choix de couleur. Qu’est-ce qui n’est pas couvert par la présente garantie? Cette garantie ne couvre pas les problèmes ou les dommages résultant d’un transport inadéquat, d’une installation ou d’une manipulation inadéquate, d’un usage inapproprié...
-
Page 19: Support@Magickwoods.com
INSTRUCCIONES DE ENSAMBLAJE Gracias por su compra. ¿Necesita ayuda o tiene preguntas? Llame a nuestro servicio Modelo WA2442(L/R) de atención al cliente de lunes a viernes de 8 a.m. a 5 p.m., hora estándar del Este. Acabado: Blanco, Gris 1.833.748.4846 Support@magickwoods.com ÍNDICE Antes de comenzar... - Page 20 CONTENIDO DEL PAQUETE Pieza # Descripción Cantidad GABLETE IZQUIERDO Y GABLETE DERECHO PARTE SUPERIOR E INFERIOR ENSAMBLE EL PANEL POSTERIOR REPISA BASTIDOR Y PUERTA PANEL POSTERIOR LATERAL IZQUIERO Y DERECHO CONSEJO ÚTIL: Utilice cinta de pintor para etiquetar temporalmente los componentes como se muestra en el diagrama para facilitar el montaje.
- Page 21 Paso 2 Ensamble las piezas del gabinete como se muestra en la ilustración. Con un destornillador Phillips, gire el conector en dirección de las manecillas del reloj para fijarlo en su lugar. Asegúrese de que todos los conectores estén trabados en su lugar antes de mover el gabinete. Paso 3 Agregue el panel posterior lateral izquierdo a la caja del gabinete como se muestra en la ilustración.
- Page 22 Paso 4 1. Incline ligeramente los estantes e introdúzcalos en el gabinete como se muestra en el diagrama. 2. Presione los estantes hacia abajo para bloquearlos en su lugar. 3. Antes de insertar los estantes en el gabinete, asegúrese de que el borde frontal acabado está en el lado de la puerta.
- Page 23 Paso 6 Inserte el ensamble del panel posterior como se muestra en el dibujo. Paso 7 Con un destornillador Phillips, asegure el panel posterior y el panel posterior lateral izquierdo/ derecho con tornillos CSK de 1" y tornillos CSK de 5/8" como se muestra en la ilustración. Tenga cuidado de no apretar demasiado, ya que se podría dañar el producto.
- Page 24 Paso 8 Coloque el gabinete en posición vertical. Con un destornillador Phillips, asegure el gablete izquierdo y derecho con tornillos CSK de 1" como se muestra en la ilustración. Tenga cuidado de no apretar demasiado, ya que se podría dañar el producto. TORNILLO CSK DE 1"...
- Page 25 AJUSTES DE LA PUERTA Si necesita ajustar la puerta hacia arriba/abajo o hacia la izquierda/derecha y hacia delante/atrás, siga las instrucciones a continuación. Ajuste hacia delante/atrás Regulación hacia arriba/abajo Ajuste hacia la izquierda/derecha ¿Necesita ayuda? O póngase en contacto con nosotros en el 1.833.748.4846.
- Page 26 CUIDADO Y LIMPIEZA • Para una limpieza normal, utilice un paño suave y húmedo. Seque la superficie después de limpiarla. • Utilizando una solución de agua y jabón suave, con la mayor parte del agua exprimida del paño. • Para los artículos más difíciles de limpiar, puede utilizar la mayoría de los limpiadores domésticos de uso general.
- Page 27 Lo que no cubre esta garantía: Esta garantía no cubre ningún problema o daño como resultado del transporte inadecuado, instalación indebida, manipulación incorrecta, uso indebido, abuso, negligencia, uso anormal, uso comercial, mantenimiento inadecuado, reparaciones no autorizadas, accidentes o desastres naturales como huracanes, incendios, terremotos o inundaciones.
Need help?
Do you have a question about the WA2442L and is the answer not in the manual?
Questions and answers