Table of Contents
Advertisement
Quick Links
Advertisement
Table of Contents

Subscribe to Our Youtube Channel
Related Manuals for Vivitar Vivicam 3760


Summary of Contents for Vivitar Vivicam 3760
- Page 1 V3760 User Manual English 050118TP...
-
Page 2: Fcc Statement
FCC STATEMENT This device complies with Part 15 of the FCC Rules. Operation is subject to the following two conditions: (1) This device may not cause harmful interference, and (2) This device must accept any interference received, including interference that may cause undesired operation Note: This equipment has been tested and found to comply with the limits for Class B digital devices, pursuant to Part 15 of the FCC rules. -
Page 3: Trademark Information
Contact your dealer for precise product definition and included accessories. The manufacturer assumes no liability for any errors or discrepancies in this user’s manual. For user manual and driver updates, refer to the Vivitar website or contact your dealer. are U.S. registered trademarks of Microsoft Corporation. -
Page 4: Safety Instructions
SAFETY INSTRUCTIONS Read and understand all Warnings and Cautions before using this product. Warnings If foreign objects or water have entered the camera, turn the power OFF and remove the batteries and the AC power adapter. Continued use in this state might cause fire or electric shock. Consult the store of purchase. If the camera has fallen or its case has been damaged, turn the power OFF and remove the batteries and the AC power adapter. - Page 5 Cautions Insert the batteries paying careful attention to the polarity (+ or –) of the terminals. Inserting the batteries with its polarities inverted might cause fire and injury, or damage to the surrounding areas due to the battery rupturing or leaking. Do not fire the flash close to anyone’s eyes.
-
Page 6: Notes On Battery Usage
Remove the batteries if the ViviCam 3760 will not be used for an extended period of time. The batteries may leak and cause a fire, injury or soiling of the battery compartment. -
Page 7: Table Of Contents
CONTENTS INTRODUCTION...8 Overview...8 Package Contents...9 GETTING TO KNOW YOUR VIVICAM 3760...10 Front View...10 Rear View...11 LED Indicators...12 LCD Monitor Information...13 GETTING STARTED...16 Installing the Batteries...16 Attaching the Camera Strap...16 Using the AC Power Adapter...17 Loading an SD Memory Card...18 Choosing the Language...19 Setting the Date and Time...19... - Page 8 Video Clips...44 For Computers Running Windows...44 For Computers Running Mac OS...44 INSTALLING PHOTOSUITE...45 INSTALLING PHOTOVISTA...46 INSTALLING ACROBAT READER...47 USER MANUAL...48 MENU OPTIONS...49 RECORD MENU...49 MOVIE MENU...52 SCENE MENU...53 PLAYBACK MENU...54 CONNECTING YOUR VIVICAM 3760 TO OTHER DEVICES...55 VIVICAM 3760 SPECIFICATIONS...56...
-
Page 9: Introduction
INTRODUCTION Overview Your new ViviCam 3760 delivers good quality, 2032 x 1520 resolution images using a 3.0 Megapixels CCD sensor. An auto-flash sensor automatically detects the shooting (lighting) conditions and determines whether the flash should be used. This feature helps ensure that your images turn out right. -
Page 10: Package Contents
Package Contents Carefully unpack your ViviCam 3760 and ensure that you have the following items. In the event that any item is missing or if you find any mismatch or damage, promptly contact your dealer. Common Product Components ViviCam 3760 Digital camera... -
Page 11: Getting To Know Your Vivicam 3760
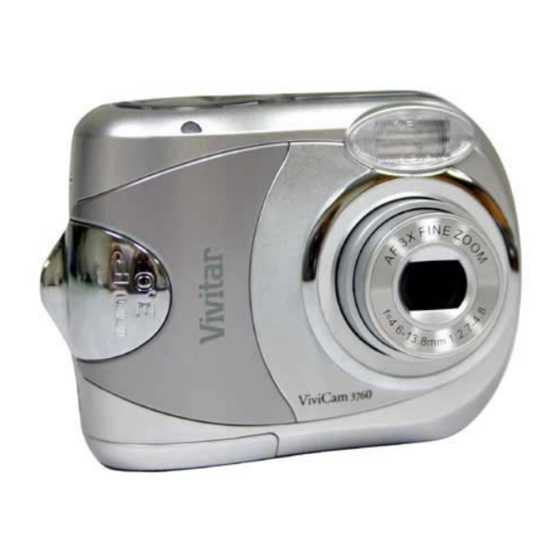
GETTING TO KNOW YOUR VIVICAM 3760 Front View VIVICAM 3760 VIVICAM 3760 VIVICAM 3760 VIVICAM 3760 1. Self-timer LED 2. Shutter button 3. Power button 4. Flash 5. Lens 6. DC IN 3V port 7. USB port 8. Strap eyelet... -
Page 12: Rear View
Rear View 1. W Zoom out button 2. T Zoom in button Playback button Menu button 5. LED indicator 6. LCD monitor 7. Battery/SD Memory Card cover 8. Tripod socket Arrow button (Up) Mode button Arrow button (Left) Flash button Arrow button (Down) Macro button Delete button... -
Page 13: Led Indicators
Blinking green LED indicator Solid green Self-timer indicator Blinking red * (1) The ViviCam 3760 sounds one beep. * (2) The ViviCam 3760 sounds two beeps. * (3) The ViviCam 3760 sounds three beeps. Description/Activity The ViviCam 3760 is powering up... -
Page 14: Lcd Monitor Information
LCD Monitor Information By toggling the button or pressing the and numbers are displayed on the monitor screen to keep you informed of the camera’s status. Record mode: 1. Record mode 2. Image resolution ] 2032 x 1520 ] 1600 x 1200 ] 1280 x 960 ] 640 x 480 3. - Page 15 Movie mode: 1. Movie mode 2. White balance 3. Recordable movie time available 4. Zoom state 5. Battery 6. Card indicator (when present) Scene mode: 1. Scene mode ] Landscape mode ] Sports mode ] Portrait mode ] Pan mode ] Night scene mode ] Backlight mode 2.
- Page 16 Image Playbavck: 1. Playback mode 2. Current image/total number of image 3. Forward key 4. Battery 5. Card indicator (when present) 6. Reverse key Video Playback: 1. Playback mode 2. Recorded time 3. Movie mode 4. Current image/total number of image 5.
-
Page 17: Getting Started
GETTING STARTED You may use 2 AA size batteries (either Alkaline or Ni-MH) to power your ViviCam 3760. Most often the ViviCam 3760 will be shipped with two AA alkaline batteries. These batteries are adequate to power-up the camera and demonstrate its functionality for a limited period of time. -
Page 18: Using The Ac Power Adapter
Using the AC Power Adapter 1. Make sure your ViviCam 3760 is turned off. 2. Connect one end of the AC power adapter to the camera jack labeled “DC IN 3V”. 3. Connect the other end to an electrical outlet. -
Page 19: Loading An Sd Memory Card
Your camera comes with approximately 6MB of internal memory, allowing you to store images and video clips in the ViviCam 3760. However, you can expand the memory capacity by using ta Secure Digital (SD) memory card so that you can store additional images and video clips. -
Page 20: Choosing The Language
1. Select a language that you prefer by using the 2. Press the OK button to confirm. Note: The language setting will be retained even if the ViviCam 3760 is turned off. Setting the Date and Time The date/time setting screen will automatically appear: When first turning the camera on. -
Page 21: Setting Image Resolution And Quality
These settings affect the number of images that can be stored in the internal memory, or on a SD memory card. As you get to know the ViviCam 3760, it is recommended that you try each quality and resolution setting to get an appreciation for the effects that these settings will have on your images. - Page 22 Number of Recordable Images The frame counter indicates the approximate number of images that can be stored in the internal memory or the SD memory card at the camera's current image quality and resolution settings. The number of recordable images will vary depending on the recorded subject and the capacity of the memory card, or if there are files other than images (non camera data), or if the images have been captured at different image quality/resolution settings.
-
Page 23: Capturing Images
CAPTURING IMAGES Toggling the button allows you to choose 3 different modes: [ mode, [ ] Movie mode and [ confirm your selection. Still-image Record Mode Still-image record mode is the most common mode for fully automatic digital- still photography. It is the easiest mode to capture images quickly and easily with good results. -
Page 24: Using The Lcd Monitor
Using the LCD Monitor Yours camera is equipped with a 1.4" full color TFT LCD monitor to help you compose images, replay recorded images/video clips and adjust menu settings. The mode icons, text and numbers displayed on the monitor may vary according to the current mode and settings. -
Page 25: Using The Zoom Function
Using the Zoom Function The ViviCam 3760 is equipped with a 3x optical zoom lens. The lens moves during the optical zoom photography, allowing you to capture telephoto and wide-angle shots. By using the optical zoom function; images appear closer by pressing the T button, or smaller away by pressing the W button. -
Page 26: Using The Macro Mode
Using the Macro Mode With this mode, the camera’s lens switches the auto focus system to focus on subjects that are much closer to the lens. This feature allows you to shoot close-up objects, such as small insects or flowers to get the finest detail. 1. -
Page 27: Using The Flash
Using the Flash The flash is designed to function automatically when lighting conditions warrant the use of flash. You can take an image using a desired flash mode to suit your circumstances. 1. Turn the camera on by pressing the 2. -
Page 28: Scene Modes
Scene modes are predefined camera settings that optimize the camera for a particular type of scene. Your ViviCam 3760 is programmed to handle all adjustments for you, giving you the optimum photographic results for various shooting conditions. -
Page 29: Sports Mode
Sports Mode Use this mode to capture fast-moving subjects when you want to freeze the action. 1. Turn the camera on by pressing the 2. Toggle the button to the [ 3. Select [ ] by using the 4. Compose your scene and press the shutter button. Note: In this mode, the ISO speed cannot be set and the Flash mode defaults to off [ Portrait Mode... -
Page 30: Pan Mode
Pan Mode Normally, your camera performs Auto Focus in an attempt to maximize the chance that your images are within focus. When the Pan mode is selected for the shooting mode, the camera’s focus distance is preset to 1 meter (3.3 feet), and images are captured without the AF mechanism, allowing you to instantly catch the moment when you do not want to miss a shot. -
Page 31: Backlight Mode
Backlight Mode Use this mode when light is coming from behind your subject, throwing their features into shadow, or when your subject is in the shade but the background is brightly lit. 1. Turn the camera on by pressing the 2. -
Page 32: Playback Mode
PLAYBACK MODE In the [ ] mode, you can view, magnify, delete images, play video clips, or run a slide show. This mode also provides a thumbnail image display, allowing you to quickly scan for an image you want. While the camera is turned on, simply press the button whenever you want to enter the playback mode. -
Page 33: Displaying Thumbnail Images
Displaying Thumbnail Images This function allows you to view thumbnail images on the LCD monitor simultaneously so that you can quickly scan for a particular image. 1. Press the button. The last recorded image appears on the LCD monitor. 2. Press the W button. Nine thumbnail images are displayed simultaneously. -
Page 34: Slideshow Display
Slideshow Display The slide show function enables you to play your images back automatically in sequential order as a slide show. This is very useful and entertaining feature for reviewing recorded images and for presentations. 1. Press the button. 2. Press the button. -
Page 35: Deleting Images/Video Clips
Deleting Images/Video Clips Use this function to delete one or all images/video clips stored in the internal memory or memory card. To delete images or videos stored in internal memory, do not insert a memory card into the camera. Otherwise, you will delete the images or video clips stored on the memory card. -
Page 36: To Delete All Images/Video Clips At Once
To delete all images/video clips at once Perform the following procedures to delete all images/video clips that are stored in the camera or memory card. 1. Press the button. 2. Press the button 3. Select [Delete] by using the 4. Select [All images] by using the To delete all images, select [Yes] by using the press the OK button. -
Page 37: Formatting An Sd Card Or Internal Memory
Formatting an SD Card or Internal Memory This utility formats the internal memory (or memory card) and erases all stored images including non-camera data. To format the internal memory, do not insert a memory card into the camera. Otherwise, you will format the memory card. -
Page 38: Changing The Camera Startup Screen
Changing the Camera Startup Screen This feature lets you select one of your recorded images as your setup screen image, which will be displayed on the monitor whenever you press the 1. Press the button. 2. Select the image that you want to set as the opening logo by using the button. -
Page 39: Protecting Images
Protecting Images This feature prevents images from being deleted accidentally. 1. Press the button. 2. Select the image that you want to protect by using the 3. Press the button. 4. Select [Protect] by using the 5. Select [Single]/[All] by using the [Single]: Protect one image/movie. -
Page 40: Movie Mode
MOVIE MODE Recording Video Clips The movie mode allows you to record video clips at a resolution of 320x240 pixels. 1. Turn the camera on by pressing the 2. Toggle the button to the [ 3. To start recording a video clip, press (and release) the shutter button. 4. -
Page 41: Viewing Video Clips
“Quick Time Player”. These players are available at no charge and can be downloaded from the Microsoft and Apple web sites, respectively at www.microsoft.com and www.apple.com. Movies clips captured with the ViviCam 3760 are saved in the popular MPG format, without audio. -
Page 42: Transferring Recorded Images
You can share recorded images/video clips with your family or friends via e-mail or post them on the Web. Before doing these things, you need to connect the ViviCam 3760 to your computer using the USB cable and then transfer the images/video clips. -
Page 43: Step 1: Install The Usb Driver On A Windows 98 Pc
After the USB driver installation is complete, restart your computer. Using the ViviCam 3760 on a Macintosh Computer If your Mac is running OS 9.6, or OSX there is no driver or extension. Simply connect the ViviCam 3760 to your Mac and it will automatically recognize the camera. -
Page 44: Step 2: Connect The Camera To Your Computer
Step 2: Connect the Camera to Your Computer 1. Connect one end of the USB cable to an available USB port on your computer. 2. Connect the other end of the USB cable to the USB connector on the camera. 3. -
Page 45: Step 3: Download Recorded Images/Video Clips
Step 3: Download Recorded Images/Video Clips When the camera is turned on and connected to your computer, it is considered to be a disk drive, just like a floppy disk or CD. You can download (transfer) images by copying them from the “removable disk” (“untitled” disk on a Macintosh) to your computer hard disk. -
Page 46: Installing Photosuite
INSTALLING PHOTOSUITE PC users will find that PhotoSuite is a very user-friendly image-editing program. With PhotoSuite, you can retouch, compose, and organize your images. It includes a variety of templates, such as photo frames, birthday cards, calendars and more. Get your images ready and explore this amazing program. To install PhotoSuite: 1. -
Page 47: Installing Photovista
INSTALLING PHOTOVISTA PC users will find that PhotoVista is an easy-to-use program that lets you create spectacular 360 images in a snap. When you view these panoramas, you get the experience of being totally immersed in a realistic environment. PhotoVista’s powerful engine quickly and automatically stitches images together, and its intuitive interface will let even a novice get great results in minutes. -
Page 48: Installing Acrobat Reader
INSTALLING ACROBAT READER The CD-ROM includes a PDF (portable document format) copy of the user’s manual. To view a PDF you must have Acrobat Reader installed in your computer. Acrobat Reader is included on the camera CD ROM. Using Acrobat Reader, you can read the user’s manual and print sections of interest. -
Page 49: User Manual
If you misplace the printed guide, you may print another copy from the CD-ROM. The only requirement for viewing the User Manual on the CD-ROM is that you have Acrobat Reader (Adobe Reader) installed on your computer. Updates to this manual, and versions in other languages may be found on the Vivitar website (www. vivitar.com). -
Page 50: Menu Options
MENU OPTIONS The Basic of the Menu Operations: 1. Press the button in the [ ] / [ The menu appears. Switch between the main menu and Set menu by using the 2. Navigate through the items by using the 3. - Page 51 Refer to section in this manual titled “Setting Image Resolution and Quality” for further detail. Your ViviCam 3760 adjusts the exposure of each scene automatically. However, if the subject is too dark, or too bright, you may override the camera’s automatic exposure determination to make the subject...
- Page 52 The ISO speed decides the sensitivity to the lights. The higher the ISO number is, the more sensitive it is to the lights. When recording under dark situations or recording a fast moving subjects, use a high-number setting. However, while recording high quality images, we suggest you to use a low-number setting.
-
Page 53: Movie Menu
MOVIE MENU Setting Description White balance Refer to section in this manual titled “White balance” in the RECORD MENU for further detail. Beeper Reset Language Refer to section in this manual titled "RECORD MENU" for further detail. Date & Time Power off time... -
Page 54: Scene Menu
SCENE MENU Setting Description Image size Quality Refer to section in this manual titled "RECORD MENU" for further detail. White balance In Scene mode, the ISO speed cannot be set. Date imprint Beeper Reset Refer to section in this manual titled "RECORD MENU" for further detail. Language Date &... -
Page 55: Playback Menu
PLAYBACK MENU Setting Description Delete Refer to section in this manual titled “Deleting Images/Video Clips” for further detail. Copy to card This feature allows you to copy your images from the camera’s internal memory to a memory card. Of course, you can only do this when the memory card is installed and the internal memory contains images. -
Page 56: Devices
CONNECTING YOUR VIVICAM 3760 TO OTHER DEVICES SD Memory Card PCMCIA Adapter USB Cable Computer SD Card Reader Notebook Printer... - Page 57 VIVICAM 3760 SPECIFICATIONS Item Description Image sensor Effective pixels Approx. 3 mega pixels Image resolution Still images: 2032 x 1520 pixels; 1600 x 1200 pixels; 1280 x 960 pixels; 640 x 480 pixels Video clips: 320 x 240 pixels Image quality Super fine;...
Need help?
Do you have a question about the Vivicam 3760 and is the answer not in the manual?
Questions and answers