Otodynamics Otoport OAE+ABR User Manual
Hide thumbs
Also See for Otoport OAE+ABR:
- User manual (297 pages) ,
- User manual (208 pages) ,
- User manual (228 pages)

Related Manuals for Otodynamics Otoport OAE+ABR


Summary of Contents for Otodynamics Otoport OAE+ABR
- Page 1 Otoport User Manual for Otoport NHSP model Otoport OAE+ABR Otoport NHSP model Issue 4.4...
- Page 2 No part of this publication may be copied by any means, translated or distributed to third parties without the express written permission of Otodynamics Ltd. Copyright © 2022 Otodynamics Ltd. All Rights Reserved. Otodynamics Ltd MDSS GmbH Schiffgraben 41, 30-38 Beaconsfield Rd...
-
Page 3: Table Of Contents
Supplied only in Otoport NHSP OAE+ABR kit Supplied only in Otoport NHSP OAE kit Supplied in both kits Optional accessories Controls, indicators and connections OAE labelling Otoport OAE+ABR controls, indicators and connections ABR labelling Probe cable clip Probe tips 2.10... - Page 4 Getting started Connecting probes and sensor cables on the Otoport OAE+ABR Connecting the probe on the Otoport OAE Disconnecting the probe Using the keys and keypad Test preparation General checks before testing Environment checks for ABR Tip selection and probe fitting...
- Page 5 Otoport OAE+ABR User Manual for Otoport NHSP TEOAE test Entering demographic data Preparing the baby Selecting the ear Checking probe fit Monitoring the test Test result ABR test Impedance check ABR Checkfit ABR test ABR test results Bilateral ABR testing...
- Page 6 Otoport power Battery life 13.1 Charging the battery 13.2 Conditioning the Otoport battery 13.3 Manufacturer calibration and repairs Section Three Administrators Installing Otolink software Introduction 15.1 Minimum PC specifications 15.2 Installing ILO V6 15.3 Otolink CD menu 15.4 Install Otolink 15.5 Completing Otoport driver installation 15.6...
- Page 7 Otoport OAE+ABR User Manual for Otoport NHSP Management Management menu 19.1 Users menu 19.2 Facility & Risk 19.3 Date and time 19.4 Other options 19.5 Test details for ..Local Managers TEOAE Checkfit 20.1 TEOAE recording 20.2 ABR testing 20.3...
- Page 8 Notes on QA for ..Local Managers Probe Test 24.1 QA 1 Cavity Test 24.2 Data governance Section Four Technical Mode of operation TE Test 26.1 ABR test 26.2 Response detection OAEs 27.1 Confidence levels in TEOAE tests 27.2 Conclusions 27.3 Technical specifications General...
- Page 9 Otoport OAE+ABR User Manual for Otoport NHSP...
-
Page 10: Section One General
Section One General... -
Page 11: Before Use
User Manual for Otoport NHSP Before use Intended use This Otodynamics Otoport OAE+ABR device is indicated for use when there is a requirement to screen for hearing disorders by objective and non-invasive means. ABR, TEOAE and DPOAE screening test results are automatically interpreted and a clear ‘Pass’... -
Page 12: Otoport Setup
CHAPTER TWO Before use • Good OAEs do not exclude the possibility of auditory neuropathy or higher neural dysfunctions but these higher level dysfunctions are almost unknown in the well baby population. This is why OAEs have been used as an effective primary screen in hearing screening programmes for decades in many countries. -
Page 13: General Use Precautions
Otoport OAE+ABR User Manual for Otoport NHSP General use precautions TRAINING REQUIRED Measuring OAEs and ABRs requires that the ear is exposed to sound. Whilst the level of this exposure is harmless under normal test conditions, it is not recommended that tests be allowed to continue indefinitely even if there is no result. -
Page 14: Contraindications
If additional hygienic protection is required, clear plastic infection control sleeves designed to contain the Otoport during use are available from Otodynamics. Otodynamics does not guarantee the accuracy of the test results, or the tests themselves, if accessories other than those supplied by Otodynamics are used. - Page 15 When connecting the Otoport with PCs, printers and servers a secured user network is required. Observe good Information security management practices per EN ISO/IEC 27001 standard. If in any doubt, or if further guidance is required, contact Otodynamics or your dealer for support.
-
Page 16: The Importance Of Setting The Appropriate Stimulus Levels
CHAPTER TWO Before use The importance of setting the appropriate stimulus levels The correct stimulus setting is vital for effective hearing screening with OAEs and ABR. The optimum stimulus level for your screening programme will be one that identifies the vast majority of infants with abnormal ears, but only rarely wrongly reports a healthy normal ear as needing to be referred. -
Page 17: Auditory Brainstem Response
Otoport OAE+ABR User Manual for Otoport NHSP Never over-stimulate for infant screening. Over-stimulation will result in mild and some moderate hearing losses being missed. TEOAEs - never use stimulus levels above 87dBpe for screening, DPOAEs - never use stimulus level of 70dBSPL or above for screening AABR - never use stimulus level above 45dBHL for screening. -
Page 18: Training
Training in operating the device is provided by Otodynamics Ltd in the UK. Training in the operation of the device elsewhere is via an approved dealer who has been trained by Otodynamics. -
Page 19: Equipment Identification
Equipment identification Supplied only in Otoport NHSP OAE+ABR REF NHSP-OS-ST+ABR Otoport NHSP OAE+ABR REF ABR-INF Infection control sleeve for Otoport OAE+ABR unit only REF NHSP-PR-ABRLS UGS TEOAE Serviceable probe for binaural use (BLUE) 1 meter cable REF NHSP-PR-ABRRS UGS TEOAE Serviceable... - Page 20 CHAPTER TWO Equipment identification REF BGSL BLUE BGS probe body and lid Supplied with Otoport NHSP Re-order quantity: 10 REF BGSR RED BGS probe body and lid Supplied with Otoport NHSP Re-order quantity: 10 REF NHSP-ABR-CAV Probe cavity and ABR cable tester ABR Starter kit REF ABR-E-TAB ABR Tab Electrodes x 1...
-
Page 21: Supplied Only In Otoport Nhsp Oae Kit
Otoport OAE+ABR User Manual for Otoport NHSP REF ABR-EC1 Tab electrode cables - 1m REF ABR-CAS Equipment case for Otoport NHSP OAE+ABR kit Supplied only in Otoport NHSP OAE kit REF NHSP-OS-ST Otoport NHSP REF OP-INF Infection control sleeve for... -
Page 22: Supplied In Both Kits
CHAPTER TWO Equipment identification REF BGS BGS probe body and lid x 1 Supplied with Otoport NHSP Re-order quantity: 10 REF ABR-CAV Probe cavity and ABR cable tester REF OP-CAS Equipment case for Otoport NHSP kit Supplied in both kits TPC probe coupler tubes x 5 Re-order codes: REF TPC-10 (quantity: 10) - Page 23 Otoport OAE+ABR User Manual for Otoport NHSP REF PR-POUCH Drawstring probe pouch REF PR-CLIP Probe cable clip REF OP-CHG Charger and mains lead Supplied with required country-specific plug adapter REF OP-CAB PC downoad cable REF OTOLINK Otolink software CD...
-
Page 24: Optional Accessories
CHAPTER TWO Equipment identification Documentation pack Includes instrument and software manuals, quickstart and probe use guides Optional accessories REF ODS Docking station Provides connections for charging and downloading to PC not compatiable with NHSP OAE+ABR... -
Page 25: Controls, Indicators And Connections
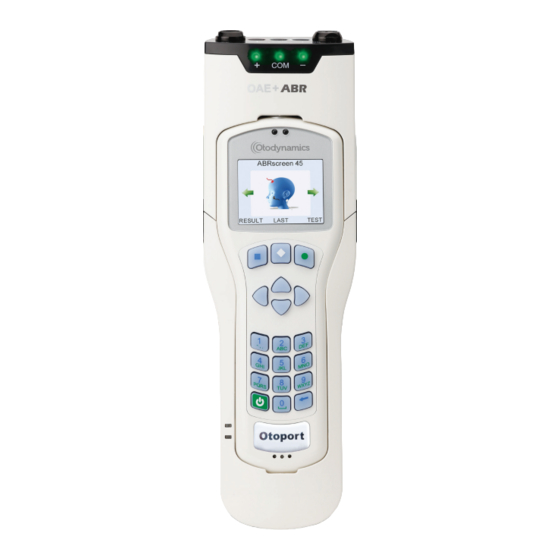
Otoport OAE+ABR User Manual for Otoport NHSP Controls, indicators and connections Probe socket Stimulus OK (S) and Noise OK (N) indicators Display screen Menu selection keys Arrow (up/down/ left/right navigation) keys Data entry keypad On/Off power key Charging status indicators... -
Page 26: Oae Labelling
CHAPTER TWO Equipment identification OAE labelling Symbols 2.6.1 The label uses one or more of the following symbols: Symbol Description Where indicated Product Label Serial Number Product Label Date of Manufacture Product Label Bluetooth ® wireless technology Product Label enabled Caution Product Label Refer to user manual... - Page 27 The Bluetooth ® word mark and logos are registered trademarks owned by Bluetooth SIG, Inc. and any use of such marks by Otodynamics Ltd. is under license. Other trademarks and trade names are those of their respective owners Serial number 2.6.2...
- Page 28 CHAPTER TWO Equipment identification Certification or regulatory marks 2.6.3 The label features one or more of the following certification/regulatory marks: Symbol Description CE Mark (with Notified Body number) (EEA) 1639 WEEE Directive applies (EEA) MET Mark...
-
Page 29: Otoport Oae+Abr Controls, Indicators And Connections
Otoport OAE+ABR User Manual for Otoport NHSP Otoport OAE+ABR controls, indicators and connections Probe sockets and sensor sockets Impedance check indicator LEDs Locked clips Otoport unit Otoport controls and keypad ‘USB/PSU’ connected’ and ‘battery charging’ indicator LEDs Charger / PC cable socket... -
Page 30: Abr Labelling
CHAPTER TWO Equipment identification ABR labelling System 2.8.1 Upgrade 2.8.2 Symbols 2.8.3 The label and device use the following symbols: Symbol Description Where indicated Product Label Caution Product Label Refer to user manual Product Label Class II electrical protection Product Label (double insulated) continued ... - Page 31 The fields in the serial number are made up of the following parts: (01) Company prefix: Otodynamics, Item reference: Otoport NHSP OAE+ABR (11) Production date: 31st January 2015 (21)
- Page 32 CHAPTER TWO Equipment identification Certification or regulatory marks 2.8.5 The label features one or more of the following certification/regulatory marks: Symbol Description CE Mark (with Notified Body number) (EEA) 1639 WEEE Directive applies (EEA) MET Mark...
-
Page 33: Probe Cable Clip
Otoport OAE+ABR User Manual for Otoport NHSP Probe cable clip The probe cable clip is provided to aid the practical aspects of positioning and securing the probe cable during OAE testing. Using the probe cable clip can improve your test times by reducing noise from cable rub and providing greater probe stability. -
Page 34: Probe Tips
CHAPTER TWO Equipment identification Probe tips 2.10 Samples of tips are provided with your instrument. Further supplies may be obtained from Otodynamics. REF T-T3E Fits ~3mm ear canal Small and premature newborns T5.5B REF T-T5C REF T-T5.5B Fits ~5mm ear canal Fits ~5.5mm ear canal... - Page 35 2.10.1 TRAINING REQUIRED All Otodynamics probe tips are disposable and MUST be discarded after each test. The probe coupler tubes should be visually examined for signs of contamination and the outer parts cleaned with an antiseptic wipe. Take care not to squeeze any cleaning fluid into the tubes.
-
Page 36: Getting Started
CHAPTER THREE Getting started Getting started Connecting probes and sensor cables on the Otoport OAE+ABR The connections panel for probes and sensor cables is found at the top end of the module. Connecting the probes 3.1.1... - Page 37 Connecting the sensors 3.1.2 The Otoport OAE+ABR is supplied with a sensor cable loom featuring croc clip connectors for sensor attachment. Alternatively, any wired sensors that are terminated with 1.5mm ‘Touchproof’ DIN 42-802 connectors may be used.
-
Page 38: Connecting The Probe On The Otoport Oae
CHAPTER THREE Getting started Connecting the probe on the Otoport OAE TRAINING REQUIRED Prior to the testing session, connect the probe to the Otoport. The probe plug contains a ‘key’ that must be aligned with the ‘keyway’ in the probe socket on the Otoport. Probe key Socket keyway The arrow at the front of the probe plug indicates the position of the ‘key’... -
Page 39: Disconnecting The Probe
Otoport OAE+ABR User Manual for Otoport NHSP Push the probe into the socket until it hits the end stop. DO NOT force in the probe. Probe in socket Screw up the knurled sleeve in a clockwise direction until finger tight. - Page 40 CHAPTER THREE Getting started Then gently pull the probe out from the probe socket. Remove probe Important Note: Do NOT attempt to screw or unscrew the probe by holding the main probe body (smooth chrome section). Main probe body This will result in damage to the probe and will invalidate the probe warranty.
-
Page 41: Using The Keys And Keypad
Otoport OAE+ABR User Manual for Otoport NHSP Using the keys and keypad Control keys 3.4.1 The keys directly below the screen marked with a square, a diamond or a circle enable you to execute the functions offered on the screens. Their... - Page 42 CHAPTER THREE Getting started Entering characters 3.4.3 Character entry is similar to a mobile phone where numbered keys can be pressed sequentially to select the required character. The order of the characters is dependent on context. For example when used to enter: Patient ID Numbers are presented first then capitals, e.g.
- Page 43 Otoport OAE+ABR User Manual for Otoport NHSP Entering dates 3.4.4 A right arrow symbol is shown at the end of a date field. When the field is highlighted, press the right arrow key to access the calendar pop-up table. The day will be highlighted first and can be altered using the up/down arrow keys.
- Page 44 CHAPTER THREE Getting started Deleting characters 3.4.6 The bottom right hand key is the Delete key. If the cursor is at the end of a row of characters, press this key to delete the last character. The Contrast function indicated on this key is no longer available. Left and right arrow keys can be used to scroll back through the text.
- Page 45 Otoport OAE+ABR User Manual for Otoport NHSP Stimulus and Noise OK indicators (blue LEDs) 3.4.9 The two blue LEDs above the screen on the Otoport give an indication of whether stimulus and noise levels are acceptable for data collection. The Stimulus LED is highlighted with an S. It is lit when the stimulus level recorded by the probe microphone is within the expected range.
-
Page 46: Test Preparation
CHAPTER FOUR Test preparation Test preparation TRAINING REQUIRED General checks before testing Ensure the Otoport is charged. Ensure the Otoport daily checks have been carried out. Do not run an OAE test if there is any discharge from the ear to be tested. Choose a quiet room, without background noises. -
Page 47: Tip Selection And Probe Fitting
Otoport OAE+ABR User Manual for Otoport NHSP Tip selection and probe fitting Tip selection and probe fit are essential to ensure successful OAE recordings. A good probe fit will help to block out external noise and enhance the OAE signal. When selecting a tip, first inspect the ear to be tested to assess its size and to check that it is clear and free from debris. -
Page 48: Helpful Hints
CHAPTER FOUR Test preparation Fitting for infants using ear cups 4.3.2 Only the Sanibel Infant Earcup is approved for use with the Otoport ABR. Fit a tip to the probe before fitting the probe to the ear cup. The T7M tip for TE probes should be used;... -
Page 49: Sensor Fitting
Otoport OAE+ABR User Manual for Otoport NHSP Noises from the baby may not prevent successful recording, but will increase the test time. Constant environmental background noise, for example from air conditioning or machinery, may prevent a successful test. Testing should only be conducted in rooms where the noise level recording on the Otoport is mainly below the noise reject level when the probe is not fitted in the ear. - Page 50 CHAPTER FOUR Test preparation Placement (montage) 4.5.2 Sensors are placed at three sites: the high forehead, the nape of the neck, and a reference (common) sensor on the shoulder. In all locations avoid hair when possible. When using wet gel sensors the sticky area around the central gel should be pressed to the skin –...
- Page 51 Otoport OAE+ABR User Manual for Otoport NHSP If using tab sensors, now connect the sensor cables to the sensors. Connect the black cable to the high forehead, the white cable to the nape of the neck and the green cable to the back of the shoulder.
-
Page 52: Test Troubleshooting
CHAPTER FIVE Test troubleshooting Test troubleshooting OAE test problems The most frequent cause of unsuccessful OAE recordings is failure to fit the probe correctly, so that it is deep enough in the ear canal, or without the correct size tip to seal the ear canal. The presence of fluid and debris in the ear canal or middle ear will also inhibit recordings. -
Page 53: Abr Test Problems
Otoport OAE+ABR User Manual for Otoport NHSP ABR test problems Impedance values are too high and the test will not run 5.2.1 Solutions: Wait for about two minutes. During this time the sensors may connect better to the skin and, therefore, reduce the impedance values. -
Page 54: Oaes And Screening
CHAPTER FIVE Test troubleshooting 5. Touch each sensor to identify which is causing the problem, try: • holding the skin around the sensor taut • maintaining light pressure on the sensor • gently stroking the baby’s head • repositioning the baby’s head High environment electrical noise 5.2.3 Audible noise in the room as well as interference from other electrical... -
Page 55: Section Two Screeners
Otoport OAE+ABR User Manual for Otoport NHSP Section Two Screeners... -
Page 56: Switch On And Login
CHAPTER SIX Switching on Switch on and Login Switching on Press the green On/Off button and select Yes to confirm. Following switch on, the logo screen is displayed whilst the Otoport performs system checks. In the event of a problem, an error message will be displayed. -
Page 57: Qa Checks Reminder
Otoport OAE+ABR User Manual for Otoport NHSP QA checks reminder If the daily QA checks have not been run, a reminder message will be shown. Use the Left/Right arrow buttons until you arrive at the QA Area then press Select. - Page 58 CHAPTER SIX Switching on Scroll across to select your user name and enter your password. The password must be eight characters long and contain at least one upper and one lower case letter and a number. Passwords must not be shared. A generic user must not be used and should not appear in the user list on the Otoport.
-
Page 59: Daily Qa Checks
Otoport OAE+ABR User Manual for Otoport NHSP Daily QA checks QA checks are designed to identify faults or problems with the equipment. These checks are mandatory on the Otoport and MUST all be completed with the ‘expected’ outcome for each QA test, as stipulated in the national guidelines, before the equipment can be used to screen babies each day. -
Page 60: Visual Inspection
CHAPTER SEVEN QA area Data Upload Make sure that all screening data has been uploaded before starting a new session. The local manager must be notified of any instrument found with data that cannot be uploaded. That instrument must not be used until the problem has been resolved. Visual Inspection Look at the probe and its coupler tubes to check for wax or damage. - Page 61 Otoport OAE+ABR User Manual for Otoport NHSP If the probe has not been used with this Otoport before a message like this is shown: The number in the box should match that on the white label on the probe cable. If it does not then add the correct number. When it is correct press Save.
- Page 62 CHAPTER SEVEN QA area Two Probes If two probes are connected to the Otoport, the probe test will run automatically on both in turn. In the case of two probes insert both probes into test cavities before beginning the Probe Test. Results 7.2.1 The possible results of the test for each probe tested are:...
- Page 63 Otoport OAE+ABR User Manual for Otoport NHSP Noisy The Drum symbol means there was too much noise during the test to tell if the probe passed or failed. Check that the probe is properly fitted to the cavity. Try to reduce any noise in the room and then select Retest.
- Page 64 CHAPTER SEVEN QA area Dual probe test result If two probes are connected to the Otoport, both are tested automatically in sequence and a result is shown for each. Detail If you cannot achieve a pass result, then record the details of the test in the log.
-
Page 65: Qa Tests
Otoport OAE+ABR User Manual for Otoport NHSP A typical details screen is shown below for three probe test outcomes, Pass, Query and Fail. Pass: Probe sensitivity Query: Probe sensitivity in Fail: Probe sensitivity out in range range but a frequency more... - Page 66 CHAPTER SEVEN QA area Select the probe you wish to test (if you have a single probe connected then you will not see this message). Place the probe in the OAE Test Cavity and select OK. If test conditions are good the banner at the top of the screen will read Checkfit OK as in a normal OAE test.
- Page 67 Otoport OAE+ABR User Manual for Otoport NHSP Cavity OK The test result should be a green tick a green tick beside the cavity picture, pressing OK on this screen will show a banner reading CAVITY OK. Press OK and then Save this result.
- Page 68 CHAPTER SEVEN QA area Noisy This result indicates that the test environment was too noisy, or that there is a fault with the equipment. Poor Probe Fit This result is shown if the probe fit changed during the test. Incomplete This result is shown if the test was ended by the user (rather than running until it stopped automatically).
- Page 69 Otoport OAE+ABR User Manual for Otoport NHSP If you cannot record a CAVITY OK in this test then you may: • Change the probe and repeat the QA process from the start. • If an alternative probe passes all tests then remove the original probe from use.
- Page 70 CHAPTER SEVEN QA area Occlude the tip of the coupler, without a probe tip, with a finger or thumb. Press OK to begin test. The test outcome will take about seven seconds to complete. The test outcome should be Occlusion OK. Select OK then Save the result.
- Page 71 Otoport OAE+ABR User Manual for Otoport NHSP Artefacts? This outcome indicates that some signal that could be mistaken for an OAE was recorded in the test. This can be interpreted as a clear response by the national IT system when it is uploaded. This result can occur occasionally by chance, but a persistent result indicates a fault with the equipment.
- Page 72 CHAPTER SEVEN QA area Incomplete This result is shown if the test was ended by the user (rather than running until it stopped automatically). If you cannot record an OCCLUSION OK result, then you may: • Change the probe and repeat the QA process from the start. •...
- Page 73 Otoport OAE+ABR User Manual for Otoport NHSP If you are using two probes, then the QA3 Real Ear Test must be run on each of them; the screen below will be shown: Select the probe you wish to test (if you have a single probe connected then you will not see this message).
- Page 74 CHAPTER SEVEN QA area If the test ear used has sufficient OAEs and the equipment is working correctly, the test result will be Real Ear OK. The test may stop once sufficient OAE response has been detected at two frequency bands on the colour-screen Otoports and on three frequency bands on the legacy (black and white) Otoport models.
- Page 75 Otoport OAE+ABR User Manual for Otoport NHSP Attach the three electrode cable sensor clips to the top of the ABR test cavity as illustrated, then press OK. The order and position they are attached in is not important. QA4 checks the integrity of the electrode connectors and the functioning of the AABR test.
- Page 76 CHAPTER SEVEN QA area Impedance Check All impedances should show 0k Ohms: If the impedances are any higher than this, then check the connection of the cable to the test cavity and press Check. If after adjusting the impedances still do not show 0k Ohms then there may be a problem with the electrode cables.
- Page 77 Otoport OAE+ABR User Manual for Otoport NHSP Wait until the test stops. This may take some time while the instrument looks for any signs of an artefactual response. QA4 Test results Cavity OK The test should terminate with Cavity OK, which means that no false ABR responses were found.
-
Page 78: Teoae Test
CHAPTER EIGHT TEOAE test TEOAE test TRAINING REQUIRED On the TEOAE Test screen, choose Select to go to the Patient menu. Entering demographic data Select 1 New to enter details of a new baby to test. The Otoport will check that the previous patient has test data for both the left and right ears. -
Page 79: Preparing The Baby
Otoport OAE+ABR User Manual for Otoport NHSP Enter the following data. Mandatory fields are marked with an asterisk. 10 digit NHS number Hospital ID Mandatory field if NHS number is not available *Family Name Baby’s surname *DOB Date of birth... -
Page 80: Selecting The Ear
CHAPTER EIGHT TEOAE test Selecting the ear Select RIGHT or LEFT for the ear being tested. Checking probe fit It is important to perform a test in the appropriate conditions. The Checkfit screen allows a user to assess the testing environment. Conditions such as high ambient noise, poor fit of the probe in the ear (including leaks) and blocked probes can be detected before starting the test. - Page 81 Otoport OAE+ABR User Manual for Otoport NHSP Ear canal size indicator The bar on the left of the screen gives an estimate of ear canal size. . Baby ears should show as small (0-2 segments) if the probe fit is good.
- Page 82 CHAPTER EIGHT TEOAE test The stimulus (S) and noise (N) LEDs above the screen are lit when the stimulus and noise levels are good for testing. Additional information on checkfit is available in the Administrators section of this manual.
-
Page 83: Monitoring The Test
Otoport OAE+ABR User Manual for Otoport NHSP Monitoring the test The two blue lights should be on most/all the time. The Noise bar indicates the level of noise. If the conditions become noisy once a screening test has been started you may pause the test by pressing the blue button. -
Page 84: Test Result
CHAPTER EIGHT TEOAE test Test result The Otoport NHSP test outcomes are: Otodynamics Result Description Test Result Test Result Clear Response The test met the NHSP criteria. No Clear The test did not meet NHSP criteria and Response no problems were identified during the recording that may have prevented a Clear Response from being detected. -
Page 85: Abr Test
Otoport OAE+ABR User Manual for Otoport NHSP ABR test TRAINING REQUIRED The Auditory Brainstem Response (ABR) test records the electrophysiological response of the auditory system to sound. Find ABR Test from the scrolling modules using the arrow keys then press Select. -
Page 86: Impedance Check
CHAPTER NINE ABR test Impedance check The Otoport checks the quality of the connection between the skin and each of the three sensors. This takes 2-3 seconds. A low impedance provides a good connection. Also, well ‘balanced’ electrodes (the difference between electrode impedance at forehead and nape) provides the best opportunity to reject noise and show an AABR response. - Page 87 Otoport OAE+ABR User Manual for Otoport NHSP If the test still does not start automatically, observe the two noise bars TN (EEG Noise), and PN (Powerline Noise). They may be high. For advice on how to reduce the noise see section ABR test problems.
- Page 88 CHAPTER NINE ABR test Further advice on ... Otoport impedance measurements The impedance of each sensor, Forehead (+ve), Nape (-ve) and Common are shown in the Impedance Check panel. Green circles are displayed for all impedance values where testing is possible.
- Page 89 Otoport OAE+ABR User Manual for Otoport NHSP Further advice on ... Electrical noise indicators The bars on the left of the screen indicate the electrical noise levels. The lower the test noise the more rapidly an ABR response will be detected.
-
Page 90: Abr Checkfit
CHAPTER NINE ABR test ABR Checkfit The test stimulus in ABR tests can be provided either by applying an ear cup to the ear and inserting the probe into the ear cup or by inserting the probe directly into the ear, as for OAE testing. Which option is used, and how the probe checkfit functions, depends on the Ear Cups setting in Test Setup (see chapter Note: Until advised otherwise, Screeners are permitted only the use of ear... - Page 91 Otoport OAE+ABR User Manual for Otoport NHSP The ear icon shown below indicates that the Otoport is in Ear Cups mode. If the levels are consistent and the noise level is low the test will start. With Ear Cups set to Off, Checkfit proceeds as for OAE tests (see section for details).
-
Page 92: Abr Test
CHAPTER NINE ABR test ABR test During the test the Otoport plays a series of clicks into the ear and records the electrical response from the sensors. The ABR signal is very small and difficult to distinguish from other electrical signals. The ABR test screen shows progress towards the detection of an ABR response. - Page 93 Otoport OAE+ABR User Manual for Otoport NHSP Test stop reasons 9.3.1 When the stop criteria have been met, the test will stop automatically and a single beep will sound for an ABR pass result or a double beep for any other result.
-
Page 94: Abr Test Results
There are three basic types of test result, Clear Response, No Clear Response and Incomplete. The table below shows these results and the associated graphics shown on the Otoport. Otodynamics Result Description Test Result Test Result Clear Response The test met the NHSP criteria. - Page 95 Otoport OAE+ABR User Manual for Otoport NHSP Incomplete The screener cancelled the test before a decision was possible. High Mains Interference from electrical equipment Noise invalidated the test. The screener should try to reduce the electrical noise in the environment by turning off any...
-
Page 96: Bilateral Abr Testing
CHAPTER NINE ABR test Bilateral ABR testing Bilateral ABR tests automatically run tests on both ears in sequence, right ear then left ear. Ear cups are recommended for bilateral testing and both ears should be prepared before testing commences. The current test ear is indicated during the test by a blue or red icon on the test screen. - Page 97 Otoport OAE+ABR User Manual for Otoport NHSP When the right ear is completed the test result will be displayed briefly before testing on the opposite ear starts. When both tests are complete, stop reason icons for both ears will be shown on the screen together.
-
Page 98: Saving Tests
CHAPTER TEN Saving tests Saving tests Once a test has finished the test result is displayed, OK is the only available option, select OK. Save is the only available option from the Review screen, select Save to save the test result. The options available from the saved result screen are Test and Finish. - Page 99 Otoport OAE+ABR User Manual for Otoport NHSP Select Finish to return to the main menu. As above and now continuing for ABR.
-
Page 100: Uploading Data To S4H
100 CHAPTER ELEVEN Transferring data to eSP Uploading data to S4H Each screener is responsible for the accuracy of screening data and ensuring that it is uploaded into S4H at the end of each screening session. Data must be uploaded within 24 hours of the screen being done. Downloading from the Otoport 11.1 •... -
Page 101: Uploading To S4H
Otoport OAE+ABR User Manual for Otoport NHSP If the upload is not successful (data should arrive within 5 minutes) please refer to document “SEDQ data not arriving in S4H”. Uploading to S4H 11.2 After downloading to the PC, upload to S4H is automatic. Data should arrive within five minutes. -
Page 102: Maintenance And Cleaning
12.2 TRAINING REQUIRED Otodynamics does not recommend the use of bleaches such as sodium hypochlorite based cleansers. The following is the suggested method of cleaning an Otodynamics probe. It should be noted that the probe is a precision assembly and, as such, care should be taken throughout in its handling and cleaning. -
Page 103: Changing Probe Coupler Tubes
Otoport OAE+ABR User Manual for Otoport NHSP Coupler assembly - Each coupler assembly has two sound tubes. These are protected from ingress of foreign materials by wax guards in the tubes and by the disposable probe tip. There is a loudspeaker at the end of one tube and a microphone at the end of the other. -
Page 104: Probe Safety Note
Probe safety note 12.4 TRAINING REQUIRED Probes are designed for use with an Otodynamics disposable tip. Use of a tip is essential. Use without a tip will expose the ear canal to the hard plastic sound tubes and this might cause injury. -
Page 105: Use Of The Otoport And Cleaning
Cleaning of probe Other than the probe and cable, the Otoport hardware should not come into contact with the patient being tested. Otodynamics probe tips are disposable and for single use only. A new tip should be used for each ear tested. -
Page 106: Otoport Power
CHAPTER THIRTEEN Otoport power Otoport power Battery life 13.1 The battery level is displayed when the Otoport is switched on. The battery when fully charged will allow over 250 screening tests. To save power, the Otoport will go into standby mode after 90 seconds of inactivity. Switch off after each screening session to ensure that all data has been saved and to conserve the battery. -
Page 107: Charging The Battery
Otoport OAE+ABR User Manual for Otoport NHSP Auto switch off The Otoport will automatically switch off when the battery is empty. It will be necessary to charge the Otoport before it will switch on again. Charging the battery 13.2 Charging can take up to 4.5 hours You cannot screen whilst the Otoport is charging. -
Page 108: Conditioning The Otoport Battery
CHAPTER THIRTEEN Otoport power A tick will also appear on screen when the Otoport is fully charged. If the cable has release keys, squeeze to disconnect, otherwise just pull out the cable. Conditioning the Otoport battery 13.3 Once a year the battery should be conditioned. Upload all data prior to conditioning. -
Page 109: Manufacturer Calibration And Repairs
Calibration certificates must be kept for your records. Otodynamics highly recommends that the Otoport is serviced every three years (this is not a device safe operation requirement). During Otodynamics approved service the Otoport system will be thoroughly inspected and calibration will be checked; any system items with significant wear/tear or negatively affecting the system’s calibration will be replaced at no additional... -
Page 110: Section Three Administrators
Section Three Administrators... -
Page 111: Installing Otolink Software
Otoport OAE+ABR User Manual for Otoport NHSP Installing Otolink software Introduction 15.1 There are several stages to Otolink installation and they should be conducted in the order detailed below. Prior to the installation close all programs running on your PC. -
Page 112: Installing Ilo V6
CHAPTER FIFTEEN Installing Otolink software Installing ILO V6 15.3 The Otoport you have purchased may be supplied with ILO V6 software as standard. This software is also available as an option. For most data types, ILO V6 is not essential for review of data on the PC as data can be viewed in Otolink. -
Page 113: Otolink Cd Menu
Browse CD This allows the contents of the CD to be viewed. Otodynamics.com This will open the Otodynamics website on your web browser (your PC will need to be connected to the internet). Register Select this option to register your software with Otodynamics. -
Page 114: Install Otolink
USB drivers required for the Otoport to communicate with the PC. Follow the on-screen instructions, selecting Next when necessary. Select the tick/check box to ‘Always trust software from Otodynamics Ltd’ and then click Install. During installation, you may see the following message:... - Page 115 Otoport OAE+ABR User Manual for Otoport NHSP A message is displayed when installation is complete. Before pressing the Finish button, it is recommended that your Otoport is connected to the PC using the cable provided. Otolink will then automatically be configured for your Otoport type and where necessary drivers will be updated or installed.
-
Page 116: Completing Otoport Driver Installation
CHAPTER FIFTEEN Installing Otolink software Completing Otoport driver installation 15.6 Otoport drivers were loaded onto your PC during the Otolink installation. To complete the driver installation, follow the instructions below. For Windows 10, 8, 7 and Vista 15.6.1 Connect the Otoport to the PC and Windows will automatically complete the driver installation process. -
Page 117: Configuring Your Otoport
Otoport OAE+ABR User Manual for Otoport NHSP Configuring your Otoport TRAINING REQUIRED S4H setup 16.1 Before an S4H Otoport can be used for testing it must be configured with information from S4H. This procedure loads the users, facilities and risks that will be required by a particular Otoport. - Page 118 CHAPTER SIXTEEN Configuring your Otoport This will take a few seconds and a window will indicate progress. You are then presented with the Login window (see the next section). Connection problems 16.1.1 If the S4H URL (connection address) is incorrect the S4H configuration window will open.
- Page 119 Otolink by right clicking on the Tray Icon and selecting Exit from the dropdown menu. Now start Otolink by double clicking on the Otolink shortcut: or by selecting Otolink from: Start > All Programs > Otodynamics > Otolink. Now re-attempt Otoport configuration.
-
Page 120: Login
CHAPTER SIXTEEN Configuring your Otoport Login 16.2 After the current settings have been read you will be prompted to select your Otoport User name and to enter your Password. User name should be chosen from the list displayed when the arrow besides the User name box is selected. -
Page 121: Site/Facilities
Otoport OAE+ABR User Manual for Otoport NHSP Site/Facilities 16.3 The top section of this screen displays the Site Name, Site ID, Device ID and GSN that will be used with your Otoport. It is not possible to edit any of these details here but you may wish to check that they are correct or to make a note of them. -
Page 122: Users
CHAPTER SIXTEEN Configuring your Otoport Users 16.4 Two columns display Users registered at chosen S4H Site (listed alphabetically by surname on the left) and Current Otoport Users (on the right). Select the users you wish to add to the Otoport by clicking on the box next to their name;... - Page 123 Otoport OAE+ABR User Manual for Otoport NHSP Notes: Passwords must contain both upper and lower case and numeric characters and must be eight characters long. An error message will be displayed if any of these conditions are not met. Changes in passwords must be confirmed by repeating the password in the Confirm password box.
-
Page 124: Risks
CHAPTER SIXTEEN Configuring your Otoport Risks 16.5 The S4H Registered Risks box lists all the risk factors registered on S4H for your site. Select the risks you wish to add to the Otoport by clicking on the box next to the risk; a tick will then appear in the box. Selecting Undo Risk Selection will remove the ticks from all of the risks. -
Page 125: Probes
Otoport OAE+ABR User Manual for Otoport NHSP Probes 16.6 Probes stored on the Otoport will be listed. The electronic ProbeID is listed along with the Probe Serial Number that has been entered on the Otoport. If there is an error in the probe serial number, then use the button to Delete Selected Probe and re-enter the correct serial number on the Otoport when starting a test. -
Page 126: Saving Configuration To Otoport
CHAPTER SIXTEEN Configuring your Otoport Saving configuration to Otoport 16.7 When you are happy with the changes you have made to the Otoport configuration click on the Upload to Otoport button in the top right corner. If there are any required fields you have failed to complete you will be prompted, otherwise the updated settings will be loaded on to the Otoport. -
Page 127: Test Setup
Otoport OAE+ABR User Manual for Otoport NHSP Test setup Test Setup allows users to change the setup for ABR tests. Only users with Administrator (A) rights have access to this area. Setup for A users The Ear Cups setting allows users to select whether they wish to use Ear Cups or insert the probe directly into the ear. - Page 128 CHAPTER SEVENTEEN Test setup Ear canal cavities greater than around 0.5cc will trigger the warning. With Neonate setting Off (or if Ear Cups set to On), no warning message is displayed if a large ear volume is detected. Only users with Administrator rights have access to this setting.
-
Page 129: System
Select Controls to adjust Volume, Brightness and timing of the Backlight. Select Battery to view current battery status. System Details displays information for Otodynamics engineers. Select About for Otoport firmware revision number and issue date and device identification numbers. Select Back to return to the System module screen. -
Page 130: Controls Menu
CHAPTER EIGHTEEN System Controls menu 18.2 Select Volume to increase or decrease the unit’s volume level or to turn sound off. Select Brightness to adjust the brightness of the screen for varying light conditions. Select Backlight to configure the status of the screen and keypad backlights. - Page 131 Otoport OAE+ABR User Manual for Otoport NHSP Brightness 18.2.2 The screen Brightness can be altered by pressing the left/right arrow keys. Select Save to accept the adjusted Brightness level. Select Cancel to ignore changes and return to the Controls Menu.
-
Page 132: Battery
CHAPTER EIGHTEEN System Battery 18.3 The Battery screen provides information on the current battery status. The total Battery Power remaining is displayed as a percentage and as an approximate operation time. The calculated time is only an approximate indication as the power requirements will vary depending on the mode of operation. -
Page 133: System Details
Select Condition to condition the Otoport battery. See chapter Otoport power for more information. System details 18.4 System Details displays information for Otodynamics engineers. The device performs electrical self-checks and any errors during these tests are displayed (see chapter About 18.5 The About screen details information relating to the Otoport’s identification... -
Page 134: Management
CHAPTER NINETEEN Management Management Management menu 19.1 Select Users to review the current User List. The Facility & Risk option is not available to Otoport NHSP users. Select Date & Time to adjust the date and time settings. Select Other Options to alter patient ID format, add a site and device identification which are then saved to Test Records. -
Page 135: Users Menu
Otoport OAE+ABR User Manual for Otoport NHSP Users menu 19.2 Add New User is not available on this device. New users must be added via Otolink. Select View Users to review the current User List. Select Back to return to the Management menu screen. -
Page 136: Facility & Risk
CHAPTER NINETEEN Management Facility & Risk 19.3 The Facility & Risk menu is not available to Otoport NHSP users. Configuration is via Otolink. Date and time 19.4 The date and time set on the device can be altered in the Date & Time screen. -
Page 137: Other Options
Otoport OAE+ABR User Manual for Otoport NHSP Important Note: Do not set the date on the Otoport to an earlier date, if there is data stored on the device. Other options 19.5 These fields cannot be changed by the user on the Otoport NHSP. -
Page 138: Test Details For ..... Local Managers
CHAPTER TWENTY Test details for Local Managers Test details for Local Managers This chapter describes the OAE and ABR tests in more depth than is typically relevant to the screener. A fuller understanding of the information available on the Otoport may help to resolve issues and improve test practice. - Page 139 Otoport OAE+ABR User Manual for Otoport NHSP Press the left/right arrow keys during Checkfit to access the Stimulus Spectrum Display. This shows how the energy in the stimulus waveform is distributed over frequencies. This distribution is dependent on the fit of the probe and the geometry of the individual ear canal.
-
Page 140: Teoae Recording
CHAPTER TWENTY Test details for Local Managers TEOAE recording 20.2 Following Checkfit, the OAE recording begins and data is collected and displayed on a choice of four test screens - two OAE histograms and two data tables. The screens are continually updated to give a real time representation of the OAE response. - Page 141 Otoport OAE+ABR User Manual for Otoport NHSP Data tables 20.2.2 During the test the two data tables are accessed by pressing the left/right arrow keys. The first data table displays the dB levels at the specified half octave frequencies. The following table describes each field:...
- Page 142 CHAPTER TWENTY Test details for Local Managers The second data table lists other statistics required for test analysis. The following table describes each field in detail: Field Description Units The total OAE Signal level dB SPL Noise The total Noise level dB SPL The amount of data accepted due to noise being below the noise reject level...
-
Page 143: Abr Testing
Otoport OAE+ABR User Manual for Otoport NHSP ABR testing 20.3 Data summary 20.3.1 The Fsp is a measure of the likelihood that a response is present (see Eberling C., Don M. Scand Audiol 1984;13:187-197). Template correlation (TC) is a measure of the similarity of the current waveform to a template constructed from the responses of 30 neonates aged 0 to 6 weeks. - Page 144 CHAPTER TWENTY Test details for Local Managers If ABR noise is low (<15nV), and there is no progress in the test, the test will stop automatically with a No Valid ABR result as continuing the test would not find an ABR present. If ABR noise is too high (>85nV), a valid ABR cannot be detected, so the test will continue to run even if other pass criteria are met.
- Page 145 Otoport OAE+ABR User Manual for Otoport NHSP Impedance monitoring 20.3.4 During the test, if progress towards ABR detection is slow, the impedance levels are automatically checked in the background. • If impedance levels are low, the test will continue. •...
-
Page 146: Troubleshooting
21.3 The System main menu area includes System details. This screen provides information for Otodynamics engineers relating to the Otoport hardware. If your device is not functioning correctly or you suspect a fault, go to the System details menu and press the left or right arrow keys until the screen tittled Errs: is displayed. -
Page 147: Instrument Fault Message
(See section Run the probe checks (see chapter ). If the tests are ‘OK’ the device is functioning correctly and can be used for OAE testing again. If you receive the Instrument fault message again, contact Otodynamics for support. -
Page 148: Hardware Fault Messages
Noise detected through the probe does not indicate a fault. If this message is displayed, turn the unit off, disconnect the probe and then turn it back on. If the message is consistently displayed with the probe disconnected, then contact Otodynamics. Otolink communication problems 21.6... - Page 149 Otolink software may not have installed correctly. Try removing and then reinstalling the software drivers or Otolink software. If your problems persist, please contact your local IT Support, your Otodynamics distributor or Otodynamics Support.
-
Page 150: Manual Driver Installation
The New Hardware wizard should start automatically when the Otoport is connected. If it does not then the Update Hardware wizard can be started by navigating to Device Manager, right clicking on Otodynamics Otoport- ChanA/B and selecting Update driver. This example installation is for Windows XP. Installation for other operating systems may vary. - Page 151 Otoport OAE+ABR User Manual for Otoport NHSP Select No, not this time and click Next. Accept the option to Install the software automatically. This should find the Otodynamics Otoport drivers on the CD already in your CD-ROM drive.
- Page 152 Install from a specific location then Next. Select Search removable media and click Next. If the CD is not available, the drivers can also be installed by selecting Include this location in the search and browsing to the folder C:\Program Files\Otodynamics\Otolink\Drivers.
- Page 153 Windows will search for the correct drivers. When the drivers have been found Windows will prompt that the drivers have not passed Windows logo testing. The drivers have been certified for use by Otodynamics engineers. Select Continue Anyway. Windows will then install the drivers.
- Page 154 CHAPTER TWENTY-ONE Troubleshooting Once complete click Finish. The driver installation for Otoport channel A is now complete. Repeat the installation again for channel B. Once complete, again click Finish. The driver installation for the Otoport is now complete and the hardware is ready to communicate with the Otolink PC software.
-
Page 155: Records
Otoport OAE+ABR User Manual for Otoport NHSP Records Records menu 22.1 Select Find to search for saved patient records within the Patient List. Select Work List to edit or add a new patient to the Worklist. The Worklist can be reviewed and a patient selected to test. -
Page 156: Patient List
156 CHAPTER TWENTY-TWO Records Patient List 22.2 The Patient List will display Patient Records that meet the search criteria or will list all the patients in the database if no search criteria were specified. The Patient List displays patients alphabetically from the Family name field and also shows the patient ID. - Page 157 Otoport OAE+ABR User Manual for Otoport NHSP Test summary 22.2.1 TRAINING REQUIRED When reviewing Results, a summary of each of the patient’s tests is given on screen. The diagrams on the next page detail all features of the Test Summary screens.
- Page 158 158 CHAPTER TWENTY-TWO Records TEOAE test summary screen Patient’s family Current test of total name Test mode number of tests Test result Set stimulus level Ear tested R (Right) or L (Left) Band pass indicators showing which ½ octave bands Total OAE signal achieved their Stop level (dB SPL)
- Page 159 Otoport OAE+ABR User Manual for Otoport NHSP Detailed test review 22.2.2 TRAINING REQUIRED Test Results can be reviewed in detail by choosing Select on the Test Summary screen. The OAE test data is shown on various test screens. Please refer to chapters for a full description of the screen displays for the relevant test type.
-
Page 160: Work List
160 CHAPTER TWENTY-TWO Records Work list 22.3 The Work List facility allows for Patient Details to be entered and saved prior to the test, to reduce data entry time during the testing session. Select Add Patient to add a new patient to the work list. Select View Work List to review, edit or test a patient on the current Work List. - Page 161 Otoport OAE+ABR User Manual for Otoport NHSP Once the correct patient details have been entered select Save to add the patient to the Work List or select Cancel to return to the Work List Menu screen and discard entered data.
- Page 162 162 CHAPTER TWENTY-TWO Records Review patient details in work list 22.3.3 Selecting Detail on the Work List screen displays the selected Patient Details in a non-editable format. Select Test to run a test on this patient. Please refer to chapter TEOAE Test or ABR Test for an explanation on how to setup and perform a test.
-
Page 163: Database Summary
Otoport OAE+ABR User Manual for Otoport NHSP Erase work list 22.3.4 The complete Work List can be deleted by selecting Erase work list. Database summary 22.4 A database Summary can be accessed from the Records Menu screen. It details the present number of Patients and Tests saved to the database. -
Page 164: Downloading Waveforms From S4H
164 CHAPTER TWENTY-THREE Downloading from S4H Downloading Waveforms from S4H Details of each test, including the waveform, start and end times are stored in S4H with the baby record or within the QA test file. Please follow your national IT systems guidance on downloading screening data. Veiwing downloaded screening data 23.1 through Otolink... - Page 165 Otoport OAE+ABR User Manual for Otoport NHSP Notes on QA for Local Managers ALL QA checks are mandatory on the Otoport. It should be noted that the Otoport will NOT allow access to the screening tests until all relevant QA checks have been adequately completed with the expected outcome, as per the national guidelines.
- Page 166 CHAPTER TWENTY-FOUR Notes on QA for Local Managers Probe Test 24.1 Query result 24.1.1 This result indicates that the probe is working and the levels recorded at all frequencies are within the absolute useable limits. The probe is still useable but there has been a change at one or more frequencies of more than +/- 3dB when compared with previously saved values for this probe.
- Page 167 Otoport OAE+ABR User Manual for Otoport NHSP Fail 24.1.2 This means one or more of the stimulus levels recorded are outside the absolute limits specified for the Probe for screening use. If a Fail is shown on screen you must inspect the probe coupler tubes again for debris which can cause this failure.
- Page 168 If you remain concerned seek guidance from Otodynamics. They may require the Cavity Test data files. The Artefacts? outcome is an indication that a fault with the equipment may increase the Clear Response rate in OAE testing.
- Page 169 Otoport OAE+ABR User Manual for Otoport NHSP Note When a probe is withdrawn from service, the replacement probe must pass all QA tests when connected to the Otoport in question, before that Otoport can be returned to service. QA1 Details At the end of the test the indications of possible response (blue) and noise (red) should be below the -5dBSPL level.
- Page 170 CHAPTER TWENTY-FIVE Data governance Data governance Waveform-viewer data may be needed to monitor quality. Screener activity reports for individual screeners should be monitored for any indication of poor practice which could reduce the sensitivity or specificity of the screening test. Indication of where there may have been poor practice would be screeners with: •...
- Page 171 Otoport OAE+ABR User Manual for Otoport NHSP Stim – The recorded stimulus level at the start of the test. The target is 84 dB but acceptable between 81-87 dB. If the stimulus level is outside this range “Stim out of range” will appear. A Clear Response result obtained in these conditions is acceptable but these conditions could give rise to a “No...
- Page 172 CHAPTER TWENTY-FIVE Data governance Both examples are of testing in sub optimum conditions resulting in incomplete test outcomes. Advice should be around finding ways to avoid testing in noisy conditions and improving probe fit. Both these measures would contribute to reducing testing time and improving screen specificity.
- Page 173 Otoport OAE+ABR User Manual for Otoport NHSP Example: Screen sensitivity Screener activity reports that show close to 100% CR rates and/or high levels of NC may be an indication that screen sensitivity is compromised and should therefore be investigated. Screeners may have repeated tests with a NCR outcome or may have stopped the test before the stop criteria were met and started again several times.
- Page 174 Section Four Technical...
- Page 175 Otoport OAE+ABR User Manual for Otoport NHSP Mode of operation TE Test 26.1 Parameter Description Stimulus Idle 80µs positive broadband square wave pulse with an intensity of 64dB pe (peak equivalent) in a 1cc cavity. Adjusted 80µs positive broadband square wave.
- Page 176 CHAPTER TWENTY-SIX Mode of operation Signal and noise calculation Measures of signal and noise levels are based on the correlation and differences between waveforms A and B. Stimulus repetition rate One stimulus every 13ms, approximately 80 stims per second. Response window 3-13ms or 3-9ms after start of stimulus presentation.
- Page 177 Otoport OAE+ABR User Manual for Otoport NHSP ABR test 26.2 Stimulus level 40dBHL Stimulus rate 51.8Hz Stimulus polarity Alternating Stimulus type Chirp (see below) Evaluation method Fsp & Template Correlation Sampling rate 25.6 kHz Frame length 18.8ms Amplifier gain 75dB Amplifier CMRR >...
- Page 178 CHAPTER TWENTY-SIX Mode of operation Electrodes Disposable wet gel electrodes (FDA 510(k) cleared) Electrode Montage Positive electrode Forehead Negative electrode Nape of neck Common electrode Back of shoulder Stimuli description 26.2.1 Chirp stimuli: 2.5ms duration of alternating polarity. The frequency...
- Page 179 Otoport OAE+ABR User Manual for Otoport NHSP dispersion of the chirp is defined by the delay at frequency T(f)= k * f^ with k=0.0920, and d=0.4356. −d The wide band chirp waveform was cosine filtered in the time domain to give the required duration and a frequency range of 1686 to 4614Hz (-3dB points).
- Page 180 Data was collected from 13 facilities with differing screening environments in the UK and overseas*. Each test site used the Otodynamics’ ABR short chirp delivered to the ear canal at either 35dBHL or 40dBHL, chosen according to the regular protocol in operation at the site.
- Page 181 All the data above relates to the specificity of individual tests, and not to the specificity of the whole screening protocol. * Report on the performance of Otoport ABR. Otodynamics Ltd, 2016 **Norton, SJ, Gorga M P, Widen, JE, Folsom, RC, Sininger, YS, Cone- Wesson, B, Vohr, BR and Fletcher, KA.
- Page 182 CHAPTER TWENTY-SEVEN Response detection Response detection OAEs 27.1 OAE response detection is based on the Signal to Noise ratio (SNR) at each test frequency (for DPOAE tests) or across a specific frequency range (for TEOAE tests). Dependent upon the statistical nature of the noise, even with the probe in a cavity, there is a finite probability that data at the measurement frequency appears above the noise and will be considered as a ‘signal’...
- Page 183 Otoport OAE+ABR User Manual for Otoport NHSP Confidence levels in TEOAE tests 27.2 In the case of TEOAE measurements, data points are aggregated in to frequency bands. Normally this banding is performed as some proportion of octaves. Because of this logarithmic banding of data there is a frequency variance in the SNR required for any given level of confidence.
- Page 184 (4-10ms). The SNR required for various confidence levels with these results are: Confidence Minimum SNR required for confidence level 99.9% 99.99% Note: All of the above data were derived empirically from laboratory studies using Otodynamics equipment in the presence of noise recorded from real clinics.
- Page 185 Otoport OAE+ABR User Manual for Otoport NHSP Conclusions 27.3 How to use this data in relation to OAE screening? 27.3.1 The test confidence percentage is a statistical indicator of how likely the test will correctly identify an ear with no OAE in response to the selected type and level of stimulus.
- Page 186 CHAPTER TWENTY-SEVEN Response detection For example, with a birth rate 600,000 per annum, screening with TEOAE in a well-baby neonate population (assume 0.3% incidence), a screening protocol of 2 bands from 4 with a minimum 5dB SNR stipulation we could predict that the screening process would ‘miss’...
- Page 187 90mm x 38mm x 28mm – Weight 120g Interfaces 28.1.2 Probe connector compatible with Otodynamics UGx probes (8 pin) Charging/Data connector - connects to Otodynamics PSU (charging) or to PC USB port (USB 1.1or 2.0) via Data Cable ® Bluetooth...
- Page 188 CHAPTER TWENTY-EIGHT Technical specifications Clock/Calendar 28.1.5 Internal Real Time Clock/Calendar operates to 2099 Power 28.1.6 Li-Polymer Battery Intelligent multi-level power control for charging/testing/idle/sleep/shutdown: After 1.5 minutes unit will enter sleep mode After 20 minutes in sleep mode unit will shut down Sleep time: 20 hours minimum (with fully charged battery) Running time:...
- Page 189 Relative Humidity: Noncondensing: 10% to 90% Warm-up time: <10s when unit is stored within stated temperature range *Otodynamics instruments and probes are calibrated at an ambient pressure of 101kPa (standard atmospheric pressure at sea level). Lowering the ambient pressure significantly (e.g. when operating at altitude) alters the acoustic response of the probe.
- Page 190 Bis (2-ethylhexyl) phthalate (DEHP – 0.1%); Butyl benzyl phthalate (BBP – 0.1%); Dibutyl phthalate (DBP – 0.1%); Diisobutyl phthalate (DIBP – 0.1%). Otodynamics Otoport and Otoport+ABR products do not contain phthalates. • No Ozone Depleting Substances are used by Otodynamics / its Products.
- Page 191 Otoport OAE+ABR User Manual for Otoport NHSP • None of the following are used by Otodynamics in its Products: Polychlorinated Biphenyls (PCBs); Chlorinated Paraffins; brominated flame retardants, asbestos, chlorofluorocarbons (CFC’s), hydrochlorofluorocarbons (HCFC’s), hydrofluorocarbons (HFC’s), Tributyl Tin (TBT); Triphenyl Tin (TPT) and Tributyl Tin Oxide (TBTO).
- Page 192 CHAPTER TWENTY-EIGHT Technical specifications Electromagnetic compatibility - User 28.2 Guidance The Otoport has been tested and certified to the medical electromagnetic compatibility standard EN 60601-1-2:2015. This standard limits both: the electromagnetic emissions generated by the Otoport; and the susceptibility of the Otoport to electromagnetic disturbances at the levels found in its intended environment.
- Page 193 (i) UGD or UGS probe, as supplied by Otodynamics; (ii) charger and mains lead, as supplied Otodynamics; (iii) PC download cable, as supplied by Otodynamics; (iv) electrode cables, as supplied by Otodynamics or equivalent. Maximum length 2m. Warning Use of accessories, transducers and cables other than those...
- Page 194 CHAPTER TWENTY-EIGHT Technical specifications Electromagnetic compatibility - Technical 28.3 Description Compliance levels 28.3.1 The Otoport has been tested and certified to the medical electromagnetic compatibility standard EN 60601-1-2:2015. Compliance levels are as below: (i) Electromagnetic emissions - complies with: CISPR 11:2015 EC 61000-2:2014 IEC 61000-3:2013 The instrument is group 1, class B for the purposes of CISPR 11.
- Page 195 Otoport OAE+ABR User Manual for Otoport NHSP Details of radio receivers 28.3.4 The instrument contains the following intentional RF receivers: (i) Bluetooth ® receiver. Operates in frequency range of 2.4000- 2.4835GHz with a bandwidth of 1MHz hopping pseudo-randomly in the frequency range.
- Page 196 Europe Radio Equipment Directive (2014/53/EU) CE marking certification Silicon Labs Declaration of Conformity - DoC for WT11i and WT11u. Otodynamics Otoport and Otoport+ABR 3rd Body Test House Validation Safety & EMC measurements. The WT11u is Bluetooth ® qualified and the declaration ID is B016141 (QDID 22298).
- Page 197 10kHz anti-alias filter, which ‘rounds’ any ‘sharp edges’. (b) Transducers and headband force: The stimulus is delivered to the patient’s ear using a UGS or UGD Otodynamics probe. The probe tip holds the probe in the ear canal, with no headband or other retaining device required.
- Page 198 CHAPTER TWENTY-EIGHT Technical specifications Suppose, for example, that a stimulus level of 90dB is reported by the Otoport during stimulus setup (rectangular stimulus). If this stimulus was replaced by the reference stimulus, of the same amplitude, the level generated in a IEC 60711 ear simulator would be: 90dB + -6.1dB + 3.0dB = 86.9 dB SPL peak-to-peak equivalent.
- Page 199 Probe connectors compatible with Otodynamics UGS and UGD probes (8 pin) Electrode connectors compatible with 1.5mm ‘Touchproof’ DIN 42-802 connectors Charging/Data connector - connects to Otodynamics PSU (charging) or to PC USB port (USB 1.1or 2.0) via Data Cable Indicators 28.5.3...
- Page 200 European Union. • Do not dispose of these products as unsorted municipal waste. • You can return your device and accessories to Otodynamics, or to any Otodynamics supplier. • You can also contact your local authorities for advice on disposal.
- Page 201 Otoport OAE+ABR User Manual for Otoport NHSP Symbol explanations 28.7 Symbol Description Class II Type BF Bluetooth ® enabled Caution USB 1.1 When discarded, the item must be sent to separate collection facilities for recovery and recycling Probe socket Battery charging indicator...
- Page 202 CHAPTER TWENTY-EIGHT Technical specifications Symbol Description Refer to operating instructions Otodynamics’ factory address Product catalogue number Product date of manufacture Product serial number RF transmitter Training required TRAINING REQUIRED...
- Page 203 Otoport OAE+ABR User Manual for Otoport NHSP Index Symbols ½ octave bands 140 Cables 193 Calendar 188 Calibration 109 Caution 15 Cavity Test 65 About 133 CD menu 113 ABR 17 Certification 28 ABR Cavity test 74 Changing probe coupler tubes 103...
- Page 204 CHAPTER TWENTY-NINE Index Database summary 163 Half-octave histogram 140 Data entry keypad 25 Hard reset 45 Data summary 143 Hardware fault messages 148 Data tables 141 Hardware ID 133 Date and time 136 Hardware options 188 Declared Conformity 190 Hardware processing and storage 188 Deleting characters 44 Histogram 140 Deviations from the standard 194...
- Page 205 Otoport OAE+ABR User Manual for Otoport NHSP New 78 Radio receivers 195 NHi 142 Radio transmitters 195 NLO 142 Real Ear Test 72 Noise level indicator 80 Records menu 155 Noise OK 25 Regional standards 196 Noise OK LED 45...
- Page 206 CHAPTER TWENTY-NINE Index Stimulus waveform 138 Suitable environments 192 Summary 163 View user list 135 Switch on screen 56 View work list 160 Symbol explanations 201 Volume 129 Symbols 26 System 129 System details 146 Waveform display 144 Work list 160 TC 143 Technical specifications 187 Template correlation 143...
Need help?
Do you have a question about the Otoport OAE+ABR and is the answer not in the manual?
Questions and answers
I am having trouble uploading data from my Otoport
Good morning, I **** just messaging in regards to the AABR sensor placement for the Negative. I understand the manual suggests placing this on the back of the shoulder however, would it be acceptable to place this sensor on the front of the shoulder avoiding the bony area? I ask as it is suggested not to move the Positive sensor due to the AABR not being recognised however there is no mention for the Negative.
No, the Negative AABR sensor for the Otodynamics Otoport OAE+ABR should be placed on the nape of the neck, not the front or back of the shoulder.
This answer is automatically generated