Table of Contents
Advertisement
Advertisement
Table of Contents

Related Manuals for Vivitar Vivicam 35


Summary of Contents for Vivitar Vivicam 35
- Page 1 Vivicam 35 User Manual English 040208tp...
-
Page 2: Table Of Contents
Introduction 1.1. Overview 1.2. Warnings and Precautions 1.3. Package Contents 1.4. System Requirements 1.5. Vivicam 35 Features Installing the Batteries Installing the Software 3.1. Twain Driver for Windows-based PCs 3.2. ArcSoft Suite 3.2.1. PhotoImpression 3.2.2. VideoImpression 3.3. NetGUI In-A-Flash Photo 3.4. - Page 3 Transferring Images to the application software PC/Web Camera Video Function 6.1. Using the ViviCam 35 in Video Mode 6.2. Using the ViviCam 35 with PCCam 6.3. Using the ViviCam 35 with NetMeeting 6.4. Using the ViviCam 35 with Movie Maker (Windows XP) Specifications...
-
Page 4: Introduction
1.0 Introduction - 1.1 Overview - Thank you for purchasing the Vivicam 35 digital camera. It can capture digital images, short video-clips (continuous shooting mode), and it can also serve as a PC/Web camera. The V35 is equipped with 8 MB of memory to store your images and movie clips. - Page 5 instructions, may cause harmful interference to radio communications. However, there is no guarantee that interference will not occur in a particular installation. If this equipment does cause harmful interference to radio or television reception, which can be determined by turning the equipment off and on, the user is encouraged to try to correct the interference by one or more of the following measures: Reorient or relocate the receiving antenna...
- Page 6 When placing batteries in the camera, check the polarity of the batteries (- and +) to ensure proper orientation. Incorrect polarity may result in the batteries splitting or leaking and causing a fire, injury, or soiling of the battery compartment. Remove the batteries if the camera will not be used for an extended period of time.
-
Page 7: Package Contents
Note: Included components may vary, as specified by local retailers and locations. Check with your retailer for specifics. 1.4 System Requirements - You must use a computer to download the images from your Vivicam 35. The computer that you use must meet the following minimum requirements: Windows Me/2000/XP Direct X 8.0, or higher... -
Page 8: Vivicam 35 Features
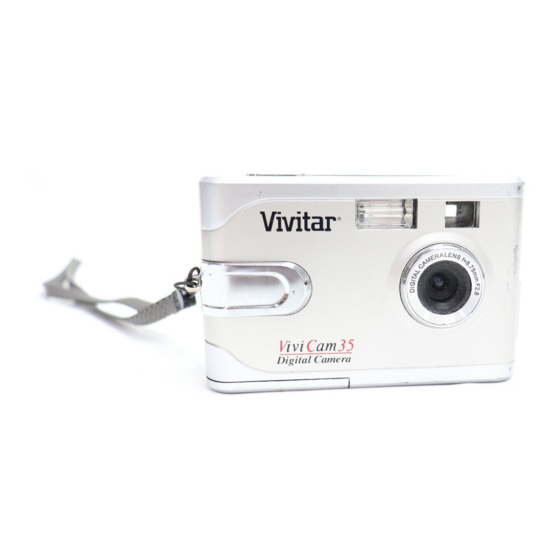
1.5 Vivicam 35 Features - Front Side: Back Side:... -
Page 9: Installing The Batteries
2.0 Installing the Batteries - Step 1: Open the battery door by lifting the tab on the door. Step 2: Insert three AAA batteries with the polarity as shown: Step 3: Close the battery cover. Warning: Do not open the battery door when the camera is powered ON. This will cause all images in memory to be lost immediately. - Page 10 Dispose of batteries properly in accordance with local laws and regulations. Do not place them in fire. The Vivicam 35 has an automatic power-saving feature. The camera will turn off automatically if it has not been used after approximately thirty (30) seconds.
-
Page 11: Installing The Software
5. Adobe Reader 3.1 Twain Driver To use your Vivicam 35 camera on your PC you must first install this software beforehand, known as the “driver.” Install this driver software before connecting your camera to your PC for the first time. You will only need to... -
Page 12: Arcsoft Suite
3.2 ArcSoft Suite – 3.2.1 ArcSoft PhotoImpression is a complete digital image editing application designed with real people in mind. Easy-to-use “Getting Start” guides, user-friendly UI, complete image editing functionality, give users wonderful experience to organizing, viewing, enhancing, editing, printing and sharing photos. -
Page 13: User Manual
3.4 User Manual - Click on the “User Manual” button to go to the index of ViviCam 35 User Manuals. The Vivicam 35 User Manual is included on the CD ROM in PDF format. -
Page 14: Capturing Images
4.0 Capturing Images - Using your new Vivicam 35 is fun and easy. There are two basic steps to capturing your first image. Step 1: Turn on the camera by holding down the Power Button for two seconds. Step 2: Press the shutter button to capture... -
Page 15: Capture An Image
4.2 Capture an Image - In film-photography we say: “Take a Photo.” In digital-photography we say: “Capture an Image.” Capturing an image with the Vivicam 35 is easy. Step 1: Power on the camera and look through the viewfinder to frame subject. -
Page 16: Camera Status Icons
.3 Camera Status Icons - Beyond the basics of capturing an image, the Vivicam 35 has many other features. Turn on the camera and notice the many icons and symbols on the status LCD: As you press the Mode button the LCD display will change in the following order. -
Page 17: Power-Off The Camera
Other icons on the LCD: Function Display Icon Whenever the camera communicates with a PC, the USB icon will be shown on the LCD. Battery status 4.4 Power-Off the Camera - Hold do wn the Power ON imme diately. You can also press LC then pres s the Shutte camer... -
Page 18: Self-Timer
4.6 Self-Timer - If y ou would like get into the image you may use the self-timer feature to lay image capt re by ten (10) seconds. Place the camera on a tripod or a flat, stable surface. Turn on the camera. Press the Mode button until th “... -
Page 19: Continuous Capture
recording automaticall y when the built-in memory is full. When the built-in memory is full, the wo rd “ FL “ will be shown on the LCD display. Note: When you download a movie-clip it will be in the popular AVI format. Use Windows Media Player or Apple Quick Time Player to view movies. -
Page 20: Image Resolution
4.10 Image Resolution Resolution is the size of a digital image measured in pixels (dots), expressed s horizont al number of pixels x vertical number of pixels. The ViviCam 35 offers two resolution modes. This is called VGA resolution. This is called QVGA resolution. -
Page 21: High/Low Image Compression
more images (four times more) than VGA resolution. If you would like to get into the QVGA resolution, turn on the camera. Press the Mode button until “ ” appears on the LCD display and “Hi” start lashing on & off. Press the Shutter button to change “Hi”... -
Page 22: Using The Flash - Automatic, Or On/Fill
4.14 Techniques for Capturing the B The ViviCam 35 can capture good images. Here are a few tips for getting the best possible images from your camera. 1. Use good lighting. The ViviCam 35 works best with adequate lighting. -
Page 23: Downloading Images To Your Pc
5.0 Download Images to your Computer Note: Before connecting your V iviCam 35 to your PC for the first time you must first install the camera driver first (see section 3.1). After the dri software has been installed, your still images and movie clips can be transferred to your PC using the USB cable. - Page 24 The images in your camera will appear as thumbnail sized images as shown: Using your mouse click on images to selct them. (Right click on an image to enlarge it.) You may click on the “Select All” button to select every image. If there are more than twelves images in camera memory click on “Next Page.”...
-
Page 25: Transferring Images To The Application Software
P hotoImpression – ng these steps: ges. Double click on “ “DualCa Vivicam 35 GUI control panel appe ars on the screen. llow the steps in the prior section. Note that the V35 GUI – “Transfer to AP”. -
Page 26: Pc/Web Camera Video Function
6.0 PC/Web Camera Video Function 6.1 Using the ViviCam 35 in Video Mode – PC users may use their Vivicam 35 as a PC/Web cam. Note t ViviCam 35 is a dual mode camera. In the video mode t camera. -
Page 27: Using The Vivicam 35 With Pccam
6.2 Using the ViviCam 35 with PCCam – Click on Start, Programs, Vivicam 35, PCCam - to start the PCCam program: The camera will start functioning as a PC camera. Or you may select “Options” -> “Preview” to begin the video function. -
Page 28: Using The Vivicam 35 With Movie Maker (Windows Xp)
Windows XP users can use Windows Movie Maker. Click on Start, Programs, Accessories, Windows Movie Maker to start Movie Maker: Movie Maker starts - Click on: “Capture from a Video Device” Select “ViviCam 35” in the available devices section. Follow on-screen instructions until live-video is displayed. -25-... -
Page 29: Specifications
7.0 Specifications Image Resolution: 640 x 480 Pixels (VGA), or 320 x 240 Pixels (QVGA) Built-in memory: 8 MB (SDRAM) Image Storage Capacity (approximate): Resolution 640 x 480 (VGA)/HD 640 x 480 (VGA)/LD 320 x 240 (QVGA)/HD 320 x 240 (QVGA)/LD Movie = 320 x 240 (QVGA) elf-Timer: 10 seconds apture Modes: Single, Continuous, AVI Capture (movie clips)
Need help?
Do you have a question about the Vivicam 35 and is the answer not in the manual?
Questions and answers
What type of charger and usb cable is required for vivitar vivicam 35?