
Related Manuals for GIANTEX HU10569-Q


Summary of Contents for GIANTEX HU10569-Q
- Page 1 Queen Size Bed Frame Cadre de Lit Queen Size HU10569-Q THIS INSTRUCTION BOOKLET CONTAINS IMPORTANT SAFETY INFORMATION. PLEASE READ AND KEEP FOR FUTURE REFERENCE.
-
Page 2: Before You Start
Before You Start Please read all instructions carefully. Retain instructions for future reference. Separate and count all parts and hardware. Read through each step carefully and follow the proper order. We recommend that, where possible, all items are assembled near to the area in which they will be placed in use, to avoid moving the product unnecessarily once assembled. - Page 3 COMPONENT LIST / LISTE DES PIÈCES Headboard Footboard Side Rail /Tête de lit /Pied de lit /Barre latérale Headboard Legs Footboard Legs Side Rail Legs /Pieds de tête de lit /Pieds de lit /Pieds de la barre latérale No.99-60x150(H) 575x80x20mm 240x80x30mm Center Rail 10PCS Slat...
- Page 4 HARDWARE LIST / LISTE DES ACCESSOIRES Small Adjuster /Petit dispositif de réglage M8x20 M6x30 Allen Key Allen Key /Clé Allen /Clé Allen 70mm M6x50 M6x60 65mm Screw /Vis Spring Washers Flat Washers 32mm /Rondelles élastiques /Rondelles plates...
- Page 5 BACK VIEW /VUE DE L'ARRIÈRE EN: Unzip the black non-woven fabric on the back of headboard and take out all the parts out. Attention: Zip the black non-woven fabric after taking out the parts! FR: Détachez le tissu non tissé noir au dos de la tête de lit et retirez toutes les pièces.
- Page 6 FRONT VIEW /VUE DE L'AVANT EN: Attach the Bolt (B) to the headboard (1) and footboard (2). FR: Fixez le boulon (B) à la tête de lit (1) et au pied de lit (2).
- Page 7 EN: Attach the side rail leg (6) to the side rail (3). FR: Fixez le pied du rail latéral (6) au rail latéral (3).
- Page 8 EN: Attach side rail (3) to headboard (1) and footboard (2) by pushing the bracket down to fit it. FR: Fixez la barre latérale (3) à la tête de lit (1) et au pied de lit (2) en poussant le support vers le bas pour l'ajuster.
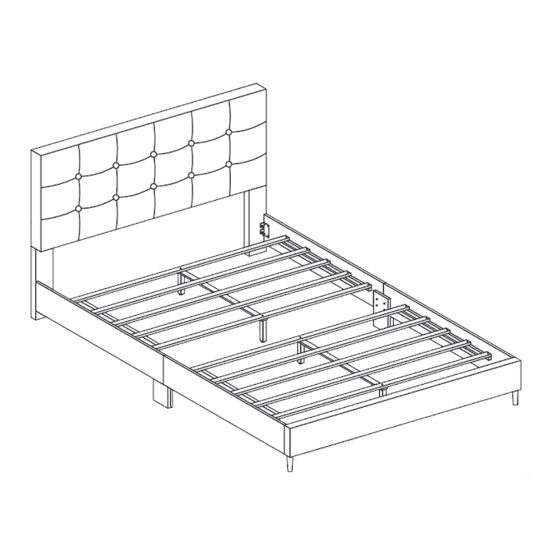
- Page 9 EN: Attach the support legs (9) to the slats (8) and center rail (7). ATTENTION: Please keep the adjuster around 5 to 8 mm distance away from the floor. FR: Fixez les pieds de support (9) aux lattes (8) et à la barre centrale (7).
- Page 10 EN: Tighten the 4 Corner with Allen Key (G). Install the bed slats to side rail. Tighten the slats with screw. The distance of the slats should be sufficient to obtain desirable bed stability. FR: Serrez les 4 coins avec la clé Allen (G). Installez les lattes du lit sur la barre latérale.
- Page 11 Return / Damage Claim Instructions DO NOT discard the box / original packaging. In case a return is required, the item must be returned in original box. Without this your return will not be accepted. Take a photo of the box markings. A photo of the markings (text) on the side of the box is required in case a part is needed for replacement.
- Page 12 USA office: Fontana AUS office: Truganina GBR office: Ipswich FRA office: Saint Vigor d'Ymonville USA:cs.us@costway.com If you're having difficulty, our friendly AUS:cs.au@costway.com customer team is always here to help. GBR:cs.uk@costway.com FRA:cs.f r @costway.com...
Need help?
Do you have a question about the HU10569-Q and is the answer not in the manual?
Questions and answers