
Subscribe to Our Youtube Channel
Related Manuals for Mirion Technologies BIODEX ULTRA-PRO 058-720


Summary of Contents for Mirion Technologies BIODEX ULTRA-PRO 058-720
- Page 1 ULTRA-PRO ™ ULTRASOUND TABLE OPERATION MANUAL 058-720 058-725 7 Vreeland Road, Florham Park, NJ 07932 (800) 631-3826 | (201) 825-9500 | www.biodex.com FN: 08-047 Rev D 5/23...
- Page 2 This manual covers operation procedures for the following products: 058-720 Table, Ultra-Pro Ultrasound, 115 VAC 058-725 Table, Ultra Pro Ultrasound, 230 VAC Contact Information Manufactured by: Mirion Technologies (Capintec), Inc. 7 Vreeland Road, Florham Park, NJ 07932 (800) 631-3826 | (201) 825-9500 | Fax: 201-825-1336 email: FLO-TechSupport@mirion.com www.biodex.com...
-
Page 3: Table Of Contents
TABLE OF CONTENTS Definition of Symbols……………………………………………………………………………………………..2 Before Proceeding………………………………………………………………………………………………….3 Important Safety Information……………………………………………………………………………………5 Chapter 1: Introduction……………………………………………………………………………………………6 Table Parts and Adjustments…………………………………………………………………………………..7 Chapter 2: Assembly and Table Operation…………………………………………………………………...8 Relocating the Table……………………………………………………………………………………………….8 Height Adjustment………………………………………………………………………………………………….8 Trendelenburg/reverse Trendelenburg………………………………………………………………………..8 Fowler Back Adjustment…………………………………………………………………………………………..9 Leveling the Table………………………………………………………………………………………………….9 Installing and using Optional Accessories…………………………………………………………………….9 Foot Controller……………………………………………………………………………………………………...9 Articulating Scanning Arm Board………………………………………………………………………………10 Side Rails……………………………………………………………………………………………………………11... -
Page 4: Definition Of Symbols
Symbol Definition Carefully read these instructions prior to use Operating Instructions Caution General Warning General Mandatory Action Dangerous Voltage “On” Power “Off” Power Pinch Point Earth (ground) Alternating Current Fuse USB Connector/Cable Non-Ionizing Electromagnetic Radiation Waste in Electrical Equipment Disposal Classification and Identification of Equipment Date of Manufacture Manufactured By Type B Applied Part... -
Page 5: Before Proceeding
Before Proceeding NOTE: The warnings, cautions and instructions provided in this manual must be read, followed, and kept available for consultation at all times. Observing the information, instructions and procedures presented throughout this manual is essential for using this product both properly and safely. Specific Cautions •... - Page 6 Training This operation manual includes assembly and operating instructions. operating/assembly questions can be directed to our service department during business hours. User Profile Patient The product (without accessories) shall accommodate patients fitting the following profile: Height: from infant to 74 inches (6ft - 2in). Weight: up to 500 lbs.
-
Page 7: Important Safety Information
Important Safety Information CAUTION: Federal Law restricts this device to sale by or on the order of a physician, sonographer or other licensed professional. Follow the unpacking and assembly instructions document. Before using this equipment, read the entire operation manual carefully. Failure to read the manual may result in user error or injury. -
Page 8: Chapter 1: Introduction
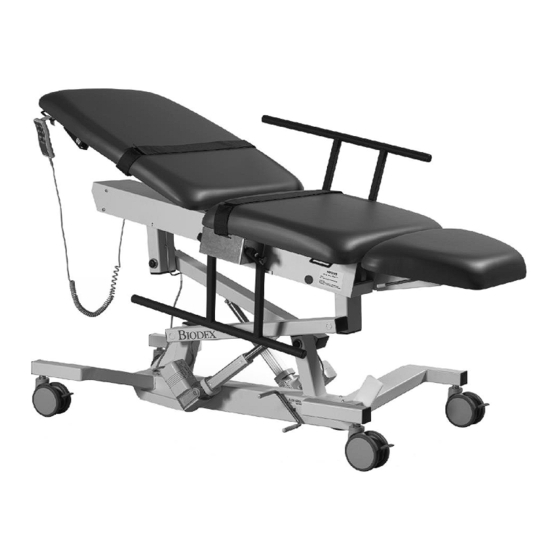
1. INTRODUCTION Intended Use The Ultra Pro Ultrasound Table was designed to provide a safe ergonomic environment for the sonographer and patient. The design features are intended to relieve musculoskeletal stress on the sonographer while scanning, and to provide the utmost patient comfort. Indications for Use The Ultra Pro Ultrasound Table is typically used in radiology departments, cardiovascular facilities, diagnostic imaging centers and private practice clinics to achieve quality images for a... - Page 9 Table Parts and Adjustments Fowler Back motor controlled with infinite adjustment through 80° Optional Flush-mounted Side Rails fold beneath the table for unencumbered access Durable Hand Controller Leg Section folds down for stirrup access Central Floor Locking System...
-
Page 10: Chapter 2: Assembly And Table Operation
2. Assembly and Table Operation Relocating the Table CAUTION: Before moving the table with a patient, make sure side rails are in the up position and restraining straps in place to secure the patient. This table can be easily moved across smooth surfaces. To move the table, release the central locking system by pressing with your foot on the short end of the central locking lever. -
Page 11: Fowler Back Adjustment
Fowler Back Adjustment The motorized Fowler back is infinitely adjustable to 80° via the hand-held or optional foot controller. Leveling the Table The table has a self-leveling feature which can be used when the table is in a Trendelenburg or reverse Trendelenburg position. -
Page 12: Articulating Scanning Arm Board
Articulating Scanning Arm Board (058-736) The optional Articulating Scanning Arm Board is installed by inserting the arm board tube into the receiving tube located on each side of the table. The arm board tube compensator located toward the end of the tube may need to be adjusted before inserting the arm board tube into the receiving tube or for any slack that may occur over time. -
Page 13: Side Rails
Side Rails (058-633) The optional side rails can be installed on both sides of the table. Each rail pivots individually to either the raised or lowered position. Two rails are supplied: one for each side of the table. To install the side rails: 1. -
Page 14: Headrest Extension
Headrest Extension (058-738) The optional headrest is removable and adjustable. To install the headrest, simply slide it into the receiving tube at the head end of the table until it clicks into place. Push to adjust angle. Push to release. Figure 5. -
Page 15: Paper Dispenser
Paper Dispenser (058-611) Manufactured to accommodate a roll of hygienic table paper (sold separately), the optional dispenser is mounted to the head end of the table. Installing the paper dispenser: 1. Raise the Fowler back section of the table completely. 2. -
Page 16: Pole
I.V. Pole (058-737) The optional I.V. Pole must be installed on the patient's right side of the table. Installing the I.V. Pole: Using a 7/16" wrench, remove the two 1/4-20" hex head screws from the end of the tabletop frame on the side of the table to which the I.V. pole will be installed. 2. -
Page 17: Appendix A - Specifications
APPENDIX A - SPECIFICATIONS Dimensions: Overall: 70" l x 30" w (177.8 x 76.2 cm); 35" w (88.9 cm) with optional side rails Drop-down Leg Section: 12.6" l (32 cm) Motions: Height Adjustable: 23" to 39" (58.4 to 99 cm) Trendelenburg: 0°... - Page 18 7 Vreeland Road, Florham Park, NJ 07932 (800) 631-3826 | (201) 825-9500 | www.biodex.com...
Need help?
Do you have a question about the BIODEX ULTRA-PRO 058-720 and is the answer not in the manual?
Questions and answers