
Related Manuals for Atari GAMESTATION PRO


Summary of Contents for Atari GAMESTATION PRO
- Page 1 User guide Manuel de l’utilisateur Guía del usuario Manuale dell’Utente Guia do usuário Bedienungsanleitung Gebruikershandleiding ユーザー ガイド COLLECT THEM ALL! WWW.MYARCADEGAMING.COM...
- Page 3 ENGLISH ___________ Includes Console, two 2.4 GHz wireless joysticks with paddle controls, HDMI® cable, power cable and user guide Materials needed (not included): 8 AA batteries and mini-screwdriver, or USB-C® cable Please read and follow this user guide thoroughly before use. 1.
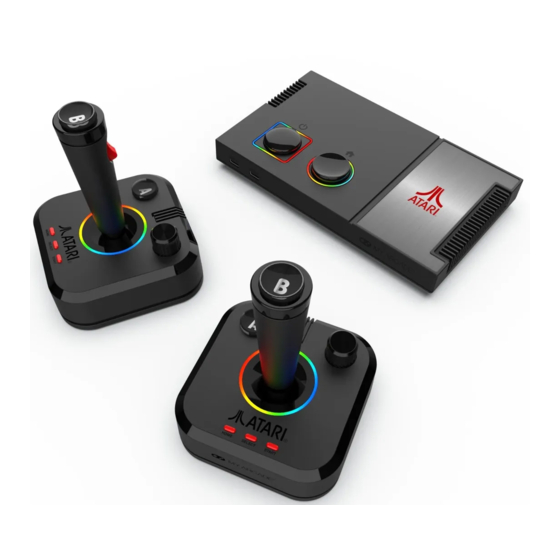
- Page 4 9 10 1. A button 7. START button 8. On/o switch 2. B button 9. Power port (5V IN) 3. C button 4. Paddle 10. LED sync indicator 11. MENU / RGB button 5. HOME button 6. SELECT button Photo Sensitivity Warning This game contains flashing lights or patterns which may trigger epileptic seizures among a small percentage of people, even those with no prior history of epilepsy or seizures.
- Page 5 5. Insert the USB-A end of the cable into a powered source. 6. Press the power button located on the top of the console. NOTE: The RGB lights around the power and home buttons will illuminate when the console is powered on. This may take up to 3 seconds after the power button is pressed.
- Page 6 NOTE: PADDLE SENSITIVITY is not supported on all paddle games. Save options The Atari® Gamestation Pro allows for game saves onto a microSD™ card. The microSD™ card slot allows up to 128 GB capacity. 1. Format the microSD™ card to a FAT32 file system.
- Page 7 same time). • Do not mix di erent brands of batteries. • We do not recommend using batteries labeled “Heavy Duty”, “General Use”, “Zinc Chloride” or “Zinc Carbon” . • Do not leave batteries in the controller for long periods of non-use. •...
- Page 8 If this equipment does cause harmful interference to radio or television reception, which can be determined by turning the equipment o and on, the user is encouraged to try to correct the interference by one or more of the following measures: •...
- Page 9 Service information For service on any defective product under the 120-day warranty policy, please contact Consumer Support to obtain a Return Authorization Number. MY ARCADE® reserves the right to require the return of the defective product and proof of purchase. NOTE: MY ARCADE®...
- Page 10 FRANÇAIS __ Avertissement sur l'épilepsie. (Article Annexe I) Annexe I A lire avant toute utilisation d'un jeu vidéo par vous-même ou votre enfant. Certaines personnes sont susceptibles de faire des crises d'épilepsie ou d'avoir des pertes de conscience à la vue de certains types de lumières clignotantes ou d'éléments fréquents dans notre environnement quotidien.
- Page 11 Avertissement concernant les risques d'épilepsie et des précautions à prendre lors de l'utilisation d'un jeu vidéo. (Article Annexe II) Annexe II Certaines personnes sont susceptibles de faire des crises d'épilepsie ou d'avoir des pertes de conscience à la vue de certains types de lumières clignotantes ou d'éléments fréquents dans notre environnement quotidien.
- Page 12 Comprend Console, deux joysticks sans fil 2,4 GHz avec commandes à palettes, câble HDMI®, câble d'alimentation et manuel d'utilisation Matériel nécessaire (non inclus) : 8 piles AA et petit tournevis ou câble de chargement USB-C® Veuillez lire attentivement le présent manuel avant toute utilisation.
- Page 13 9 10 1. Bouton A 7. Bouton START 8. Commutateur on / o 2. Bouton B 9. Port d'alimentation 3. Bouton C 4. Palette 10. Témoin de synchronisation à LED 11. Bouton MENU / RGB 5. Bouton HOME 6. Bouton SELECT Avertissement sur la photosensibilité...
- Page 14 fourni dans le port d'alimentation (5V IN) situé à l'arrière de la console. 5. Branchez l'extrémité USB-A du câble sur une source d'alimentation. 6. Appuyez sur le bouton d'alimentation situé sur le haut de la console. REMARQUE : Les lumières RVB autour des boutons d'alimentation et d'accueil s'allument lorsque la console est mise sous tension.
- Page 15 REMARQUE : l'option PADDLE SENSITIVITY n'est pas prise en charge par tous les jeux de paddle. Options de sauvegarde L'Atari® Gamestation Pro permet de sauvegarder des jeux sur une carte microSD™. L'emplacement pour carte microSD™ permet d'atteindre une capacité de 128 Go.
- Page 16 soient internes ou sur la carte microSD. Information sur la pile La fuite d’acide sulfurique peut causer des blessures et endommager le produit. En cas de fuite, lavez soigneusement la peau et les vêtements touchés. Éloignez l’acide sulfurique des yeux et de la bouche. Les piles qui fuient peuvent faire des bruits secs.
- Page 17 informations importantes. • Le jouet ne doit être utilisé qu'avec un transformateur pour jouets ou une alimentation électrique pour jouets. • Les batteries rechargeables doivent être chargées sous la surveillance d'un adulte. • Le produit ne doit être connecté qu'à des équipements portant l'un des symboles suivants.
- Page 18 Information sur la garantie Tous les produits MY ARCADE® sont assortis d’une garantie limitée et ont été soumis à une série de tests pour assurer la meilleure fiabilité et la meilleure compatibilité. Il est peu probable que vous ayez un problème, mais si un défaut se manifeste pendant l’utilisation du produit, MY ARCADE®...
- Page 19 Pour plus d'informations sur l'émulateur, visitez le site : www.MyArcadeGaming.com Sauvez un arbre, enregistrez-vous en ligne MY ARCADE® fait un choix écologique en demandant à ce que tous les produits soient enregistrés en ligne. Cela évite l’impression des cartes d’enregistrement papier. Tous les renseignements dont vous avez besoin pour enregistrer votre achat récent d’un produit MY ARCADE®...
- Page 20 ESPAÑOL __________ Incluye Consola, dos joysticks inalámbricos de 2,4 GHz con controles de paleta, cable HDMI®, cable de alimentación y guía del usuario Materiales necesarios (no incluidos): 8 pilas AA y un mini destornillador o cable de carga USB-C® Lea y siga minuciosamente esta guía del usuario antes de usar. 1.
- Page 21 9 10 7. Botón START 1. Botón A 8. Interruptor on/o (Encendido/apagado) 2. Botón B 9. Puerto de alimentación (5V IN) 3. Botón C 4. Paleta Indicador LED de sincronización 5. Botón HOME (Inicio) Botón MENU / RGB 6. Botón SELECT (Seleccionar) Advertencia de fotosensibilidad Este juego contiene luces parpadeantes o patrones que podrían provocar convulsiones epilépticas en un pequeño porcentaje de personas, incluso...
- Page 22 posterior de la consola. 5. Inserte el extremo USB-A del cable en una fuente alimentada. 6. Presione el botón de encendido ubicado en la parte superior de la consola. NOTA: Las luces RGB alrededor de los botones de encendido e inicio se iluminarán cuando la consola esté...
- Page 23 NOTA: PADDLE SENSITIVITY no es compatible con todos los juegos de paleta. Opciones de guardado La Atari® Gamestation Pro permite guardar partidas en una tarjeta microSD™. La ranura para tarjetas microSD™ permite hasta 128 GB de capacidad. 1. Formatee la tarjeta microSD™ a un sistema de archivos FAT32.
- Page 24 Información de las pilas La fuga de ácido de las pilas puede causar lesiones corporales, así como daños a este producto. Si se produce una fuga de las pilas, lave minuciosamente la piel y la ropa afectadas. Mantenga el ácido de las pilas alejado de los ojos y la boca.
- Page 25 de los siguientes símbolos. Información de FCC NOTA: Este equipo ha sido sometido a pruebas y cumple con los límites para un dispositivo digital Clase B, de acuerdo con la Parte 15 del reglamento de la FCC. Estos límites están diseñados para proveer una protección razonable contra la interferencia perjudicial en una instalación residencial.
- Page 26 obra por un período de 120 días desde la fecha de la compra original. Si ocurre un defecto cubierto por esta garantía a un producto comprado en los EE. UU., MY ARCADE®, a su criterio, reparará o reemplazará el producto comprado sin costo o reembolsará según el precio original de compra.
- Page 27 reciente compra de MY ARCADE® está disponible en: www.MyArcadeGaming.com/product-registration Declaración de Conformidad Se puede encontrar una copia de la Declaración de conformidad de UE para este producto en este vínculo: www.MyArcadeGaming.com/pages/doc...
- Page 28 ITALIANO _ Include Console, due joystick wireless da 2,4 GHz con paddle di comando, cavo HDMI®, cavo di alimentazione e manuale dell'Utente Accessori richiesti per l'uso del dispositivo (non compresi nella dotazione): 8 batterie AA en un cacciavite di piccole dimensioni o un cavo di ricarica USB-C®...
- Page 29 9 10 1. Pulsante A 7. Pulsante START 8. Commutatore di 2. Pulsante B accensione/spegnimento 3. Pulsante C 4. Paddle 9. Porta di alimentazione 10. Spia a LED di sincronizzazione 5. Pulsante HOME 11. Pulsante MENU / RGB 6. Pulsante SELECT Aavvertenza sulla fotosensibilità...
- Page 30 appropriato. Se ad esempio si collega la console all'ingresso HDMI® 1 del televisore, anche il televisore deve essere impostato sull'ingresso HDMI® 1. Insira cuidadosamente a extremidade USB-C® do cabo incluído na porta de alimentação (5V IN) localizada na parte traseira do console. Inserire l'estremità...
- Page 31 PADDLE SENSITIVITY non è supportata in tutti i giochi che prevedono l'utilizzo della paddle. Opzioni di salvataggio Atari® Gamestation Pro consente di salvare lo stato dei giochi in una scheda microSD™. Lo slot della scheda microSD™ ha una capacità di 128 GB.
- Page 32 Ripristino delle impostazioni predefinite L'opzione FACTORY RESET è disponibile nella sezione ABOUT del menu SETTINGS. L'utilizzo dell'opzione FACTORY RESET determina la cancellazione di tutti gli stati salvati, sia all'interno del gioco sia nella scheda microSD™. Informazioni sulle batterie La fuoriuscita di acido da una delle batterie può causare lesioni personali e danneggiare questo prodotto.
- Page 33 • Con questo dispositivo, è consigliabile utilizzare un adattatore CD 5V 2A. • Utilizzare esclusivamente un adattatore rispondente ai requisiti del dispositivo. • L’adattatore non è un giocattolo. • Gli adattatori utilizzati con il dispositivo devono essere regolarmente ispezionati per controllare che non presentino segni di danneggiamento sul cavo, la spina, l’involucro o altre parti.
- Page 34 Il presente apparecchio è conforme alle direttive contenute nella parte 15 della normativa emanata dalla FCC. L’operatività dell’apparecchio è soggetta alle seguenti due condizioni: 1. L’apparecchio non deve generare interferenze dannose. 2. L’apparecchio deve accettare qualsiasi interferenza in ricezione, incluse quelle che potrebbero causarne una modalità di funzionamento indesiderata.
- Page 35 MY ARCADE® si riserva il diritto di richiedere la restituzione del prodotto difettoso e la prova di acquisto. NOTA: Senza il codice di autorizzazione alla restituzione, MY ARCADE® non prenderà in considerazione alcun reclamo per prodotto difettoso. Linea diretta dell’Assistenza clienti 877-999-3732 (solo USA e Canada) o +1-310-222-1045 (altri paesi) Indirizzo di posta elettronica dell’Assistenza clienti...
- Page 36 PORTUGUÊS ____ Inclui Console, dois joysticks sem fio de 2,4 GHz com controles paddle, cabo HDMI®, cabo de alimentação e guia do usuário Materiais necessários (não incluídos): 8 pilhas AA e minichave de fenda ou cabo de carregamento USB-C® Leia este guia do usuário e o siga integralmente antes de usar. 1.
- Page 37 9 10 7. Botão START 1. Botão A 8. Interruptor On/O 2. Botão B 9. Porta de alimentação 3. Botão C 10. LED indicador de sincronização 4. Paddle 11. Botão MENU / RGB 5. Botão HOME 6. Botão SELECT Aviso de fotossensibilidade Este jogo contém luzes ou padrões piscantes que podem causar surtos epilépticos em uma pequena porcentagem de pessoas, mesmo naquelas sem histórico de epilepsia ou convulsões.
- Page 38 Pressione o botão liga/desliga localizado na parte superior do console. NOTA: As luzes RGB ao redor dos botões liga/desliga e Home acenderão quando o console for ligado. Isso pode levar até 3 segundos após o botão liga/desliga ser pressionado. Como configurar os joysticks Remova a tampa das pilhas localizada na parte inferior de cada joystick.
- Page 39 Opções de salvamento O Atari Gamestation Pro permite que jogos sejam salvos em um cartão microSD™. O slot para cartão microSD™ tem até 128 GB de capacidade. 1. Formate o cartão microSD™ para um sistema de arquivos FAT32.
- Page 40 • Somente um adulto deve instalar e substituir as pilhas. • Não misture baterias alcalinas, convencionais (carbono-zinco) ou recarregáveis. • Não misture pilhas usadas e novas (substitua todas as pilhas ao mesmo tempo). • Não misture pilhas de marcas diferentes. •...
- Page 41 Informações da FCC OBSERVAÇÕE: Esse equipamento foi testado e comprovado como estando de acordo com os limites para um dispositivo digital de Classe B, de acordo com a Parte 15 das Regras da FCC. Esses limites foram projetados para fornecer uma proteção razoável contra interferências prejudiciais em uma instalação residencial.
- Page 42 Se ocorrer um defeito coberto por esta garantia a um produto comprado nos EUA, MY ARCADE®, a seu critério, consertará ou substituirá o produto comprado sem custos ou reembolsará o preço de compra original. Se for necessária a substituição e o produto não estiver mais disponível, poderá...
- Page 43 Declaração de Conformidade Uma cópia da Declaração de conformidade da UE deste produto pode ser encontrada neste link: www.MyArcadeGaming.com/pages/doc...
- Page 44 DEUTSCHE____ Im Lieferumfang enthalten Konsole, zwei kabellose 2,4-GHz-Joysticks mit Paddle-Steuerung, HDMI®-Kabel, Stromkabel und Benutzerhandbuch Benötigte Teile (nicht im Lieferumfang enthalten): 8 AA-Batterien und ein Mini-Schraubenzieher oder USB-C®-Ladekabel Bitte lesen Sie vor dem Gebrauch das Benutzerhandbuch und folgen Sie den darin enthaltenen Anweisungen. 1.
- Page 45 9 10 7. START-Taste 1. A-Taste 8. On/O -Schalter 2. B-Taste 9. Stromanschluss 3. C-Taste 10. LED sync indicator 4. Paddle 11. MENÜ / RGB-Taste 5. HOME-Taste 6. SELECT-Taste Warnung vor lichtempfindlichkeit Dieses Spiel enthält blinkende Lichter oder Muster, die bei einem kleinen Prozentsatz von Menschen epileptische Anfälle auslösen können, auch bei Menschen ohne Vorgeschichte von Epilepsie oder Anfällen.
- Page 46 den gleichen HDMI® 1-Anschluss als Quelle für Ihr Fernsehgerät festlegen. 4. Stecken Sie das USB-C®-Ende des mitgelieferten Netzkabels vorsichtig in den Stromanschluss (5V IN) auf der Rückseite der Konsole. 5. Schließen Sie das USB-A-Ende des Kabels an eine Stromquelle an. 6.
- Page 47 HINWEIS: PADDLE SENSITIVITY wird nicht von allen Paddle-Spielen unterstützt. Optionen speichern Die Atari® Gamestation Pro ermöglicht das Speichern von Spielen auf einer microSD™-Karte. Der microSD™-Kartensteckplatz bietet eine Kapazität von bis zu 128 GB. Formatieren Sie die microSD™-Karte in einem FAT32-Dateisystem.
- Page 48 Zurücksetzen auf Werkseinstellungen FACTORY RESET finden Sie im Abschnitt ABOUT unter SETTINGS. FACTORY RESET löscht alle Spielstatus sowohl intern als auch auf der microSD™-Karte. Hinweise zu den Batterien Das Auslaufen von Batteriesäure kann zu körperlichen Verletzungen und Schäden am Produkt führen. Reinigen Sie in einem solchen Fall den betro enen Bereich der Haut und Ihre Kleidung gründlich.
- Page 49 • Der Adapter selbst ist kein Spielzeug. • Adapter, die mit diesem Gerät verwendet werden, müssen regelmäßig auf Schäden am Kabel, Anschluss, Gehäuse und an anderen Teilen untersucht werden. • Bitte bewahren Sie das Benutzerhandbuch für wichtige Informationen auf. • Das Spielzeug darf nur mit einem Wandler für elektrisches Spielzeug oder einem Netzteil für Spielzeug verwendet werden.
- Page 50 entspricht den FCC-RF-Strahlungsgrenzwerten für unkontrollierte Umgebungen. Der Sender darf sich nicht in der Nähe einer anderen Antenne oder eines Senders befinden oder gemeinsam mit diesen genutzt werden. Hinweise zur Garantie Alle Produkte von MY ARCADE® verfügen über eine beschränkte Garantie und wurden einer Reihe von sorgfältigen Prüfungen unterzogen, um ein höchstmögliches Maß...
- Page 51 Kundendienst-Hotline 877-999-3732 (nur USA und Kanada) oder +1-310-222-1045 (weltweit) E-Mail-Adresse des Kundendienstes support@MyArcadeGaming.com Website www.MyArcadeGaming.com Informationen zum Emulator finden Sie unter: www.MyArcadeGaming.com Registrieren Sie sich online und retten Sie einen Baum MY ARCADE® hat sich aus Umweltschutzgründen dafür entschieden, alle Produkte online registrieren zu lassen. Auf Papier gedruckte Registrierungskarten werden dadurch nicht länger benötigt.
- Page 52 NEDERLANDS _______ Bevat Console, twee 2,4 GHz draadloze joysticks met paddles, HDMI®-kabel, voedingskabel en gebruikershandleiding Benodigde materialen (niet inbegrepen): 8 AA batterijen en mini schroevendraaier of USB-C®-kabel Lees en volg deze gebruikershandleiding zorgvuldig voor gebruik. 1. Aan/Uit-knop 4. Stroomaansluiting 2. Home-knop 5.
- Page 53 9 10 7. START-knop 1. A-knop 8. Aan/uit-schakelaar 2. B-knop 9. Stroomaansluiting 3. C-knop 10. Synchronisatie-indicator 4. Paddle 11. MENU / RGB-knop 5. HOME-knop 6. SELECT-knop Waarschuwing bij lichtgevoeligheid Dit spel bevat knipperende lichten of patronen die epileptische aanvallen kunnen veroorzaken bij een klein percentage mensen. Dit kan ook voorkomen bij mensen die geen voorgeschiedenis hebben van epileptische aanvallen.
- Page 54 voorzichtig in de voedingspoort (5V IN) aan de achterkant van de console. 5. Steek het USB-A-uiteinde van de kabel in een voedingsbron. 6. Druk op de aan/uit-knop aan de bovenzijde van de console. LET OP: De RGB-lampjes rond de aan/uit- en home-knoppen gaan branden wanneer de console wordt ingeschakeld.
- Page 55 Atari® 2600-games. LET OP: PADDLE SENSITIVITY wordt niet door alle paddle-games ondersteund. Opslagopties De Atari® Gamestation Pro kan games opslaan op een microSD™-kaart. Je kunt microSD™-kaarten met een maximum capaciteit van 128 GB gebruiken. 1. Formatteer de microSD™-kaart naar een FAT32-bestandssysteem.
- Page 56 kleding grondig wassen. Houd accuzuur uit de buurt van ogen en mond. Lekkende batterijen kunnen een knappende geluiden maken. • Batterijen mogen alleen door een volwassene worden geïnstalleerd en vervangen. • Gebruik geen alkaline, standaard (koolstof-zink) of oplaadbare batterijen door elkaar. •...
- Page 57 FCC-informatie OPMERKING: Dit apparaat is getest en voldoet aan de limieten voor een klasse B digitaal apparaat, conform deel 15 van de FCC-regels. Deze limieten zijn opgesteld om redelijke bescherming te bieden tegen schadelijke interferentie in een residentiële installatie. Deze apparatuur genereert, gebruikt en kan radiofrequentie-energie uitstralen en kan, indien niet geïnstalleerd en gebruikt in overeenstemming met de instructies, schadelijke interferentie van radiocommunicatie veroorzaken.
- Page 58 Als er zich een defect voordoet dat onder deze garantie valt aan een product dat in de VS is gekocht, MY ARCADE®, naar eigen goeddunken, het gekochte product kosteloos repareren of vervangen of de oorspronkelijke aankoopprijs terugbetalen. Als een vervanging noodzakelijk is en uw product niet langer beschikbaar is, kan een vergelijkbaar product naar eigen goeddunken van MY ARCADE®...
- Page 59 Conformiteitsverklaring Een kopie van de EU-conformiteitsverklaring voor dit product vindt u onder de volgende link: www.MyArcadeGaming.com/pages/doc...
- Page 60 付属品 コンソール, 、 パドルコントロール付き2.4GHzワイヤレスジョイスティック 2本、 HDMI®ケーブル、 電源ケーブル、 ユーザーガイド 必要なアイテム (別売り) : 単三電池8本、 ミニドライバーまたはUSB-C® ご使用の前に、 このユーザーガイドをよくお読みになり、 指示に従ってく ださい。 1. 電源ボタン 4. 電源ポート 2. ホームボタン 5. HDMI OUT 3. USB-C® ポート 6. microSD™ カードスロッ ト...
- Page 61 このゲームには、 てんかんや発作の病歴がない方でも、 まれに光過敏性 発作を誘発する可能性のある光やパターンの点滅が含まれています。 ご 自分の判断でプレイしてください。 あなたやご家族の中に、 てんかん性の 発作を起こしたことがある方がいる場合は、 ゲームをプレイする前に医師 に相談してください。 プレイ中にめまい、 視界の変調、 目や筋肉のけいれ ん、 意識の喪失、 方向感覚の喪失、 無意識の動作、 けいれんなどの異常な 症状が現れた場合は、 直ちにゲームを中止して、 プレイを再開する前に医 師の診察を受けてください。 初めて使用する場合 Proコンソールのセッ トアップ方法 Atari Gamestation 付属のHDMI®ケーブルの一端をコンソールの背面にあるHDMI OUT ポートに丁寧に差し込みます。 2. ケーブルのもう一方の端子をテレビに差し込みます。 3. テレビが適切なビデオ入力に設定されていることを確認します。 たと えば、 コンソールをテレビのHDMI® 1ポートに接続する場合は、 テレビ を同じくHDMI® 1に切り替えます。...
- Page 62 3. 各ジョイスティックのオン/オフスイッチを ( ) から ( ) へ動かします。 4. 電源を入れると、 ジョイスティック背面のLED同期インジケーターが点 滅します。 ジョイスティ ックがコンソールと同期すると、 LED同期インジ ケーターが点灯します。 注 : 電池を使いたくない場合は、 USB-C®ケーブル (別売) のUSB-C®端子 をジョイスティックの背面にある電源ポート (5V IN) に丁寧に差し込み ます。 ケーブルのもう一方の端子をAtari Gamestation Proコンソール の前面に丁寧に差し込みます。 このオプションを使えば、 電池は不要で す。 電池の交換の仕方 注 : 長時間プレイする場合は、 高品質のアルカリ電池を使用してください。 MENU / RGB ボタン...
- Page 63 注 : TYPEとGAME DIFFICULTYは、 Atari® 2600ゲームにのみ対応して います。 注 : PADDLE SENSITIVITYは、 すべてのパドルゲームに対応しているわ けではありません。 オプションの保存 Atari Gamestation Proでは、 microSD™カードにゲームを保存できます。 microSD™カードスロッ トの最大容量は128 GBです。 microSD™カードをFAT32ファイルシステムにフォーマッ トします。 microSD™カードにフォルダを作成し、 Statesというラベルを付けます。 コンソールの側面にあるmicroSD™カードスロッ トにmicroSD™カード を挿入します。 注 : microSD™カードは、 ピンを上に向けてコンソールに挿入してください 。 ジョイスティックの背面にあるMENUボタンをすばやく押すと、 SAVE MENUにアクセスします。 このメニューから、 セーブ状態の保存、 ロード、 削除ができます。...
- Page 64 すべての電池を交換 してください)。 • 異なるブランドの電池を混ぜて使用しないでください。 • 「高出力」 、 「 高容量」 、 「 塩化亜鉛」 または 「亜鉛炭素」 と 表記された電池 の使用は推奨されません。 • 長期間使用しないときは、 製品に電池を入れたままにしないでくださ い。 • 使用していないときは、 電池を取り出し、 涼しく乾燥した場所に保管し てください。 • 消耗した電池は本機から取り外してください。 • 電池を逆方向に入れないでください。 プラス (+) とマイナス (-) 端子 が 正しい方向を向いていることを確認し、 マイナス側から挿入してくださ い。 • 破損、 変形、 または液漏れした電池は使用しないでください。 •...
- Page 65 条件で電波干渉が起こらないという保証はありません。 この装置がラジオやテレビに有害な干渉を引き起こしている場合は (装 置をオフ/オンにして判断できます)、 次 のいずれかの方法で干渉を是正することが推奨されます。 • 受信アンテナの方向や位置を変える。 • 装置と受信機の距離を離す。 • 受信機を接続している回路とは別の回路の差し込みに装置を接続す る。 • ラジオ/テレビの販売店、 あるいは経験のある技術者に相談する。 本装置は FCC 規定パート 15 に準拠しています。 次の 2 つの条件に従っ て使用してください。 本装置が有害な干渉を引き起こさないこと。 2. 本装置が、 望ましくない動作を引き起こす可能性のある電波干渉を 含め、 あらゆる干渉を受容できること。 製造業者の承認なしに変更を行うと、 ユーザーは本デバイスを操作する 権利を喪失することがあります。 本装置は、 制御されていない環境に対 して規定された FCC RF 被曝範囲に準拠しています。 本トランスミッタ は、...
- Page 66 サービスに関する情報 120 日間の保証規定に基づく瑕疵製品の修理については、 お客様サポー トにお問い合わせください。 返品認証番号を発行いたします。 MY ARCADE® は、 瑕疵製品の返却および購入証明書を要求する 権利を 有します。 注: MY ARCADE® では、 返品認証番号がない場合、 瑕疵製品の補償の手 続きを行わないもの とします。 お客様サポートホッ トライン 877-999-3732 (米国、 カナダ専用) また +1-310-222-1045 (米国、 カナダ以外) お客様サポート電子メール support@MyArcadeGaming.com ウェブサイト www.MyArcadeGaming.com エミュレーターの情報については、 をご覧ください: www.MyArcadeGaming.com 環境保護のため、 オンラインでの登録をお願いいたします では、 環境に配慮し、 すべての製品の登録をオンラインで行っています。 こ MY ARCADE®...
- Page 67 HDMI® USB-C® microSD™ USB-C®...
- Page 68 9 10 HOME SELECT START HDMI OUT HDMI® HDMI® 1...
- Page 69 HDMI® 1 USB-C® (5V IN) USB-A .( ) USB-C® USB-C®...
- Page 70 MENU RGB • SAVE MENU GAME CONTROLS • MENU Game controls GAME CONTROLS 2600 GAME DIFFICULTY TV TYPE Atari® PADDLE SENSITIVITY microSD™ Atari® Gamestation Pro microSD™ FAT32 microSD™ States microSD™ microSD™ microSD™ SAVE MENU SAVE MENU...
- Page 71 microSD™ ) Factory reset ABOUT FACTORY RESET FACTORY RESET SETTINGS microSD™ • • • • • " " ." " " " " " • • • • • • • •...
- Page 72 • • • • • • • • • • • • (FCC) • • •...
- Page 73 • MY ARCADE® MY ARCADE® MY ARCADE® MY ARCADE® MY ARCADE®...
- Page 74 MY ARCADE® MY ARCADE® MY ARCADE® 877-999-3732 +1-310-222-1045 support@MyArcadeGaming.com www.MyArcadeGaming.com www.MyArcadeGaming.com MY ARCADE® MY ARCADE® www.MyArcadeGaming.com/product-registration www.MyArcadeGaming.com/pages/doc...
- Page 76 Fabricado en China. MY ARCADE® y el logotipo de MY ARCADE® son marcas registradas de dreamGEAR®, LLC. Diseño de envase © 2023 de dreamGEAR®, LLC. El color y la decoración pueden variar de los del envase. © 2023 Atari Interactive, Inc. ATARI, el logotipo de ATARI y todos los nombres y logotipos individuales de juegos de Atari son marcas comerciales o marcas registradas de Atari Interactive, Inc.
Need help?
Do you have a question about the GAMESTATION PRO and is the answer not in the manual?
Questions and answers