Table of Contents
Advertisement
Quick Links
Assembly Instructions & User's Manual
Multifunction Cooker
Model: 166913
For Outdoor Use Only
Please keep this instruction manual for future reference
Customer Service: 1-888-922-2336
7:00 am to 12:00 am CST (daily)
Live Chat at: www.academy.com
Email: customerservice@academy.com
--------------------OR--------------------
Customer Service: 1-888-837-1380, 10:00 am to 7:00 pm CST
Monday to Friday
Email: customerservice@rankam.com
(Made in China)
Page 1 of 19
166913 English
20230315-Ver.1
Advertisement
Table of Contents

Subscribe to Our Youtube Channel
Related Manuals for Outdoor Gourmet 166913


Summary of Contents for Outdoor Gourmet 166913
- Page 1 Assembly Instructions & User’s Manual Multifunction Cooker Model: 166913 For Outdoor Use Only Please keep this instruction manual for future reference Customer Service: 1-888-922-2336 7:00 am to 12:00 am CST (daily) Live Chat at: www.academy.com Email: customerservice@academy.com --------------------OR-------------------- Customer Service: 1-888-837-1380, 10:00 am to 7:00 pm CST Monday to Friday Email: customerservice@rankam.com...
-
Page 2: Table Of Contents
Parts List -------------------------------------------------------------------------------------------------- P.9 Hardware List -------------------------------------------------------------------------------------------- P.10 Tools List -------------------------------------------------------------------------------------------------- P.10 P.11 – 15 Assembly Instructions --------------------------------------------------------------------------------- Lighting Instructions ----------------------------------------------------------------------------------- P.16 Care and Maintenance -------------------------------------------------------------------------------- P.17 – 18 Troubleshooting ---------------------------------------------------------------------------------------- P.18 Warranty Information ----------------------------------------------------------------------------------- P.19 Page 2 of 19 166913 English 20230315-Ver.1... -
Page 3: Warnings
Do not attempt to extinguish an oil or grease fire with water. Failure to follow these instructions could result in fire, explosion or burn hazard which could cause property damage, personal injury, or death. Page 3 of 19 166913 English 20230315-Ver.1... - Page 4 Do not move the appliance when in use. Allow the cooking vessel to cool to 115°F (46°C) before moving or storing. ⚫ Do not leave the appliance unattended, keep children and pets away from the appliance at all times. Page 4 of 19 166913 English 20230315-Ver.1...
- Page 5 Never drop food or accessories into hot cooking liquid. Lower food and accessories slowly into the cooking liquid in order to prevent splashing or overflow. When removing food from the appliance care should be taken to avoid burns from hot cooking liquids. Page 5 of 19 166913 English 20230315-Ver.1...
- Page 6 Exchange your tank only for an OPD safety feature-equipped tanks as described in the “LP Tank” section of this manual. ⚫ Always keep new and exchanged LP tanks in upright position during use, transit or storage. ⚫ Leak test new and exchanged LP tanks BEFORE connecting to appliance. Page 6 of 19 166913 English 20230315-Ver.1...
- Page 7 If leak is detected at any time, STOP. ⚫ If you cannot stop a gas leak, immediately close LP tank valve, leave area of appliance, and call LP gas supplier or your fire department! Page 7 of 19 166913 English 20230315-Ver.1...
-
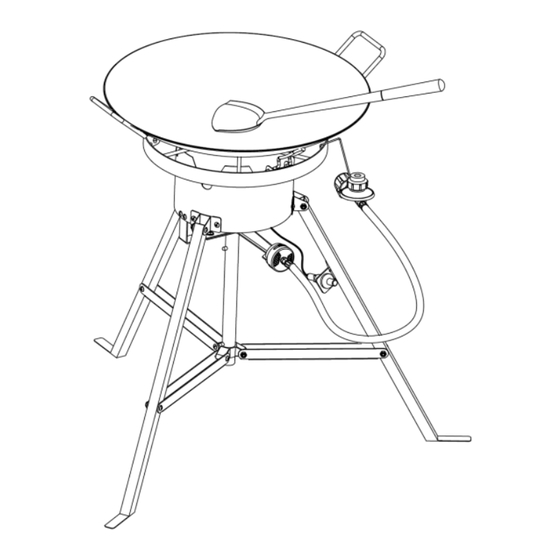
Page 8: Product Diagram
Customer Service Center at 1-888-837-1380 or email at customerservice@rankam.com. Use only replacement parts specified by manufacturer. 6. Always close LP tank valve after performing tank leak test by turning OPD hand wheel clockwise. Product Diagram Page 8 of 19 166913 English 20230315-Ver.1... -
Page 9: Parts List
12. Igniter Assembly 1 pc 1 pc Part number: MET-MC0008 Part number: ELE-FF0002 Part number: ELE-FF0001 Part number: PLA-MC0001 14. Flat Spatula 1 pc 13. Leg B 1 pc Part number: MET-MC0020 Part number: MET-MC0021 Page 9 of 19 166913 English 20230315-Ver.1... -
Page 10: Hardware List
Bolt (M5 x 30) Locking Nut (M5) L Pin Cotter Pin M8 x 16 Bolt M8 Nut Bolt (M6 x 12) Tools List Phillips screwdriver (not included) Adjustable wrench (not included) Needle Nosed Pliers (not included) Page 10 of 19 166913 English 20230315-Ver.1... -
Page 11: Assembly Instructions
Bolt A and Flange Nut B. 3. Attach the ignition bracket (11) to the Burner (4) by using 1 bolt (G) and 1 nut (H). Please follow the order of assembling as per diagram. Page 11 of 19 166913 English 20230315-Ver.1... - Page 12 Flange Nut B. 6. Attach the Legs Connecting Part (9) to the pole as shown. Put the L Pin (E) through the hole of pole, attach the Cotter Pin (F) to the pin. Page 12 of 19 166913 English 20230315-Ver.1...
- Page 13 Nut D as shown in the diagram. Please pay attention to assemble the Leg B (13) in the right position. 9. Attach the Legs to the fire ring by using 3pcs of Bolt C and Nut D. Page 13 of 19 166913 English 20230315-Ver.1...
- Page 14 If the electrode tip is located at proper distance, the electrode tip will generate sparks when the igniter button is pressed. 12. Fasten the Regulator (6) outlet to the burner inlet per following shown. Page 14 of 19 166913 English 20230315-Ver.1...
- Page 15 STEP 1 shown. Fold the legs per the STEP 2 shown until the legs connecting part pass through the button at the top of the pole. Page 15 of 19 166913 English 20230315-Ver.1...
-
Page 16: Lighting Instructions
Before each use, check to see if there is evidence of abrasion, wear, cuts or leaks, the hose must be replaced prior to the appliance being put into operation. The replacement hose assembly shall be that specified by the manufacturer. Page 16 of 19 166913 English 20230315-Ver.1... -
Page 17: Care And Maintenance
All cleaning and maintenance should only be done when the appliance is cool and with the fuel supply turned off at the LP tank. DO NOT clean any part in a self-cleaning oven. The extreme heat will damage the finish. Page 17 of 19 166913 English 20230315-Ver.1... -
Page 18: Troubleshooting
Refer to the section of “Lighting Distance between electrode tip and Instructions” step 3 (P.16) to adjust burner port is not correct. the distance between electrode tip and burner. Page 18 of 19 166913 English 20230315-Ver.1... -
Page 19: Warranty Information
10:00am to 7:00pm, Central Standard Time, Monday to Friday RANKAM (CHINA) MANUFACTURING COMPANY LIMITED 18/F., New Lee Wah Centre, 88 Tokwawan Road, Kowloon, Hong Kong Customer Service: – – – 1380 customerservice@rankam.com 10:00am to 7:00pm, Central Standard Time, Monday to Friday Page 19 of 19 166913 English 20230315-Ver.1...
Need help?
Do you have a question about the 166913 and is the answer not in the manual?
Questions and answers