Table of Contents
Advertisement
Quick Links
Advertisement
Table of Contents

Related Manuals for Holman QuikDial


Summary of Contents for Holman QuikDial
- Page 1 User Guide...
- Page 2 PRODUCT CODE: CO6004 2 of 32...
-
Page 3: Table Of Contents
Contents Overview Main Components Additional Functions Specifications Precautions and Use Setup Battery Installation Setup Process Set Clock Starts Start Time Run Time Set Day Zone Conflicting Starts Removal of All Zones from a Start Operation Automatic Watering Manual Watering Manual Watering No/Suspended Watering Mode Maintenance Cleaning... -
Page 4: Overview
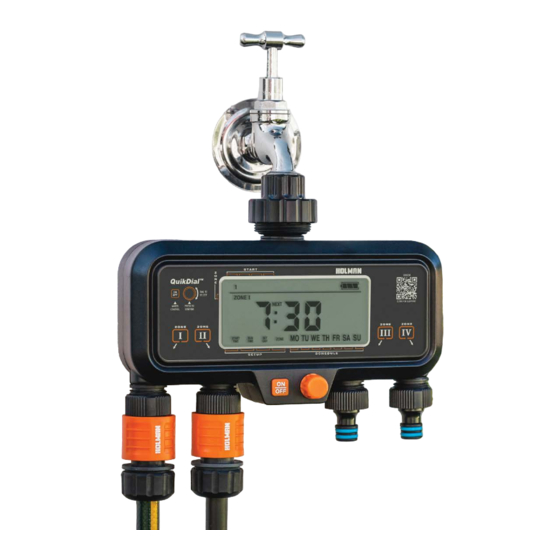
Overview Main Components 1. ZONE 1 outlet 6. Tap connection locking nut 2. ZONE 2 outlet 7. Display 3. ZONE 3 outlet 8. ON/OFF 4. ZONE 4 outlet 9. MENU DIAL ® Each outlet is 20mm BSP 10. Battery compartment: with 12mm snap‑on ®... -
Page 5: Additional Functions
Overview (continued) Additional Functions ® Inactivity on your QuikDial Tap Timer controls for 10 seconds will return to the default system mode displaying the current time Á Removing the AA batteries will reset all clock and schedule settings ® To reset your QuikDial Tap Timer, remove the batteries for 2 minutes which will return the timer to factory default Á... -
Page 6: Precautions And Use
Overview (continued) Precautions and Use Á Your QuikDial is designed to hang vertically from a tap Á Do not use in place of irrigation solenoids Á Use with caution on short run drip systems, these can keep valves open when they need to close. -
Page 7: Setup
Battery Installation 1. Install 2× 1.5v AA ® The timer screen will flash through ZONE I, ZONE alkaline batteries into your QuikDial Tap Timer, as II, ZONE III, ZONE IV indicated in the battery as part of start up compartment [a] ® Once the start‑up process... -
Page 8: Setup Process
Setup (continued) Setup Process ® Your QuikDial has a simple ® ZONES will water and intuitive setup system sequentially starting from the set START TIME quickly completed in 5 steps ® 1 or all ZONES can be included in each START,... - Page 9 Setup (continued) Setup Process ® Here is a quick overview to see how all these settings combine into a automated watering schedule for your garden Z O N E Start Time 07:00 Run Time 10min Mo Tu We Th Fr Sa Su Set Day ZONE I will start at 7:00 am, for a duration of 10 minutes, on Mondays and Tuesdays.
- Page 10 Setup (continued) Setup Process Z O N E Start Time 07:00 Run Time 10min Th Fr Sa Su Set Day Start Time 06:00 Run Time 15min Mo Tu Th Fr Sa Su Set Day Start Time 18:30 Run Time 20min Tu We Th Sa Su Set Day...
- Page 11 Setup (continued) Setup Process Z O N E Start Time 07:00 Run Time 10min Th Fr Sa Su Set Day Start Time 06:00 Run Time 15min Mo Tu Th Fr Sa Su Set Day Start Time 18:30 Run Time 20min Tu We Th Sa Su Set Day...
-
Page 12: Set Clock
Setup (continued) Set Clock 4. Press the MENU DIAL and ® The current time and day the MINUTES will flash [c] of the week is needed as the reference point for your program to work ® The CLOCK is in 24hr time (12:00 is midday and 00:00 is midnight) 1. -
Page 13: Starts
Setup (continued) Starts ® Your QuikDial has up to 4 START TIMES available, these can be used for 1 or both ZONES as needed ® There is a default time set for each START. To see these, turn the MENU DIAL clockwise (right) ®... - Page 14 Setup (continued) Turn a Start On/Off ® Begin by turning the MENU DIAL clockwise (right) until you see the START NUMBER (1, 2, 3 or 4) you want to select ® If the START is OFF and you need to turn it ON: 1.
- Page 15 Setup (continued) Turn a Start On/Off ® If the START is ON and you need to turn it OFF: 1. Select the START NUMBER 4. Press the MENU DIAL to by turning the MENU DIAL confirm the start as OFF 2.
-
Page 16: Start Time
® START TIME is the time of 3. Press the MENU DIAL day your watering begins once, the menu box around START TIME will flash [c] ® Your QuikDial waters each ZONE sequentially starting from this time. ZONES are added at a later step— refer to... -
Page 17: Run Time
Setup (continued) Start Time 6. Press the MENU DIAL 7. Turn the MENU DIAL left or again and the MINUTES right to set the MINUTES will now flash [e] 8. Once the MINUTES are correct, press the MENU DIAL again to move on to RUN TIME Run Time ®... -
Page 18: Set Day
Setup (continued) Run Time Set Day 3. Turn the MENU DIAL ® Your QuikDial allows clockwise (right), and the you to select the days menu box will now flash of the week to water around RUN TIME [b] Á There is no interval watering option ®... - Page 19 Setup (continued) Set Day 4. Turn the MENU DIAL 6. Turn the MENU DIAL clockwise (right), until a box clockwise (right) to is flashing around SET DAY move to TU and lines are flashing below 7. Repeat for each day, the days of the week [b] pressing the MENU DIAL to remove days as needed...
-
Page 20: Zone
ZONE or select all ZONES is flashing around ZONE [a] via the ZONE menu ® When ZONES are set to water within the same START your QuikDial will water each zone sequentially starting from the set START TIME 5. Press the MENU DIAL to confirm you’d like to... - Page 21 Setup (continued) Zone 6. ZONE I will flash [b] 7. Turn the MENU DIAL clockwise (right) and ZONE II [c] will flash ® Pressing the MENU DIAL once when the ZONE is flashing will allow you ® As ZONE II is not to select or delete the ZONE from the START programmed to water during...
-
Page 22: Conflicting Starts
Setup (continued) Conflicting Starts Á If more than one START ® Use the 4 available has been set with the STARTS to spread out your same START TIME and watering needs—avoiding SET DAYS, the timer will conflicting STARTS ignore the duplication. Only the first start will be run in these cases 22 of 32... -
Page 23: Removal Of All Zones From A Start
Setup (continued) Removal of All Zones from a Start Á A START will not allow 2. Press the MENU DIAL you to turn it ON until 3. A box will flash around a ZONE is selected START TIME for the START 4. -
Page 24: Operation
QuikDial controls, the set watering schedule will be active in the background as per your confirmed settings ® In this state, your QuikDial display will cycle between ® Additional zones the CLOCK [a] and the scheduled for watering START TIME of your next... -
Page 25: Manual Watering
Operation (continued) Manual Watering ® By default, the pre‑set manual RUN TIME is 5 min 1. For manual (instant) ® During watering, the watering, press ON/OFF sprinkler animation will be active [c] and the selected 2. ZONE I will flash [a], ZONE [d] will flash turn the MENU DIAL to select a ZONE... -
Page 26: Manual Watering
® If the RUN TIME stops flashing before you were able to adjust it—press ON/OFF to stop watering and restart the MANUAL WATERING process from step 1 ® To stop watering before the remaining time has lapsed, press ON/OFF and your QuikDial will return to the default display 26 of 32... -
Page 27: No/Suspended Watering Mode
Operation (continued) No/Suspended Watering Mode 1. To stop all automatic 3. To return to scheduled watering, press the automatic watering, MENU DIAL for 3 seconds press the MENU DIAL for 3 seconds 2. The display will enter NON WATERING MODE [a] 4. The NON WATERING ICON will disappear and your automated watering will continue... -
Page 28: Maintenance
Maintenance Cleaning ® Check and clean your filter washer at least twice a year ® Debris can be removed with a soft toothbrush and suitable cleaner where needed (white vinegar/CLR) ® Damaged filters/washers should be replaced ® In hard water areas, further cleaning may be required after periods of no use—as minerals will set in the body of the timer 1. -
Page 29: Cold Weather
Maintenance (continued) Cold Weather ® Your QuikDial should be Á Keep your QuikDial out of freezing conditions removed from the tap and as this can damage stored away during winter internal components Batteries Á Please only use quality ® Remove batteries from... -
Page 30: Troubleshooting
Troubleshooting Incorrect Decal ® If you have received a QuikDial with the batch number 23/36, it is likely this will have the incorrect face decal due to a printing error. This will not affect the functionality of the QuikDial, however may cause some confusion in the initial set up process ®... - Page 31 There may be an airlock—remove your timer from the tap and give it a shake to displace the airlock The Holman website has a host of additional information on features. Head to support.holmanindustries.com.au for more tips, tricks and support content.
- Page 32 We recommend registering your new product on our website. This will ensure we have a copy of your purchase and activate an extended warranty. Keep up to date to with relevant product information and special offers available through our newsletter. www.holmanindustries.com.au/product-registration/ Copyright © 2023 Holman Industries...
Need help?
Do you have a question about the QuikDial and is the answer not in the manual?
Questions and answers