JVC PC-X290 Instructions Manual
Cd portable component system
Hide thumbs
Also See for PC-X290:
- Service manual (83 pages) ,
- Instructions manual (48 pages) ,
- Instructions manual (24 pages)
Table of Contents
Advertisement
Available languages
Available languages
Quick Links
CD PORTABLE COMPONENT SYSTEM
SISTEMA PORTATIL DE COMPONENTES DE CD
PC-X290
Consists of CA-PCX290 and SP-PCX290
Consta del CA-PCX290 el SP-PCX290
SP-PCX290
PHONES
A
CA-PCX290
-
VOLUME
CD PORTABLE COMPONENT SYSTEM
STANDBY/ON
FM MODE
SENSOR
STANDBY
TUNER/
CD/
TAPE
AUX
RANDOM
BAND
REC
PLAY
PLAY
CD SYNCHRO RECORDING
AUTO STOP SYSTEM
REC
PLAY
REW
FF
STOP/EJECT
PAUSE
PLAY
REW
FF
STOP/EJECT
PAUSE
INSTRUCTIONS
MANUAL DE INSTRUCCIONES
SP-PCX290
+
B
CD/
TUNER/
TAPE
RANDOM
BAND
For Customer Use:
Enter below the Model No. and Serial
No. which are located either on the rear,
bottom or side of the cabinet. Retain this
information for future reference.
Model No.
Serial No.
LVT1189-002B
[J]
Advertisement
Chapters
Table of Contents

Related Manuals for JVC PC-X290


Summary of Contents for JVC PC-X290
- Page 1 CD PORTABLE COMPONENT SYSTEM SISTEMA PORTATIL DE COMPONENTES DE CD PC-X290 Consists of CA-PCX290 and SP-PCX290 Consta del CA-PCX290 el SP-PCX290 SP-PCX290 SP-PCX290 CA-PCX290 VOLUME CD PORTABLE COMPONENT SYSTEM STANDBY/ON FM MODE SENSOR STANDBY TUNER/ TAPE RANDOM BAND PHONES TUNER/...
- Page 2 Warnings, Cautions and Others Mises en garde, précautions et indications diverses CAUTION To reduce the risk of electrical shocks, fire, etc.: 1. Do not remove screws, covers or cabinet. 2. Do not expose this appliance to rain or moisture. ATTENTION Afin d’éviter tout risque d’électrocution, d’incendie, etc.: 1.
- Page 3 Introduction We would like to thank you for purchasing one of our JVC products. Before operating this unit, read this manual carefully and thoroughly to obtain the best possible performance from your unit, and retain this manual for future reference.
-
Page 4: Table Of Contents
Contents Location of the Buttons and Controls ....... 3 Front Panel ..............3 Remote Control ............5 Getting Started ............6 Unpacking ..............6 Putting the Batteries into the Remote Control ... 6 Connecting the Speakers ..........6 Connecting Other Equipment ........7 Power Supply ............. -
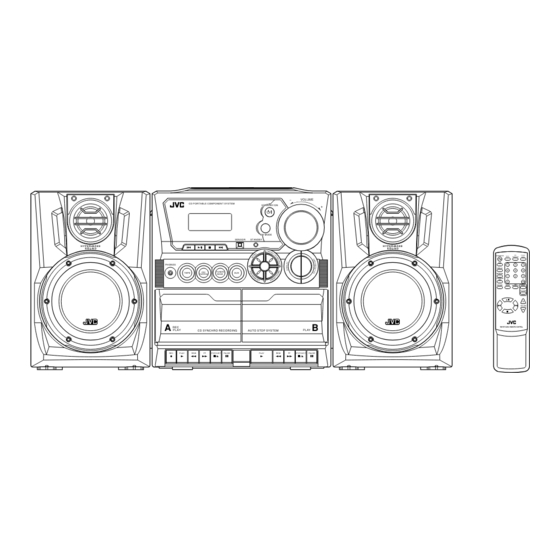
Page 5: Location Of The Buttons And Controls
Location of the Buttons and Controls Become familiar with the buttons and controls on your unit. Front Panel VOLUME CD PORTABLE COMPONENT SYSTEM STANDBY/ON FM MODE SENSOR STANDBY PHONES TUNER/ TAPE RANDOM BAND PLAY PLAY CD SYNCHRO RECORDING AUTO STOP SYSTEM PLAY STOP/EJECT PAUSE... - Page 6 Continued Display Window TUNER TAPE SYNC REP 1 INTRO PROG RANDOM HBS MUTING ALL STEREO FM AM MONO AM PM CLASSIC ROCK JAZZ FLAT Display Window See pages in the parentheses for details. 1 CD play mode indicators (14, 15) Front Panel •...
-
Page 7: Remote Control
Remote Control Remote Control 1 STANDBY/ON button (9) 2 AUX button (9) 3 DISPLAY button (9) 4 FM MODE button (12) 5 PROGRAM/SET button (9, 12, 14) TUNER/ 6 MUTING button (10) TAPE RANDOM BAND 7 INTRO button (15) 8 HBS (Hyper Bass Sound)/PRESET EQ (Equalizer) button (10) 9 4/6/7/¢... -
Page 8: Getting Started
Getting Started Do not connect the AC power cord until all other connections have been made. Continued Unpacking Connecting the Speakers To connect speakers After unpacking, check to be sure that you have all the following items. You can connect the speakers using the speaker cords. The number in the parentheses indicates the quantity of the pieces supplied. -
Page 9: Connecting Other Equipment
Attaching the speaker system to the main unit Connecting Other Equipment Fit the speaker into the grooves on the main unit (1) and slide You can connect an audio equipment as a playback device. down the speaker vertically (2) as the illustration shows. When you connect and use this equipment, refer also to its manual. -
Page 10: Power Supply
Power Supply To insert the batteries Use AC power or dry batteries (not supplied) to operate the unit. • As long as the AC power cord is connected to a power source, the unit operates on AC power rather than on the batteries in it. -
Page 11: Common Operations
Common Operations Press 4 or ¢ to adjust Turning On or Off the Power the minute, then press To turn on the unit, press STANDBY/ON PROGRAM/SET. • When you use the batteries for power supply, the backlight of the display dims to save power consumption. -
Page 12: Adjusting The Volume
Adjusting the Volume Reinforcing the Bass Sound You can adjust the volume level only while the unit is turned The Hyper Bass Sound function provided for this unit can enhance the bass sound while listening to any source at low volume. -
Page 13: Ensuring Good Fm And Am Reception
Ensuring Good FM and AM Reception FM reception: Pull out the antenna and reorient it for better reception. AM reception: Reorient the main unit for better reception. For better reception of both FM and AM • Make sure the antenna conductors do not touch any other terminals and connecting cords. -
Page 14: Listening To Fm And Am Broadcasts
Listening to FM and AM Broadcasts Tuning in a Station Press PRESET UP/REPEAT or PRESET DOWN to select Press TUNER/BAND. a preset number. The unit automatically tunes in the previously tuned station (either FM or AM). TUNER PROG STEREO • Each time you press the button, the band alternates between FM and AM. -
Page 15: Playing Back Cd
Playing Back CD This unit has been designed to play back the following CDs: Audio CD, CD-R, and CD-RW. Continued use of irregular shape CDs (heart-shape, octagonal, etc.) can damage the unit. Track number Elapsed playing time When playing a CD-R or CD-RW To stop during play, press 7. -
Page 16: Programming The Playing Order Of The Tracks -Program Play
Continued To stop during play, press 7. Programming the Playing Order of the Tracks The PROG indicator goes off from the display and the unit —Program Play exits from Program play. (The program you have made is stored in memory until you erase the program.) You can arrange the order in which the tracks play before you start playing. -
Page 17: Playing At Random-Random Play
Playing at Random—Random Play Repeating Tracks or CD—Repeat Play The tracks of loaded CD will play at random. You can have the CD, the program or the individual track • To use Repeat play for Random play, press PRESET UP/ currently playing repeat as many times as you like. -
Page 18: Playing Back Tapes
Playing Back Tapes To play the tapes in the decks B and A continuously You can play back only type I (Normal) tapes. Set the cassette tapes in the decks A and B. Playing Back a Tape • If the tape direction is set wrong, replace the cassette. Press STOP/EJECT 7 /0 for the deck you Press PLAY 3 for the deck B. -
Page 19: Recording
Recording IMPORTANT: Recording onto a Tape on Deck A • It should be noted that it may be unlawful to re-record On the unit ONLY: pre-recorded tapes, records, or discs without the consent of the owner of copyright in the sound or video Put a recordable cassette into the deck A with recording, broadcast or cable program and in any the exposed part of the tape down. -
Page 20: Dubbing Tapes
To record an AM station—Beat Cut Recording Disc While recording an AM broadcast, beats may be heard —Disc Synchronized Recording (which are never heard when listening to the broadcast without recording it). You can start disc play and recording at the same time. If this occurs, set the BEAT CUT switch on the back of the unit to 1 or 2 to reduce the beating sound. -
Page 21: Maintenance
Maintenance To get the best performance of the unit, keep your discs, tapes, and mechanism clean. Handling cassette tapes Handling discs • If the tape is loose in its cassette, take • Remove the disc from its case by up the slack by inserting a pencil in holding it at the edge while pressing the one of the reels and rotating. -
Page 22: Troubleshooting
Troubleshooting If you are having a problem with your unit, check this list for a possible solution before calling for service. If you cannot solve the problem from the hints given here, or the unit has been physically damaged, call a qualified person, such as your dealer, for service. - Page 23 Introducción Muchas gracias por adquirir uno de nuestros productos JVC. Antes de operar esta unidad, lea detenidamente este manual para comprender a fondo todas las instrucciones y obtener un máximo disfrute de esta unidad. Guarde este manual para futuras consultas.
- Page 24 Contents Ubicación de los botones y controles ......3 Panel frontal ............... 3 Control remoto ............5 Primeros pasos ............6 Desembalaje ............... 6 Colocación de las pilas en el control remoto ..... 6 Conexión de los altavoces .......... 6 Conexión de otro equipo ..........
-
Page 25: Ubicación De Los Botones Y Controles
Ubicación de los botones y controles Familiarícese con los botones y controles de su unidad. Panel frontal VOLUME CD PORTABLE COMPONENT SYSTEM STANDBY/ON FM MODE SENSOR STANDBY PHONES TUNER/ TAPE RANDOM BAND PLAY PLAY CD SYNCHRO RECORDING AUTO STOP SYSTEM PLAY STOP/EJECT PAUSE... - Page 26 Continua Ventanilla de visualización TUNER TAPE SYNC REP 1 INTRO PROG RANDOM HBS MUTING ALL STEREO FM AM MONO AM PM CLASSIC ROCK JAZZ FLAT Ventanilla de visualización Para los detalles, consulte las páginas entre paréntesis. 1 Indicadores del modo de reproducción de CD (14, 15) Panel frontal •...
-
Page 27: Control Remoto
Control remoto Control remoto 1 Botón STANDBY/ON 2 Botón AUX (9) 3 Botón DISPLAY (9) 4 Botón FM MODE (12) 5 Botón PROGRAM/SET (9, 12, 14) TUNER/ 6 Botón MUTING (10) TAPE RANDOM BAND 7 Botón INTRO (15) 8 Botón HBS (Hyper Bass Sound)/PRESET EQ (ecualizador) (10) 9 Botones 4/6/7/¢... -
Page 28: Primeros Pasos
Primeros pasos No conecte el cable de alimentación de CA hasta que se hayan realizado todas las demás conexiones. Continua Desembalaje Conexión de los altavoces Para conectar los altavoces Después de abrir el paquete, asegúrese de que dispone de todos los elementos siguientes. Podrá... -
Page 29: Conexión De Otro Equipo
Fijación del sistema de altavoz a la unidad principal Conexión de otro equipo Fije el altavoz en las ranuras de la unidad principal (1) y Podrá conectar un equipo de audio como dispositivo de deslícelo hacia abajo verticalmente (2), tal como se muestra reproducción. -
Page 30: Fuentes De Alimentación
Fuentes de alimentación Para insertar las pilas Utilice energía de CA o pilas secas (no suministradas) para operar la unidad. • Mientras el cable de alimentación de CA se encuentre conectado a una fuente de alimentación, la unidad será alimentada mediante energía de CA, y no mediante las pilas instaladas en la misma. -
Page 31: Operaciones Comunes
Operaciones comunes Pulse 4 o ¢ para ajustar Conexión y desconexión de la alimentación los minutos, y luego pulse Para encender la unidad, pulse PROGRAM/SET. STANDBY/ON • Cuando se usan pilas como fuente de alimentación, la luz de fondo de la pantalla se oscurece para ahorrar energía. -
Page 32: Ajuste Del Volumen
Ajuste del volumen Refuerzo de los sonidos graves El nivel de volumen sólo se podrá ajustar mientras la unidad La función Hyper Bass Sound de esta unidad puede resaltar está encendida. los sonidos graves mientras escucha cualquier fuente a un volumen bajo. -
Page 33: Cómo Asegurar Una Buena Recepción En Fm Y Am
Cómo asegurar una buena recepción en FM y AM Recepción en FM: Extraiga la antena y cambie su orientación para una mejor recepción. Recepción en AM: Cambie la orientación de la unidad principal para obtener una mejor recepción. Para una mejor recepción en FM y AM •... -
Page 34: Escuchando Radiodifusiones En Fm Y Am
Escuchando radiodifusiones en FM y AM Cómo sintonizar una emisora Pulse PRESET UP/REPEAT o PRESET DOWN para Pulse TUNER/BAND. seleccionar un número de preajuste. La unidad sintoniza automáticamente la emisora sintonizada previamente (ya sea FM o AM). • Cada vez que pulsa el botón, la banda alterna TUNER PROG entre FM y AM. -
Page 35: Reproducción De Cd
Reproducción de CD Esta unidad ha sido diseñada para reproducir los discos CD siguientes: CD de audio, CD-R y CD-RW. El uso continuo de discos CD de forma irregular (forma de corazón, octogonal, etc.) puede dañar la unidad. Número de Tiempo de reproducción Cuando se reproduce un CD-R o CD-RW pista... -
Page 36: Programando El Orden De Reproducción De Las Pistas-Reproducción Programada
Continua Para detener la reproducción, pulse 7. Programando el orden de reproducción de las El indicador PROG se apaga en la pantalla y la unidad sale de pistas—Reproducción programada la reproducción programada. (La programación realizada por usted se retiene en la memoria hasta que la borre). Antes de comenzar la reproducción, podrá... -
Page 37: Reproducción Al Azar-Reproducción Aleatoria
Reproducción al azar—Reproducción aleatoria Repetición de pistas o de CD—Reproducción repetida Las pistas del CD cargado se reproducen de forma aleatoria. • Para usar la reproducción repetida para la reproducción Usted podrá hacer que el CD, la programación o la pista aleatoria, pulse PRESET UP/REPEAT de manera que el individual que se está... -
Page 38: Reproducción De Las Cintas
Reproducción de las cintas Para reproducir continuamente las cintas de las Usted podrá reproducir solamente cintas tipo I (Normal). platinas B y A Reproducción de una cinta Coloque las cintas cassette en las platinas A y • Si la dirección de la cinta no es la correcta, saque el Pulse STOP/EJECT 7 /0 de la platina que cassette. -
Page 39: Grabación
Grabación IMPORTANTE: Grabación de una cinta en la platina A • Tenga en cuenta que la regrabación de cintas En la unidad SOLAMENTE: pregrabadas, grabaciones o discos sin el consentimiento de los titulares del copyright podría resultar ilegal en Ponga un cassette grabable en la platina A cuanto a grabación de sonido o de vídeo, radiodifusión o con la parte expuesta de la cinta hacia abajo. -
Page 40: Duplicación De Cintas
Para grabar una emisora AM—Corte de batido Grabación de discos Mientras graba un radiodifusión en AM, se podrán escuchar —Grabación sincronizada de discos batidos (que no se escucharían durante la audición del programa si no lo grabara). Podrá iniciar simultáneamente la reproducción y la grabación En tal caso, ajuste el interruptor BEAT CUT en la parte del disco. -
Page 41: Mantenimiento
Mantenimiento Para obtener el máximo rendimiento de la unidad, mantenga limpios los discos, las cintas, y el mecanismo. Manejo de las cintas cassette Manejo de los discos • Si la cinta está floja en su cassette, • Saque el disco de su estuche elimine la flojedad haciendo girar uno sujetándolo por los bordes, mientras de los carretes con un lápiz. -
Page 42: Localización De Averías
Localización de averías Si experimenta algún problema con su unidad, verifique la siguiente lista para ver si consigue resolver el problema antes de acudir al centro de servicio. Si el problema persiste a pesar de las indicaciones contenidas en esta lista, o si la unidad está físicamente dañada, solicite el servicio a personal cualificado, como por ejemplo, su proveedor. - Page 43 If service is not available locally, box the product carefully, preferably in the original carton, and ship, insured, with a copy of your bill of sale plus a letter of explanation of the problem to the nearest JVC Factory Service Center, the name and location of which will be given to you by the toll-free number.
- Page 44 To prevent electrical shock, do not open the cabinet. There are no user serviceable parts inside. Please refer to qualified service personnel for repairs. Accessories To purchase accessories for your JVC product, please call toll free: 1 (800)882-2345 or on the web at www.JVC.com BT-51026-1...
- Page 45 MEMO...
- Page 46 MEMO...
- Page 47 VICTOR COMPANY OF JAPAN, LIMITED EN, SP 0204TMMMDWORI © 2004 VICTOR COMPANY OF JAPAN, LIMITED...
Need help?
Do you have a question about the PC-X290 and is the answer not in the manual?
Questions and answers