
Subscribe to Our Youtube Channel
Related Manuals for Gradus Group Elvid STUDIOVISION SRM-17X1D-4KHS


Summary of Contents for Gradus Group Elvid STUDIOVISION SRM-17X1D-4KHS
- Page 1 STUDIOVISION SRM-17X1D-4KHS 17.3 in. Rack Drawer Monitor STUDIOVISION 4K SRM-17X1D-4KHS USER MANUAL...
- Page 2 THANK YOU FOR CHOOSING ELVID. The Elvid SRM-17X1D-4KHS rackmount monitor with HDR support is a 17.3-inch full HD monitor that’s ideal for travel, broadcast trucks, and location shoots. When it’s not in use, the monitor folds down and slides into a single rack space of a 19-inch machine rack.
-
Page 3: Table Of Contents
TABLE OF CONTENTS Overview ....................................................4 Getting Started ...................................................6 User Interface ..................................................7 Picture Menu ..................................................9 Marker Menu ..................................................10 Function Menu .................................................10 Waveform Menu ................................................11 Audio Menu ..................................................12 System Menu ..................................................12 Supported Resolutions and Frame Rates ........................................13 Specifications ..................................................14 Troubleshooting ................................................15... -
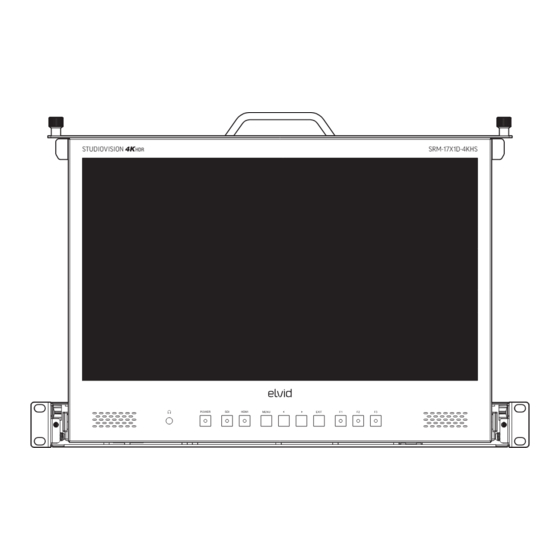
Page 4: Overview
OVERVIEW FRONT Safety screws STUDIOVISION 4K SRM-17X1D-4KHS Headphone jack Function buttons 1–3 Power button Exit button SDI signal selector Navigation button HDMI signal selector Navigation button Menu button... - Page 5 BACK DC power port LAN port Tally port USB port SDI output HDMI input SDI input HDMI output...
-
Page 6: Getting Started
GETTING STARTED MOUNTING THE MONITOR USB PORT Refer to the machine rack’s specifications for maximum weight User-defined LUTs can be imported via the USB port and stored in capacity to ensure it will safely hold the monitor. the User1–User6 options. Insert the monitor into a standard 19-inch rack with the correct User-defined LUTs must be in .cube format, 3D size must be orientation. -
Page 7: User Interface
POWERING ON When you turn on the screen for the first time, an audio monitor, Plug the power supply into an outlet and into the power input on histogram, vector scope, and RGB waveform scope will appear on-screen. the rear panel. Use the locking screw to futher secure the power supply connection. - Page 8 MENUS RESTORING THE FACTORY PRESETS Press the Menu button to open the main menu. To erase all submenu changes and return to the factory presets: Main menu items are: Picture, Marker, Function, Waveform, Audio, and Press Menu to open the main menu, and scroll to the System System.
-
Page 9: Picture Menu
PICTURE MENU BRIGHTNESS DEFAULT LUT Adjusts the monitor’s brightness value from 0–100. The preset Available only when Default is selected in the Camera LUT menu. value is 50. When Default is activated, select from the list of LUTs that are built into the monitor. -
Page 10: Marker Menu
MARKER MENU CENTER MARKER MARKER COLOR Turning on the center marker places a crosshair at the center of the Changes the color of the on-screen markers. Choose from color screen. The preset is set to Off. options white (default), black, red, green, and blue. ASPECT MARKER ASPECT MAT Sets the on-screen aspect marker display. -
Page 11: Waveform Menu
CHECK FIELD ZOOM In Check Field mode, only the selected color information from the Available only when Zoom is selected in the Scan menu. Scales the incoming video signal color will appear on-screen. Check Field mode incoming video signal. Select 10% to 90%. The default value is 50%. is useful for calibrating the monitor using SMPTE color bars. -
Page 12: Audio Menu
AUDIO MENU VOLUME AUDIO CH Adjust the headphone volume from 0 to 100. The default volume is Selects the stereo pair that’s monitored in the headphones. Select set to 50. CHh1 & CH2 (default), CH3 & CH4, CH5 & CH6, or CH7 & CH8, CH9 &... -
Page 13: Supported Resolutions And Frame Rates
SUPPORTED RESOLUTIONS AND FRAME RATES HDMI 2.0 3G-SDI 480i (59.94) 59.94i 480i (60) 576i (50) 480p (59.94) 59.94p 480p (60) 576p (50) 23.98p (1280×720) 720p (23.98) 720p (24) 720p (25) 29.97p 720p (29.97) 720p (30) 1080 720p (50) 1080 59.94i 720p (59.94) 1080 720p (60) -
Page 14: Specifications
SPECIFICATIONS DISPLAY POWER Input Power DC 10~24 V Panel Type TFT LCD Battery Type None Display Size 17.3 in. (44 cm) Power Consumption 14 W (12 V) Display Resolution 1920 × 1080 Aspect Ratio 16:9 MOUNTING Viewing Angle Horizontal: 170° Vertical: 170°... -
Page 15: Troubleshooting
TROUBLESHOOTING Problem Solution The StudioVision will not turn on. • Make sure the AC adapter is fully plugged in, and the AC power source is reliable. The StudioVision is turned on, but • Check whether the color saturation is properly configured. there is only a black and white image. - Page 16 For more information or to arrange service, visit www.elvidcinema.com or call Customer Service at 212-594-2353. Product warranty provided by the Gradus Group. www.gradusgroup.com Elvid is a registered trademark of the Gradus Group. © 2023 Gradus Group LLC. All Rights Reserved. www.elvidcinema.com...
Need help?
Do you have a question about the Elvid STUDIOVISION SRM-17X1D-4KHS and is the answer not in the manual?
Questions and answers