Table of Contents
Advertisement
Available languages
Available languages
Quick Links
STYLE SELECTIONS and logo design
are trademarks or registered trademarks
of LF, LLC. All rights reserved.
Serial Number
Questions, problems, missing parts? Before returning to your retailer, call our customer
service department at 877-888-8225, 8 a.m. - 8 p.m., EST, Monday - Sunday.You could
also contact us at partsplus@lowes.com.
AS23097
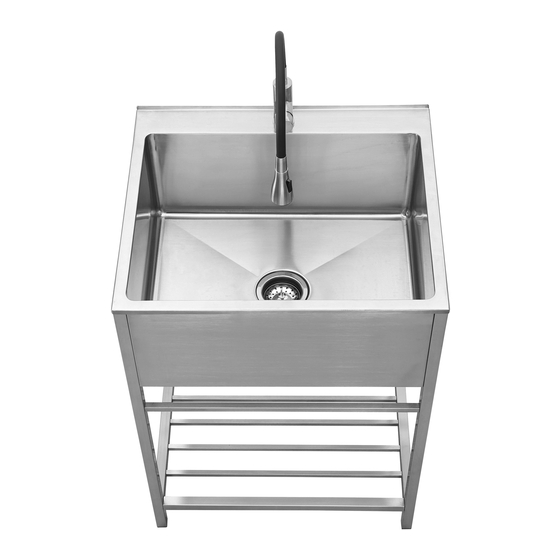
FREESTANDING UTILITY SINK
MODEL #LW-8656LT-25S / LW-8656LT-25B
Purchase Date
1
ITEM #5286855 / 5286856
25-IN All-IN-ONE
ATTACH YOUR RECEIPT HERE
Advertisement
Chapters
Table of Contents

Related Manuals for LF Style selections LW-8656LT-25S


Summary of Contents for LF Style selections LW-8656LT-25S
- Page 1 ITEM #5286855 / 5286856 25-IN All-IN-ONE FREESTANDING UTILITY SINK STYLE SELECTIONS and logo design are trademarks or registered trademarks of LF, LLC. All rights reserved. MODEL #LW-8656LT-25S / LW-8656LT-25B ATTACH YOUR RECEIPT HERE Serial Number Purchase Date Questions, problems, missing parts? Before returning to your retailer, call our customer service department at 877-888-8225, 8 a.m.
-
Page 2: Table Of Contents
TABLE OF CONTENTS Package Contents ..........................2 Hardware Contents ..........................3 Safety Information ..........................4 Warning ..............................4 Preparation .............................4 Tools Required (Not included) ........................4 Installation Instructions ...........................5 Care and Maintenance ...........................8 Warranty ..............................9 Replacement Parts List ........................10 PACKAGE CONTENTS Carefully check all components for damages and/or missing parts prior to installation. If there are any damages or if you are missing parts, do not proceed with the installation. -
Page 3: Hardware Contents
PACKAGE CONTENTS HARDWARE CONTENTS Note: Hardware not shown to size. -
Page 4: Safety Information
SAFETY INFORMATION Please read and understand this entire manual before attempting to assemble, operate or install the product. WARNING • Keep small parts away from children. • Some steps are more easily handled with 2 adults. PREPARATION Before beginning assembly of product, make sure all parts are present. Compare parts with package contents list and hardware contents list. -
Page 5: Installation Instructions
INSTALLATION INSTRUCTIONS Step 1: Installing the Rack CAUTION: Do not place side load onto feet when righting the cabinet. A thorough inspection must be made before installation and any damages or missing parts must be promptly reported. Do not proceed with the installation. - Page 6 INSTALLATION INSTRUCTIONS Step 2: Installing the Strainer Sealant 2a. Apply a ring of sealant (not included) to the underside of the strainer flange. 1. Screener 2b. Insert the strainer body (2) into the sink. 2. Strainer Body 2c. Assemble the rubber washer (3), the paper washer (4) and locknut (5) onto the strainer body (2) from 3.
- Page 7 INSTALLATION INSTRUCTIONS Step 4: Installing the Faucet 4a. Take the faucet out of the packing box and fit the faucet to the mounting hole on the sink, as shown in diagram 1. 4b. Slide the rubber washer first, the metal gasket second, and then the mounting nut over the hoses onto the shank and hand tighten them firmly.
-
Page 8: Care And Maintenance
CARE AND MAINTENANCE SINK RACK • After use, always rinse your sink with tap water to • Remove dust and dry dirt with a soft, damp cloth. dilute and remove deposits. • Clean grease, oil, paint and ink stains with •... -
Page 9: Warranty
WARRANTY ONE YEAR LIMITED WARRANTY A thorough inspection must be made before installation and any damage must be promptly reported. We will not be liable for failures or damage that could have been discovered or avoided by proper inspection and testing prior to installation. The manufacturer warrants this product to be free from defects in materials or workmanship for one (1) year from the date of purchase. -
Page 10: Replacement Parts List
REPLACEMENT PARTS LIST For replacement parts, call our customer service department at 877-888-8225, 8 a.m. - 8 p.m., EST, Monday - Sunday. You could also contact us at partsplus@lowes.com. Printed in Vietnam... - Page 11 63,5 CM LAVABO INDEPENDIENTE PARA USO STYLE SELECTIONS y el diseño del GENERAL TODO EN UNO logotipo son marcas comerciales o marcas registradas de LF, LLC. Todos los derechos reservados. MODELO #LW-8656LT-25S / LW-8656LT-25B ADJUNTE SU RECIBO AQUÍ Fecha de compra Número de serie...
-
Page 12: Contenido Del Paquete
ÍNDICE Contenido del paquete .........................12 Aditamentos ............................13 Información de seguridad ........................14 Advertencia ............................14 Preparación ............................14 Herramientas necesarias (no se incluyen) ...................14 Instrucciones de instalación .........................15 Cuidado y mantenimiento ........................18 Garantía ...............................19 Lista de piezas de repuesto .........................20 CONTENIDO DEL PAQUETE Verifique detenidamente que ninguno de los componentes esté... -
Page 13: Aditamentos
CONTENIDO DEL PAQUETE ADITAMENTOS Nota: los aditamentos no se muestran en tamaño real. -
Page 14: Información De Seguridad
INFORMACIÓN DE SEGURIDAD Lea y comprenda completamente este manual antes de intentar ensamblar, usar o instalar el producto. ADVERTENCIA • Mantenga a los niños alejados de las piezas pequeñas. • Algunos de los pasos se pueden realizar con mayor facilidad entre 2 adultos. PREPARACIÓN Antes de comenzar a ensamblar el producto, asegúrese de tener todas las piezas. -
Page 15: Instrucciones De Instalación
INSTRUCCIONES DE INSTALACIÓN Paso 1: instalación del armazón PRECAUCIÓN: no coloque carga lateral en las patas cuando enderece el gabinete. Se debe realizar una inspección minuciosa antes de la instalación y se debe informar de inmediato cualquier daño o pieza faltante. No continúe con la instalación. - Page 16 INSTRUCCIONES DE INSTALACIÓN Paso 2: instalación del colador Sellador de silicona 2a. Aplique un anillo de sellador (no se incluye) en la parte inferior de la brida del colador. 1. Filtro 2b. Coloque el cuerpo del colador (2) en la tina. 2.
- Page 17 INSTRUCCIONES DE INSTALACIÓN Paso 4: instalación del grifo 4a. Saque el grifo de la caja y colóquelo en el orificio de montaje de la tina, como se muestra en el diagrama 1. 4b. Deslice la arandela de goma primero, luego el empaque de metal y después la tuerca de montaje sobre las mangueras en el vástago y apriete con la mano firmemente.
-
Page 18: Cuidado Y Mantenimiento
CUIDADO Y MANTENIMIENTO TINA ARMAZÓN Lo que debe hacer Lo que debe hacer • Después de su uso, siempre enjuague la tina • Elimine el polvo y suciedad seca con un paño con agua del grifo para diluir y eliminar los suave húmedo. -
Page 19: Garantía
GARANTÍA UN AÑO DE GARANTÍA LIMITADA Realice una inspección minuciosa antes de la instalación e informe inmediatamente sobre cualquier pieza dañada. No seremos responsables por fallas o daños que pudieran haber sido descubiertos o evitados mediante una inspección y prueba adecuadas antes de la instalación. El fabricante garantiza que este producto no presentará... -
Page 20: Lista De Piezas De Repuesto
LISTA DE PIEZAS DE REPUESTO Para obtener piezas de repuesto, llame a nuestro Departamento de Servicio al Cliente al 877-888- 8225, de lunes a domingo, de 8 a.m. a 8 p.m., hora estándar del Este. También puede ponerse en contacto con nosotros en partsplus@lowes.com. Impreso en Vietnam...
Need help?
Do you have a question about the Style selections LW-8656LT-25S and is the answer not in the manual?
Questions and answers