Advertisement
Device Overview
Indications for Use
This Blood Pressure Monitor TMB-2084 is a digital monitor intended for use in measuring blood pressure and heartbeat rate with arm circumference ranging from 22 cm to 42 cm (about 8¾˝-16½˝). It is intended for indoor, adult use only.
Contraindications
- The device is not suitable for use on the women who are or may be pregnant.
- The device is not suitable for use on patients with implanted electrical devices, such as cardiac pacemakers, defibrillators.
Safety Information
The signs below might be in the user manual, labeling or other component.
They are the requirement of standard and using.
 | Caution Indicates that caution is necessary when operating the device or control close to where the symbol is placed, or that the current situation needs operator awareness or operator action in order to avoid undesirable. consequences. |  | For indoor use only |
 | MR Unsafe To identify an item which poses unacceptable risks to the patient, medical staff or other persons within the MR environment. |  | Symbol for "Class II Equipment" |
 | Symbol for "DIRECT CURRENT" | ||
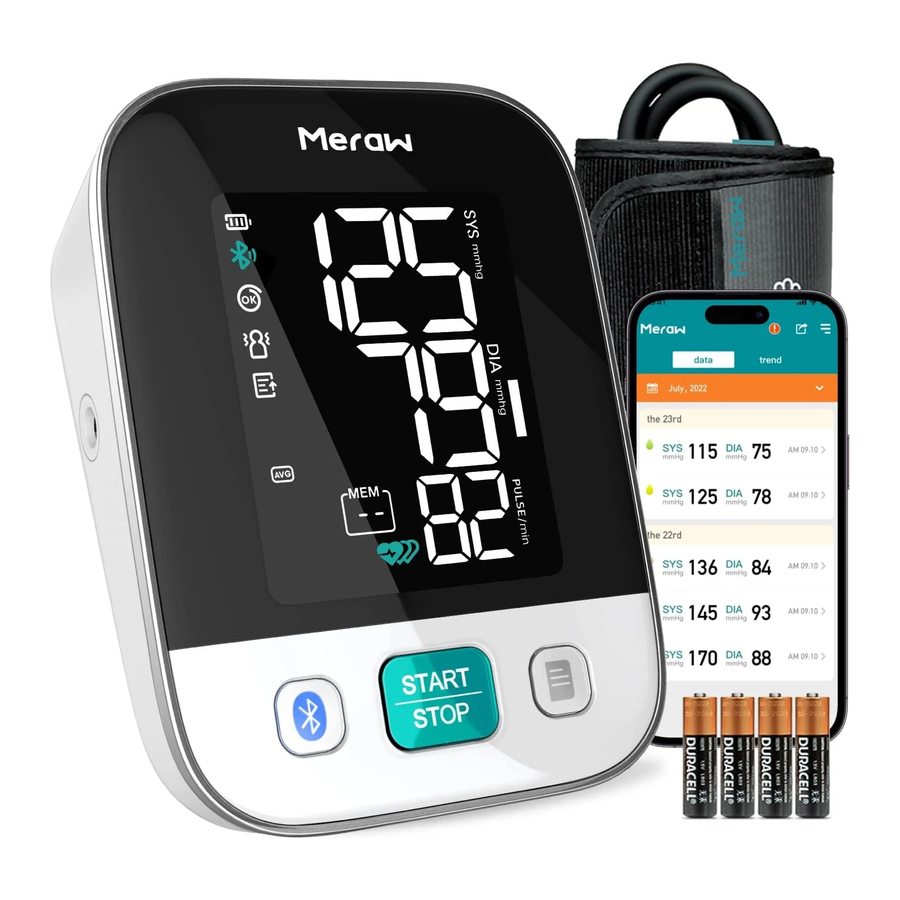
Device Components


- CUFF
- AIR HOSE
- AIR CONNECTOR PLUG
- START/STOP BUTTON
- LCD DISPLAY
- Micro USB
- RECORD BUTTON
Component list of pressure measuring system:
- Cuff
- Air pipe
- PCBA
- Pump
- Valve
List
- Cedar Blood Pressure Monitor
![]()
- Cuff (22-42cm/83/4 -161/2")
![]()
- 4 x AAA Alkaline batteries
![]()
- Micro USB
![]()
- User manual
![]()


LCD Display

| SYMBOL | DESCRIPTION | EXPLANATION |
| SYS | Systolic blood pressure | The high pressure measured. |
| DIA | Diastolic blood pressure | The low pressure measured. |
| mmhg | mmHg | Measurement Unit of the blood pressure. |
 | Average value | Displays average of last 3 readings. |
| PULSE/min | Pulse display | Pulse in beats per minute. |
 | Heartbeat | Heartbeat dectetion during measurement. |
 | Irregular heartbeat | Irregular heartbeat detected during measurement. |
 | Data pending to transmit | Appears in next measurement, when the data transmission fails. |
 | Bluetooth transfer icon | The bluetooth transfer icon blinks when the bluetooth is working. |
 | Battery indicator | Indicate the current battery. |
 | Excessive body motion detector | Appears when talking, moving, or shaking of the arm with the cuff on is detected during the measurement. |
 | Cuff wrap detection | Appears when the cuff is secured well. |
 | Memory display | Indicate it is in the memory mode and which group of memory it is. |
 | Current time | Time and date (year/month/day; hour: minute) |
 | Blood pressure level | Indicates the blood pressure level, |
Device Set Up
Power Supply
- Battery powered mode: 6V DC 4× AAA batteries
- AC adapter powered mode: 5V
![]() 1A
1A
![]()
 1A
1A

In order to get the best effect and protect your monitor, please use the right batteries and special power adapter which complies with local safety standard.
Installing Batteries
- Slide off the battery cover.
- Install or replace 4× AAA size batteries as indicated in the battery compartment. The display will light up and show the icon
![]() . Press "START/ STOP" button to turn off, otherwise it will power off automatically after 10 seconds.
. Press "START/ STOP" button to turn off, otherwise it will power off automatically after 10 seconds.
Any time the battery is low, it will display the icon" bAt Lo" &![]() . It will power off automatically after 5 seconds.
. It will power off automatically after 5 seconds.
![]()
- Close the battery cover.
Replace the batteries if:- The low battery symbol appears on the display.
- When any button is pressed and nothing is displayed on the screen.
 . Press "START/ STOP" button to turn off, otherwise it will power off automatically after 10 seconds.
 . It will power off automatically after 5 seconds.
- Do not use new and used batteries together.
- Do not use different types of batteries together.
- Do not dispose the batteries in fire. Batteries may explode or leak.
- Remove batteries if the device is not likely to be used for some time.
- Worn batteries are harmful to the environment. Do not dispose with daily garbage. Remove the old batteries from the device following your local recycling guidelines.
Setting Date and Time
It is important to set the clock before using your blood pressure monitor, so that a time stamp can be assigned to each record that is stored in the memory. (year: 2022—2050 Time format: 12H/24H)
Auto Setting
Once connected to smartphone App via Bluetooth, date and time will be syned to BPM automatically.
Manual Setting
- When the monitor is off, press and hold the "START/ STOP " button to display the date format. Press the "Bluetooth" or "Record" button to switch the date format between [month/day] and [day/month].
![]()
- Press the "START/ STOP " button to confirm the date format, then the year will flash. Press the "Bluetooth" or "Record" button to change the year.
![]()
- When you get the right year, press the "START / STOP" button to confirm the year. The screen will then show a blinking number representing the [MONTH].
![]()
- Repeat steps 2 and 3 to set the [MONTH] and [DAY].
![]()
- Repeat steps 2 and 3 to set the time format.
![]()
- Repeat steps 2 and 3 to set the [HOUR] and [MINUTE].
![]()
- After the minute is set, the LCD will display "do nE" and then it will turn off.
![]()


Measurement
Tie The Cuff
- Insert the air plug into the air jack
![]()
- Wrap the arm cuff firmly in place around your left upper arm.
![]()


NOTES
The bottom edge of the arm cuff, should be 0.5 inch (1 to 2 cm) above the elbow. Air tube is on the inside of your arm and aligned with your middle finger.
- Secure closed with the fabric fastener.
![]()

NOTES
- When you take a measurement on the right arm, the air tube will be at the side of your elbow. Be careful not to rest your arm on the air tube.
- The blood pressure can differ between the right arm and the left arm, and the measured blood pressure values can be different. We recommends to always use the same arm for measurement. If the values between both arms differ substantially, please check with your physician which arm to use for your measurements.
Sit Correctly
To take a measurement, you need to be relaxed and comfortably seated, under comfortable room temperature. Avoid bathing, drinking alcohol or caffeine, smoking, exercising or eating 30 minutes before taking a measurement.
- Sit in a chair with your legs uncrossed and feet flat on the floor.
![]()
- Sit with your back and arm supported.
- The arm cuff should be placed on your arm at the same level as your heart, with the arm resting comfortably on a table.

Start The Measurement
Notes:
- To stop the measurement, press the START/STOP button once to deflate the arm cuff.
- Remain still and quiet while taking a measurement.
Press the START/STOP button.
- The arm cuff will start to inflate automatically.
- The whole measurement takes around 35 seconds


Measurement Tips
To help ensure an accurate reading, follow these directions:
- Stress raises blood pressure. Avoid taking measurements during stressful times.
- Measurements should be taken in a quiet place.
- It is important to take measurements at the same times each day. Taking measurements in the morning and in the evening is recommended.
- Remember to have a record of your blood pressure and pulse readings for your physician. A single measurement does not provide an accurate indication of your true blood pressure. You need to take and record several readings over a period of time.
- Avoid bathing, drinking alcohol or caffeine, smoking, exercising and eating for at least 30 minutes before taking a measurement.
- Rest for at least 5 minutes before taking a measurement.
Bluetooth & App
Download App
Meraw Health app is available both on Google play and App Store, search and download.
Make sure your phone has enough storage and meet lowest system version requirement before downloading

Scan above QR code to download App and get App instruction.

Android system: Android 9.0 or above

iOS system: iOS 10.0 or above
Add My Device
- Add device
After opening Meraw App for the first time, it will guide you to add new device.
![]()
- Choose device
Choose Meraw Cedar and continue
![]()
- Start Connection
Follow the instruction and start connection
![]()
- Connection successfuly
The connection process will complete automatically
![]()


View Data

All synced data will be listed by month, and show brief information including:
- Blood pressure level
- SYS
- DIA
- measured time
Some factors may influence the accuracy of measurement, click a data and add remark on it.

Data Management
Recall the records
- When the monitor is off, press "RECORD" button, the display will show the average value of the latest three records first.
![]()
- When the memory record is less than three groups, the display will show the latest record (memory record 01)
![]()
- Press "Record" or "Bluetooth" button to get the record you want.
Each press "Record" butooth will increase the memory record by one in a cycling manner (AVG-01-02...).
Each press "Bluetooth" butooth will increase the memory record by one in a cycling manner (AVG-...-02-01).


Sync the records
- Turn on Bluetooth and open App on your smartphone before you sync the records.

- Each time you complete a measurement, data will be synced to App automatically,
![]() will blink during uploading and turn solid on after uploading successful.
will blink during uploading and turn solid on after uploading successful.
![]()
- If you data is not synced to App,
![]() will show in data page, indicating the record is not uploaded to App.
will show in data page, indicating the record is not uploaded to App.
![]()
- You could press 'Bluetooth' button when the blood pressure monitor is off to sync data that are not uploaded.
![]()

 will blink during uploading and turn solid on after uploading successful.
 will show in data page, indicating the record is not uploaded to App.

Delete the records
If you did not get the correct measurement, you can delete results by following steps below.
To delete a single measurement
- Enter the memory recall mode as described in section [Recall the Records]. Press "Record" or "Bluetooth" button to get the measurement you would like to erase.
- Press and hold "Record" button for 3 seconds, and the display will show a blinking "dEL yES" along with the memory number of the reading.
- Use the "Record" or "Bluetooth" button to toggle between "dEL yES" and "dEL no", Press "START/STOP" to confirm the selection.
If "dEL yES" is selected, the unit will delete the record and display "dEL do nE" along with the memory number of the reading. After then it will return to last memory record and All the records are pushed forward one digit (e.g., 03 becomes 02, and so on)
If "dEL no" is selected, it will stop the deletion.


To delete all measurements
- Enter the memory recall mode as described in section [Recall the Records].
- Press and hold "BLUETOOTH" and "RECORD" button for 5 seconds, and the display will show a blinking "dEL ALL" along with the user ID.
![]()
- Use the "BLUETOOTH" or "RECORD" button to toggle between "dEL ALL" and "dEL no", Press "START/STOP" to confirm the selection.
![]()


If "dEL ALL" is selected, the unit will display "dEL ALL do nE" + User ID and delete all the record of the current user. Several seconds later, it will display "---".
If "dEL no" is selected, it will stop the deletion.

ABOUT BLOOD PRESSURE
Systolic pressure and diastolic pressure
When ventricles contract and pump blood out of the heart, the blood pressure reaches its maximum value in the cycle, which is called systolic pressure. When the ventricles relax, the blood pressure reaches its minimum value in the cycle, which is called diastolic pressure.

Standard blood pressure classification
The blood pressure classification published by AAC/AHA in 2017 is as follows:
Only a physician can tell your normal BP range. Please contact a physician if your measuring result falls out of the range. Please note that only a physician can tell whether your blood pressure value has reached a dangerous point.

Healthy and unhealthy blood pressure ranges
Irregular Heartbeat Detector
An irregular heartbeat is detected when a heartbeat rhythm varies while the unit is measuring the systolic and diastolic blood pressure. During each measurement, the monitor records all the pulse intervals and calculate the average; if there are two or more pulse intervals, the difference between each interval and the average is more than the average value of ±25%, or there are four or more pulse intervals, the difference between each interval and the average is more than the average value of ±15%, the irregular heartbeat symbol appears on the display when the measurement results are appeared.
The appearance of the IHB icon indicates that a pulse irregularity consistent with an irregular heart-beat was detected during measurement. Usually this is NOT a cause for concern. However, if the symbol appears often, we recommend you seek medical advice. Please note that the device does not replace a cardiac examination, but serves to detect pulse irregularities at an early stage.
Blood pressure fluctuate throughout the day
- Individual blood pressure varies multiple times everyday. It is also affected by the way you tie your cuff and your measurement position, so please take the measurement under the same conditions.
![]()
- If the person takes medicine, the pressure will vary more.
- Wait at least 3 minutes for another

Different blood pressure at home compared to the hospital
The blood pressure is different even throughout the day due to weather, emotion, exercise etc. Also, there is the "white coat" effect, which means blood pressure usually increases in clinical settings.
What you need to pay attention to when you measure your blood pressure at home:
If the cuff is tied properly.
If the cuff is too tight or too loose. If the cuff is tied on the upper arm.
If you feel anxious.
Taking 2-3 deep breaths before beginning will be better for measuring.
Advice: Relax yourself for 4-5 minutes until you calm down.
Measuring on the right arm
It is ok for both arms, but there will be some different results for different people. We suggest you measure the same arm every time.

NOTE: If the product still does not work, contact Transtek Customer Service. Under no circumstance should you disassemble or attempt to repair the unit by yourself.
Global Customer Service
support@merawlabs.com
www.merawlabs.com

Documents / Resources
References
Download manual
Here you can download full pdf version of manual, it may contain additional safety instructions, warranty information, FCC rules, etc.
Advertisement


Need help?
Do you have a question about the Cedar and is the answer not in the manual?
Questions and answers