Table of Contents
Advertisement
Quick Links
Advertisement
Table of Contents

Subscribe to Our Youtube Channel
Related Manuals for Kind KD-BC-8H

Summary of Contents for Kind KD-BC-8H
- Page 1 KD-BC-8H/4H Director recording system Instruction manual...
-
Page 2: Table Of Contents
3、Connect wired and wireless networks ... 22 4、Coding and streaming ........23 5、Live webcast with encoder ........ 23 6、factory data reset..........25 7、Firmware upgrade ..........26 8、The device quickly resets and restarts ..27 七、KIND Assistant mobile APP usage instructions .. 28 八、Contact us................. 40... -
Page 3: 一、Precautions For The Use Of The All-In-One Machine
一、Precautions for the use of the all-in-one machine Before use, please read this manual carefully and keep it properly; Please follow the warning signs and instructions on the product; Please unplug the machine before cleaning. Do not use alcohol, thinner, insecticide or other volatile solvents, as doing so may deform the housing or damage the surface For your safety, do not allow the equipment to be... - Page 4 enjoyment without the permission of the copyright owner. Note that for live performances, shows and exhibitions, even your personal entertainment may be restricted。 Do not use this product near water; Do not place the product in an unstable place, such as wheelbarrow, stand and other easy to fall places, causing serious damage to the product。...
-
Page 5: Product And Service Disclaimer
Product and Service Disclaimer The information provided in this manual is intended as a guide only. Throughout its history, KIND strives to provide correct, complete and appropriate information. However, KIND cannot exclude that some information in... - Page 6 KIND is not responsible for any omissions or errors. Or any subsequent loss or damage caused by the information provided in the contents of this Manual, further information on the contents of this manual or products may be contacted by local offices or KIND Headquarters。...
-
Page 7: 二、Bc-8H/4H Kind Characteristics Of The Recording System
二 、 BC-8H/4H KIND Characteristics of the recording system KIND-BC8HA set of multi-channel audio and video acquisition, video stunt transfer, Pinion control, tuning and mixing, director communication, multi-channel screen monitoring screen and streaming media server in one of the portable recording machine, not only portable,... - Page 8 using stroke or other conversion effects and merging (keying) a single video clip when switching between two video clips。 You can mix audio inputs from 5-way stereo and 5-way microphones. Each channel has a range of functional components, including channel faders, input gain...
-
Page 9: 三、Host Topology
三、Host topology 四、Diagram of rear interface connection ①MIC, stereo input, output... - Page 10 ②Call director ports 1 to 8 ③WIFI antenna interface ④Camera control antenna ⑤1-4 SDI inputs ⑥Channel 4 HDMI input ⑦5-8 SDI inputs ⑧Channel 8 HDMI input ⑨SDI output ⑪USB and TF interface ⑩HDMI output ⑫485 interface ⑬RJ45 network port ⑭220V power interface Note: The interface panel in the above figure is 800H, and 400H does not contain 5-8 signals;...
- Page 11 External computer signal recommended WIND10 system 1080P full HD resolution, HDMI4 and SDI4 use the consent channel, can not input signals at the same time; Port Instructions L/R Audio output XLR Balanced analog audio output interface 1~5 Audio input XLR balanced analog audio input interface and each with 48V phantom power...
- Page 12 HDMI video output interface supports signal specification 1080i50 video source output 485 control interface: adopts RS485 control signal, supports PELCO-D, VISCV control protocol, uses 8th and 9th hole connection, 8 is positive, 9 is negative Wi-Fi interface, antenna can be inserted to enhance signal search range Antenna interface, control camera, can...
-
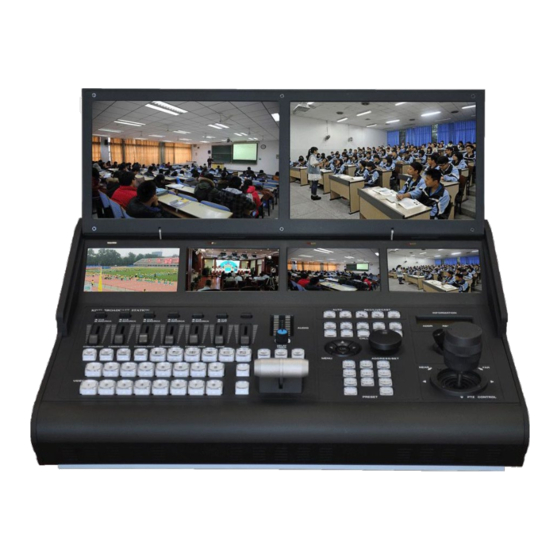
Page 13: 五、Operation Panel Introduction
五、Operation panel introduction ①Mixer: Supports five microphones, five stereo sound and five digital audio, each group controls the size of one sound, and the last one is the total audio, controlling the overall volume。 ②Audio differentiator switch: Press the first five audio zone buttons for MAC and RCA, pop up for V+A digital audio, the sixth audio pop up for digital audio, and press down for mute。... - Page 14 ④Automatic and manual mode switch key: to distinguish between two different modes (this function corresponds to the model); ⑤Recording button: You can control the start of recording, pause and broadcast, press to start recording, and hold down for 3 seconds to stop recording (the indicator light is recording, the indicator light is off, the recording button indicator is consistent with the recording button indicator)。...
- Page 15 equipment support); ⑦ Transition effect key: includes stroke, fade in and fade out, picture in picture, video transition effect ⑧Image transfer effect type selection, multi-mode transfer effect, each key is a switching mode, each key has 4 switching modes, each press, the way to switch the screen is different;...
- Page 16 ⑪Camera menu function: First click the OK key to display the menu of the POC camera, and the built- in functions of the camera can be adjusted through ⑫Preset point: you can SET 9 preset points for the the up and down left and right buttons。 camera, adjust the camera lens to the position that needs to be shot, press the set key, the preset point is set successfully, after the setting is successful,...
- Page 17 the current control address information on the LCD display on the console, rotating the knob encoder, the control address number on the LCD will change, for example, the address of the camera is 1 at this time, you can adjust the number to 1 through the knob encoder, and control the camera lens through the joystick。...
- Page 18 ⑮8 pre-monitoring mode switch key, press this button once PVW window generates 8 small pre- monitoring Windows (only 800H can achieve its function);...
- Page 19 ⑯Picture-in-picture: After use, the picture-in- picture mode will appear in the PVW interface. By selecting PVW and PGM two rows of keys to combine picture-in-picture, you can adjust the picture-in- picture position through the interface shown in the above figure...
- Page 20 ⑰Controller: can pass the camera orientation and focal length; method controlling orientation of the camera, by controlling the up and down left and right rotation and left and right rotation of the rocker, the camera is pushed and pulled。...
-
Page 21: 六、 The Instructions For Connecting The Computer To The Driver
六 、 The instructions for connecting the computer to the driver 1、Device login First of all, the computer side box director recording machine is under the same LAN, using a web browser to access the following address: http:/< IP address of the device > For example, if the default factory IP address of the device is 192.168.1.168, visit http://192.168.1.168, and the login authentication dialog box is displayed. -
Page 22: 3、Connect Wired And Wireless Networks
status information interface, or select the "Video source selection and adjustment" and "Audio source and volume adjustment" sub-functions "Video & Audio Adjustment" function in the web management interface, but the software cannot configure the signal source selection of video and audio。 3、Connect wired and wireless networks Click Network and Service Menu on the web interface to enter the network interface management configuration... -
Page 23: 4、Coding And Streaming
4、Coding and streaming Enter the encoding and media stream, you can set the video format and video file detailed Settings, including video resolution, stream size, frame rate, video format, whether constant code recording, Recommended recording Settings: Resolution: 1920*1080 25 frames. Recording stream: 25MB constant code recording format depending on your needs. - Page 24 platform, let's use mudu live as an example Configure RTMP live broadcast parameters, click the "RTMP Configuration" button, copy the push address provided by the live broadcast platform and fill in the "push point". If there is no user name and password, you can leave it out.
-
Page 25: 6、Factory Data Reset
Note: Before enabling RTMP live broadcast service, please configure the network information and fill in the correct IP address and network management information to ensure that the encoder can access the Internet normally。 6、factory data reset If the user changes the parameters of the encoder and the device does not work properly (most typically, the network address is changed so that the encoder cannot be accessed over the network), the factory Settings of the... -
Page 26: 7、Firmware Upgrade
Restoring factory Settings will cause a hard reboot of the device, which takes about 1 minute。 Please note: After the factory Settings are restored, the following parameters will be changed to their default values; The password of user admin is restored to admin; address device restored... -
Page 27: 8、The Device Quickly Resets And Restarts
Please note: After the firmware upgrade file is uploaded, the encoder automatically restarts the device for the upgrade. The upgrade process takes about 1 to 2 minutes (depending on the duration of the upgrade). After the upgrade is complete, choose System Status > Software Version on the WEB UI to check whether the latest version... -
Page 28: 七、Kind Assistant Mobile App Usage Instructions
七 、 KIND Assistant mobile APP usage instructions Open the KIND Assistant APP and the system automatically identifies the device information in the network segment as shown below:... - Page 29 Click either of the next IP segments to enter the APP Settings interface as shown below: Above is the main interface of KIND Assistant, on this interface you can set the video resolution, sound, signal source, network management, platform backtrack, video...
- Page 30 related Settings。 Click the video scaling button to enter the detailed setting interface of the video, as shown below Video storage Recommended resolution: 1920 x 1080 Frame rate: 25 bit rate: constant bit rate mode Bit rate Based on your requirements (no less than 2MB is recommended) Other parameters Default Settings are recommended。...
- Page 31 ( Substream Settings page) The sub-stream is set according to its own network conditions, and the civil setting is: resolution: 1280*720,Frame rate: 25 bytes stream: 1000KB...
- Page 32 You are advised to follow the preceding figure Click the audio icon button to set the audio coding in detail as shown below Click the signal source button to select the detailed Settings of the signal source as shown below Click the audio source button to enter the detailed setting interface...
- Page 33 The following figure shows the network management By adding the WIFI button on this interface, you can set the default WIFI network that the all-in-one is connected to。...
- Page 34 The platform push flow is shown below The current interface can set the main stream recording and live six information. In the push point address bar, fill in the RTMP push connection and save it to push the live broadcast。 Click the video setting button (the interface below pops...
- Page 35 On this screen, you can set the video storage location and video copying functions。 OSD Watermark The system supports four superimposed subtitle Settings, which can add some text and system time subtitle effects...
- Page 36 Advanced Settings diagram below The advanced Settings include four functions: quick reset, quick restart, factory Settings restoration, and device name setting。...
- Page 37 Quick reset as shown below A quick reset resets the video's encoding service and streaming service。 Quick restart as shown below The fast restart takes 15 seconds to restart successfully...
- Page 38 Restore factory Settings as shown in the following figure When the system problems can not be repaired, you can use this button to restore factory operation, the system will clear all user Settings, please note。...
- Page 39 The following figure shows the device name The system supports the user-defined device name function KIND Assistant software can be downloaded from our official website...
-
Page 40: 八、Contact Us
八、Contact us BEIJING KIND NETWORK TECHNOLOGY CO.LTD Address: 16C, Unit 1, Building C, Yingdu PLAZA, No. 48, ZhichunRoad, Haidian District, Beijing,China Official website:WWW.KINDLIVECAST.COM :100086 Zip Code :010-58732646、 Phone...
Need help?
Do you have a question about the KD-BC-8H and is the answer not in the manual?
Questions and answers