Table of Contents
Advertisement
Quick Links
Advertisement
Table of Contents

Related Manuals for Electric Bike Technologies ELECTRIC FAT TRIKE


Summary of Contents for Electric Bike Technologies ELECTRIC FAT TRIKE
- Page 1 WARNING! Serious injury or damage can occur with using this product. Read and understand this manual before using the Electric Fat Trike. ELECTRIC FAT TRIKE OWNER’S MANUAL 1-800-375-0224 // Support@ElectricTrike.com Copyright © 2024 Electric Bike Technologies, Inc. All rights reserved...
-
Page 2: Warning
ELECTRIC FAT TRIKE WITHOUT FIRST READING AND UNDERSTANDING THE MANUAL. Failure to read and understand the electric Fat Trike owner’s manual and its warnings specific to this product could result in dangerous situations, accidents, damage to the electric tricycle, damage to property, injury to you and others, or death. -
Page 3: Welcome / Contact Information
Many of our customers share how riding the electric Fat Trike gives them the delightful sensation of being a kid again. We’re confident this purchase has changed or will transform your life in many ways. -
Page 4: Table Of Contents
Regarding the Stem Rise Loosening the Stem Rise What Isn't Covered by the Electric Fat Trike Warranty Tightening the Stem Rise What Isn't Covered by the Limited Electric Fat Trike Warranty Warranty Claims REMOVING THE BATTERY Situations Requiring Battery Removal... - Page 5 How to Inflate and Deflate a Tire MAINTENANCE AND SERVICE GUIDELINES 46 & 47 FAT TRIKE STORAGE Routine Checks How to Store Your Electric Fat Trike Additional Weekly Checks Post-Ride Routine THE COLOR LCD OVERVIEW Quarterly Maintenance (Every three months) OPERATING THE COLOR LCD 40 &...
-
Page 6: Terms And Conditions
Failure to read and understand instructions and warnings specific to this product could result in dangerous situations, accidents, damage to the electric Fat Trike, damage to property, injury to you and others, or death. If you have any questions about assembly or operation, contact customer service at 1-800-375-0224 or by email at support@electrictrike.com. -
Page 7: Returns And Refunds
Please save your box and take extreme care in repackaging the electric Fat Trike. Items must be received at Electric Bike Technologies, Inc. in Croydon, PA, no later than thirty days after our original shipping date. If the electric Fat Trike is returned in less than new condition or refusal on delivery, Electric Bike Technologies, Inc. reserves the right to deduct any wear or damages, including excessive mileage or extra shipping costs due to refusal. -
Page 8: Warranty
LIMITED WARRANTY The electric Fat Trike is warranted to the original retail purchaser to be complete and free from defects in materials and workmanship for one year from the date of delivery. The warranty covers every component from manufacturing defects. The warranty begins on the date of deliv- ery, according to the tracking data provided by the shipping company. -
Page 9: Symbols And Warnings
Fat Trike can substantially diminish the likelihood of accidents or injuries. While this electric Fat Trike owner’s manual endeavors to provide comprehensive guidance on safe tricycle operation, it is not exhaustive and cannot contemplate every conceivable situation or condition that might arise during cycling. Consequently, the manual does not make any representations or guarantees concerning the safe operation of the electric tricycle under all potential conditions. -
Page 10: For The Parents
Fat Trike. You should be there and assist your child while learning to ride. Children need to be able to use the electric Fat Trike and control it in any and all situations, including hills, slopes, and varied surfaces. -
Page 11: Rider Responsibilities
• Do not operate your electric tricycle when weather, road conditions, or traffic make it unsafe to do so. • Since the electric Fat Trike arrives fully assembled, the operator (rider) needs to inspect the trike upon arrival, test and maintain the trike. -
Page 12: Kid & Cargo Trailer & Hitch Or Bike Rack Safety
HITCH OR BIKE RACK SAFETY The electric Fat Trike is not a bicycle and is a unique shape and tricycle product. As such, it does not work with most, if not all, traditional bike racks and should not be used with such racks. Any such use of the electric Fat Trike on bike racks is done solely by the Owner’s decision and the Owner/User assumes all risk and liability for such use. -
Page 13: Bicycle & Tricycle Safety Rules
BICYCLE & TRICYCLE SAFETY RULES 1. Obey all rules of the road and all local traffic laws. 10. Use approved hand signals for turning and stopping. 2. An electric tricycle is wider than a traditional bicycle and the 11. Never ride with headphones. They mask traffic sounds and emer- rider should be aware of the surrounding space. -
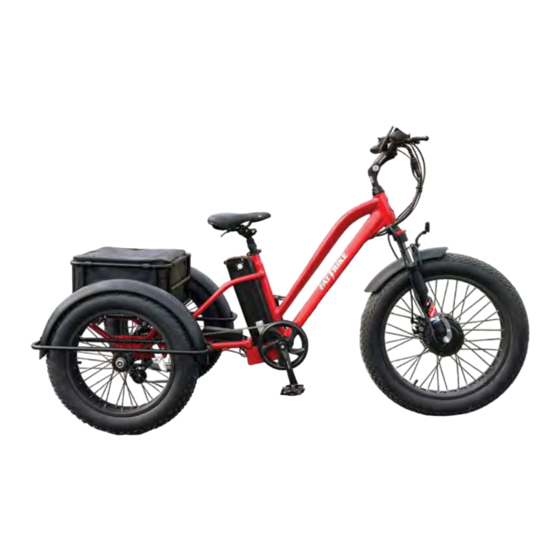
Page 14: Electric Fat Trike Components
ELECTRIC FAT TRIKE COMPONENTS TECH TIP: Please familiarize yourself with the component names of the electric Fat Trike. In the list below, components marked with an asterisk (*) have detailed images on the following pages. –Seatpost Quick-Release 10– 19– Chain* Headset –Suspension Seatpost*... -
Page 15: Detail Components
WARNING! DO NOT place your fingers or body parts in between the fenders and tires, while the tires are moving. This could result in an injury or a fall. TECH TIP: Please familiarize yourself with the component names of the electric Fat Trike. -
Page 16: The Rear Freewheel Components
DETAIL COMPONENTS (CONTD.) THE REAR FREEWHEEL COMPONENTS A–Rear Brake Caliper B– 160mm Disc Brake Rotor C–7 Speed Cassette D– Chain E–Rear Derailleur Cable F–Frame G–Rear Derailleur H– Cassette Guard I–Axle J–Brake Rotor Adapter THE DRIVETRAIN COMPONENTS A–Chain B– Cable Housing Box –48 Tooth Chainring D–Crank Arm –Pedal... -
Page 17: The Handlebar Controls
DETAIL COMPONENTS (CONTD.) PARKING PARKING LOCK LOCK THE HANDLEBAR CONTROLS A–Grips E–LCD B–Brake Levers w/ Parking Locks F–Handlebar C–Remote Pad G–Shifter D–Bell H–Twist Throttle THE SADDLE COMPONENTS A–Saddle (or Seat) B–Saddle Lever C– Seat Rails D–Quick-Release (QR) E–Suspension [ 17 ]... -
Page 18: The Charger Components
DETAIL COMPONENTS (CONTD.) Inside the cable are the Pins to the Charger Port Plug THE CHARGER COMPONENTS A–Charger Port Plug* B–Charging Indicator C– Charger D–Charger Cord Plug** E– Outlet Plug * The Port Plug (A) plugs into the battery’s charging port (H) in the image below. ** The Cord plug (D) plugs into (D1) in the image to the left. -
Page 19: Unpacking The Electric Fat Trike
CAUTION: Since the electric Fat Trike arrives fully assembled, the operator (rider) is required to read this manual entirely to understand and learn how to operate the electric trike correctly. It’s best to start slowly and practice to a point where you are comfortable operating this electric Fat Trike. -
Page 20: The Welcome Kit
The Drybag in the rear basket contains the Welcome Kit, the battery charger and two battery keys, with additional ordered accessories or parts potentially located within the same Drybag. The Welcome Kit encompasses: –Welcome / Warning Letter –Multi-Tool C–Electric Bike Technologies Stickers MULTI-TOOL A–10mm Socket G – 10mm Open End Wrench –4mm Allen Key... -
Page 21: Quick-Release Lever Overview
QUICK-RELEASE LEVER OVERVIEW WARNING! Riding with an improperly tightened quick-release lever will result in the saddle to drop down inside the trike’s frame and/or the saddle to twist which can cause you to lose control, fall, and be injured. Less than a half a turn of the tension, the adjusting nut can distinguish between a safe and unsafe clamping force. If you have trouble clamping the quick-release lever closed, seek a bike shop, a neighbor, friend, or a family member for help. -
Page 22: Seatpost & Saddle Height
TECH TIP: Keep in mind, positioning the seat above the level of your handlebars can result in increased pressure on your neck, wrists, arms, and back. NOTE: The electric Fat Trike’s seatpost does not feature white lines; these were used in the image solely for reference to highlight specific areas. -
Page 23: The Stem 23
Less than half a turn of tension on the stem bolt can make the difference between an unsafe and safe clamping force. TECH TIP: Before you begin adjusting the height of your stem, it will be easier if you straddle the electric Fat Trike to determine your proper stem height. -
Page 24: Regarding The Stem Rise
REGARDING THE STEM RISE For an enjoyable experience on your electric Fat Trike, it’s crucial that the handlebar is easily reachable, optimizing your riding posture. The stem rise refers to the stem’s inclination connecting the fork to the handlebar. A positive degree angle (+) implies a more elevated stem rise, facilitating a more upright riding stance. -
Page 25: Removing The Battery
Removing the battery also lessens the temptation for thieves to target your electric Fat Trike. 2) While Charging– Charge the battery indoors (within a house or garage) and avoid environments with extreme temperature fluc- tuations (10°–30°C or 50°–86°F), direct sunlight, moisture, or condensation. -
Page 26: Installing The Battery
INSTALLING THE BATTERY 1) Start by aligning the battery’s track (image 12) with the corresponding track within the trike’s frame (image 13). 2) Carefully slide the battery along its track towards the trike’s frame (image 14), ensuring a smooth descent until it securely connects with the frame (image 15) 3) After insertion, firmly press down on the battery handle until it sits flush against the battery’s surface (image 16). -
Page 27: Battery Overview
ABOUT THE BATTERY KEYS The electric Fat Trike comes standard with two battery keys for the battery ignition, locking, and unlocking the battery. The battery cannot be removed once it’s locked into the frame without damaging the trike and battery. Make sure you always have at least one battery key placed somewhere safe. -
Page 28: Lithium-Ion Battery Safety 28
LITHIUM-ION BATTERY SAFETY WARNING! Failure to follow the instructions and guidelines in this section may damage electrical components on the electric Fat Trike and will void your warranty. More importantly, failure to follow the instructions may result in a fire, explosion, property damage, injury, or death. -
Page 29: Transport
LITHIUM-ION BATTERY SAFETY (CONTD.) TRANSPORT ▶ When transporting an electric bike and/or trike’s battery, it SHOULD NOT be left on the trike. The battery must be removed and placed inside your vehicle. It’s also important not to leave the battery inside a hot vehicle. These temperatures and weather conditions can result in poor charging ability and possibly cause a fire, explosion, injury, or death. -
Page 30: Charging The Battery 30
Failure to monitor the battery and/or charger may result in a fire, explosion, injury, or death. TECH TIP: The electric Fat Trike's battery is "memory free." You aren't required to discharge the battery entirely during use, but it's much better for the battery to not drain to 0%. -
Page 31: The Charging Indicator Location
CHARGING THE BATTERY (CONTD.) WARNING! DO NOT leave the battery charging unattended or after the charge is complete for more than what is required for battery balancing (three hours). More than three hours could result in a fire, explosion, injury, or death. If you see or smell smoke or a burning smell, immediately stop charging, remove the charger from the battery, and take the battery and charger outside and far away from any combustible products. -
Page 32: Driving Overview
CAUTION: Before embarking on your first ride, it’s imperative to thoroughly read and comprehend this manual. For a safer experience, start by riding your electric Fat Trike at a slow pace and practice regularly. This hands-on approach will enhance your riding proficiency over time. -
Page 33: Shifting Overview
Our electric Fat Trike boasts a straightforward 1x7 gearing system. The “1” in 1x7 indicates the single chainring (a 48-tooth chainring) protect- ed within the chain guard. Meanwhile, the “7” highlights the number of gears present on the cassette, positioned between the rear wheels beneath the rear basket. -
Page 34: Braking Overview 34
PRACTICE IS KEY To ensure optimal safety and control while riding the electric Fat Trike, mastering the art of braking gradually and coming to a smooth stop is paramount. Applying excessive force or braking too abruptly can lead to wheel lockup, potentially causing the trike to slide, tip over, and lead to a loss of control, falls, and potential injuries. -
Page 35: The Parking Brake Overview
THE PARKING BRAKE OVERVIEW The parking brake serves as a valuable feature for the electric Fat Trike, ensuring it remains stationary. This mechanism offers riders an easier and more stable method for mounting and dismounting the trike. Especially crucial when parked on an incline, the parking brake prevents the trike from rolling away. -
Page 36: Front Suspension Fork
“Fork travel” denotes the span the suspension moves before becoming fully compressed. As the front suspension is telescopic, its travel corresponds to the wheel’s movement. When you receive your electric Fat Trike, it will be set with the suspension in the OPENED OR UNLOCKED open or unlocked position. -
Page 37: Tire Inflation
HOW TO INFLATE AND DEFLATE A TIRE The electric Fat Trike utilizes a Schrader valve similar to a car tire. To add air to the tube, begin by removing the valve cap and attaching the floor pump fitting securely to the valve stem. Conversely, to release air, simply remove the valve cap and depress the pin inside the valve stem using the end of a key. -
Page 38: Fat Trike Storage
Turn to page 45 to learn How to Clean & Lube the electric Fat Trike. After the “no-riding” time has passed, it may be best for you to take your electric Fat Trike to a bike store for a check-up. If you have any bike mechanical skills and feel comfortable checking and changing parts, here are some items to look at. -
Page 39: The Color Lcd Overview
CAUTION: Avoid using the 5v USB Port in damp or wet conditions to prevent liquid, mud, or dirt from entering. Always secure the USB Port cover af- ter use. Refrain from leaving the electric Fat Trike outdoors for any duration, and ensure the LCD is covered to shield it from sunlight, heat, and moisture. -
Page 40: Operating The Color Lcd 40
CAUTION: Avoid using the 5v USB Port in damp or wet conditions to prevent liquid, mud, or dirt from entering. Always secure the USB Port cover after use. Refrain from leaving the electric Fat Trike outdoors for any duration, and ensure the LCD is covered to shield it from sunlight, heat, and moisture. -
Page 41: Altering The Lcd Luminance
OPERATING THE COLOR LCD (CONTD.) SENSOR ALTERING THE LCD LUMINANCE Luminance levels range from the brightest at 100% to the dimmest at 10%, with a default setting of 100%. Adjust the brightness by selecting the desired level with the “+” and “–” buttons, then press the “i”... -
Page 42: The Pas Settings
THE PAS SETTINGS NOTE: The LCD comes PRE-PROGRAMMED for your electric Fat Trike. The following instructions are provided to enable customization of the PAS (Pedal Assist Sensor) settings to suit your preferences. WHAT IS THE PAS? PAS RING PAS, or Pedal Assist Sensor, gauges the speed at which you pedal (cadence) and activates the motor accordingly. -
Page 43: Error Codes For The Color Lcd
ERROR CODES FOR THE COLOR LCD When an error code appears, it may indicate that your electric Fat Trike isn’t functioning properly. These error codes are displayed within the speedometer section of the LCD. Below, you will find a list of common error codes, along with explanations to assist in identifying and diagnosing the issue. -
Page 44: Troubleshooting
SAFETY PRECAUTION Should you encounter any components that are frayed, sliced, abraded, or otherwise impaired, cease operation of the electric Fat Trike immedi- ately. Contact customer service without delay at 1-800-375-0224. It is crucial to secure replacements for any damaged parts prior to resuming use of the electric Fat Trike. -
Page 45: Cleaning & Lubricating The Fat Trike
Then, using the hose on a gentle setting, rinse away any soapy residue. 5) Dry the electric Fat Trike with a soft, clean cloth, being careful not to touch the disc brakes with your hands to avoid contamination from oils or cleaning agents. -
Page 46: Maintenance And Service Guidelines 46
Do not inflate a tire beyond the maximum pressure (30 PSI) indicated on the tire’s sidewall. Over inflation can cause the tire to burst off the rim, posing risks to the trike, rider, and others nearby. While the sidewall of the electric Fat Trike tires suggests a pressure range of 5-30 PSI, we urge you to avoid pressures in the 5-11 PSI range. -
Page 47: Post-Ride Routine
Be cautious when applying the front brake, and gradually use the front and rear brake in unison for a more con- trolled stop. DO NOT operate the electric Fat Trike if you notice any signs of corrosion, rust, or if the cables or wire connections appear burnt. For further assistance, please contact customer service at 1-800-375-0224. -
Page 48: Torque Specs
Ft-Lbs or Nm for compatibility with commonly used tools. Make any necessary unit conversions independently. It is imperative to use a calibrated torque wrench when securing critical fasteners on your electric Fat Trike. Ensure you meticulously follow the torque wrench manufacturer’s instructions to guarantee precise outcomes. -
Page 49: Electric Fat Trike Sizing
ELECTRIC FAT TRIKE SIZING NOTE: The seat height was gauged from the minimum insertion mark on the seatpost down to its lowest achievable position. Handlebar Reach: 24”–27” Handlebar Rise: 8”–10” Seat to Pedal Height: 28”–33” Standover Height: 24.5” Rear Basket Dimensions: 17.5” x 14.5” x 8”... -
Page 50: Electric Fat Trike Specs
ELECTRIC FAT TRIKE SPECS INTENDED USE Mobility, Neighborhood, Cruising, Paved Trail, Sand, and Rural COLOR Red, Blue, Sliver, and Black TOP SPEED 26 MPH with a Programmable Limit RANGE 12–26 Miles (Based on Rider Weight, Input and Terrain Contingent) MOTOR Bafang Motor–Front Geared with 750–1,000 Peak Watts @ 320 RPM (48v) -
Page 51: Electric Fat Trike Battery Specs
ELECTRIC FAT TRIKE BATTERY SPECS NOMINAL VOLTAGE NOMINAL CAPACITY 11.6Ah BATTERY ENERGY Approx. 556w DIMENSIONS Approx. 15.5" Length x 4.3" Width x 3" High TOTAL WEIGHT 8.8 lbs CELL ASSEMBLY 18650–3.6v–13S LIFE CYCLES 80% DOD = 800 Cycles MAX CONTINUOUS DISCHARGE 22.5A...
Need help?
Do you have a question about the ELECTRIC FAT TRIKE and is the answer not in the manual?
Questions and answers