Table of Contents
Advertisement
Advertisement
Table of Contents

Related Manuals for Electric Bike Technologies FAT TRIKE


Summary of Contents for Electric Bike Technologies FAT TRIKE
- Page 1 Serious injury or damage can occur with using this product. Read and understand this manual before using the electric Fat Trike. ELEC T R IC FAT TRIKE OWNER’S MANUAL 1-800-375-0224 | Support@ElectricTrike.com Copyright © 2022 Electric Bike Technologies, Inc. All rights reserved.
- Page 2 ELECTRIC FAT TRIKE WITHOUT FIRST READING AND UNDERSTANDING THE MANUAL. Failure to read and understand the electric Fat Trike owner’s manual and its warnings specific to this product could result in dangerous situations, accidents, damage to the electric tricycle, damage to property,...
- Page 3 THANK YOU FOR PURCHASING THE ELECTRIC FAT TRIKE! You are now a part of our extraordinary family of electric Fat Trike owners. For most people, it has become more than an electric trike. It has opened up a whole new world for some by helping them be more active and independent.
-
Page 4: Table Of Contents
• Adjusting the Stem Height P. 4 WARRANTY • Limited Warranty P. 21 THE STEM RISE • What Isn't Covered by the Electric Fat Trike Warranty • About the Stem Rise • Loosening the Stem Rise P. 5 WARRANTY (CONTD.) •... - Page 5 • Why Doesn’t My Motor Run? P. 41 TROUBLESHOOTING (CONTD.) • Error Codes for the 2017 LCD P. 42 CLEANING & LUBING THE TRIKE • How to Clean the Electric Fat Trike • How to Lube the Electric Fat Trike Chain...
-
Page 6: Terms And Conditions
Fat Trike, damage to property, injury to you and others, or death. If you have any questions about assembly or operation, contact customer service at 1-800-375-0224 or by email at support@electrictrike.com. -
Page 7: Returns And Refunds
Items must be received at Electric Bike Technologies, Inc. in Croydon, PA, no later than thirty days after our original shipping date. If the electric Fat Trike is returned in less than new condition or refusal on delivery, In that case, Electric Bike Technologies, Inc. reserves the right to deduct any wear or damages, including excessive mileage or extra shipping costs due to refusal. -
Page 8: Returns And Refunds (Contd.)
DAMAGE AND SHORTAGE CLAIM Damage resulting from shipping is the responsibility of the shipping company and the pur- chaser is responsible for notifying Electric Bike Technologies, Inc. on the day of delivery and filing an insurance claim with the shipping company. -
Page 9: Limited Warranty
WARRANTY LIMITED WARRANTY The electric Fat Trike is warranted to the original retail purchaser to be complete and free from defects in materials and workmanship for the One Year “Tire-to-Tire” Warranty. The warranty covers every component from manufacturing defects. The warranty begins on the date of delivery according to the tracking data provided by the shipping company. -
Page 10: What Isn't Covered By The Electric Fat Trike Warranty
Electric Bike Technologies, Inc. as acceptable for rental or commercial use. The electric Fat Trike Limited Warranty does not cover or apply to any Electric Bike Technologies, Inc. product sold by a non-authorized reseller or retailer. -
Page 11: Symbols And Warnings
It’s impossible to anticipate every situation or condition which can occur while cycling, this electric Fat Trike owner’s manual makes no representation about the safe use of the electric tricycle under all conditions. There are risks associated with the use of any electric tricycle which cannot be predicted or avoided and which are the sole responsibility of the rider. -
Page 12: For The Parents
By choosing to ride the electric Fat Trike, you are assuming responsibility for those risks. Suppose you purchase (or received it as a gift) the electric Fat Trike for a minor. In that case, it is essential that a responsible adult/parent thoroughly review and read the electric Fat Trike owner’s manual to the minor. - Page 13 • Do not operate your electric tricycle when weather, road conditions, or traffic make it unsafe to do so. • Since the electric Fat Trike arrives fully assembled, the operator (rider) needs to inspect the trike upon arrival, test, and maintain the trike. Electric Bike Technologies, Inc.
-
Page 14: Kid & Cargo Trailer And Hitch Or Bike Rack Safety
HITCH OR BIKE RACK SAFETY The electric Fat Trike is not a bicycle and is a unique shape and tricycle product. As such, it does not work with most, if not all, traditional bike racks and should not be used with such racks. -
Page 15: 10 Bicycle & Tricycle Safety
BICYCLE & TRICYCLE SAFETY 1. Obey all rules of the road and all local traffic 10. Use approved hand signals for turning and laws. stopping. 2. An electric tricycle is wider than a traditional 11. Never ride with headphones. They mask bicycle and the rider should be aware of the traffic sounds and emergency vehicle sirens, surrounding space. -
Page 16: 11 Electric Fat Trike Components
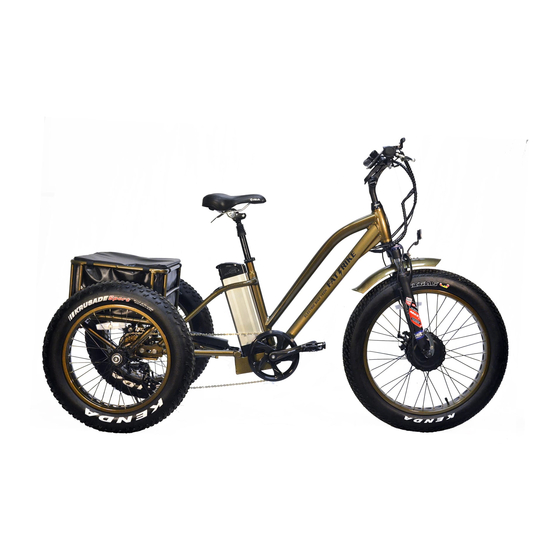
ELECTRIC FAT TRIKE COMPONENTS TECH TIP: It would be helpful if you familiarized yourself with the name of the components on the electric Fat Trike. Although you cannot see the disc brake, on page 12 is a more detailed image. -
Page 17: 12 Detail Components
DETAIL COMPONENTS TECH TIP: It would be helpful if you familiarized yourself with the name of the components on the electric Fat Trike. THE FRONT WHEEL The front wheel is comprised of these components. A–Front Fender –Hub Motor B–Tire –180mm Rotor C–Rim... -
Page 18: 13 Detail Components (Contd.)
DETAIL COMPONENTS (CONTD.) THE REAR FREEWHEEL COMPONENTS The rear freewheel is comprised of these components. A–Rear Brake Caplier B–160mm Disc Brake Rotor C–7 Speed Cassette D–Chain E–Rear Derailluer Cable F–Frame G–Rear Derailluer H–Cassette Guard I–Axle J–Brake Rotor Adaptor THE DRIVETRAIN COMPONENTS The drivetrain is comprised of these components. -
Page 19: 14 Detail Components (Contd.)
DETAIL COMPONENTS (CONTD.) THE HANDLEBAR CONTROLS The handlebar controls are comprised of these components. A– LCD E–Remote Pad B–Bell –Handlebar –Brake Lever w/ Parking Lock –Shifter D– Grips –Twist Throttle THE SADDLE COMPONENTS The saddle is comprised of these components. A–Saddle (or Seat) B–Saddle Lever C–Seat Rails... -
Page 20: 15 Detail Components (Contd.)
DETAIL COMPONENTS (CONTD.) Inside Pins to the Charger Port Plug THE CHARGER COMPONENTS The charger is comprised of these components. –Charger Port Plug* B– Charging Indicator C– Charger –Charger Cord Plug** E– Outlet Plug * The Port Plug (A) plugs into the Battery’s Charging Port (H) in the image below. -
Page 21: 16 Unpacking The Electric Fat Trike
TECH TIP: Save the electric Fat Trike box for 30 days, in case you decide to return it for a refund. For more information on the return period, click or copy this link, https://www.electrictrike.com/pages/terms-and-con-... -
Page 22: 17 The Welcome Kit
Electric Bike Technology stickers, and the Warning/Thank You Letter. If you order any additional accessories or parts, they may be placed within the Drybag. THE WELCOME KIT –Thank You Postcard B–Electric Bike Technologies Stickers C–Multi-Tool Kit MULTI-TOOL COMPONENTS A–10mm Socket G– 10mm Open End Wrench M–4mm Allen Key... -
Page 23: 18 Quick-Release Lever Overview
QUICK-RELEASE LEVER OVERVIEW WARNING! Riding with an improperly tightened quick-release lever will result in the saddle and handle- bars to drop down inside the trike’s frame or move (as in twist) and possibly cause you to lose control, fall, and be injured. Less than a half a turn of the tension, the adjusting nut can distinguish between a safe and unsafe clamping force. -
Page 24: 19 Seatpost & Saddle Height
TECH TIP: Just remember, if you place the seat higher than your handlebars, you will be applying more pressure on your neck, wrists, arms, and back. NOTE: The electric Fat Trike seatpost DOES NOT have light blue lines. This color was used as a reference to highlight an area in the image. -
Page 25: 20 The Stem
TECH TIP: Before you begin adjusting the height of your stem, it will be easier if you straddle the electric Fat Trike to determine the proper height of the stem. FINDING THE CORRECT STEM HEIGHT The handlebar reach is the distance from the seat to the handlebars, but it depends on the rider’s torso and arm’s length. -
Page 26: 21 The Stem Rise
ABOUT THE STEM RISE To comfortably ride your electric Fat Trike, it’s essen- tial to have the handlebar within your reach. The stem rise is the angle of the stem from the fork to the handlebar. -
Page 27: 22 Removing The Battery
WHY WOULD YOU REMOVE THE BATTERY FROM THE TRIKE? When transporting the electric Fat Trike, the battery shouldn’t be left on the trike. The bat- tery must be taken off and placed inside the vehicle to protect it from the weather. It also shouldn’t be left inside a hot vehicle. -
Page 28: 23 Installing The Battery
INSTALLING THE BATTERY NOTE: The electric Fat Trike’s battery’s track IS NOT green. The color was chosen to bring attention to the particular area of the image. INSERTING THE BATTERY BACK Align the battery’s track in image 12 (not actually colored green on the battery itself) to the trike’s track that is inside the trike’s frame (image 13). -
Page 29: 24 Battery Overview
BATTERY OVERVIEW CAUTION: Only use charging products that come with your electric Fat Trike and/or from Electric Bike Technologies, Inc. and not any third-party products. Using any third-party charging products will void the warranty and could result in damage to the trike’s electric system and even potential fire or explosion. -
Page 30: 25 Charging The Battery
WARNING! Failure to follow the instructions and guidelines in this section may damage electrical compo- nents on your electric Fat Trike and will void your warranty. More importantly, failure to follow the instructions may result in a fire, explosion, injury, or death. -
Page 31: 26 Charging The Battery (Contd.)
CHARGING THE BATTERY (CONTD.) WARNING! DO NOT leave the battery charging unattended or after the charge is complete for more than what is required for battery balancing (three hours). More than three hours could potentially result in a fire, explosion, injury, or death. To learn more about Battery Safety, read pages 27 and 28. THE CHARGING INDICATOR The charging indicator is located on the top of the battery. -
Page 32: 27 Battery Safety
After receiving the images, someone from customer service will contact you. • Only use the charging products that come with the electric Fat Trike. Do not use any third-party products. Using anything other than what is supplied by electric Fat Trike and/or Electric Bike Technologies, Inc. -
Page 33: 28 Battery Safety (Contd.)
If inhaled or ingest any fluids or gases from the battery, immediately seek fresh air and medical aid. • When transporting the electric Fat Trike, the battery shouldn’t be left on the trike. The battery must be protected from the weather. Take the battery off the trike and place it inside your vehicle. -
Page 34: 29 Driving Overview
CAUTION: We strongly encourage you to read and understand this manual entirely before your first ride. We recommend you familiarize yourself with and practice riding your electric Fat Trike by starting slowly, practicing, and that will help improve your riding skills. -
Page 35: 30 Shifting Overview
(image 24). The shifter, shifts the chain onto different gears on the cassette which will make it easier or harder to pedal. Our electric Fat Trike has a simple, 1x7 gearing. The one in the 1x7 represents, the one chain- ring (a 48 tooth chainring) that is enclosed in the chain guard. -
Page 36: 31 Braking Overview
BRAKING OVERVIEW WARNING! Applying brakes too hard or too sudden can lock up a wheel, which could cause the trike to slide, fall over, flip, and you could lose control or fall, which can result in an injury. Be cautious about locking your brakes within a turn. -
Page 37: 32 Braking Overview (Contd.)
THE PARKING BRAKE The parking brake is a handy feature, as it locks the electric Fat Trike in place. It provides the rider an easy and sturdier way to get on and off the trike. Another valuable benefit is that applying the parking park on a hill will stop the trike from rolling away. -
Page 38: 33 Front Suspension Fork
HOW TO LOCK OUT THE FRONT FORK Straddle the electric Fat Trike. On the right and top of the fork is the top lever (image 28). In image 28, the top lever is at 90°, which means that the suspension is open (or unlocked). -
Page 39: 34 Tire Inflation
Replace the patched tube as soon as possible. The best and safest way to inflate the electric Fat Trike tire is with a bicycle floor pump that’s compatible with a Schrader valve and an analog gauge that displays the PSI pressure. -
Page 40: 35 Fat Trike Storage
WARNING! Failure to follow the instructions and guidelines in this section may result in damage to electri- cal components on your electric Fat Trike and will void your warranty. More importantly, failure to follow these instructions may result in an injury and/or death. -
Page 41: 36 The 2017 Lcd Overview
Prolonging sun, heat, and/or moisture exposure will cause the liquid crystals in the display to be damaged. NOTE: The 2017 LCD is already programmed for the electric Fat Trike. The 2017 LCD IS NOT equipped with a USB plug. -
Page 42: 37 Operating The 2017 Lcd
Always turn the system off when BUTTON not using the electric Fat Trike. HOW TO TURN THE BACKLIGHT ON AND OFF Press and hold the up arrow on the remote pad to turn the backlight on or off. -
Page 43: How To Change The Menu Settings
PAS SETTINGS NOTE: The 2017 LCD is ALREADY PROGRAMMED for the electric Fat Trike. These instructions below will allow you to customize the PAS settings. WHAT’S THE PAS? PAS RING The Pedal Assist Sensor (PAS) will sense how quickly you are pedaling (cadence) and use that to run the motor. -
Page 44: 39 Additional Lcd Settings
ADDITIONAL LCD SETTINGS TECH TIP: Many settings do not save or take effect until you power the LCD off and then back on. Press and hold the up and down arrows on the remote pad simultaneously to access the menu settings. Press the “M”... -
Page 45: Why Doesn't My Motor Run
A 48-volt battery should measure at least 47-volts. If any of these components are worn, cut, scratched, and/or damaged, then DO NOT ride your electric Fat Trike until you contact customer service at 1-800-375-0224 and the components have been replaced. -
Page 46: Error Codes For The 2017 Lcd
If any of these components are worn, cut, scratched, and/or damaged, then DO NOT ride your electric Fat Trike until you contact customer service at 1-800-375-0224 and the components have been replaced. Go to page 40 and learn Why Doesn’t my Motor Run? -
Page 47: 42 Cleaning & Lubing The Trike
CLEANING & LUBING THE TRIKE CAUTION: Before you begin to wash your electric Fat Trike, REMOVE THE BATTERY from the trike. Failure to do so could damage the electrical components and system. Avoid spraying water on the electrical parts of the trike. -
Page 48: 43 Battery Maintenance
• Only use the charging products that come with the electric Fat Trike. Do not use any third-party products. Using anything other than what is supplied by electric Fat Trike will void the warranty. There is a potential risk of a fire, explosion, injury, or death. -
Page 49: Before Each Ride Or As A Weekly Service
If you’re uncomfortable performing any trike maintenance, you should visit a bike shop for help. TECH TIP: The tire PSI information is found on the sidewall of the tires. Electric Fat Trike recommends using 20–30 PSI. Putting more or less PSI will depend on the rider's weight, terrain, and riding preferences. -
Page 50: Before Each Ride Or As A Weekly Service
DO NOT use the electric Fat Trike if you exhibit any corrosion, rust, or the cables or wire connections look burnt. Contact customer service at 1-800-375-0224 for further assistance. -
Page 51: 46 Maintenance & Service (Contd.)
AFTER EACH RIDE TURN OFF the electric Fat Trike by pressing and holding the “i” button on the remote pad. CHECK THE FRAME, WHEELS, AND TIRES for any damages. CHARGE THE BATTERY to keep it healthy. -
Page 52: These Are Only Recomendations
This is to be used as a guide for a skilled, trained mechanic to use when assembling, adjust- ing, or repairing an electric Fat Trike. Always use your best judgment–these figures are given without warranty and are subject to change without notice. Torque measurements given in Ft-Lbs or Nm were convenient for commonly available tools that use those units. -
Page 53: 48 Electric Fat Trike Sizing
ELECTRIC FAT TRIKE SIZING 1 – Handlebar Reach: 24"–27” 5–Seat Height* to Ground: 34”–40” 2– Handlebar Rise: 8”–10” 6– Wheelbase: 49” –Seat Height* to Pedal: 28”–33” –Overall Length: 78” 4– Standover Height: 19”– 20” –Overall Width: 31" * The seat height was measured from the minimum insertion height (marked on the seatpost) to the lowest seatpost height. -
Page 54: 49 Electric Fat Trike Specs
ELECTRIC FAT TRIKE SPECS INTENDED USE Mobility, Neighborhood, Cruising, Paved Trail, Sand & Rural COLOR Desert Bronze TOP SPEED 26 Mph w/ Programmable Limit RANGE 12–26 Miles (Based on Rider Weight, Input & Terrain Contingent) MOTOR Bafang Motor– Front Geared w/ 750 –1,000w @ 320 RPM (48v) - Page 55 OPERATION TEMPERATURE RANGE Charge: 0°C–45°C / Discharge: -20°C–60°C STORAGE TEMPERATURE 0°C –40°C (Extended Storage: 15°C–25°C;) BATTERY BOX MATERIAL Aluminum Enclosure BATTERY WEIGHT 4.4–10.6 lbs ASSEMBLED PACK CERTIFICATES UL; UN38.3; MSDS; RoHS; SGS LIMITED WARRANTY 1 Year MANUFACTURER Electric Bike Technologies, Inc.
Need help?
Do you have a question about the FAT TRIKE and is the answer not in the manual?
Questions and answers