Table of Contents
Advertisement
Quick Links
WARNING! Serious injury or damage can occur with using this product.
Read and understand this manual before using the Liberty Trike.
LIBERTY
TRIKE
OWNER'S MANUAL
1-866-894-4620 // Support@LibertyTrike.com
Copyright © 2023 Electric Bike Technologies, Inc. All rights reserved.
The Liberty Trike™ logo is registered trademark of Electric Bike Technologies, Inc.
v12.08.23
Advertisement
Table of Contents

Subscribe to Our Youtube Channel
Related Manuals for Electric Bike Technologies LIBERTY TRIKE


Summary of Contents for Electric Bike Technologies LIBERTY TRIKE
- Page 1 Read and understand this manual before using the Liberty Trike. LIBERTY TRIKE OWNER’S MANUAL 1-866-894-4620 // Support@LibertyTrike.com Copyright © 2023 Electric Bike Technologies, Inc. All rights reserved. The Liberty Trike™ logo is registered trademark of Electric Bike Technologies, Inc. v12.08.23...
- Page 2 Failure to read and understand the Liberty Trike Owner’s manual and its warnings specific to this product could result in dangerous situations, accidents, damage to the Liberty Trike, damage to property, injury to you and others, or death. [ 2 ]...
- Page 3 Liberty Trike riders. Dive into our Liberty Trike Owners group to share your experiences, post pictures, ask questions, and offer insights to those curious about the world of Liberty Trike. Your voice and story can inspire and guide others on this electrifying journey.
-
Page 4: Table Of Contents
PGS. 8: WARRANTY P. 25: THE HANDLEBAR REACH • Limited Warranty • Finding the Correct Reach • What Isn't Covered by the Liberty Trike Warranty • Adjusting the Handlebar Reach • What Isn't Covered by the Limited Liberty Trike • Warranty Claims P. - Page 5 • How to Remove the Handlebar & Stem • Why Does My Battery Appear Empty After Charging? • How to Seatpost & Saddle P. 48: CLEANING & LUBING THE LIBERTY TRIKE P. 40: FOLDING THE LIBERTY TRIKE • How to Clean the Liberty Trike •...
-
Page 6: 6: Terms And Conditions
TERMS AND CONDITIONS Liberty Trike is a subsidiary brand of Electric Bike Technologies, Inc. Users must follow the instructions and warnings contained on this page, in supplied videos and in the manual* where provided for safety. Do not attempt to operate your electric bicycle, tricycle, or conversions sys- tem from Electric Bike Technologies, Inc. -
Page 7: 7: Returns And Refunds
RISK-FREE TRIAL PERIOD In spirit of our "NO RISK" program, we invite you to try the Liberty Trike for 21 days. If you don't absolutely love it, give us a call at 1-866-894- 4630, or email, support@libertytrike.com, to arrange a return. We'll then issue you a full refund, minus the cost of shipping. Please note that the shipping cost is $40 each way, totaling $80. -
Page 8: Limited Warranty
LIMITED WARRANTY The Liberty Trike is warranted to the original retail purchaser to be complete and free from defects in materials and workmanship for one year from the date of purchase. The warranty only covers the frame, fork, and electronic components: motor, battery, display (hereinafter: Electric Bike Tech products). -
Page 9: 9: Symbols And Warnings
Liberty Trike will significantly reduce the risk of an injury. It’s impossible to anticipate every situation or condition which can occur while cycling, this Liberty Trike owner’s manual makes no representa- tion about the safe use of the electric tricycle under all conditions. There are risks associated with the use of any electric tricycle which cannot be predicted or avoided and which are the sole responsibility of the rider. -
Page 10: 10: For The Parents
The Liberty Trike is not made or intended to ridden by more than one-person at a time. It is not intended to carry multiple people or minors. As the parent or guardian, you must read this manual and review its warnings and the electric tricycle's functions and operating procedures with your child before letting your child ride the Liberty Trike. -
Page 11: 11: Rider Responsibilities
Electric Bike Technologies, Inc. assumes no legal responsibility for the operation of its products on public or private property. ▶ Electric Bike Technologies, Inc. cannot offer any legal advice pertaining to the operation of the electric tricycle in a particular area and does not guarantee that the electric tricycle are legal for you to operate. ▶... - Page 12 HITCH OR BIKE RACK SAFETY The Liberty Trike is not a bicycle and is a unique shape and tricycle product. As such, it does not work with most, if not all, traditional bike racks and should not be used with such racks. Any such use of the Liberty Trike on bike racks is done solely by the Owner's decision and the Owner/ User assumes all risk and liability for such use.
-
Page 13: 13: Bicycle And Tricycle Safety Rules
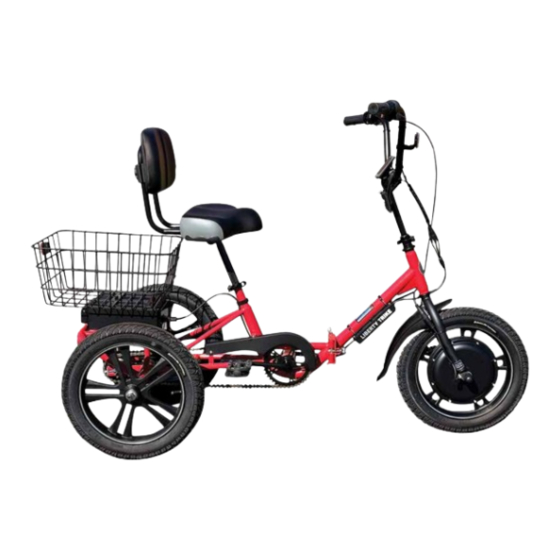
BICYCLE AND TRICYCLE SAFETY RULES 1. Obey all rules of the road and all local traffic laws. 12. Never carry a passenger, unless it is a small child wearing an approved helmet and secured in a correctly mounted child 2. An electric tricycle is wider than a traditional bicycle and the carrier or a child-carrying trailer. - Page 14 COMPONENTS OF THE LIBERTY TRIKE TECH TIP: Please familiarized yourself with the name of the components on the Liberty Trike. Although you cannot see the disc brake, on page 15 is a more detailed image. In the list below, components marked with an asterisk (*) have detailed images on the following pages.
-
Page 15: The Front Wheel
WARNING! DO NOT place your fingers or body parts in between the front fender and tires, while the tires are moving. This could result in an injury or a fall. TECH TIP: Please familiarized yourself with the name of the components on the Liberty Trike. THE FRONT WHEEL –Tire... -
Page 16: Rear Freewheel Components
REAR FREEWHEEL COMPONENTS A– Long Chain B– Short Chain –22 Tooth Coaster Hub D–Chain Tensioner E–Dropout Bolt F–Torque Arm –Coupler –22 Tooth Gear HANDLEBAR CONTROLS –E-Brake Lever w/ Parking Brake E–Hold to Turn On and Off I–LCD –Grip –Decrease Assist Level –Reflector –Remote Pad –Walk Assist Mode... -
Page 17: Drivetrain Components
DETAIL COMPONENTS (CONTD.) DRIVETRAIN COMPONENTS – Chain – Chain Guard –40 Tooth Chainring – Crank Arm –Pedal BATTERY COMPONENTS A–Battery B–Two Battery Keys C–Battery Handle –Ignition –Plug to Charger –Charging Port CHARGER COMPONENTS –Charger –Charging Indicator –Outlet Plug –Charging Cord Plug* K–... -
Page 18: 18: Box Contents
Watch & Learn About Your First Liberty Trike Ride Click or copy this link: https://youtu.be/vgEf_PZvLnc?si=i4YGY-1-w1LOxTLl ** Important: If you've purchased an extra battery with your Liberty Trike, please be aware that it will be shipped separately from the main trike package [ 18 ]... -
Page 19: 19: Quick-Release Lever Overview
QUICK-RELEASE LEVER OVERVIEW WARNING! Riding with an improperly tightened quick-release lever will result in the saddle to drop down inside the trike’s frame and/ or the saddle to twist which can cause you to lose control, fall, and be injured. Less than a half a turn of the tension, the adjusting nut can distinguish between a safe and unsafe clamping force. -
Page 20: 20: Frame Assembly
In these pictures below, the cables are attached, DO NOT attach the cables until you read about Cable Assembly on page TECH TIP: Position the Liberty Trike Stand beneath the rear section of the frame. This support aids in aligning the front and rear parts of the frame during assembly or maintenance. -
Page 21: 21: The Front Wheel
(refer to image 3 for the correct orientation). 3. Confirm correct positioning by standing directly in front of the Liberty Trike; the disc brake should be visible on the right side of the front fork. 4. Upon successful alignment, securely reconnect the motor cable and the 3-to-1 cable. -
Page 22: 22: Cable Assembly
CABLE ASSEMBLY CAUTION: If you don't have the mechanical or physical ability to correctly and safely assemble the Liberty Trike, you should obtain the services of a bike shop for assistance. TECH TIP: It's best to align the arrows on the cables and firmly push them together (images 5, 6, and 6a). If you don't align the arrows, it may result in bent pins. - Page 23 Discovering the proper seat height is crucial for optimizing performance and comfort on your Liberty Trike. Sit on the Liberty Trike, place one foot on the pedal, and rotate the crank until your foot reaches the lowest position, and the crank arm aligns with the seat tube.
-
Page 24: 24: Installing The Stem
INSTALLING THE STEM 1. Stand facing the front of the Liberty Trike and secure the front wheel firmly between your legs. 2. Begin by gently loosening the quick-release lever (image 10). This can be done by pulling it outward to open while simultaneously turning it counterclockwise. -
Page 25: 25: The Handlebar Reach
To modify the handlebar's reach or angle, follow these steps: 1. Stand facing the Liberty Trike with a firm grip on the front wheel held securely between your legs. Locate the two stem bolts positioned behind and under the LCD (image 12). You'll need a 6mm Allen key for the top bolt and a 3/8" socket wrench equipped with a 13mm socket for the bottom bolt. -
Page 26: 26: Rear Basket Assembly
WING BOLT REMOVING THE REAR BASKET You may need to remove the rear basket if you plan to transport the Liberty Trike inside a vehicle or need to lower the seatpost to its lowest position. Follow these steps: 1. If your wing bolts look like image 14a, turn the wing bolts counterclockwise. Keep the washer and wing bolts together in a small sealed bag for safekeeping. -
Page 27: 27: Battery Overview
BATTERY OVERVIEW TECH TIP: You can safely keep the battery key in the "On" position, even when the Liberty Trike is not in use. To turn the trike off, use the remote pad by pressing the "i" button. BATTERY KEY POSITIONS ON –the battery is on and the trike can be used. - Page 28 LITHIUM-ION BATTERY SAFETY WARNING! Failure to follow the instructions and guidelines in this section may damage electrical components on your electric trike and will void your warranty. More importantly, failure to follow the instructions may result in a fire, explosion, property damage, injury, or death. DO NOT use the battery if your battery has been damaged, punctured, burned, been smoking, or has been on fire, and do not use the battery or charger.
-
Page 29: Transport
LITHIUM-ION BATTERY SAFETY (CONTD.) TRANSPORT ▶ When transporting an electric bike and/or trike's battery, it SHOULD NOT be left on the trike. The battery must be removed and placed inside your vehicle. It’s also important not to leave the battery inside a hot vehicle. - Page 30 If inhaled or ingested with any fluids or gases from the battery, immediately seek fresh air and medical assistance TECH TIP: The Liberty Trike's battery is "memory free." You aren't required to discharge the battery entirely during use, but it's much better for the battery to not drain it down to 0%.
-
Page 31: The Charging Indicator
CHARGING THE BATTERY (CONTD.) WARNING! DO NOT leave the battery charging unattended or after the charge is complete for more than what is required for battery balancing (three hours). More than three hours could potentially result in a fire, explosion, injury, or death. CAUTION: Undamaged batteries will not release fluids or gases. -
Page 32: 32: Driving Overview
HOW TO TURN AND ON SLOPES Practice, practice, and practice some more is what we preach to new Liberty Trike riders. It's best to practice on a flat surface, free of cars or objects. Use caution when approaching the turn and proceed at a slow speed, make a wide turn, and lean into the turn. For example, lean into the left turn if you are turning left. -
Page 33: It Takes Practice
BRAKING OVERVIEW WARNING! Applying brakes too hard or too sudden can lock up a wheel, which could cause the trike to slide, fall over, flip, and you could lose control or fall, which can result in an injury. Be cautious about locking your brakes within a turn. Sometimes there's a tendency for the trike to slide, resulting in the trike tipping or flipping over, resulting in damage to the trike and injuring you. -
Page 34: The Parking Brake
THE PARKING BRAKE The parking brake serves as a convenient feature, securely immobilizing the Liberty Trike. It offers riders a stable platform for mounting and dismounting and is particularly useful on inclines to prevent unintended rolling. However, it's essential to remember that the parking brake should only be engaged when the trike is parked and NOT during normal riding. -
Page 35: 35: Tire Inflation
HOW TO INFLATE A TIRE The Liberty Trike uses a Schrader valve just like you'd find on a car tire. To inflate the tube, remove the valve cap and clamp the floor pump fitting onto the end of the valve stem. -
Page 36: 36: To Disassemble Or Fold
NOTE: The Liberty Trike weighs a total of 56 lbs The front and rear halves weigh 25 lbs each, and the battery pack weighs 6 lbs. Since the Liberty Trike is an electric folding trike, it can easily be folded or taken apart to transport or store in your home or garage. The Liberty Trike must be stored in a location that protects it from snow, rain, sun, etc. -
Page 37: Disconnecting The Cables
PULL APART HOW TO REMOVE THE REAR BASKET Removing the rear basket might make it easier to store the Liberty Trike in your home, garage, or shed. It also might make it easier to fit inside the trunk of your vehicle. -
Page 38: How To Disconnect The Frames
CAUTION: This is a pinch point, watch your hand and/or fingers when removing the frame pin. TECH TIP: Learn how to loosen the Quick-Release Lever, turn to page 20. Use the Liberty Trike Stand* to help you hold up the rear half of the frame. -
Page 39: How To Remove The Handlebar & Stem
(CONTD.) TECH TIP: When storing the Liberty Trike in two pieces, NEVER lift the Liberty Trike by the rear basket, and DO NOT lay the Liberty Trike down on the chainring or the disc brake side as it could cause damage to those components. -
Page 40: 40: Folding The Liberty Trike
FOLDING THE LIBERTY TRIKE CAUTION: We strongly encourage you to read and understand this manual entirely before folding the Liberty Trike for transport or storage. TECH TIP: Learn how to use the Liberty Trike Stand, click or copy this link, https://youtu.be/5Qm9k7cey10?si=vJH6GVr4BmE8Sp6V... -
Page 41: 41: Lcd Overview
LCD OVERVIEW CAUTION: Avoid leaving the trike outside for long or short periods of time. Always cover the LCD to protect it from the sun, heat and/or moisture. Prolonging sun, heat, and/or moisture exposure will cause the liquid crystals in the display to be damaged. LCD OVERVIEW Battery Percentage: 1–5 Levels Top of the Display Area... -
Page 42: How To Turn The Lcd On And Off
CAUTION: It's essential to familiarize yourself with the LCD functions before your first ride. New riders should limit the power levels until they are comfortable with the Liberty Trike's powerful motor. We recommend that you start slowly, practice, and improve your riding skills. -
Page 43: Increasing The Backlight
LCD CONTROLS (CONTD.) CAUTION: It's essential to familiarize yourself with the LCD functions before your first ride. DO NOT use the USB port in wet or moist con- ditions. Make sure no liquids, mud, or dirt can enter the USB port. Always close the USB port cover properly when the USB port is not in use. INCREASING THE BACKLIGHT REMOTE PAD On the remote pad, press and hold the "+"... -
Page 44: 44: Power Levels
POWER LEVELS CAUTION: If climbing a steep grade or hill, it's essential to accelerate slowly at first. Keep your body low and shift your weight forward to avoid the front wheel from lifting upwards. Sometimes if you accelerate too quickly, you may tilt/or flip the trike backward, which will result in a fall and/or injury. -
Page 45: 45: Lcd Functions
LCD FUNCTIONS CAUTION: Please familiarized yourself with the LCD functions before your first ride. REMOTE PAD SCROLL UP TO CHANGE SETTINGS AND TURN ON AND OFF SCROLL DOWN WALK BOTTOM OF DISPLAY AREA HOW TO CHANGE THE TRIP, ODOMETER, RIDE TIME, MAX AND AVG SPEED SETTINGS On the remote pad, press the "i"... -
Page 46: 46: Torque Specs
Make your own conversions as needed. Always use a correctly calibrated torque wrench to tighten critical fasteners on your Liberty Trike. Carefully follow the torque wrench manufacturer's instructions on the correct way to set and use the torque wrench for accurate results. -
Page 47: Why Does My Battery Appear Empty After Charging
NOTE: The following instructions should be considered as general guidelines only. Your situation can be slightly different. Want to learn more about your Liberty Trike? Watch our Helpful Videos,* and learn how to fix the error codes. If you still can't solve your problem(s), contact customer service at 1-866-894-4620 and our experts will help you solve the issue. -
Page 48: 48: Cleaning & Lubing The Liberty Trike
HOW TO CLEAN THE LIBERTY TRIKE Unless the Liberty Trike is filthy, you can “spot clean” (cleaning only where it is dirty) your trike. Be cautious of the electrical parts of the trike and water. Avoid spraying water directly onto the electrical parts. Failure to do so could damage the trike’s electrical components and system. -
Page 49: Routine Checks
If the power does not cut off, contact customer service at 1-866-894-4620 for assistance. 2) Cable and Wire Check– Inspect cables and wire connections for signs of corrosion or burn marks. Do not use or charge the Liberty Trike if any warning signs are present. -
Page 50: Quarterly Maintenance
1-866-894-4620 for further assistance. CAUTION: If you don’t have the strength to lift the front of the Liberty Trike, seek a neighbor or friend that can assist you in this proce- dure. If no one is available then you can try the "slow roll test." Make sure that the area that you use is clear of any objects, that can injure you and wear a helmet for safety. -
Page 51: 51: Liberty Trike Sizing
LIBERTY TRIKE SIZING A– Reach: 22" F– Seat Height to Ground: 25-31" ADDITIONAL SPECS: B– Handlebar Rise: 4.5" G–Overall Width: 24" Total Weight: 56 Lbs. C – Height: 41-44" H– Wheelbase: 40" Ground Clearance: 6" D– Standover Height: 13.5" –Overall Length: 55"... -
Page 52: 52: Liberty Trike Specs
56 lbs (Front and Rear Halves: 25 lbs Each and 6 lbs Battery Pack) PARTS: Liberty Trike Battery Pack, Liberty Trike Charger, Liberty Trike Tire, Liberty Trike Tube, Liberty Trike Seat, and Liberty Trike Mag Wheels ACCESSORIES: Thumb Screws, Liberty Trike Cargo Trailer, Pedal Extenders, Liberty Trike Stand, Front Basket, Handlebar Crossbar, 3" Round... -
Page 53: 53: Liberty Trike Battery Specs
LIBERTY TRIKE BATTERY SPECS NOMINAL VOLTAGE NOMINAL CAPACITY BATTERY ENERGY Approx. 288Wh DIMENSIONS Approx. 10" Lgth x 6" Width x 3" High TOTAL WEIGHT 6.1 lbs CELL ASSEMBLY 18650-3.6v-8S 4P LIFE CYCLES 800–1000 Cycles MAX CONTINUOUS DISCHARGE 22.5A BMS PROTECTION CURRENT...
Need help?
Do you have a question about the LIBERTY TRIKE and is the answer not in the manual?
Questions and answers
Puissance de la batterie 36V 8.0Ah et combien de kilomètres que je peux faire avec une charge complète ?
The battery capacity is 288Wh (36V × 8Ah). Electric trikes typically consume between 10–20Wh per kilometer, depending on conditions such as rider weight, terrain, and assistance level.
Using an average consumption of 15Wh/km:
288Wh ÷ 15Wh/km = approximately 19 kilometers.
So, the estimated range on a full charge is about 19 kilometers.
This answer is automatically generated
Quick release lever isnt working. It’s as tight as humanly possible but seat still swivels. Is there a certain position or place it should be on seat post?
The quick-release lever on the seat post of the Liberty Trike must be properly tightened to prevent the seat from swiveling. The cam lever's action secures the clamp around the seat post, and the clamping force is determined by the tension of the adjusting nut. Ensure the quick-release is tight before and after every ride to maintain stability and security.
This answer is automatically generated