Table of Contents
Advertisement
Advertisement
Table of Contents

Related Manuals for Thermo Scientific Phenom XL G2 Desktop SEM


Summary of Contents for Thermo Scientific Phenom XL G2 Desktop SEM
- Page 1 USER MANUAL MICROSCOPE – Phenom XL G2 Desktop SEM Phenom XL G2 Desktop SEM The versatile desktop SEM that automates quality control In the United States, please contact: 888.777.5573 nanoScience 480.758.5400 support@nanoscience.com I n s t r u m e n t s...
-
Page 3: Table Of Contents
Contents Things You Must Know . . . . . . . . . . . . . . . . . . . . . . . . . . . . . . . . . . .6 1 . - Page 4 4.4.1 Optical Navigation Camera view..... .22 4.4.2 Main SEM view ........23 4.4.2.1 Settings page .
-
Page 6: Things You Must Know
Do not put connected to earth ground. Before materials in the air gap between the using the microscope verify that the Phenom XL Desktop SEM and the table. microscope is properly grounded. User Manual | Phenom XL G2 Desktop SEM... - Page 7 The correct disposal of your old product will help prevent potential negative consequences for the environment and human health. Phenom XL G2 Desktop SEM | User Manual...
-
Page 8: Introduction
Thermo Fisher Scientific Achtseweg Noord 5 5651 GG Eindhoven The Netherlands • e-mail: service.phenom@thermofisher.com • phone: +31 (0)40 2356 566 • opening hours: Monday - Friday, 09:00 - 17:00 (CET, GMT +1). User Manual | Phenom XL G2 Desktop SEM... -
Page 9: Packaging Contents
• Power cable Europe 2 x • Power cable US 2 x Power supply Mouse and keyboard • Power cable China 2 x Allen key Phenom XL Desktop SEM Starter Kit User manual Phenom XL G2 Desktop SEM | User Manual... -
Page 10: System Overview
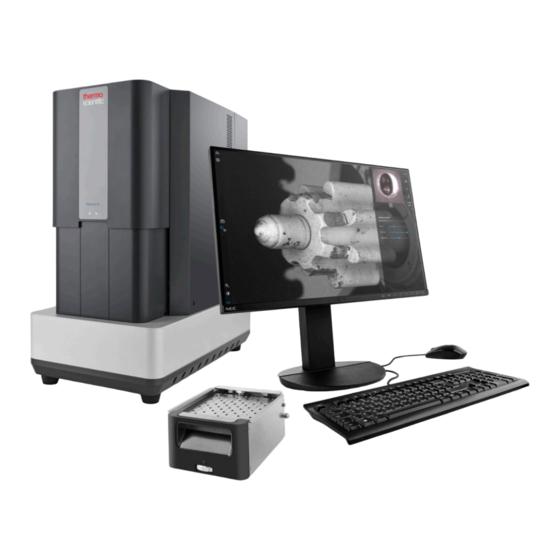
Mouse and keyboard 10 Fuse holder 4. Mouse Contains the fuse 5. Keyboard 11. Power connection to the Phenom XL Desktop SEM Flat panel monitor Pre-vacuum pump 6. Monitor 12. Pre-vacuum pump hose User Manual | Phenom XL G2 Desktop SEM... - Page 11 Spectroscopy) detector to the Workstation PC 21 . Ethernet connector SEM Connect the Workstation to the Phenom XL Desktop SEM 22 . Power connector (in) Connects the Workstation PC to the mains outlet Phenom XL G2 Desktop SEM | User Manual...
-
Page 12: Installing The Phenom Xl
• When positioning the Phenom XL always work with two persons, one at each end. In the United States, please contact: 888.777.5573 nanoScience 480.758.5400 support@nanoscience.com I n s t r u m e n t s www.nanoscience.com User Manual | Phenom XL G2 Desktop SEM... -
Page 13: Connecting The Phenom Xl Desktop Sem
• Tighten the nut on the Phenom side, using a 14 mm (0.55”) spanner (wrench). It takes 1 to 1.5 full turn to properly tighten the nut. Phenom XL G2 Desktop SEM | User Manual... - Page 14 SEM Network Port on the rear of the Workstation PC. 12. Optionally connect a network cable (not supplied) between the Local Network Port at the rear of the Workstation PC with the local area network. User Manual | Phenom XL G2 Desktop SEM...
-
Page 15: Activating The System
To unlock the door, please use supplied Allen key. The door will only open, if it has been unlocked properly. Phenom XL G2 Desktop SEM | User Manual... - Page 16 5. Please verify that both components have been removed and click Finish. The system will then start up automatically. Note: The software will reset and the display will be unresponsive for a few minutes. User Manual | Phenom XL G2 Desktop SEM...
-
Page 17: Using The Phenom Xl Desktop Sem
• one of the following items: colloidal graphite, silver paint, • Always make sure the sample is firmly fastened to the or double-sided carbon adhesive pads; sample stub. Moving a sample from atmosphere to • a can of compressed air. Phenom XL G2 Desktop SEM | User Manual... -
Page 18: Samples That Cannot Be Prepared In Colloidal Graphite Or Silver Paint
2. Place a clean stub on top of the exposed adhesive. Pull the stub off the adhesive sheet to expose the other side of the adhesive pad. User Manual | Phenom XL G2 Desktop SEM... -
Page 19: Particle Samples
4.2.2 Particle samples for instructions. the detector. Make sure the sample is firmly attached to the sample stub with colloidal graphite, silver paint, adhesive pad, or a clamp before imaging in the SEM. Phenom XL G2 Desktop SEM | User Manual... -
Page 20: Biological Samples
3. Insert the stub pin into the hole on the mounting surface, using tweezers. 4. Make sure that the stub is inserted in such way that the flat lower surface of the stub is seated on the mounting surface.. User Manual | Phenom XL G2 Desktop SEM... - Page 21 • The sample is loaded and ready for imaging. • If the Phenom XL Desktop SEM was in standby or hibernate (power saving) mode, the instrument will now be re-activated. • The sample automatically moves to the optical imaging position. Phenom XL G2 Desktop SEM | User Manual...
-
Page 22: Operating
8 . Expands Live Databar 5 . Magnification control 9 . Opens Gallery page Scrolling with the mouse wheel zooms in and out 10 . Expands the System Settings menu 11 . Main imaging window User Manual | Phenom XL G2 Desktop SEM... -
Page 23: Main Sem View
– Manual Focus by using the mouse scroll wheel • Left-click or click the mouse wheel to switch – Focus in selected area (a sub-window with a between Contrast–Brightness adjustments faster refresh rate appears. While open, Phenom XL G2 Desktop SEM | User Manual... -
Page 24: Settings Page
List of Plugins installed • Update system software 5 . Opens the Licenses tab • Collect System Information (SysInfo) file Add/remove licenses 2 . Acquistions Settings tab Sets up the Acquisition parameters User Manual | Phenom XL G2 Desktop SEM... -
Page 25: Live Databar
Clicking on the High Voltage, Beam Intensity, Pressure and Detector fields expands a sub-menu with the available options. Clicking on the Magnification, HFW, Working distance and Label fields reveals a text field wherein a value can be typed. Phenom XL G2 Desktop SEM | User Manual... -
Page 26: System Settings
Close the menu by clicking the arrow at the bottom of clicking the corresponding tickbox. the menu, pressing Esc or clicking outside the settings window. Return to the previous operations settings menu by clicking “Exit Advanced”. User Manual | Phenom XL G2 Desktop SEM... -
Page 27: Gallery
Click on the line icon to add a measurement. Click on the “A” icon to add text. The image can be overwritten by clicking “Save” or saved as a new file by clicking “Save as…” Phenom XL G2 Desktop SEM | User Manual... -
Page 28: 3Drr Application
Loads a previously saved project different angle as a 3D view Displays the Roughness View Enables a heatmap overlay for each of the previous options Performs a First Order Correction to the reconstruction User Manual | Phenom XL G2 Desktop SEM... - Page 29 Displays the Ra and Rz values of the profiles. Maximum number of profiles is 10. Remove profile measurements by pressing “x” 9 . Close and Save buttons Removes the reconstruction Saves the project files to the Workstation PC Phenom XL G2 Desktop SEM | User Manual...
-
Page 30: Live Eds Application
Magnification, Contrast/Brightness, Focus controls. Refer to section 4.4.2. Main SEM screen 5 . Peak recommendation window Hovering over the spectrum reveals a list with the peaks located the closest to the selected position User Manual | Phenom XL G2 Desktop SEM... -
Page 31: Typical Live Eds Workflow
• If you wish to save this measurement, click on “Add to project” (8). The EID application will open and you can save a project or add more images and measurements. Phenom XL G2 Desktop SEM | User Manual... -
Page 32: Eid Application
Text field to type in the title of the project. 5 . Spectrum view 11 . Live button Displays the EDS spectrum that has been previously Click to display the Main Live SEM image view. acquired or is currently being acquired. User Manual | Phenom XL G2 Desktop SEM... - Page 33 – Default – Exclude: Permanently excludes an element from any EID analysis – Change color: Reveals a pallet to select the color that will represent the selected element in an EDS map Phenom XL G2 Desktop SEM | User Manual...
-
Page 34: Eid Measurements Panel
When clicked, the SEM view displays a live SEM image. Stage and main SEM controls are enabled. Place any EID measurement on a feature to acquire the SEM image and start an EID measurement. User Manual | Phenom XL G2 Desktop SEM... -
Page 35: Eid Settings Page
A wizard with instructions will appear • Spot tab Set up of EID Spot measurement parameters • Linescan tab Set up of EID Linescan measurement parameters • Map tab Set up of EID Map measurement parameters Phenom XL G2 Desktop SEM | User Manual... -
Page 36: Eid Map View
2 . Thumbnail view Thumbnails of the SEM and the individual elemental maps are displayed 3 . Intensity bar Swipe left or right to change the display weight of each element within the map User Manual | Phenom XL G2 Desktop SEM... -
Page 37: Keyboard Shortcuts
Right-mouse left or right drag = Focus in SEM 8 . Ctrl + Left-mouse drag = Live Measuring in SEM 9 . S = Open/Close sidepanel 10 . T or O = Open/Close Top Panel (Operational Settings) Phenom XL G2 Desktop SEM | User Manual... -
Page 38: Maintenance
• The loading tray area should be kept dust free by wiping with a dust free dry cloth. In the United States, please contact: 888.777.5573 nanoScience 480.758.5400 support@nanoscience.com I n s t r u m e n t s User Manual | Phenom XL G2 Desktop SEM www.nanoscience.com... -
Page 39: Troubleshooting
• If the sample holder is provided with chip, activate the sample holder using NavCam when the door is closed. the chip code. In the United States, please contact: 888.777.5573 nanoScience 480.758.5400 support@nanoscience.com I n s t r u m e n t s Phenom XL G2 Desktop SEM | User Manual www.nanoscience.com... - Page 40 (Error 512). • If unloading is not possible, call Thermo Fisher Scientific Service Support. • If this message shows during installation make sure that the pre-vacuum pump hose is connected and tightened correctly. User Manual | Phenom XL G2 Desktop SEM...
- Page 41 Shut down the Phenom XL Desktop SEM and contact Thermo Fisher Scientific Pre-vacuum pump makes excessive noise during normal operation. Service Support. The pre-vacuum pump starts but Press the Reset button (section 6.2.3). the system does not start up. Phenom XL G2 Desktop SEM | User Manual...
-
Page 42: Error Recovery And Reporting
• Reboot the Phenom XL Desktop SEM software by pressing the RESET button (Fig. 2,6). – The RESET button is recessed to prevent accidental reboot of the instrument software. • Gently press the RESET button, using a pen or paperclip User Manual | Phenom XL G2 Desktop SEM... -
Page 43: Preparing The Phenom Xl Desktop Sem For Transport
Allen key. 8. Once all steps are completed, click Finish. In the United States, please contact: 888.777.5573 nanoScience 480.758.5400 support@nanoscience.com I n s t r u m e n t s www.nanoscience.com Phenom XL G2 Desktop SEM | User Manual... -
Page 44: Disconnecting And Packing
3. Using two people, one at each side, carefully lift the instrument and place it in the flight case. User Manual | Phenom XL G2 Desktop SEM... -
Page 45: Technical Specifications
USB 2.0 Flash drive, internal hard drive or network 2000 m Sample stage Computer controlled, motorized X and Y Sample size Maximum sample dimensions up to 100 x 100 mm, 40 mm (h) Phenom XL G2 Desktop SEM | User Manual... - Page 46 OUT OF OR IN CONNECTION WITH THE SOFTWARE OR DATA, OR PROFITS; OR THE USE OR OTHER DEALINGS IN THE SOFTWARE. BUSINESS INTERRUPTION) HOWEVER CAUSED AND ON ANY THEORY OF LIABILITY, WHETHER IN User Manual | Phenom XL G2 Desktop SEM...
- Page 47 BUT NOT LIMITED TO, THE IMPLIED WARRANTIES OF MERCHANTABILITY AND FITNESS FOR A PARTICULAR PURPOSE ARE DISCLAIMED. IN NO EVENT SHALL THE COPYRIGHT HOLDERS OR CONTRIBUTORS BE LIABLE FOR ANY DIRECT, INDIRECT, INCIDENTAL, SPECIAL, Phenom XL G2 Desktop SEM | User Manual...
- Page 48 In the United States, please contact: 888.777.5573 nanoScience 480.758.5400 support@nanoscience.com I n s t r u m e n t s www.nanoscience.com Find out more at thermofisher.com/phenom-xl For Research Use Only. Not for use in diagnostic procedures. © 2020 Thermo Fisher Scientific Inc. All rights reserved. All trademarks are the property of Thermo Fisher Scientific and its subsidiaries unless otherwise specified.
Need help?
Do you have a question about the Phenom XL G2 Desktop SEM and is the answer not in the manual?
Questions and answers