Table of Contents
Advertisement
Advertisement
Table of Contents

Subscribe to Our Youtube Channel
Related Manuals for Thermo Scientific Nicolet RaptIR


Summary of Contents for Thermo Scientific Nicolet RaptIR
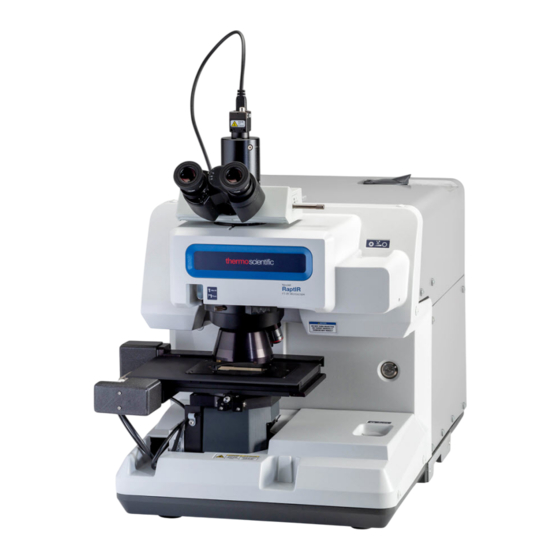
- Page 1 Nicolet RaptIR FTIR Microscope USERGUIDE 269-3517 00 A Revision A February 2022...
-
Page 2: Table Of Contents
Contents 1. Introduction 1.1 Intended use 1.2 Disclaimer 1.3 Conventions Used 1.4 Warranty information 2. Overview 2.1 Features and controls 2.2 Connections and ports 2.3 Optional Joystick 2.4 Optional trinocular eyepiece 2.5 Using OMNIC Paradigm software 3. Operation 3.1 Prepare the microscope 3.2 Analyze samples 3.3 ATR measurements 3.4 Locate, light, and mask the sample 3.5 Verify microscope performance 4. Maintenance 4.1 Clean the microscope 4.2 Maintain the liquid nitrogen dewar... - Page 3 © 2022 Thermo Fisher Scientific Inc. All rights reserved. Microsoft, Windows and Excel are either trademarks or registered trademarks of Microsoft Corporation in the United States and/or other countries. Teflon is a trademark of Chemours in the United States and/or other countries.
-
Page 4: Introduction
1. Introduction 1. Introduction Thermo Scientific Nicolet™ RaptIR™ FTIR Microscope... -
Page 5: Intended Use
1. Introduction 1.1 Intended use The Thermo Scientific Nicolet RaptIR FTIR Microscope is a Fourier-transform (FTIR) microscope designed for use in a controlled laboratory environment, and is intended to be used with Nicolet series spectrometers. With the RaptIR microscope, you can quickly find your target, collect high-resolution visual images, and generate high spatial resolution IR data for analysis. -
Page 6: Disclaimer
1. Introduction 1.2 Disclaimer Do not use the microscope for anything other than its intended purpose as described in this user guide. NOTICE Read the site and safety information for your system before using the microscope. Thermo Scientific Nicolet™ RaptIR™ FTIR Microscope... -
Page 7: Conventions Used
Avoid hazard. Indicates a hazardous situation which, if not avoided, could result in minor or moderate injury. NOTICE Follow instructions with this label to avoid damaging the system hardware or losing data. Note Contains helpful supplementary information. Nicolet™ RaptIR™ FTIR Microscope Thermo Scientific... -
Page 8: Warranty Information
Damage due to improper moving techniques. Missing or damaged parts if the shipping boxes are unpacked before our service engineer installs the system. Damage due to removing the sealed plastic bag before the instrument has come to room temperature. Thermo Scientific Nicolet™ RaptIR™ FTIR Microscope... -
Page 9: Overview
2. Overview... -
Page 10: Features And Controls
Press to turn the microscope on or off. The blue power indicator blinks while the microscope is start- and button ing up and stays a steady blue when the microscope is ready for use. Nicolet™ RaptIR™ FTIR Microscope Thermo Scientific... - Page 11 Align the red indicator dots on the stage and the sample slide. alignment indicator Control stage Used to rotate the stage during installation. Do not adjust after installation. orientation Slide-in The optional slide-in ATR attachment is used for ATR measurements. ATR attachment Thermo Scientific Nicolet™ RaptIR™ FTIR Microscope...
-
Page 12: Connections And Ports
2.2 Connections and ports USB 3.0 connection to computer's USB 3.0 port Connection to the optional joystick Connect to Auxiliary Signals port on the spectrometer Connect to "Accessory" port on the spectrometer Connection to power supply cable Nicolet™ RaptIR™ FTIR Microscope Thermo Scientific... -
Page 13: Optional Joystick
Push the joystick forward, backward, left, or right to move the stage along the sample plane. Rotate to move the stage up or down. Speed control Controls the speed of the stage for precise, slow movement or fast movement. Thermo Scientific Nicolet™ RaptIR™ FTIR Microscope... -
Page 14: Optional Trinocular Eyepiece
Adjustable eyepieces for looking at the sample. Best used with the optional joystick. Three-position view selector Controls the light path for the eyepieces. In: Eyepiece only, no camera Middle: Eyepiece and camera Out: Camera only, no eyepieces Camera The USB camera is operated with OMNIC Paradigm software. Nicolet™ RaptIR™ FTIR Microscope Thermo Scientific... -
Page 15: Using Omnic Paradigm Software
2. Overview 2.5 Using OMNIC Paradigm software Run your microscope and analyze your samples using OMNIC Paradigm software, Thermo Scientific's streamlined material analysis software. The user-friendly dashboard screen helps you view instrument status and recent work, process your spectra, conduct multi-component searching, and create new libraries. Designed with lab managers and science educators in mind, this software helps automate workflows using an intuitive drag-and-drop workflow creator. - Page 16 The map view Analyze your sample using the map view. Here you can view your sample, define areas of interest for your analysis, and measure sample data. Nicolet™ RaptIR™ FTIR Microscope Thermo Scientific...
- Page 17 Use the arrows around the live image to move the stage without a joystick. Mosaic view Shows the mosaic image and is the primary workspace where you define your background point and areas for analysis. Thermo Scientific Nicolet™ RaptIR™ FTIR Microscope...
- Page 18 The sky view shows a high-level view of the mosaic. When you zoom in, the sky view shows you what part view of the mosaic you are viewing. You can use the sky view to navigate around the whole mosaic. Nicolet™ RaptIR™ FTIR Microscope Thermo Scientific...
-
Page 19: Operation
3. Operation... -
Page 20: Prepare The Microscope
Liquid nitrogen is extremely cold and therefore hazardous. Wear protective clothing and eyewear and follow standard laboratory safety practices to prevent injury. Pour the liquid nitrogen slowly. If you pour too quickly, the nitrogen may splash. Nicolet™ RaptIR™ FTIR Microscope Thermo Scientific... - Page 21 2. If the software is connected to the microscope already, the instrument status displays Nicolet iS50 RaptIR and a green check mark. . 3. If the software is not already connected to the instrument, connect now. a. Go to Configure > Connectivity and select the spectrometer. Click Connect. Thermo Scientific Nicolet™ RaptIR™ FTIR Microscope...
- Page 22 To switch to the microscopy view, go to Configure > Sample Location > RaptIR. The dashboard changes to show microscopy tools. To switch back to spectroscopy tools, change the sample location back to another accessory or module on your main spectrometer. Nicolet™ RaptIR™ FTIR Microscope Thermo Scientific...
-
Page 23: Analyze Samples
When your sample is installed, you are ready to begin the session and collect a mosaic. If you ejected the stage, the stage will move back into position automatically when you begin the session. You can leave the stage ejected until you start the session. Thermo Scientific Nicolet™ RaptIR™ FTIR Microscope... - Page 24 To start the session without automatically collecting a mosaic, select Do not capture mosaic. 3. Click Start Session. The stage moves your sample into position and the software collects a low-magnification mosaic. The software switches to the Map view and displays the mosaic in the main panel. Nicolet™ RaptIR™ FTIR Microscope Thermo Scientific...
- Page 25 Spectra tab. If you are measuring multiple areas over a period of time, replace your background measurement periodically. In general, you should always have a recent measurement of the background before your measure the sample. Thermo Scientific Nicolet™ RaptIR™ FTIR Microscope...
- Page 26 When the measurement is complete, view the results in the new tab. See "Next steps" for more on analyzing and sharing your results. 3.2.6 Analyze particles Use the Particle Analysis tools to locate, characterize, and identify particles. To analyze particles ❖ Nicolet™ RaptIR™ FTIR Microscope Thermo Scientific...
- Page 27 Refine your selection using the options and selection tools. Select Recalculate after updating settings to update the particles. See the OMNIC Paradigm guides and tutorials for detailed explanations of the particle analysis tools and settings. Thermo Scientific Nicolet™ RaptIR™ FTIR Microscope...
- Page 28 3.2.7 Next steps Apply profiles to visualize properties of the sample data Apply processing to selected spectra Create reports or export data Explore spectra further in the Spectra view. Nicolet™ RaptIR™ FTIR Microscope Thermo Scientific...
-
Page 29: Atr Measurements
Once you have captured a mosaic, you can measure the background with the crystal installed and measure you sample using the area or points tools, just like a standard reflection measurement. In general, the default ATR Contact Thermo Scientific Nicolet™ RaptIR™ FTIR Microscope... - Page 30 Press Contact to test the contact pressure Press Release to release contact. "Analyze areas, lines, and points" "Analyze particles". The software prompts you to insert or remove the ATR crystal attachment as needed. Nicolet™ RaptIR™ FTIR Microscope Thermo Scientific...
-
Page 31: Locate, Light, And Mask The Sample
To move the stage horizontally, open the Camera View and open the Stage tools. Click the arrows to the sides and above and below the sample image to move the stage. Change the movement speed to change how far the stage moves with each click. Thermo Scientific Nicolet™ RaptIR™ FTIR Microscope... - Page 32 Double-click inside the live video image to center the stage on that position. To move the stage up and down, open the Camera View and open the focus settings. Click the left and right arrows to move the stage up or down. Nicolet™ RaptIR™ FTIR Microscope Thermo Scientific...
- Page 33 To bring the sample into focus automatically, click Autofocus. The software moves the stage and up down to find the optimal focus. Autofocus works best with areas of high visual contrast. Autofocus may struggle with some low-contrast samples and samples with multiple focal planes. Tips for autofocus Thermo Scientific Nicolet™ RaptIR™ FTIR Microscope...
- Page 34 To control the illumination in the software, open the Camera View. Select either Transmission or Reflection and drag the slider to the desired light setting. You can also enter an exact value. Autoilluminate Click Autoilluminate for the software to automatically optimize the sample illumination. Nicolet™ RaptIR™ FTIR Microscope Thermo Scientific...
- Page 35 2. Use the sliders or enter an exact value to adjust the height, width, and rotation of the aperture. Note To visualize the aperture, adjust the illumination until you can see the bright blue rectangle of light passing through the aperture. Thermo Scientific Nicolet™ RaptIR™ FTIR Microscope...
-
Page 36: Verify Microscope Performance
PV and qualification workflows use the polystyrene standards plate to test the microscope's performance. Table 3-1: Descriptions of qualification and performance verification workflows Test Description Nicolet RaptIR - Factory Qual- Runs factory recommended tests and all qualification tests. ification Nicolet RaptIR - Factory Runs factory recommended tests and all qualification tests using the ATR accessory. - Page 37 There is a problem with one or more software services. Click the system status icon for details. If the service does not start automatically after a few minutes, restart the computer. If you continue to have trouble with system status errors, contact customer support. Thermo Scientific Nicolet™ RaptIR™ FTIR Microscope...
- Page 38 [This page intentionally left blank]...
-
Page 39: Maintenance
4. Maintenance... -
Page 40: Clean The Microscope
If you wish to remove dust from a mirror, window, or optical component, blow it off with the dust blower that was included with the microscope. Do not use canned air or duster, which may damage the instrument. Never allow any liquid to come into contact with a window or optical component. Nicolet™ RaptIR™ FTIR Microscope Thermo Scientific... -
Page 41: Maintain The Liquid Nitrogen Dewar
Water and atmospheric contaminants condensing on the detector window will show up in spectra as unwanted peaks NOTICE If your instrument shows any of these symptoms, the detector dewar may have a vacuum leak. Contact us immediately for assistance. Thermo Scientific Nicolet™ RaptIR™ FTIR Microscope... -
Page 42: Troubleshooting
5. Troubleshooting... - Page 43 ATR attachment as a lever to tighten the objective. Over tightening the objective will damage it. If the objective feels snug and you are still having alignment issues, contact your service representative. Nicolet™ RaptIR™ FTIR Microscope Thermo Scientific...
- Page 44 USB 3.0 connector. There may be a problem with "System The system status shows a yellow or red icon. the instrument Status"for more or with soft- information. ware services. Thermo Scientific Nicolet™ RaptIR™ FTIR Microscope...
-
Page 45: Contacting Us
6. Contacting us For Technical Support, please contact: www.thermofisher.com... -
Page 46: Ordering Parts
6. Contacting us 6.1 Ordering parts To order parts, contact us. If you need to send the instrument or an accessory to us for repair, call or e-mail us first for any shipping requirements or other instructions. Nicolet™ RaptIR™ FTIR Microscope Thermo Scientific...
Need help?
Do you have a question about the Nicolet RaptIR and is the answer not in the manual?
Questions and answers