Table of Contents
Advertisement
Available languages
Available languages
Quick Links
KURZANLEITUNG
QUICK USER GUIDE
STRUČNŶ NÁVOD
OVERSIGTSVEJLEDNING
GUÍA RÁPIDA
PIKAOPAS
GUIDE RAPIDE
KRATKA UPUTA
RÖVID ÚTMUTATÓ
GUIDA RAPIDA
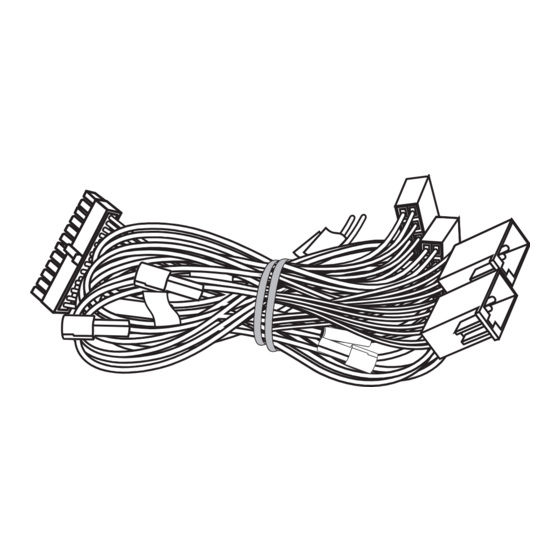
ISO cable harness
BEKNOPTE HANDLEIDING
HURTIGVEILEDNING
KRÓTKA INSTRUKCJA
BREVE MANUAL
GHID RAPID
КРАТКАЯ ИНСТРУКЦИЯ
ÖVERSIKTSINSTRUKTION
STRUČNÝ NÁVOD
ÖZET KILAVUZ
КОРОТКА ІНСТРУКЦІЯ
Advertisement
Table of Contents

Related Manuals for Bury technologies ISO cable harness


Summary of Contents for Bury technologies ISO cable harness
- Page 1 ISO cable harness KURZANLEITUNG BEKNOPTE HANDLEIDING QUICK USER GUIDE HURTIGVEILEDNING STRUČNŶ NÁVOD KRÓTKA INSTRUKCJA OVERSIGTSVEJLEDNING BREVE MANUAL GUÍA RÁPIDA GHID RAPID PIKAOPAS КРАТКАЯ ИНСТРУКЦИЯ GUIDE RAPIDE ÖVERSIKTSINSTRUKTION KRATKA UPUTA STRUČNÝ NÁVOD RÖVID ÚTMUTATÓ ÖZET KILAVUZ GUIDA RAPIDA КОРОТКА ІНСТРУКЦІЯ...
-
Page 2: Scope Of Supply
Scope of supply Lieferumfang Leveringsomvang Scope of supply Levering Rozsah dodávky Zawartość Leveringsomfang Âmbito de fornecimento Alcance de suministro Scopul ambalarii Toimituksen laajuus Комплектность Fourniture Leveransomfattning Opseg isporuke Obsah balenia Sevkiyatın İçeriği A csomag tartalma Комлектність Contenuto della fornitura... -
Page 3: Leveransens Omfattning
Beschreibung der Komponenten: Scope of delivery: ISO-Kabelbaum ISO cable harness Obsah dodávky: Medfølger: Svazek ISO kabelů ISO kabelsæt Contenido: Toimituksen sisältö: Mazo de cables ISO ISO-kaapelisarja Contenu de la livraison : Opseg isporuke Faisceau de câble ISO ISO rasplet kraja kabela A kiszállítás tartalma:... -
Page 4: Montage
Montage PWR/LSP/LINE OUT Schritt 1: Ziehen Sie die ISO-Stecker hinten am Radio ab und ersetzen Sie diese durch die Stecker des ISO-Kabelbaums. Die nun freien ISO-Stecker verbinden Sie bitte mit den beiden Buchsen vom ISO-Kabelbaum (siehe Abbildung). - Page 5 Montage Möchten Sie die Musik oder die Sprache über die vier LINE-Kabel übertragen, dann sind diese entsprechend an das jeweilige Radio und dessen Anschlüsse (PHONE-IN bzw. AUX-IN) zu adaptieren. Entsprechende Adapter sind im Fachhandel erhältlich. Schritt 2: Die FSE unterstützt die Radio-Stummschaltfunktion, falls diese ebenfalls vom Radio unterstützt wird. Das Stummschaltsignal wird über das gelbe Kabel des ISO-Kabelbaums an das Radio ausgegeben.
- Page 6 - 12V Power - 12/24V Ignition - Ground - Line-out 1 - Line-out 2 1-Line L + / Phone L + 1-Line R + / Phone R + 2-Line L - / Phone L - 2-Line R - / Phone R - Anschlussplan für ISO-Kabelbaum...
- Page 7 Montage - Micro Molex 24 - ISO - connection to the electronic box (HFCK) - connection to the vehicle’s speakers - connection to the vehicle’s power supply - connection to the car radio - connection to the car radio 1 - Mute 3 2 - Mute 2 3 - Mute 1 4 - Ignition...
-
Page 8: Installation
Step 1: Pull the ISO jacks at the back of the radio off and replace them with the jacks at the ISO cable harness. Connect the now free ISO jacks with both sockets from the ISO cable harness (see picture). - Page 9 Montáž PWR/LSP/LINE OUT Krok 1: Odpojte konektor ISO na zadní straně rádia a místo něj připojte konektor z kabelového svazku ISO. Nyní volný konektor ISO připojte k oběma zdířkám kabelového svazku ISO (viz obrázek). Pokud chcete přenášet hudbu nebo hlas po čtyřech kabelech LINE, musíte je upravit podle daného rádia a jeho připojení...
- Page 10 Installation PWR/LSP/LINE OUT Trin 1: Træk ISO-stikket ud bag på radioen, og udskift dette med stikket fra ISO-kabelsættet. Det nu ledige ISO-stik skal du forbinde med de to bøsninger fra ISO-kabelsættet (se figur). Hvis du vil overføre musik eller tale gennem de fire LINE-kabler, skal disse forsynes med adaptere, der passer til den pågældende radio og dennes tilslutninger (PHONE-IN eller AUX-IN).
-
Page 11: Montaje
Montaje PWR/LSP/LINE OUT Paso 1: Retire el conector ISO de detrás de la radio y sustitúyalo por el conector del arnés de cables ISO. Conecte el conector ISO que ha quedado libre con las dos hembrillas del arnés de cables ISO (véase figura). Si desea transferir música o voz a través de los cuatro cables LINE, estos deberán adaptarse a la radio corres- pondiente y a sus conectores (PHONE-IN o AUX-IN). - Page 12 Asennus PWR/LSP/LINE OUT 1. vaihe: Vedä radion takaosassa oleva ISO-pistoke irti ja vaihda se ISO-johdinnipun pistokkeeseen. Yhdistä nyt vapaana olevat ISO-pistokkeet ISO-johdinnipun molempiin liitäntöihin (katso kuva). Mikäli autoradiossa ei ole ISO-liitäntää, kannattaa hankkia väliadapterijohto, joka muuttaa BURY- johtosarjan ISO-liitännän oikeaksi. On myös mahdollista kytkeä johdot huolellisesti juottamalla. Mikäli autoradiossa ei ole perinteisiä...
- Page 13 Montage PORT PWR/LSP/LINE OUT Étape 1 : Retirez le connecteur ISO à l’arrière de l’autoradio et remplacez-le avec le connecteur du faisceau de câbles ISO. Le connecteur ISO est maintenant libre. Veuillez le connecter avec les deux ports du faisceau de câbles ISO (voir la figure).
- Page 14 Montaža PWR/LSP/LINE OUT Korak 1: Izvucite ISO utikač na stražnjoj strani radija i zamijenite ga utikačima ISO snopa kabela. Sada slobodne ISO utikače spojite na dva ulaza ISO snopa kabela (vidi sliku). Ukoliko želite prenositi glazbu ili govor preko četiri LINE kabela, odgovarajuće ih prilagodite na dotični radio i nje- gove priključke (PHONE-IN odn.
- Page 15 Installálása PWR/LSP/LINE OUT 1. lépés: Húzza le a rádió hátuljáról az ISO csatlakozót, és helyettesítse azt az ISO kábelköteg csatlakozójával. A sza- baddá tett ISO csatlakozót kérjük, csatlakoztassa az ISO kábelköteg mindkét kapcsolóhüvelyéhez (lásd a képet). Ha a zenét vagy a beszédhangot a négy LINE kábelen keresztül szeretné továbbítani, akkor ezeket az adott rádió csatlakozóihoz kell adaptálni (PHONE-IN ill.
- Page 16 Montaggio PWR/LSP/LINE OUT Fase 1: Estrarre i connettori ISO dietro alla radio e sostituirli con i connettori del fascio di cavi ISO. Collegare quindi i connettori ISO con le due prese del fascio di cavi ISO (v. figura). Se volete trasmettere musica o voce attraverso i quattro cavi LINE, questi devono essere adatti alla vostra radio e alle relative prese di collegamento (PHONE-IN o AUX-IN).
- Page 17 Montage PWR/LSP/LINE OUT Stap 1: Trek de ISO-stekers achter op de radio eruit en vervang deze door de stekers van de ISO-bedrading. De nu vrije ISO-stekers verbindt u met de beide bussen van de ISO-bedrading (zie afbeelding). Mocht u de muziek of de spraak via de vier LINE-kabels willen overdragen, dan moeten deze dienovereenkomstig aan de betreffende radio en de aansluitingen ervan (PHONE-IN resp.
- Page 18 Montering PWR/LSP/LINE OUT Trinn 1: Trekk ut ISO-pluggen bak på radioen, og erstatt den med pluggen på ISO-kabelbunten. Den ledige ISO-pluggen forbinder du med de to kontaktene på ISO-kabelbunten (se illustrasjon). Hvis du vil overføre musikk eller tale via de fire LINE-kablene, må disse tilpasses til den aktuelle radioen og de tilhørende tilkoblingene (PHONE-IN eller AUX-IN).
- Page 19 Montaż PWR/LSP/LINE OUT Krok 1: Proszę wyciągnąć wtyczki ISO podłączone do radia, na tylnej ściance i zastąpić je wtyczkami od wiązki kabla ISO. Wolne wtyczki ISO proszę połączyć z obydwoma gniazdami od wiązki kabla ISO (patrz rysunek). Jeśli muzyka i głos mają być transmitowane poprzez 4 kable LINE, to należy je podłączyć za pomocą adaptera do radia i jego gniazd (PHONE-IN lub AUX-IN).
- Page 20 Montagem PWR/LSP/LINE OUT Passo 1: Retirar a ficha ISO da parte de trás do rádio e substituí-la pela ficha da cablagem ISO. Ligar as fichas ISO agora livres aos dois conectores da cablagem ISO (ver figura). Caso deseje transferir música e voz pelos quatro cabos LINE, deve adaptar os cabos correspondentes ao res- pectivo rádio e suas portas (PHONE-IN adequado a AUX-IN).
- Page 21 Montarea PWR/LSP/LINE OUT Pasul 1: Decuplaţi fişa ISO din spatele radioului şi înlocuiţi-o cu fişa mănunchiului de cabluri ISO. Conectaţi fişele ISO, acum libere, la cele două prize de pe mănunchiul de cabluri ISO (vezi figura). Dacă doriţi să transmiteţi muzica sau vocea prin cele patru cabluri LINE, acestea trebuie adaptate în mod cores- punzător la radioul respectiv şi la racordurile acestuia (PHONE-IN, respectiv AUX-IN).
- Page 22 Монтаж PWR/LSP/LINE OUT Шаг 1: Извлеките штекеры ISO на задней панели радиоприемника и вставьте вместо них штекеры кабельного жгута ISO. Отсоединенные штекеры ISO вставьте в оба гнезда кабельного жгута ISO (см. рисунок). Для передачи аудио или голоса по четырем кабелям с маркировкой LINE подсоедините их к соответ- ствующим...
- Page 23 Montering PWR/LSP/LINE OUT Steg 1: Dra ur ISO-anslutningen på radions baksida och ersätt den med kontakten för ISO-kablaget. Den nu lösa ISO- anslutningen kopplar du ihop med de båda anslutningarna från ISO-kablaget (se bild). Om du vill överföra musik eller tal över de fyra LINE-kablarna skall dessa anslutas på motsvarande sätt till den aktuella radion och dess anslutningar (PHONE-IN resp.
- Page 24 Montáž PWR/LSP/LINE OUT Krok 1: Vytiahnite ISO konektor vzadu z rádia a nahraďte ho konektormi ISO káblového zväzku. Voľné ISO konektory spojte, prosím, s obidvoma portami ISO káblového zväzku (pozri obrázok). Ak chcete prenášať hudbu alebo hovorené slovo cez štyri káble LINE, tak sa musia tieto príslušne prispôsobiť dotyčnému rádiu a jeho prípojkám (PHONE-IN, resp.
- Page 25 Montajı PWR/LSP/LINE OUT 1. adım: Radyonun arkasında bulunan ISO fişlerini çıkartın ve bunları ISO kablo demetinde bulunan fişler ile değiştirin. Açıkta bulunan ISO fişlerini, ISO kablo demetinde bulunan iki yuvaya bağlayın (bkz. resim). Müziği ya da konuşma sesini dört adet LINE kablosu üzerinden aktarmak istiyorsanız, bunları ilgili radyoya ve radyo bağlantılarına uygun bir şekilde bağlayın (PHONE-IN veya AUX-IN).
- Page 26 Mонтаж PWR/LSP/LINE OUT Крок 1: Витягніть штекери ISO на задній панелі радіоприймача, вставте замість них штекери кабельного джгута ISO. Від‘єднані штекери ISO вставте в обидва гнізда кабельного джгута ISO (див. малюнок). Для передачі аудіо або голосу по чотирьох кабелях LINE під‘єднайте їх до відповідних рознімів радіоприй- мача...
-
Page 27: Further Information
Further Information Eine ausführliche Bedienungsanleitung für die CC 9048, CC 9058, CC 9068, CC 9068 App fin- den Sie auf unserer Webseite unter der Adresse: www.bury.com Wir wünschen Ihnen eine gute Fahrt. A detailed instructions manual for the CC 9048, CC 9058, CC 9068, CC 9068 App is available on our website under the following address: www.bury.com Have a good trip! Podrobný... - Page 28 Opširnu uputu o posluživanju za CC 9048, CC 9058, CC 9068, CC 9068 App ćete pronaći na našoj web stranici na adresi: www.bury.com Želimo Vam sretan put. A CC 9048, CC 9058, CC 9068, CC 9068 App kezelési útmutatóit weboldalunkon töltheti le a www.bury.com címen.
- Page 29 Further Information Manualul de utilizare CC 9048, CC 9058, CC 9068, CC 9068 App este disponibil pe site-ul nostru la urmatoarea adresa: www.bury.com Vă dorim drum bun. Подробную инструкцию по эксплуатации CC 9048, CC 9058, CC 9068, CC 9068 App можно найти...
- Page 30 Service In case of general or technical queries, suggestions and comments, please do not hesitate to contact our team at any time. Suggestions and feedback are always welcomed: Administration: Producer: BURY GmbH & Co. KG BURY Spółka z o.o. Robert-Koch-Straße 1-7 ul.
- Page 31 Further Information Specific explanations regarding the assertion of claims based on defects of the product (warranty / guarantee / service) for certain countries can be found at the end of these instructions. Information on the disposal of electrical goods in the EU The crossed out wheelie bin symbol means that electrical and electronic products, batteries and accumulators must be disposed of separately in the European Union.
-
Page 32: Warranty Claim Process
EXPRESS WARRANTY AGAINST DEFECTS – AUSTRALIA EFFECTIVE 1st JANUARY, 2012 This product if imported by Point to Point Technology Pty Ltd is warranted in Australia to be free from any defect in material and workmanship, subject to the following terms and conditions. Who provides this warranty: POINT TO POINT TECHNOLOGY PTY LTD 2/2 KEYSBOROUGH CLOSE, KEYSBOROUGH VIC 3173... -
Page 33: Warranty Exclusions
return of the faulty product. If you choose do not wish to proceed with the warranty claim, you must return the replacement uni to us using the pre-paid return bag. Failure by the customer to return either unit within 14 days may incur a charge for the cost of the replacement unit. Warranty Exclusions Failure to provide a proof of purchase will result in your warranty claim being rejected.
Need help?
Do you have a question about the ISO cable harness and is the answer not in the manual?
Questions and answers