Frigidaire GMOS1964AD - Gallery 1.9 Cu. Ft. Over-The-Range Microwave with Sensor Cook Manual
- Use & care manual (23 pages)
Advertisement
- 1 INTRODUCTION
- 2 CONTROL PANEL
-
3
OPERATION
- 3.1 SETTING THE CLOCK
- 3.2 SETTING THE CLOCK ON/OFF
- 3.3 CHILD LOCK
- 3.4 VENT FAN
- 3.5 SURFACE LIGHT
- 3.6 Using Sensor Settings
- 3.7 Covering Foods
- 3.8 Using the +10/+30 Sec key
- 3.9 SENSOR COOK
- 3.10 SENSOR REHEAT
- 3.11 POPCORN
- 3.12 VEGGIES
- 3.13 POTATO
- 3.14 BEVERAGE
- 3.15 SETTING MELT/SOFTEN
- 3.16 USING AUTO DEFROST
- 3.17 OPERATING TIPS
- 3.18 MICROWAVE COOKING
- 3.19 USER SETTING VOLUME
- 3.20 TURNTABLE ON/OFF
- 3.21 SETTING WEIGHT LB/KG
- 3.22 SETTING LANGUAGE
- 3.23 DEMO SETTING
- 3.24 SETTING FILTER
- 3.25 USING ONE TOUCH START
- 3.26 SETTING THE TIMER
- 3.27 MULTI-STAGE COOKING
- 4 CLEANING AND CARE
- 5 SERVICE CALL CHECK
- 6 SPECIFICATIONS
- 7 IMPORTANT SAFETY INSTRUCTIONS
- 8 Documents / Resources
INTRODUCTION
FAQs, helpful tips and videos, cleaning products, and kitchen and home accessories are available at www.frigidaire.com.
We are here for you! Visit our website, chat with an agent, or call us if you need help. We may be able to help you avoid a service visit. If you do need service, we can get that started for you.
Let's make it official! Be sure to register your product.
Visit us at Frigidaire.com/register
Or use your mobile device to scan the QR code.


Serial Number Location
CONTROL PANEL

OPERATION
- Before operating your new appliance make sure you read and understand this Use and Care Guide completely.
- The clock can be disabled when the microwave is first plugged in and the STOP key is selected. To re-enable the clock follow clock instructions.
SETTING THE CLOCK
| Example: setting clock display for 9:00: | |
|  |
| PRESS START |
|  |
SETTING THE CLOCK ON/OFF
| Example: to turn off clock display: | |
| |
|  |
| |
| Example: to turn on clock display: | |
| |
 and hold pad.
CHILD LOCK
- Suppose you want to lock or unlock the controls.
| Touch: | Display Shows: |
|  (current time will display after 2 seconds) |
VENT FAN
| Touch: | Display Shows: |
|  |
|  |
|  |
|  |

SURFACE LIGHT
| Touch: | Display Shows: |
| |
| |
| |
 x 1
x 1Sensor cooking has an electronic controlled sensor that detects the vapor (moisture and humidity) emitted from the food as it heats. The sensor adjusts the cooking times and power level for various foods and quantities automatically.
Using Sensor Settings
- Be sure the exterior of the cooking container and the interior of the oven are dry. Wipe off any moisture with a dry cloth or paper towel.
- The oven works with foods at normal storage temperature. For example, popcorn would be at room temperature.
- More or less food than the quantity listed in the chart should be cooked following the guidelines in any microwave cookbook.
- During the first part of SENSOR COOKING, food name will appear in the display. Do not open the oven door or touch the
![]() pad during this part of the cycle. The measurement of vapor will be interrupted.
pad during this part of the cycle. The measurement of vapor will be interrupted.
When the sensor detects the vapor emitted from the food, remainder of cooking time will appear. Door may be opened when remaining cooking time appears in the display. At this time, you may stir or season food, as desired. - If the sensor does not detect vapor properly when popping popcorn, the oven will turn off, and the correct time of day will be displayed. If the sensor does not detect vapor properly when cooking other foods, the error code: E-04 will be displayed. will be displayed, and the oven will turn off.
- Check food for temperature after cooking. If additional time is needed, continue to cook manually.
 pad during this part of the cycle. The measurement of vapor will be interrupted.
Covering Foods
Some foods cook better when covered.
- Casserole lid.
- Plastic wrap: Use plastic wrap recommended for microwave cooking. Cover dish loosely; allow approximately 1/2 inch to remain uncovered to allow steam to escape. Plastic wrap should not touch food.
- Wax paper: Cover dish completely; fold excess wrap under dish to secure. If dish is wider than paper, overlap two pieces at least one inch to cover.
Be careful when removing any covering to allow steam to escape away from you.
 NOTES for SENSOR COOKING
- The final cooking result will vary according to the food condition (e.g. initial temperature, shape, quality). Check food for temperature after cooking. If additional time is needed, continue to cook manually.
- Stay near the oven while it's in use and check cooking progress frequently so that there is no chance of overcooking food.
- When SENSOR COOKING is selected Turntable On is automatically set for optimum cooking.
Using the +10/+30 Sec key
This feature will let you quickly start or add 10 or 30 seconds. Touch the +10 Sec / +30 pad to: Sec
- Start cooking for 10 seconds / 30 seconds at 100% power level.
- Extend cooking time in multiples of 10 seconds / 30 seconds each time this pad is touched during microwave cooking.
NOTE
Touch the  or
or  to add time to any cooking cycle in progress expect for defrost cooking.
SENSOR COOK
You can cook foods by touching the sensor cook pad multiple times. You don't need to calculate cooking time or power level.
- Suppose you want to cook frozen breakfast.
| Touch: | Display Shows: | |
| PRESS AGAIN FOR OPTIONS/ PRESS START | |
| PRESS AGAIN FOR OPTIONS/ PRESS START | |
| PRESS AGAIN FOR OPTIONS/ PRESS START | |
| PRESS AGAIN FOR OPTIONS/ PRESS START | |
| PRESS AGAIN FOR OPTIONS/ PRESS START | |
| Touch Sensor Cook | Food | Amount |
| X1 | Bacon | 1-3 slices |
| X2 | Frozen Dinner | 10 oz/20 oz |
| X3 | Rice | 1-2 cups |
| X4 | Frozen Breakfast | 10 oz/20 oz |
| Touch Sensor Reheat | Food | Amount |
| X1 | Soup/Sauce | 1-2 cups |
| X2 | Pizza | 1-4 slices |
| X3 | Dinner Plate | 1 plate |
| X4 | Casserole | 1 serving |
| X5 | Rolls | 1-3 pieces |
SENSOR REHEAT
- Suppose you want to reheat rolls with sensor reheat.
| Touch: | Display Shows: |
| PRESS AGAIN FOR OPTIONS/ PRESS START |
| PRESS AGAIN FOR OPTIONS/ PRESS START |
| PRESS AGAIN FOR OPTIONS/ PRESS START |
| PRESS AGAIN FOR OPTIONS/ PRESS START |
| PRESS AGAIN FOR OPTIONS/ PRESS START |
|
Time counting down |

POPCORN
The popcorn quick touch pad lets you pop 3.3, 3.0, 1.75 ounce bags of commercially packaged microwave popcorn. Pop only one package at a time. If you are using a microwave popcorn popper, follow manufacturer's instructions.
- Suppose you want to pop a 3.3 oz. popcorn.
| Touch: | Display Shows: |
| PRESS AGAIN FOR OPTIONS/ PRESS START oz oz |
|
Time counting down |
| Touch Popcorn | Amount |
| X1 | 3.3 oz |
| X2 | 3.0 oz |
| X3 | 1.75 oz |

NOTES for Popcorn
Do not use regular paper bags.
Do not re-pop unpopped kernals.
Do not pop popcorn in glass cookware.
VEGGIES
There are 2 options (Frozen Vegetables, Fresh Vegetables) under the Veggies.
- Suppose you want to cook two cups of frozen veggies.
| Touch: | Display Shows: |
| PRESS AGAIN FOR OPTIONS/ PRESS START |
| PRESS AGAIN FOR OPTIONS/ PRESS START |
|  |
POTATO
- Suppose you want to cook 1 to 4 baked Potatoes.
| Touch: | Display Shows: |
| PRESS START |
|  |
NOTES
Cooking times are based on an average 8 ounce potato.
BEVERAGE
You can choose 1 cup or 2 cups of beverages.
- Suppose you want to reheat beverages 1 cup.
| Touch: | Display Shows: |
| PRESS AGAIN FOR OPTIONS/ PRESS START |
|
Time counting down |

SETTING MELT/SOFTEN
The oven uses low power to melt and soften items. See the following table.
- Suppose you want to melt 2 sticks of Butter.
| Touch: | Display Shows: | |
| PRESS AGAIN FOR OPTIONS/ PRESS START | |
|  | |
| | PRESS START | |
|
Time counting down | |
| Touch Melt/Soften | Food | Amount |
| x1 | Melt Butter | 1 or 2 sticks |
| x2 | Melt Chocolate | 2/4/8 oz |
| x3 | Soften Ice Cream | 1 pint/1.5 quart |
| x4 | Soften Cream Cheese | 3 or 8 oz |


USING AUTO DEFROST
The auto defrost feature provides you with the best defrosting method for frozen foods. The cooking guide will show you which defrost sequence is recommended for the food you are defrosting. For added convenience, the Auto Defrost includes a built-in beep mechanism that reminds you to check, turn over, separate, or rearrange the food in order to get the best defrost results. Three different defrosting levels are provided:
- MEAT
- POULTRY
- FISH
Available weight is 0.1-6.0 lbs
- Suppose you want to defrost 1.2 lbs of fish.
| Touch: | Display Shows: |
| PRESS AGAIN FOR OPTIONS/ PRESS START |
| PRESS AGAIN FOR OPTIONS/ PRESS START |
| PRESS AGAIN FOR OPTIONS/ PRESS START |
|  |
| PRESS START |
|
Time counting down |


NOTE
The oven will beep during the defrost cycle. At this time, open the door and turn, separate, or rearrange the food. Remove any portions that have thawed. Return frozen portions to the oven and touch START to resume the defrost cycle.
OPERATING TIPS
- For best results, remove fish, shell fish, meat and poultry from its original closed paper or plastic package (wrapper). Otherwise, the wrap will hold steam and juice close to the foods, which can cause the outer surface of the foods to cook.
- For best results, roll your ground meat into a ball before freezing. During the DEFROST cycle, the microwave will signal when it is time to turn the meat over. Scrape off any excess frost from the meat and continue defrosting.
- Place foods in a shallow container or on a microwave roasting rack to catch drippings.
This table shows food type selections and the weights you can set for each type. For best results, loosen or remove covering on food.
| Touch Defrost | Menu | Amount |
| x1 | Meat | 0.1-6.0 lbs. |
| x2 | Poultry | 0.1-6.0 lbs. |
| x3 | Fish | 0.1-6.0 lbs. |
MICROWAVE COOKING
- Suppose you want to microwave for 2:30 at 40% power level.
| Touch: | Display Shows: | |
| PRESS START | |
| PRESS START | |
| PRESS START | |
|
Time counting down | |
| TOUCH POWER LEVEL PAD NUMBER OF TIMES FOR DESIRED POWER | APPROXIMATE PERCENTAGE OF POWER | COMMON WORDS FOR POWER LEVELS |
| Power Level x 1 | 100% | High |
| Power Level x 2 | 90% | |
| Power Level x 3 | 80% | |
| Power Level x 4 | 70% | Medium High |
| Power Level x 5 | 60% | |
| Power Level x 6 | 50% | Medium |
| Power Level x 7 | 40% | |
| Power Level x 8 | 30% | Med Low/ Defrost |
| Power Level x 9 | 20% | |
| Power Level x 10 | 10% | Low |
| Power Level x 11 | 0% | |


USER SETTING VOLUME
- Suppose you want to set the volume for "off".
| Touch: | Display Shows: |
| PRESS AGAIN FOR OPTIONS/ PRESS START PRESS AGAIN FOR OPTIONS/ PRESS START PRESS AGAIN FOR OPTIONS/ PRESS START |
|  |


TURNTABLE ON/OFF
| Touch: | Display Shows: |
| PRESS AGAIN FOR OPTIONS/ PRESS START PRESS AGAIN FOR OPTIONS/ PRESS START |
|  |


SETTING WEIGHT LB/KG
- Suppose you want to change from lb to kg.
| Touch: | Display Shows: |
| PRESS AGAIN FOR OPTIONS/ PRESS START |
|  |
SETTING LANGUAGE
When previous language is English, suppose you want to set the language.
| Touch: | Display Shows: |
| PRESS AGAIN FOR OPTIONS/ PRESS START PRESS AGAIN FOR OPTIONS/ PRESS START |
|  |


When the setting is completed, the current time will display 2 seconds later, if the time is not set, the oven will return to waiting state.
NOTE
When START is touched and the previous settin g was English it will be set to French. If you want to switch back to English you will have to again touch  four times and then touch START.
DEMO SETTING
- Suppose you want to turn on Demo Mode
| Touch: | Display Shows: |
| PRESS AGAIN FOR OPTIONS/ PRESS START |
|  |
SETTING FILTER
| Touch: | Display Shows: |
| PRESS AGAIN FOR OPTIONS/ PRESS START PRESS AGAIN FOR OPTIONS/ PRESS START PRESS AGAIN FOR OPTIONS/ PRESS START PRESS AGAIN FOR OPTIONS/ PRESS START PRESS AGAIN FOR OPTIONS/ PRESS START PRESS AGAIN FOR OPTIONS/ PRESS START PRESS AGAIN FOR OPTIONS/ PRESS START PRESS AGAIN FOR OPTIONS/ PRESS START |
| START |  |
| On yes | FILTER indicator light on by default for recirculaion. The FILTER indicator light will track the vent fan on time. |
| Off yes | Turn off the FILTER indicator light when vented to outside. The FILTER indicator light will not track the vent fan on time. |
| Reset yes | Reset FILTER Indicator The filter indicator light on the display will track the vent fan on time. When it is time to change the charcoal filter, the FILTER indicator light will come on. Use RESET YES to reset the vent motor tracking time and turn off the FILTER indicator light. |
| Reset no | Will not reset the time for FILTER indicator light. |


USING ONE TOUCH START
Touch 1 - 9 for 1 - 9 minutes microwave cooking. The cooking will start 2 seconds after your selection.
- Suppose you want to microwave for 3 minutes.
| Touch: | Display Shows: |
| | PRESS START Time counting down automatically after 2 seconds |


NOTE
"Food" will be displayed if a quick start cooking cycle or +10 Sec/+30 Sec key is touched more than 5 minutes after the door of microwave oven is closed. You must open then close the door again to clear "Food" from the display.
SETTING THE TIMER
- Your microwave oven can be used as a kitchen timer. You can set up to 99:99. The kitchen timer can be used while the microwave oven is running.
- Suppose you want to set a timer for 10:59.
| Touch: | Display Shows: |
|  |
| |  |
|
(Timer counts down) |


NOTE
There are not any other programs during the kitchen timer.
During the process of setting the timer, if you touch STOP or there is not any operation in 5 minutes, the oven will enter to waiting state.
NOTE
The display will return to default setting after 15 minutes if a cooking cycle is stopped and not restarted.
MULTI-STAGE COOKING
For best results, some recipes call for different power levels during a cook cycle. You can program your microwave for two power level stages during the cooking cycle.
- Suppose you want to set a 2-stage cook cycle. The first stage is a 3 minute cook time at 80% cook power then a 7 minute cook time at 50% cook power.
| Touch: | Display Shows: |
| PRESS START |
| PRESS START |
| PRESS START |
| PRESS START |
|
Time counting down |


NOTE
At the end of 3 minutes the display will change to 7 minutes.
NOTE
Defrost and auto menu can not be set in multistage cook
CLEANING AND CARE
Disconnect the power cord or leave the door open to deactivate the oven during cleaning. Disconnect the power cord before replacing filters and lights.
EXTERIOR
The outside surface is precoated steel and plastic. Clean the outside with mild soap and water; rinse and dry with a soft cloth. Do not use any type of household or abrasive cleaner. DOOR Wipe the window on both sides with a soft cloth to remove any spills or spatters. Metal parts will be easier to maintain if wiped frequently with a soft cloth. Avoid the use of spray and other harsh cleaners as they may stain, streak or dull the door surface.
EASY CARE STAINLESS STEEL / SMUDGE _PRO OF STAINLESS STEEL / BLACK STAINLESS STEEL(SOME MODELS)
Your microwave oven(some models) may have a Stainless Steel finish or coating. Clean the stainless with warm soapy water using a clean sponge or cloth. Rinse with clean water and dry with a soft clean cloth. DO NOT use ANY store bought cleaners like Stainless Steel cleaners or any other types of cleaners containing any abrasive, chlorides, chlorines or ammonia. It is recommended to use mild dish soap and water or a 50/50 solution of water and vinegar.
TOUCH CONTROL PANEL
Care should be taken in cleaning the touch control panel. If the control panel becomes soiled, open the microwave oven door before cleaning. Wipe the panel with a cloth dampened slightly with water only. Dry with a soft cloth. Do not scrub or use any sort of chemical cleaners. Close door and touch STOP.
INTERIOR
Cleaning is easy because little heat is generated to the interior surfaces. To clean the interior surfaces, wipe with a soft cloth and warm water. DO NOT USE ABRASIVE OR HARSH CLEANERS OR SCOURING PADS. For heavier soil, use baking soda or a mild soap; rinse thoroughly with hot water. The round wire rack and shelf can be cleaned with hot soapy water, rinsed and dried.
WAVEGUIDE COVER
 The waveguide cover is located on the right side in the microwave oven cavity. It is made from mica so requires special care. Keep the waveguide cover clean to assure good microwave oven performance. Carefully wipe with a damp cloth any food spatters from the surface of the cover immediately after they occur. Built-up splashes may overheat and cause smoke or possibly catch fire. DO NOT REMOVE THE WAVEGUIDE COVER.
ODOR REMOVAL
Occasionally, a cooking odor may remain in the microwave oven. To remove, combine 1 cup water, grated peel and juice of 1 lemon in a 2-cup glass measuring cup. Boil for several minutes using 100% power. Allow to set in microwave oven until cool. Wipe interior with a soft cloth.
TURNTABLE/TURNTABLE SUPPORT
The turntable and turntable support can be removed for easy cleaning. Wash them in mild, sudsy water; for stubborn stains use a mild cleanser and non-abrasive scouring sponge. They are also dishwasher-proof. Use upper wirerack of dishwasher. The turntable motor shaft is not sealed, so excess water or spills should be wiped up immediately.
Disconnect the power cord or leave the door open to deactivate the oven during cleaning. Disconnect the power cord before replacing filters and lights.
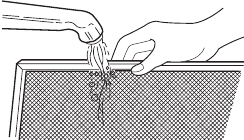
Cleaning the grease filters
The oven ventilation grease filters should be removed and cleaned often; generally at least once every month.
Grease filter part number 5304478913
To order parts call 800-599-7569

To avoid risk of personal injury or property damage, do not operate oven hood without filters properly in place.
- To remove the grease filter filters, slide the filter to the rear. Then pull filter downward and push to the other side. The filter will drop out. Repeat for the 2nd filter.

- Soak the grease filters in hot water using a mild detergent. Rinse well and shake to dry or wash in a dishwasher. Do not use ammonia. The aluminum on the filter will corrode and darken.
![]()
- To reinstall the grease filter, slide it into the side slot, then push up and toward oven to lock. Reinstall the 2nd filter using the same procedure.


Disconnect the power cord or leave the door open to deactivate the oven during cleaning. Disconnect the power cord before replacing filters and lights.
Charcoal filter replacement
Charcoal filter part number FRPAMRAF
To order parts call 800-599-7569
Charcoal filter when installed in your microwave oven, is used for nonvented, recirculated Installation. When it is time to replace the charcoal filter, the FILTER light on display will turn on.
If your microwave is vented to the outside, then you can turn off the filter light in the settings.
- Disconnect power to the microwave oven at the circuit breaker panel or by unplugging.
- Press the " Push" position on the cover.
- And then open the cover.

- Remove the charcoal filter by pushing the top of the filter inwards, then pull it forward out from the unit.

- Slide the top of the new charcoal filter into the top area of the filter cavity.

- Press the bottom of charcoal filter to place it into the correct position.

- Press the " Push" to close the cover


SERVICE CALL CHECK
Please check the following before calling for service:
Place one cup of water in a glass measuring cup in the microwave oven and close the door securely.
Operate the microwave oven for one minute at HIGH 100%.
- Does the microwave oven light come on?
YES __ NO __ - Does the cooling fan work? (Put your hand on the louver above the Control Panel.)
YES __ NO __ - Does the turntable rotate? (It is normal for the turntable to turn in either direction.)
YES __ NO __ - Is the water in the microwave oven warm?
YES __ NO __
If "NO" is the answer to any of the above questions, please check electrical outlet, fuse and/or circuit breaker. If they are functioning properly, CONTACT YOUR NEAREST ELECTROLUX AUTHORIZED SERVICER.
A microwave oven should never be serviced by a "do-it-yourself" repair person.
SPECIFICATIONS
| AC Line Voltage: | Single phase 120V, 60Hz, AC only |
| AC Power Required: | 1500 W 13.5 amps. |
| Output Power*: | 1000 W |
| Frequency: | 2450 MHz (Class B/Group2)** |
| Outside Dimensions: | 29.88 "(W) x 15.94"(D) x 16.41 "(H) |
| Cavity Dimensions: | 20.94 "(W) x 14.57"(D) x 10.51 "(H) |
| Microwave oven Capacity***: | 1.9 Cu. Ft. |
| Cooking Uniformity: | Turntable |
| Weight: | Approx. (net) 57.1 lbs, (gross) 63.9 lbs |
| Work/Night Light: | 2*1.2W LED, the part number is 5304499540. |
| Oven Light: | 1*1.2W LED, the part number is 5304499540. |
* The International Electrotechnical Commission's standardized method for measuring output wattage. This test method is widely recognized.
** This is the classification of ISM (Industrial, Scientific and Medical) equipment described in the International Standard CISPR11.
*** Internal capacity is calculated by measuring maximum width, depth and height. Actual capacity for holding food is less.
IMPORTANT SAFETY INSTRUCTIONS
Read all instructions before using this appliance.
This manual contains important safety symbols and instructions. Please pay attention to these symbols and follow all instructions given.
Do not attempt to install or operate your appliance until you have read the safety precautions in this manual. Safety items throughout this manual are labeled with a WARNING or CAUTION statement based on the risk type.
Warnings and important instructions appearing in this guide are not meant to cover all possible conditions and situations that may occur. Common sense, caution, and care must be exercised with installing, maintaining, or operating your appliance.
DEFINITIONS
 This is the safety alert symbol. It is used to alert of potential personal injury hazards. Obey all safety messages that follow this symbol to avoid possible injury or death.

Indicates a potentially hazardous situation which, if not avoided, may result in death or serious injury.
Indicates a potentially hazardous situation which, if not avoided, may result in minor or moderate injury.
NOTE
Indicates a short, informal reference – something written down to assist the memory or for future reference.

Indicates installation, operation or main-tenance information which is important but not hazardrelated.
NOTE
ELECTRICAL REQUIREMENTS
Product rating is 120 volts AC, 60 Hertz, 1.5 kilowatts and 13.5 amps. This product must be connected to a seperate and dedicated supply circuit of the proper voltage and frequency. Wire size must conform to the requirements of the National Electrical Code or the prevailing local code for this kilowatt rating. The power supply cord and plug should be brought to a seperate and dedicated 15- to 20- ampere branch circuit single grounded outlet. The outlet box should be located in the cabinet above the microwave oven. The outlet box and supply circuit should be installed by a qualifed electrician and conform to the National Electrical Code or the prevailing local code.
- If you have any questions about the grounding or electrical instructions, consult a qualified electrician or service person.
- Neither Electrolux nor the dealer can accept any liability for damage to the microwave oven or personal injury resulting from failure to observe the correct electrical connection procedures.
PRECAUTIONS MICROWAVE ENERGY
PRECAUTIONS TO AVOID POSSIBLE EXPOSURE TO EXCESSIVE MICROWAVE ENERGY
Do not attempt to operate this oven with the door open since open door operation can result in harmful exposure to microwave energy. It is important not to defeat or tamper with the safety interlocks.
Do not place any object between the oven front face and the door or allow soil or cleaner residue to accumulate on sealing surfaces.

To reduce the risk of burns, electric shock, fire, injury to persons or exposure to excessive microwave energy:
Do not operate the oven if it is damaged. It is particularly important that the oven door close properly and that there is no damage to the:
- DOOR (bent)
- HINGES AND LATCHES (broken or loosened)
- DOOR SEALS AND SEALING SURFACES.
The oven should not be adjusted or repaired by anyone except properly qualified service personnel.
This device complies with part 18 of the FCC Rules. (Only for USA)
RADIO INTERFERENCE
- Operation of the microwave oven may cause interference to your radio, TV or similar equipment.
- When there is interference, it may be reduced or eliminated by taking the following measures:
- Clean door and sealing surface of the oven.
- Reorient the receiving antenna of radio or television.
- Relocate the microwave oven with respect to the receiver.
- Move the microwave oven away from the receiver.
- Plug the microwave oven into a different outlet so that microwave oven and receiver are on different branch circuits.
UTENSILS
- Personal Injury Hazard
- Tightly-closed utensils could explode. Closed containers should be opened and plastic pouches should be pierced before cooking.
- See the instructions on "Materials you can use in microwave oven or to be avoided in microwave oven." There may be certain non-metallic utensils that are not safe to use for microwaving. If in doubt, you can test the utensil in question following the procedure below.
Utensil Test:
- Fill a microwave-safe container with 1 cup of cold water (250ml) along with the utensil in question.
- Cook on maximum power for 1 minute.
- Carefully feel the utensil. If the empty utensil is warm, do not use it for microwave cooking.
- Do not exceed 1 minute cooking time.
When using electrical appliances basic safety precautions should be followed, including the following:
To reduce the risk of burns, electric shock, fire,, injury to persons or exposure to excessive microwave energy:
- Read all instructions before using the appliance.
- Read and follow the specific: "PRECAUTIONS TO AVOID POSSIBLE EXPOSURE TO EXCESSIVE MICROWAVE ENERGY".
- This appliance must be grounded. Connect only to properly grounded outlet. See to properly grounded outlet. See "GROUNDING INSTRUCTIONS".
- Install or locate this appliance only in accordance with the provided installation instructions.
- Some products such as whole eggs and sealed containers - for example, closed glass jars - are able to explode and should not be heated in this able to explode and should not be heated in this oven.
- Use this appliance only for its intended use as described in the manual. Do not use corrosive chemicals or vapors in this appliance. This type of oven is specifically designed to heat, cook or dry food. It is not designed for industrial or laboratory use.
![]()
HOT CONTENTS CAN CAUSE SEVERE BURNS. DO NOT ALLOW CHILDREN TO USE THE MICROWAVE. Use caution when removing hot items.- Do not operate this appliance if it has a damaged cord or plug, if it is not working properly, or if it has been damaged or dropped.
- This appliance should be serviced only by qualified service personnel. Contact nearest authorized service facility for examination, repair, or adjustment.
- Do not cover or block any openings on the appliance.
- Do not store this appliance outdoors. Do not use this product near water - for example, near a kitchen sink, in a wet basement, near a swimming pool, or similar location.
- Do not immerse cord or plug in water.
- Keep cord away from heated surface.
- Do not let cord hang over edge of table or counter. When cleaning surfaces of door and oven that comes together on closing the door, use only mild, nonabrasive soaps, or detergent applied with a sponge or soft cloth.
![burn hazard]() To reduce the risk of fire in the oven cavity:
To reduce the risk of fire in the oven cavity: - Do not overcook food. Carefully attend appliance when paper, plastic, or other combustible materials are placed inside the oven to facilitate cooking.
- Remove wire twist-ties from paper or plastic bag before when placing bag in oven.
- If material inside of the oven ignite, keep oven door closed, turn oven off, and disconnect the power cord, or shut off power at the fuse or circuit breaker panel.
- Do not use the cavity for storage purposes. Do not leave paper products, cooking utensils, or food in the cavity when not in use.
- Liquids, such as water, coffee, or tea are able to be overheated beyond the boiling point without to appearing to be boiling. Visible bubbling or boiling when the container is removed from the microwave oven is not always present. THIS COULD RESULT IN VERY not always present. THIS COULD RESULT IN VERY HOT LIQUID SUDDENLY BOILING OVER WHEN THE HOT LIQUID SUDDENLY BOILING OVER WHEN THE CONTAINER IS DISTURBED OR A UTENSIL IS INSERTED INTO THE LIQUID. To reduce the risk of injury to persons:
- Do not overheat the liquid.
- Stir the liquid both before and halfway through heating it.
- Do not use straight-sided containers with narrow necks.
- After heating, allow the container to stand in the microwave oven for a short time before removing the container.
- Use extreme care when inserting a spoon or other utensil into the container.
![burn hazard]()
![shock hazard]()
Oversized food or oversized metal utensils should not be inserted in a microwave/toaster oven as they may create a fire or risk of electric shock. Do not clean with metal scouring pads. Pieces can burn off the pad and touch electrical parts involving a risk of electric shock.- Do not use paper products when appliance is operated in the toaster, air fry or convection mode.
- Do not store any materials, other than manufacturer's recommended accessories, in this oven when not in use.
- Do not cover racks or any other part of the oven with metal foil. This will cause over-heating of the oven.
- Clean Ventilation Hoods Frequently -Grease should not be allowed to accumulate on hood or filter.
- When flaming foods under the hood, turn the fan on.
- Use care when cleaning the vent-hood filter. Corrosive cleaning agents, such as lye-based oven cleaners, may damage the filter.
- Suitable for use above both gas and electric cooking equipment.

GROUNDING INSTRUCTIONS
 This appliance must be grounded. In the event of an electrical short circuit, grounding reduces the risk of electric shock by providing an escape wire for the electric current. This appliance is equipped with a cord having a grounding wire with a grounding plug. The plug must be plugged into an outlet that is properly installed and grounded.
Improper use of the grounding can result in a risk of electric shock.
Consult a qualified electrician or serviceman if the grounding instructions are not completely understood, or if doubt exists as to whether the appliance is properly grounded. If it is necessary to use an extension cord, use only a 3-wire extension cord that has a 3-blade grounded plug, and 3-slot receptacle that will accept the plug on the appliance. The marked rating of the extension cord shall be equal to or greater than the electrical rating of the appliance.
- If you have any questions about the grounding or electrical instructions, consult a qualified electrician or service person.
- Neither Electrolux nor the dealer can accept any liability for damage to the microwave oven or personal injury resulting from failure to observe the correct electrical connection procedures.

Electric Shock Hazard
Touching some of the internal components can cause serious personal injury or death. Do not disassemble this appliance.
Electric Shock Hazard
Improper use of the grounding can result in electric shock. Do not plug into an outlet until appliance is properly installed and grounded.
- A short power supply cord is provided to reduce the risks resulting from becoming entangled in or tripping over a longer cord.
- Longer cord sets or extension cords are available and may be used if care is exercised in their use.
- If a long cord or extension cord is used:
- The marked electrical rating of the cord set or extension cord should be at least as great as the electrical rating of the appliance.
- The extension cord must be a grounding-type 3- wire cord.
- The longer cord should be arranged so that it will not drape over the counter top or tabletop where it can be pulled on by children or tripped over unintentionally.
SAVE THESE INSTRUCTION
Materials you can use in the unit
| Browning dish | Follow manufacturer instructions. The bottom of browning dish must be at least 3/16 inch (5mm) above the turntable. Incorrect usage may cause the turntable to break. |
| Dinnerware | Microwave-safe only. Follow manufacturer's instructions. Do not use cracked or chipped dishes. |
| Glass jars | Always remove lid. Use only to heat food until just warm. Most glass jars are not heat resistant and may break. |
| Glassware | Heat-resistant oven glassware only. Make sure there is no metallic trim. Do not use cracked or chipped dishes. |
| Oven cooking bags | Follow manufacturer instructions. Do not close with metal tie. Make slits to allow steam to escape. |
| Paper plates and cups | Use for short term cooking/warming only. Do not leave oven unattended while cooking. |
| Paper towels | Use to cover food for reheating and absorbing fat. Use with supervision for a short-term cooking only. |
| Parchment paper | Use as a cover to prevent splattering or a wrap for steaming. |
| Plastic | Microwave-safe only. Follow the manufacturer instructions. Should be labeled "Microwave Safe". Some plastic containers soften, as the food inside gets hot. "Boiling bags" and tightly closed plastic bags should be slit, pierced or vented as directed by package. |
| Plastic wrap | Microwave-safe only. Use to cover food during cooking to retain moisture. Do not allow plastic wrap to touch food. |
| Thermometers | Microwave-safe only (meat and candy thermometers). |
| Wax paper | Use as a cover to prevent splattering and retain moisture. |
Materials to be avoided in the unit
| Aluminum tray | May cause arcing. Transfer food into microwave-safe dish. |
| Food carton with metal handle | May cause arcing. Transfer food into microwave-safe dish. |
| Metal or metaltrimmed utensils | Metal shields the food from microwave energy. Metal trim may cause arcing. |
| Metal twist ties | May cause arcing and could cause a fire in the oven. |
| Paper bags | May cause a fire in the oven. |
| Plastic foam | Plastic foam may melt or contaminate the liquid inside when exposed to high temperature. |
| Wood | Wood will dry out when used in the microwave oven and may split or crack. |
ABOUT FOOD
| FOOD | DO | DON'T |
| Eggs, sausages, nuts, seeds, fruits & vegetables |
|
|
| Popcorn |
|
|
| Unevenly cooked foods |
|
|
| General |
|
|
Our home is your home. Visit us if you need help with any of these things:
owner support
accessories
service
registration (See your registration card for more information.)
USA
1-800-374-4432
Electrolux Home Products, Inc.,
10200 David Taylor Drive
Charlotte, NC 28262
Frigidaire.com
Canada
1.800.265.8352
Electrolux Canada Corp.
5855 Terry Fox Way
Mississauga, Ontario, Canada
L5V 3E4
Frigidaire.ca

Documents / ResourcesDownload manual
Here you can download full pdf version of manual, it may contain additional safety instructions, warranty information, FCC rules, etc.
Advertisement


Need help?
Do you have a question about the GMOS1964AD and is the answer not in the manual?
Questions and answers