Table of Contents
Advertisement
Available languages
Available languages
OPERATOR'S MANUAL
MANUEL D'UTILISATION
MANUAL DEL OPERADOR
ONE+ 18V HIGH PRESSURE
INFLATOR
GONFLEUR À HAUTE PRESSION DE
18 V ONE+
INFLADOR DE ALTA PRESIÓN DE
ONE+ 18 V
PCL001
TABLE OF CONTENTS
****************
General Safety Rules ...................... 2-3
Specific Safety Rules ..................... 3-4
Symbols .......................................... 4-5
Features ..............................................5
Assembly ............................................6
Operation ........................................ 6-8
Maintenance .......................................8
Illustrations ................................... 9-10
Parts Ordering
and Service .........................Back page
WARNING:
To reduce the
risk of injury, the user must read and
understand the operator's manual
before using this product.
SAVE THIS MANUAL FOR
FUTURE REFERENCE
TABLE DES MATIÈRES
****************
Règles de sécurité générales ......... 2-3
Règles de sécurité particulières ..... 3-4
Symboles ........................................ 4-5
Caractéristiques .................................5
Assemblage ........................................6
Utilisation ....................................... 6-8
Entretien .............................................8
Illustrations ................................... 9-10
Commande de pièces
et dépannage ................... Page arrière
AVERTISSEMENT :
réduire les risques de blessures,
l'utilisateur doit lire et veiller à bien
comprendre le manuel d'utilisation avant
d'employer ce produit.
CONSERVER CE MANUEL
POUR FUTURE RÉFÉRENCE
ÍNDICE DE CONTENIDO
****************
Reglas de seguridad generales ..... 2-3
Símbolos ........................................ 5-6
Características .................................. 5
Armado ............................................. 6
Funcionamiento ............................. 6-8
Mantenimiento .................................. 8
Illustraciones ................................ 9-10
Pedidos de piezas y
servicio .........................Pág. posterior
ADVERTENCIA:
Pour
el riesgo de lesiones, el usuario debe leer
y comprender el manual del operador
antes de usar este producto.
GUARDE ESTE MANUAL
PARA FUTURAS CONSULTAS
Para reducir
Advertisement
Table of Contents

Related Manuals for Ryobi PCL001


Summary of Contents for Ryobi PCL001
-
Page 1: Table Of Contents
MANUAL DEL OPERADOR ONE+ 18V HIGH PRESSURE INFLATOR GONFLEUR À HAUTE PRESSION DE 18 V ONE+ INFLADOR DE ALTA PRESIÓN DE ONE+ 18 V PCL001 TABLE OF CONTENTS TABLE DES MATIÈRES ÍNDICE DE CONTENIDO **************** **************** **************** General Safety Rules ...... 2-3 ... -
Page 2: General Safety Rules
GENERAL SAFETY RULES Do not wear loose clothing or jewelry. Contain long WARNING! hair. Loose clothes, jewelry, or long hair can be drawn into air vents. READ AND UNDERSTAND ALL INSTRUCTIONS. Fail- Do not use on a ladder or unstable support. Stable ure to follow all instructions listed below, may result in footing on a solid surface enables better control of the electric shock, fire and/or serious personal injury. -
Page 3: Specific Safety Rules
GENERAL SAFETY RULES Keep the exterior of the inflator dry, clean, and free Inflator service must be performed only by qualified from oil and grease. Always use a clean cloth when repair personnel. Service or maintenance performed by cleaning. -
Page 4: Symbols
SPECIFIC SAFETY RULES Follow all charging instructions and do not charge the Allow pump to cool for five (5) minutes after each five battery pack or appliance outside of the temperature (5) minutes of continuous use. Never block the inflating range specified in the instructions. -
Page 5: Features
SYMBOLS Some of the following symbols may be used on this product. Please study them and learn their meaning. Proper interpretation of these symbols will allow you to operate the product better and safer. SYMBOL NAME DESIGNATION/EXPLANATION Safety Alert Indicates a potential personal injury hazard. To reduce the risk of injury, user must read and understand operator’s Read Operator’s Manual manual before using this product. -
Page 6: Assembly
ASSEMBLY WARNING: WARNING: Do not use this product if it is not completely assembled Do not attempt to modify this product or create acces- or if any parts appear to be missing or damaged. Use of sories or attachments not recommended for use with this product. - Page 7 OPERATION TO INSTALL/REMOVE BATTERY PACK Place the air chuck on the valve stem. See Figure 1, page 9. Push the air chuck down so that the threaded section of the valve stem is inside the air chuck. To install: Clamp the end of the air chuck down onto the valve Place the battery pack in the tool.
-
Page 8: Maintenance
OPERATION ACCESSORIES Insert sport ball needle into sports ball valve and inflate. See Figures 7 - 9, page 10. Remove sport ball needle after inflation. The supplied accessories perform a variety of functions. NOTE: Pressure required for most sports balls is too low for The tapered adaptor can be used on smaller pinch valves to accurate reading on tool gauge. - Page 9 NOTES...
-
Page 10: Règles De Sécurité Générales
RÈGLES DE SÉCURITÉ GÉNÉRALES équilibre permettent de mieux contrôler l’accessoire de gonflage en cas de situation imprévue. AVERTISSEMENT ! Utiliser l’équipement de sécurité. Toujours porter une LIRE ET VEILLER À BIEN COMPRENDRE TOUTES protection oculaire. Suivant les conditions, le port d’un LES INSTRUCTIONS. -
Page 11: Règles De Sécurité Particulières
RÈGLES DE SÉCURITÉ GÉNÉRALES personnes n’ayant pas reçu des instructions adéquates, un chiffon propre pour le nettoyage. Ne jamais utiliser de les accessoires de gonflage sont dangereux. liquide de freins, d’essence, de produits à base de pétrole ou de solvants puissants pour nettoyer l’outil. Le respect Vérifier qu’aucune pièce mobile n’est mal alignée, de cette règle permet de réduire les risques de perte du grippée ou brisée et s’assurer qu’aucun autre... -
Page 12: Symboles
RÈGLES DE SÉCURITÉ PARTICULIÈRES Affichage de la pression de gonflage à titre indicatif Ne pas utiliser cet accessoire de gonflage comme un seulement et pouvant indiquer des valeurs non exactes. appareil de respiration. Ne jamais laisser un gonfleur en fonctionnement sans Ne jamais diriger le jet d’air comprimé... -
Page 13: Caractéristiques
SYMBOLES Certains des symboles ci-dessous peuvent être utilisés sur produit. Veiller à les étudier et à apprendre leur signification. Une interprétation correcte de ces symboles permettra d’utiliser produit plus efficacement et de réduire les risques. SYMBOLE DÉSIGNATION / EXPLICATION Symbole d’alerte de Indique un risque de blessure potentiel. -
Page 14: Assemblage
ASSEMBLAGE AVERTISSEMENT : AVERTISSEMENT : Ne pas utiliser le produit s’il n’est pas complètement Ne pas essayer de modifier cet outil ou de créer des assemblé ou si des pièces semblent manquantes pièces et accessoires non recommandés. De telles ou endommagées. L’utilisation d’un produit dont altérations ou modifications sont considérées comme l’assemblage est incorrect ou incomplet ou comportant un usage abusif et peuvent créer des conditions... - Page 15 UTILISATION RETRAIT / INSTALLATION DU BLOC-PILES Placer l’attache du mandrin pneumatique en position déverrouillée perpendiculairement au flexible. Voir la figure 1, page 9. Placer le mandrin sur la tige de valve. Installation : Pousser le mandrin vers le bas de sorte que la sectin Aligner la nervure du bloc-piles sur la rainure du chargeur filetée de la tige soit à...
-
Page 16: Entretien
UTILISATION ACCESSORIES Insérer l’aiguille arborer la balle dans la valve du ballon de sport et gonfler. Voir les figures 7 à 9, page 10. Retirer l’aiguille arborer la balle après le gonflage. Les accessoires fournis permettent d’effectuer une variété de fonctions. - Page 17 NOTES...
-
Page 18: Reglas De Seguridad Generales
REGLAS DE SEGURIDAD GENERALES equilibrio en todo momento. La postura firme y el buen equilibrio permiten un mejor control del inflador portátil ¡ADVERTENCIA! en situaciones inesperadas. LEA Y COMPRENDA TODAS LAS INSTRUCCIONES. Use equipo de seguridad. Siempre póngase protección El incumplimiento de las instrucciones señaladas abajo ocular. -
Page 19: Reglas De Seguridad Específicas
REGLAS DE SEGURIDAD GENERALES antes de volver a utilizarlo. Numerosos accidentes son esta regla se reduce el riesgo de deterioro del alojamiento causados por herramientas mal cuidadas. plástico de la unidad. Sólo utilice accesorios recomendados por el No sobrepase la presión nominal de ningún fabricante para cada modelo en particular. -
Page 20: Símbolos
REGLAS DE SEGURIDAD ESPECÍFICAS Protéjase los pulmones. Use una careta o mascarilla Inspeccione periódicamente los cordones eléctricos contra el polvo si la operación genera mucho polvo. Con de las herramientas, y si están dañados, permita que el cumplimiento de esta regla se reduce el riesgo de los reparen en el centro de servicio autorizado más lesiones corporales serias cercano de la localidad. -
Page 21: Características
SÍMBOLOS Es posible que se empleen en este producto algunos de los siguientes símbolos. Le suplicamos estudiarlos y aprender su significado. Una correcta interpretación de estos símbolos le permitirá utilizar mejor y de manera más segura el producto. SÍMBOLO NOMBRE DENOMINACIÓN/EXPLICACIÓN Alerta de seguridad Indica un peligro posible de lesiones personales. -
Page 22: Armado
ARMADO ADVERTENCIA: ADVERTENCIA: No intente modificar este producto ni crear aditamentos No use este producto si no está totalmente ensamblado o accesorios que no estén recomendados para usar con o si alguna pieza falta o está dañada. El uso de un este producto. - Page 23 FUNCIONAMIENTO INSTALACIÓN/DESMONTAR DEL PAQUETE Instale el paquete de baterías. DE BATERÍAS Presione el botón de encendido para encender el medidor digital. Vea la figura 1, página 9. Sitúe la abrazadera del conector de inflado en posición Para conectar: de traba perpendicular a la manguera de aire.
-
Page 24: Mantenimiento
FUNCIONAMIENTO INFLADO MANUAL Introduzca la aguja pelota deportivo en la válvula del balón deportivo e infle. Conecte la manguera al artículo que se va a inflar. Retire la agua al terminar de inflar. Presione el botón de encendido para encender el medidor NOTA: La presión que necesitan las mayoría de balones digital. - Page 25 NOTAS...
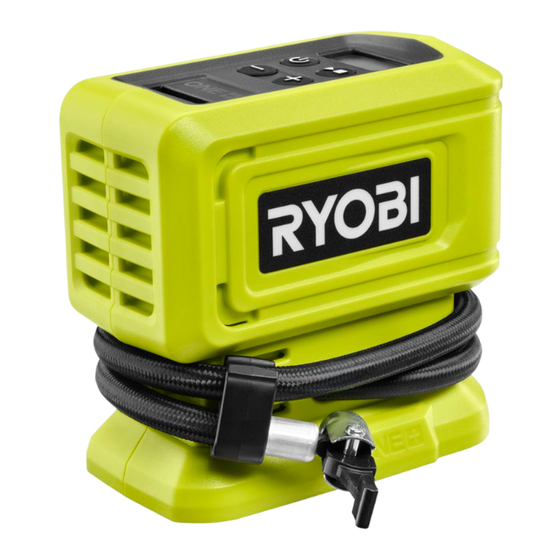
- Page 26 PCL001 A - Inflator (gonflage, inflador) B - Air hose (flexible pneumatique, manguera de aire) C - Air chuck (mandrin pneumatique, conector de inflado) D - Digital gauge (manomètre numérique, manómetro digital) E - Hose storage area with clip (rangement du tuyau avec pince, almacenamiento de...
- Page 27 Fig. 4 Fig. 6 Fig. 8 A - To loosen (pour desserrer, para aflojar) B - Locking nut (écrou de blocage, contratuerca) C - To tighten (pour serrer, para apretar) D - Presta valve stem (tige de valve Presta, vástago de válvula Presta) A - Valve stem (tige de valve, vástago de válvula) Fig.
- Page 28 RYOBI is a trademark of Ryobi Limited and is used pursuant to a license granted by Ryobi Limited. Pour faire une demande de réparations ou obtenir des pièces de rechange, trouver un Centre de réparations agréé...
Need help?
Do you have a question about the PCL001 and is the answer not in the manual?
Questions and answers
When I **** done using the PCL001, why does the power button not turn off the inflator?
The power button on the Ryobi PCL001 inflator does not turn off the device immediately after use because the digital gauge is designed to automatically shut off after five minutes of inactivity. However, to manually turn off the display, you need to press and hold the power button.
This answer is automatically generated