Table of Contents
Advertisement
Quick Links
PILOT
ON
OFF
MODEL:
PAVER-CP-TPSI
PAVER CONTROL PANEL-TPSI
Stainless Steel Control Panel for use with Fire Pits built with Patio Paver Blocks
Installation and Operating Instructions
IF YOU CANNOT READ OR UNDERSTAND THESE INSTALLATION INSTRUCTIONS
DO NOT ATTEMPT TO INSTALL OR OPERATE THIS APPLIANCE
CALIFORNIA PROPOSITION 65
WARNING
This product can expose you to Chromium, which is
known to the state of California to cause cancer
and birth defects or other reproductive harm.
(For more information, go to www.p65warnings.ca.gov)
Warning: For Outdoor Use Only
PLEASE RETAIN THIS MANUAL FOR FUTURE REFERENCE
REV. A
Page 1
PN#90351
Advertisement
Table of Contents

Related Manuals for Firegear PAVER CONTROL PANEL-TPSI

Summary of Contents for Firegear PAVER CONTROL PANEL-TPSI
- Page 1 PILOT MODEL: PAVER-CP-TPSI PAVER CONTROL PANEL-TPSI Stainless Steel Control Panel for use with Fire Pits built with Patio Paver Blocks Installation and Operating Instructions IF YOU CANNOT READ OR UNDERSTAND THESE INSTALLATION INSTRUCTIONS DO NOT ATTEMPT TO INSTALL OR OPERATE THIS APPLIANCE...
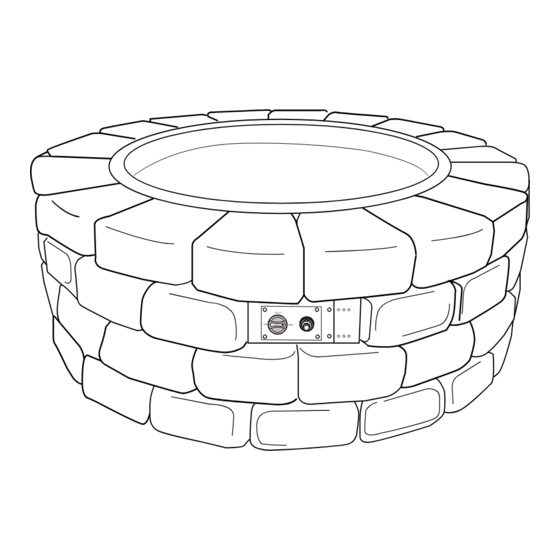
- Page 2 DESCRIPTION: The Paver Kit face plate bracket (control panel) is designed to install in conjunction with a typical Patio Block fire pit kit (purchased separately). It installs underneath the fire pit pan or disc in place of one patio block. The control panel itself provides a convenient location to house the gas valve and Piezo ignition (if applicable) then is easily removed for servicing.
- Page 3 GENERAL INSTRUCTIONS NOTE: This section provides a general overview of the Place control panel into position, mark the Paver Kit Control Panel. Follow the directions from your two holes, remove the control panel and paver block fire pit kit to build the actual fire pit. drill holes with 3/16”...
- Page 4 STEP 3: Install the main burner orifice on burner pan of the fire pit. and secure the flex connector to the ½” flared fitting. See fire pit manual. STEP 4: Temporarly set fire pit into the enclosure to make the following connections: A.
- Page 5 Piezo Wires Thermocouple Flex Line To Fire Pit Pilot Tubing Inlet Gas PAVER-CP-TPSI (Control Panel) STEP 7: Once the fittings and wired are installed into the TPSI valve bracket then insert the valve bracket into Paver Kit Bracket as shown in Fig. 8. STEP 8: Conduct a trial burn test and check for any gas leaks before completing the installation.
- Page 6 Step 10: Test the ignitor by pushing and holding the red button to ensure the 2-probe ignitor is sparking inside the ignition box in the burner pan. The spark should be located directly over top of the burner port hole for proper ignition of the gas as previously discussed.
- Page 7 LIGHTING INSTRUCTIONS CAUTION: Children and adults should be alerted to the hazards on high surface temperatures and should stay away to avoid burns or clothing ignition. Young children should be carefully supervised when they are in the area of the appliance. WARNING: Do not use this appliance if any part has been under water.
- Page 8 FOR TECHNICAL SERVICE, CALL: (800) 966-8126 Firegear Outdoors 17322 Gothard St Huntington Beach, CA 92647 Web Site: www.firegearoutdoors.com Manual changes often occur, ensure to check the Firegear Outdoor website for any recent updates and warranty information. PAVER-CP-TPSI REV. A Page 8...
Need help?
Do you have a question about the PAVER CONTROL PANEL-TPSI and is the answer not in the manual?
Questions and answers