Table of Contents
Advertisement
Advertisement
Table of Contents

Subscribe to Our Youtube Channel
Related Manuals for GRUNDIUM Ocus


Summary of Contents for GRUNDIUM Ocus
- Page 1 USER GUIDE...
-
Page 2: Table Of Contents
SCANNER SETTINGS .................................. 20 Create a new team ................................... 21 17.1 Create a new team when Ocus® is taken into use at first time ..................21 17.2 Create a new team when Ocus® has already been taken into use ................. 22 Add new team members ................................ - Page 3 Scanner WLAN access point password is forgotten ......................26 22.9 Download does not start automatically when exporting to WebDL ................26 Certifications .................................... 26 Customer care and support..............................27 Company information ................................27 Hermiankatu 6-8G, 33720 Tampere, Finland Ocus® User Guide version 5.0 ©2019 Grundium. All rights reserved.
-
Page 4: Sales Package Contents
GRUNDIUM OCUS® USER GUIDE Note: This user guide is for Ocus with software version 2.0 onwards. In case you need user guide for older software versions, please contact your distributor or support@grundium.com. SALES PACKAGE CONTENTS Ocus® scanner (MGU-00001) Protective cover... -
Page 5: Technical Specifications
Remember to handle the scanner carefully to avoid dropping or damaging it and avoid leaving fingerprints on the glass surfaces or lenses while removing the pin. Hermiankatu 6-8G, 33720 Tampere, Finland Ocus® User Guide version 5.0 ©2019 Grundium. All rights reserved. - Page 6 Tip: To ensure safe transportation, screw the transportation support pin back in before moving the scanner to another location. Do not overtighten the pin, turning it until it stops is enough. Hermiankatu 6-8G, 33720 Tampere, Finland Ocus® User Guide version 5.0 ©2019 Grundium. All rights reserved.
-
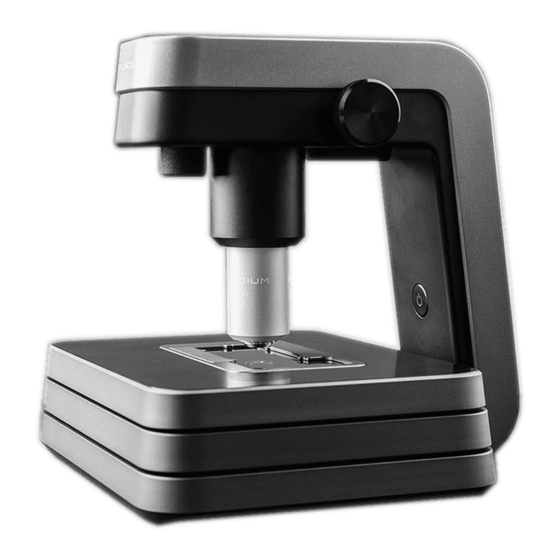
Page 7: Scanner Parts
4. Cover plate 7. Slide holder 1. Focus knob 5. X-Y-stage 8. Slide support glass 2. Power button 6. Lever 9. Overview camera 3. Objective Hermiankatu 6-8G, 33720 Tampere, Finland Ocus® User Guide version 5.0 ©2019 Grundium. All rights reserved. -
Page 8: Scanner Connectors
Scanner is powering up or shutting down. Blue steady Scanner’s WLAN access point is on. Purple steady Scanner’s first start-up is ongoing. Purple blinking Scanner’s software update is in progress. Hermiankatu 6-8G, 33720 Tampere, Finland Ocus® User Guide version 5.0 ©2019 Grundium. All rights reserved. -
Page 9: First Use
2. Connect one end of the network cable to the scanner and the other end to the Ethernet connector for your network. Hermiankatu 6-8G, 33720 Tampere, Finland Ocus® User Guide version 5.0 ©2019 Grundium. All rights reserved. -
Page 10: First Use With A Wlan Connection
Note: Make sure that the browser is using http instead of https at this phase. 6. Follow the instructions on your computer or tablet to connect the scanner to a WLAN that has access to the Internet. Hermiankatu 6-8G, 33720 Tampere, Finland Ocus® User Guide version 5.0 ©2019 Grundium. All rights reserved. -
Page 11: Network Settings
Connection to Internet via proxy can be configured in scanner Settings view. Please consult your IT administrator for assistance and see Troubleshooting for more information. Hermiankatu 6-8G, 33720 Tampere, Finland Ocus® User Guide version 5.0 ©2019 Grundium. All rights reserved. -
Page 12: Log In To The Scanner
LOG IN TO THE SCANNER WITH INTERNET CONNECTION This connection method works when the power button light is green or yellow. 1. Open the browser in your computer or tablet and type https://www.grundium.net 2. Type your e-mail address and password and press Login. -
Page 13: Start Scanning
2. Open the browser in your computer or tablet and type http://www.grundium.net 3. Type your e-mail address and password and press Login (Image 5). START SCANNING Important notice: Both in local and remote use, remember to keep at least 10 centimetres (4 inches) free space around the scanner. - Page 14 6. To zoom the specimen, use your mouse scroll, or press +, - or 5x/10x/20x quick buttons next to zoom bar on display. To pan the image, use your fingertip or mouse left button to move it. Hermiankatu 6-8G, 33720 Tampere, Finland Ocus® User Guide version 5.0 ©2019 Grundium. All rights reserved.
- Page 15 Focus is properly adjusted, when Focus in range is shown on screen. Image 11 Information in Navigator -box when Focus not in range. Image 12 Information in Navigator -box when Focus in range. Hermiankatu 6-8G, 33720 Tampere, Finland Ocus® User Guide version 5.0 ©2019 Grundium. All rights reserved.
- Page 16 Pressing AF next to the slider activates the automatic focusing mode, where the electronic focus will be continuously kept in optimal position. Hermiankatu 6-8G, 33720 Tampere, Finland Ocus® User Guide version 5.0 ©2019 Grundium. All rights reserved.
- Page 17 9. Press Scan to start the scanning. The remaining scan time is shown on screen and once the scan is completed, the scanned areas are marked to the overview image and you can zoom into them. Hermiankatu 6-8G, 33720 Tampere, Finland Ocus® User Guide version 5.0 ©2019 Grundium. All rights reserved.
-
Page 18: View The Images
Export recipe (Image 16). You can configure the recipe either from Microscope or Scan Archive view. The progress of ongoing scans can be followed from Exports list (Image 18). Hermiankatu 6-8G, 33720 Tampere, Finland Ocus® User Guide version 5.0 ©2019 Grundium. All rights reserved. -
Page 19: Change Scanners
If you have several scanners available and want to switch between them, press the scanner name at the top of the display and select another scanner. Image 19 If you want to change a scanner, select another device from menu. Hermiankatu 6-8G, 33720 Tampere, Finland Ocus® User Guide version 5.0 ©2019 Grundium. All rights reserved. -
Page 20: Switch Off The Scanner
14 KEEP THE SOFTWARE UP TO DATE From time to time, Grundium provides software updates. When a new update is available, you will get a notification and instructions on how to update the software. Scanner intended usage flow must be verified after each software update. -
Page 21: Scanner Settings
Image 20 Remove the cover plate carefully when cleaning the scanner. Wipe all surfaces with a soft, damp, lint-free cloth. You can use a microscope detergent, for example Reagena, which consists of Propan-2-ol and ammonia. (The Ocus® scanner has been tested with the Reagena microscope detergent.) Put the cover plate back. -
Page 22: Create A New Team
17.1 CREATE A NEW TEAM WHEN OCUS® IS TAKEN INTO USE AT FIRST TIME When Ocus® is taken into use at first time, you need to create a team at step 4 – Set Team & Region. A team enables you to share the scanner with other team members. -
Page 23: Create A New Team When Ocus® Has Already Been Taken Into Use
17.2 CREATE A NEW TEAM WHEN OCUS® HAS ALREADY BEEN TAKEN INTO USE 1. Select Team management from the menu under your name in up right of the screen. Image 22 To create a new team, click Team management from a menu. -
Page 24: Add New Team Members
All available devices should appear in the menu. Image 25 E-mail address of a new team member is required when adding new users. 3. Close the menu when you are ready. Hermiankatu 6-8G, 33720 Tampere, Finland Ocus® User Guide version 5.0 ©2019 Grundium. All rights reserved. -
Page 25: Taking Scanner To Another Location
Use the scanner in temperatures between 15 and 40 degrees Celsius (59 to 104 Fahrenheit). Do not open the scanner or try to change the objective. Only persons authorized by Grundium may repair the product. Unauthorized modifications may damage the scanner. Note: Warranty is void if scanner’s seals are broken. -
Page 26: Disposal
Solution: Make sure your computer/tablet and scanner are in same network. 22.3 FORGOT YOUR PASSWORD Solution: Go to https://www.grundium.net and click Forgot password at downright of the screen. Give your e-mail address and click Continue. Verification code is being sent to your e-mail. Enter the verification code into the field and click Continue. -
Page 27: Scanner Always Connects To An Unwanted Wlan And Does Not Go Into Wlan Access Point Mode
This device may not cause harmful interference, and This device must accept any interference received, including interference that may cause undesired operation. Any change or modification to the product not expressly approved by Grundium Oy could void the user's authority to operate the device. -
Page 28: Customer Care And Support
24 CUSTOMER CARE AND SUPPORT If you receive your scanner in damaged package or have any problems with the scanner contact primarily your distributor. In case you need to contact Grundium Ltd. regarding the scanner you may contact us by e-mail support@grundium.com or by phone +358 44 749 4455.
Need help?
Do you have a question about the Ocus and is the answer not in the manual?
Questions and answers