Table of Contents
Advertisement
Quick Links
Advertisement
Table of Contents

Related Manuals for Raytheon ST80 Multiview


Summary of Contents for Raytheon ST80 Multiview
- Page 1 Chapter 2: Installation ST80 Multiview Operation & Setup...
- Page 3 ST80 Multiview Operation and Setup Manual Package Contents 1. Multiview display head 2. Thumb nuts (2) 3. Threaded fixing studs (2) 4. White sun cover 5. SeaTalk cable 6. Installation template 7. Operation manual 8. Warranty card 9. Operation cue card...
-
Page 4: Table Of Contents
ST80 Multiview Operation and Setup Manual Contents Chapter 1: Introduction ............. 5 Chapter 2: Operation ..............6 2 . 1 B a s i c O p e r a t i o n ............6 Speed Key .............. - Page 5 ST80 Multiview Operation and Setup Manual Quick Entry to Response ........... 10 Pop-Up Pilot ............. 11 Alarms ..............11 Cancelling Alarms ............ 12 Pilot Alarms .............. 12 Man Overboard ............13 2.3 Operation using a Remote Keypad ......1 3 Chapter 3: CodeLock Security ..........
- Page 6 ST80 Multiview Operation and Setup Manual...
-
Page 7: Chapter 1: Introduction
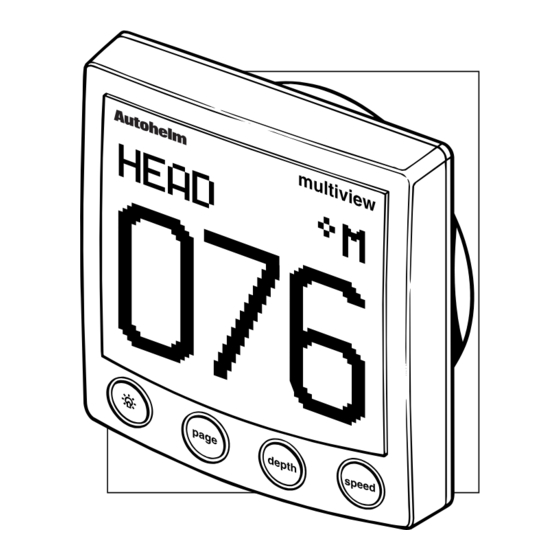
ST80 Multiview Operation and Setup Manual Chapter 1: Introduction The Multiview repeats information available on the SeaTalk bus. The display head comprises of four keys (lamp, page, depth and speed) dedicated to specific functions. m u l t i v i e D3084-1 •... -
Page 8: Chapter 2: Operation
ST80 Multiview Operation and Setup Manual Chapter 2: Operation 2.1 Basic Operation The following flow charts show the displays assigned to the page, depth and speed keys. speed page depth HEADING DEPTH SPEED speed page depth TRUE/APP WIND MIN/MAX DEPTH... -
Page 9: Speed Over Ground (Sog)
ST80 Multiview Operation and Setup Manual Speed Over Ground (SOG) • Speed over ground can be displayed in KTS, MPH or KMH. Velocity Made Good (VMG) • VMG is only displayed if your system is configured for use with sailing vessels. -
Page 10: Shallow & Deep Alarms
ST80 Multiview Operation and Setup Manual Shallow & Deep Alarms • This screen displays the current status (and value) assigned to the shallow and deep alarms. • The status of these alarms is identified by a tick (on) or cross (off). -
Page 11: Pilot
ST80 Multiview Operation and Setup Manual Pilot • The pilot screen displays the current autopilot status: AUTO, STBY, VANE or TRACK. • The pilot screen also displays the current heading in degrees true (T) or magnetic (M) and a rudder angle indicator (2° graduations). -
Page 12: Switching To System Mode
ST80 Multiview Operation and Setup Manual Switching to System Mode To switch to system mode from local mode, press and hold the key for 1 second. Switching to local Mode You can return to local mode from system mode by pressing and holding the key for 5 seconds. -
Page 13: Pop-Up Pilot
ST80 Multiview Operation and Setup Manual Pop-Up Pilot During autopilot operation, various information screens pop-up to advise you of a pilot status changes. The pop-screens you may encounter include: • Response • Rudder (gain) • Heading offset (Deviation, Heading Offset, Turn Boat and Turn Slower) •... -
Page 14: Cancelling Alarms
ST80 Multiview Operation and Setup Manual Cancelling Alarms Press any key to silence or turn an alarm off. The following table shows the action applied to the currently active alarm when a key is pressed. Alarm Silenced? Turned Off? Shallow depth... -
Page 15: Man Overboard
ST80 Multiview Operation and Setup Manual Man Overboard The man overboard screen is activated by pressing the MOB key on another unit (e.g., ST80 MOB Keypad) or waypoint 999. The default man-overboard screen consists of dead-reckoned data. If there is insufficient information to calculate a dead reckoned range and bearing, a range and bearing to the position (based on Lat/Lon) at which the man-overboard condition was initiated is displayed. -
Page 16: Chapter 3: Codelock Security
ST80 Multiview Operation and Setup Manual Chapter 3: CodeLock Security 3.1 What is CodeLock? • CodeLock is a personal four digit security code designed to protect your valuable equipment against theft. • CodeLock does not have to be switched on, but it’s there if you decide that you need it. -
Page 17: 3.2 Enabling Codelock
ST80 Multiview Operation and Setup Manual instruments are mounted in exposed locations, CodeLock can demand that you enter your personal code every time the system is switched on. In this configuration, the code can be entered into any convenient master display head. -
Page 18: Chapter 4: User Setup
ST80 Multiview Operation and Setup Manual Chapter 4: User Setup 4.1 About this Chapter This chapter describes how to adjust the Setup features using a combination of flow charts and text. The flow charts are designed to show the roll-over sequence for individual keys or key sequences (all key presses are, unless stated otherwise, momentary). -
Page 19: Setup Menu
ST80 Multiview Operation and Setup Manual Setup Menu The following flow chart shows the complete Setup menu. speed page depth SPEED POP-UP DEFAULT DISPLAY RESPONSE PILOT SELECTION DEPTH DEPTH TREND KEYPAD RESPONSE THRESHOLD BEEP ON/OFF HEADING SPEED TREND CONTRAST RESPONSE... -
Page 20: Response
ST80 Multiview Operation and Setup Manual Response The response screens control the rate at which information is updated. The range for response is 0 to 15. A high number provides a lively response and a low number a slow but smooth response. -
Page 21: Pop-Up Pilot
ST80 Multiview Operation and Setup Manual Pop-Up Pilot When the pop-up pilot option is enabled, the Multiview responds to autopilot status or configurations changes by displaying CHANGE IN STATUS. The pop-up pilot option is select or de-selected as follows: speed... -
Page 22: Contrast Adjustment
ST80 Multiview Operation and Setup Manual Contrast Adjustment The LCD contrast can be adjusted to suit most lighting conditions. Adjustments, if necessary, are made in the following manner: speed page depth INCREASE VALUE DECREASE VALUE D3094-1 Illumination Adjustment The brightness of each illumination level (1, 2 and 3) can be adjusted as a percentage of the maximum brightness for each level. -
Page 23: Multiline Selection
ST80 Multiview Operation and Setup Manual Multiline Selection This option is used to select four lines of data (from the list below) to be displayed when the multiline screen is selected. • Universal time coordinate (UTC) • Local time coordinate (LTC) •... -
Page 24: Quitting User Setup
ST80 Multiview Operation and Setup Manual Lines are selected in the following manner: speed page depth HIGHLIGHT PREVIOUS CHANGE CONTENTS HIGHLIGHT NEXT LINE LINE OF HIGHLIGHTED LINE D3099-1 Note: You can change the contents of a highlighted line to the previous option by pressing the speed key for 1 second. -
Page 25: Chapter 5: Problem Solving
ST80 Multiview Operation and Setup Manual Chapter 5: Problem Solving 5.1 Problem Solving Display is blank - keypad not illuminated • Make sure that the power supply is connected. • Check the fuse or circuit breaker. • Make sure that the SeaTalk cables are not damaged. -
Page 26: Chapter 6: Emc And Servicing Guidelines
ST80 Multiview Operation and Setup Manual Chapter 6: EMC and Servicing Guidelines 6.1 Important information All Autohelm equipment and accessories are designed to the best industry standards for use in the leisure marine environment. Their design and manufacture conforms to the appropriate... - Page 27 ST80 Multiview Operation and Setup Manual • Genuine Autohelm cables should be used at all times. Cutting and rejoining these cables can compromise EMC performance and so should be avoided unless doing so is detailed in the installation manual. • If a suppression ferrite is attached to a cable, this ferrite should not be removed.
-
Page 28: Chapter 7: Specification
ST80 Multiview Operation and Setup Manual Chapter 7: Specification Dimensions: 110 x 114.5 x 18.25mm (4.33 x 4.5 x 0.71in) Power supply: 10 to 16 V DC Current consumption: 100 mA with illumination off 200mA with illumination full on Operating temperature: -10 to +70°C (14°F to 158°F) - Page 30 ST80 Navigator Keypad Installation and Operation Handbook Raytheon Marine Europe Ltd. Anchorage Park, Portsmouth, P03 5TD, England. Telephone: (44) 1705 693611 Fax: (44) 1705 694642...
Need help?
Do you have a question about the ST80 Multiview and is the answer not in the manual?
Questions and answers