Table of Contents
Advertisement
Quick Links
Advertisement
Table of Contents

Related Manuals for Percussionaire Impulsator Home Care TRUE-IPV Therapy Device


Summary of Contents for Percussionaire Impulsator Home Care TRUE-IPV Therapy Device
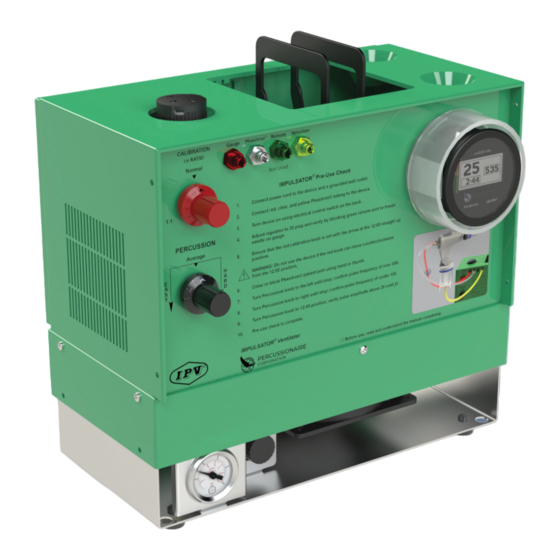
- Page 1 Impulsator ® User Manual Home Care TRUE-IPV Therapy Device ®...
- Page 2 Percussionaire®. No part of this document may be copied, reproduced, transmitted, or stored in any electronic information system without the prior written consent of Percussionaire®...
-
Page 3: Table Of Contents
Connecting the Tubing Harness to the Phasitron®5 ......8 Adding Saline, Sterile Water, or Medication ........9 TRUE-IPV® In-Line Valve Setup ................10 Adding Phasitron®5 to In-Line Valve .............10 Percussionaire® Digital Multimeter PDM (Multimeter) Setup ....11 Changing PDM Batteries ................12 Chapter 4: Controller Functions ..................13 Knob, Switch, Gauge ..................13... - Page 4 Phasitron®5 Lubrication After Cleaning and Disinfection ....25 Reassembly of the Phasitron®5 ............. 25 Chapter 8: Technical Specifications ................27 Impulsator® Specifications ................27 Percussionaire® Digital Multimeter (PDM) Specifications ....28 Phasitron®5 Technical Specifications ............28 Chapter 9: Maintenance ....................29 Phasitron®5 ......................29 Air Intake Filter Replacement .................
-
Page 5: Chapter 1: Introduction
Chapter 1: Introduction This chapter provides an overview of the Impulsator® device and TRUE-IPV® therapy. Intrapulmonary Percussive Ventilation (IPV®) Designed specifically for non-continuous home and institutional use, the Impulsator® is a pressure-limited, flow-interrupted, and time-cycled ventilator which delivers TRUE-IPV® therapy, a modality of mechanical ventilation, “Intrapulmonary Percussive Ventilation. ” The Impulsator delivers high-frequency percussive pulses approximately 60-400 cycles per minute. -
Page 6: Three Components Of True-Ipv
Three Components of TRUE-IPV® The Three Components of Intrapulmonary Percussive Ventilation (IPV®) • Diffusion • Perfusion Vesicular • Convection Peristalsis Frequency = 300 Frequency = 150 Frequency = 100 Percussive Mechanical Percussive Convective Percussive Perfusion Mixing Diffusion f=300 Ventilation With Diffusion f=150 Vesicular Peristalsis f=100... -
Page 7: Chapter 2: Intended Use
Chapter 2: Intended Use Indications for Use The Impulsator® is indicated for mobilization of secretions and raising of endobronchial secretions, bronchodilation, reducing mucosal edema, and the resolution of diffuse patchy atelectasis. Patient Population The Impulsator® ventilator is for use on patient populations from pediatric through adult. Absolute Contraindications •... -
Page 8: Clinical Limitations/Restrictions
Clinical Limitations/Restrictions Use of the Impulsator® is limited to patients, caregivers, respiratory therapists/clinicians who have received proper training and who have read and understand this manual. WARNING: When used on a patient with an artificial airway (i.e., endotracheal or tracheostomy tube), a clinician must be present so that a one-to-one relationship exists. These devices enhance secretion clearance. -
Page 9: Chapter 3: Setup
Chapter 3: Setup Impulsator® Controller Place the Impulsator® controller on the table or floor, in a place with good unrestricted airflow. Make sure the controller is away from curtains, sheets, bedspreads, or anything that might block the vents and airflow. Plug the female end of the power cord into the back of the controller. -
Page 10: Phasitron®5 Breathing Circuit Setup
Phasitron®5 Breathing Circuit Setup The patented Phasitron®5 uses a unique venturi as a “clutch” mechanism to protect the lung from over pressure. By automatically adjusting to the resistance of the lung, the Phasitron®5 precisely and safely delivers the optimal amount and pressure of air required by the alveolar space. -
Page 11: Phasitron®5 Diagram
Housing Nebulizer Cap Mouthpiece Diaphragm Nebulizer Bowl Baffle WARNING: Only use Percussionaire® parts and accessories Type BF Single patient use Configurations Phasitron®5 kit can be used with or without a mouthpiece or standard mask (as shown below). Connection sizes: 15mm ID or 22mm OD. -
Page 12: Connecting To The Impulsator
Connecting to the Impulsator® Connect red, clear, and yellow tubing connectors to the Impulsator® Model F00012 controller device. WARNING: Green REMOTE connector is a vent; do not obstruct. Connecting the Tubing Harness to the Phasitron®5 Connect yellow tubing quick-connect fitting to nebulizer bowl. -
Page 13: Adding Saline, Sterile Water, Or Medication
Adding Saline, Sterile Water, or Medication Twist clockwise to open nebulizer bowl. Add prescribed amount. Reverse to close. CAUTION: Ensure yellow nebulizer tubing is not bent. This may cause undue stress on connector. CAUTION: Do not bend nebulizer bowl while holding the tubing. This may cause undue stress on the red line conical connector. -
Page 14: True-Ipv® In-Line Valve Setup
TRUE-IPV® In-Line Valve Setup WARNING: In-line valve setup and use are for physicians, respiratory clinicians/therapists only. Patient connection wye Phasitron® port connection Pediatric to Adult Recommended to install as close to the patient wye as allowable Insert TRUE-IPV® In-Line Valve into inspiratory limb of ventilator circuit. WARNING: Ensure Pressure Relief valve is closed. -
Page 15: Percussionaire® Digital Multimeter Pdm (Multimeter) Setup
Percussionaire® Digital Multimeter (PDM) Setup NOTE: To access battery pull tabs, turn the PDM counterclockwise and remove from Impulsator® device. Pull up to remove both tabs NOTE: To ensure correct atmospheric pressure calibration at start up, remove batteries, wait 30 seconds and reinstall. Allow 15 seconds for power-on self-test. When screen goes blank, the multimeter can be installed into the device. -
Page 16: Changing Pdm Batteries
Changing PDM Batteries Press on the PDM’s bezel and twist counterclockwise approximately 20 degrees. Gently pull on the multimeter to remove it from the housing. Remove the two old batteries. Install two new batteries. Note that the positive terminals face the same direction. -
Page 17: Chapter 4: Controller Functions
207 kPa) and 40 psig (3.4 bar, 345 kPa). The Source Pressure gauge shows the operating pressure of the entire unit. The Percussionaire® Digital Multimeter (PDM) has six different operating modes: POST, Wake, Active, Report, Sleep, and Fault. See Percussionaire® Digital Multimeter (PDM) section for detailed information on each mode. -
Page 18: Percussionaire® Digital Multimeter (Pdm)
Fault. Power-On Self-Test (POST) Mode When batteries are installed in a system, the Percussionaire® Digital Multimeter (PDM) software displays the software revision, battery voltage, total usage time and serial number for 15 seconds. This Start-Up mode allows the software to perform additional tests on the hardware that are part of the Power-On Self-Test. -
Page 19: Wake Mode
Wake Mode To wake up the PDM, ensure the ventilator pressure is greater than 2 cmH₂O/hPa at the Phasitron® 5 patient delivery port for more than 1 second, with patient port blocked. The PDM remains on for the first 15 seconds, showing the Bar-Graph timer. If usage is stopped within 12 seconds, the PDM enters Report mode. -
Page 20: Report Mode
Report Mode The Session Timer and the Total Usage Timer (A) are displayed for 2 seconds, followed by the System Information page (B) for 2 seconds, alternating. The alternating page display continues for 5 minutes, or until usage resumes and the PDM enters Active mode. -
Page 21: Fault Mode
(note that positive terminals face same direction) and wait 30 seconds until the screen turns off. If POST check runs correctly, PDM may be used. If System Failure screen recurs, contact an authorized Percussionaire® service center. Fault Logging The software keeps track of several types of hardware and data faults. All faults are logged in the microcontroller’s memory and are retained even if the batteries are... -
Page 22: Chapter 5: Pre-Use Check
Chapter 5: Pre-Use Check Regularly perform this test before using the Impulsator® TRUE-IPV® device. If the Impulsator® has been stored in conditions outside the operational conditions outlined in the Technical Specifications section of this manual, allow the unit to acclimate for 2 hours before using. -
Page 23: Chapter 6: General True-Ipv® Therapy Protocol For Adults
Chapter 6: General TRUE-IPV® Therapy Protocol for Adults WARNING: Never run the Impulsator® without liquid in the nebulizer during your treatment. This is required for airway hydration. The patient should be in an upright comfortable armchair or lying with head and shoulders elevated by pillows. - Page 24 After the ability to prevent leaking of percussive air deliveries from the nose and mouth is learned, the entire percussion frequency band should be scanned by briefly rotating the PERCUSSION control knob arrow from easy to hard, back and forth (several times), returning the arrow to the 12:00 position (straight up).
-
Page 25: Chapter 7: Cleaning And Disinfection
WARNING: The cell used in this device may present a risk of fire or chemical burn hazard if mistreated. Do not recharge, disassemble, heat above 100°C (212°F) or incinerate. Replace cell with a CR123A only, or Percussionaire® part PRT- B13350. Use of another cell may present a risk of fire or explosion. -
Page 26: Disassembly Of The Phasitron®5
Disassembly of the Phasitron® 5 Disconnect tubing from controller device and Phasitron® 5. 1. Rotate nebulizer bowl towards rear of Phasitron®5, moving gently past the stop to release. 2. Gently lift nebulizer cap and bowl to separate from Phasitron®5. 3. Holding the nebulizer cap, twist the nebulizer bowl to remove bowl from cap. -
Page 27: Cleaning And Disinfecting Solutions
Cleaning and Disinfecting Solutions The Phasitron® 5 breathing circuit has been tested for biocompatibility with the following cleaning solutions: Chemical Class Active Ingredient Bleach 5.25% Sodium hypochlorite Alcohol 70% Isopropyl alcohol Peroxide 3% Hydrogen peroxide Benzyl Ammonium N-alkyl dimethyl ethyl benzyl ammonium chlorides Chloride N-alkyl dimethyl benzyl ammonium chloride Phenolic... -
Page 28: Phasitron®5 Disinfection
WARNING: Do not expose the unit to excessive moisture. Injury or equipment damage could occur. CAUTION: Do not use harsh cleansers, solvents, or detergents. Equipment damage could occur. WARNING: Percussionaire® makes no claims regarding the efficacy of the listed chemicals or processes as a means for controlling infection. -
Page 29: Phasitron®5 Lubrication After Cleaning And Disinfection
Wash hands thoroughly with soap and water or use an alcohol-based hand sanitizer before reassembly and lubrication. Lightly coat each quick-connect fitting O-ring with the Percussionaire® lubricant Lubetube, supplied with the Impulsator® device. CAUTION: Use only Percussionaire®-approved lubricant. - Page 30 Reassembly of the Phasitron® 5 (continued) Insert venturi and spring into Phasitron® 5 body. Screw white cap onto rear of the Phasitron® 5 body until stop. Holding the ring of the nebulizer cap, insert and twist nebulizer bowl until it locks.
-
Page 31: Chapter 8: Technical Specifications
Chapter 8: Technical Specifications Impulsator® Specifications Size 33.02 cm W x 29.71 cm H x 20.82 cm D (13" W x 11.7" H x 8.2" D) Mass 10.43 kg (23 lb) Storage and Transport Temp -40°C to 60°C (-40°F to 140°F) Humidity <... -
Page 32: Percussionaire® Digital Multimeter (Pdm) Specifications
Percussionaire® Digital Multimeter (PDM) Specifications Size 73 mm diameter (2.87-inch diameter) Mass 165 g (0.36 lb) Storage and Transport Temp., -20°C to 60°C (-4°F to 140°F) Humidity<93% non-condensing Display 128 x 64-pixel FSTN chip-on-glass LCD with reflector Fault Detection Independent hardware and software watchdogs... -
Page 33: Chapter 9: Maintenance
Chapter 9: Maintenance Phasitron ® 5 Use the Phasitron® Timestrip® as your guideline for replacing filters. When the Timestrip® indicates it is necessary to replace your Phasitron® P5-TH breathing circuit, also replace the Impulsator® filters. (Refer to Timestrip® section for information). Air Intake Filter Replacement Check, clean, and/or change filters every 6 months (more often in dusty environments). -
Page 34: Cooling Fan Maintenance
Fuse holder will release. Pull out the red fuse carrier. Remove and replace with new fuses, Percussionaire® part number B12792 (BK/MDL-5 115V), or equivalent. Two extra fuses (B12792) are supplied in the Accessory Kit... - Page 35 Fuse Replacement Continued Replace red fuse carrier into the fuse panel by squeezing fuses together from sides and sliding fuse holder into housing. Replace black cover by aligning it with the housing and pushing in until it snaps into place. Make sure both sides are engaged.
-
Page 36: Chapter 10: Troubleshooting
Chapter 10: Troubleshooting Problem Examine Repair Impulsator® will not Unit is not connected to an Plug unit into an approved power approved power source. source. turn on. There is a loose wire connection Service required. or grounding defect. Fuse not functioning properly. Check Fuse. -
Page 37: Chapter 11: Service And Repair
Service by an unauthorized individual or repair maintenance facility will cause the immediate expiration of the clinical readiness of the device. Return the device to Percussionaire® or an authorized service center for repair, required service, or annual preventive maintenance. -
Page 38: Chapter 12: Limited Warranty
NOTE: In the event that the operation of a Percussionaire® product is in any way adversely affected by using components other than those designed, manufactured, or approved by Percussionaire®... - Page 39 This page intentionally left blank.
- Page 40 130 McGhee Road, Suite 109, Sandpoint, Idaho 83864 USA percussionaire.com +1.208.263.2549 P20047 Rev D...
Need help?
Do you have a question about the Impulsator Home Care TRUE-IPV Therapy Device and is the answer not in the manual?
Questions and answers