Table of Contents
Advertisement
Quick Links
Advertisement
Table of Contents

Related Manuals for ELEHEAR Alpha Pro OTC

Summary of Contents for ELEHEAR Alpha Pro OTC
- Page 1 Alpha Pro User Manual...
- Page 2 WELCOME...
- Page 3 We value your selection of the ELEHEAR Alpha Pro hearing aids to enrich your daily experiences and improve your quality of life. Please note that these hearing aids are custom-tailored and optimized for an individual's unique hearing profile. As a result, they may not be suitable for others.
-
Page 4: Table Of Contents
CONTENTS 1. INTENDED USE 2. WHAT’S IN THE BOX 3. PRODUCT OVERVIEW 3.1 ELEHEAR ALPHA PRO (FRONT) 3.2 ELEHEAR ALPHA PRO (BACK) 3.3 CHARGING CASE 4. OPERATION GUIDE 4.1 CHARGING BEFORE USE 4.2 DOWNLOAD THE ELEHEAR APP 4.3 BLUETOOTH STREAMING 4.4 WEARING... - Page 5 4.9.2 CHARGING THE CHARGING CASE 4.9.3 CHARGING STATUS 5. MAINTENANCE AND CLEANING 5.1 REPLACING EAR CAPS 5.2 REPLACING WAX CAP 5.3 CLEANING 6. TROUBLESHOOTING GUIDE 7. TECHNICAL PARAM 8. IMPORTANT INFORMATION 9. WEARING GUIDELINES 10. IMPORTANT FCC COMPLIANCE INFORMATION 11. PRODUCT WARRANTY...
-
Page 6: Intended Use
INTENDED USE... - Page 7 The ELEHEAR Alpha Pro hearing aids are designed to be utilized by individuals aged 18 and above who experience mild to moderate hearing impairment.
-
Page 8: What's In The Box
WHAT’S IN THE BOX... - Page 9 Hearing aid x2 Ear caps( S / M / L ) x2 Wax cap tool x1...
- Page 10 Alpha Pro User Manual Multi-function tool pen x1 User manual x1 Alpha Pro Quick Start Guide USB Type-C to USB-A cable x1 Quick Start Guide x1...
-
Page 11: Product Overview
PRODUCT OVERVIEW... -
Page 12: Elehear Alpha Pro (Front)
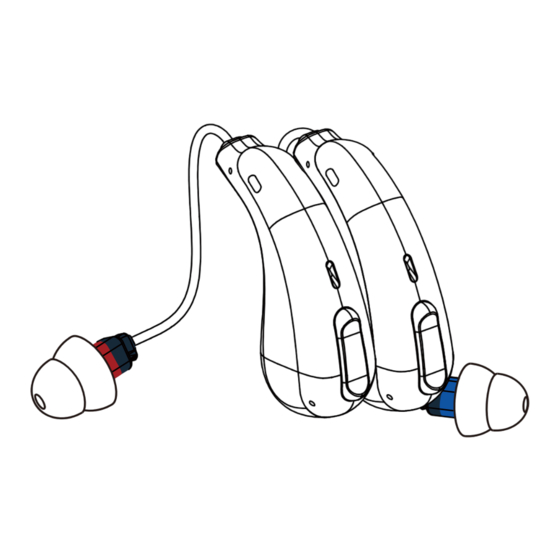
3.1 ELEHEAR Alpha Pro (FRONT) Microphone 1 Receiver Microphone 2 Power on/off button Volume up button Switch button Volume down button Ear cap Hearing aid indicator... -
Page 13: Elehear Alpha Pro (Back)
3.2 ELEHEAR Alpha Pro (BACK) Charging contact Name plate Wax cap Receiver wire Charging contact... -
Page 14: Charging Case
3.3 CHARGING CASE Hearing aid charging indicator Charging case charging indicator Reset button Charging port... -
Page 15: Operation Guide
OPERATION GUIDE... -
Page 16: Charging Before Use
4.1 CHARGING BEFORE USE We recommend fully charging both the hearing aids and the charging case for a duration of 2.5 hours prior to usage. (Refer to page 23 for charging instructions.) -
Page 17: Download The Elehear App
4.2 DOWNLOAD THE ELEHEAR APP The ELEHEAR app enables you to set up and personalize your hearing aids based on your hearing preferences, as well as manage their settings. Make sure to download the app before using the Alpha Pro. -
Page 18: Bluetooth Streaming
4.3 BLUETOOTH STREAMING The ELEHEAR Alpha Pro has Bluetooth® to connect with devices like Apple iOS or Android phones. When connected to a phone, it can play music and answer calls hands-free. Follow these steps to connect: (1) On your phone: ·... - Page 19 Note: · Connect the hearing aids to the phone within 30 minutes after taking them out. After this time, the ELEHEAR Alpha Pro Bluetooth won't be detectable. If this occurs, return them to the charging case and then take them out to reconnect.
-
Page 20: Wearing
4.4 WEARING (1) Differentiate between the left and right hearing aids. The left ear device features a blue receiver, while the right ear device is equipped with a red receiver. Left: Blue Right: Red (2) Position the hearing aid on the corresponding ear. The hearing aid body should rest near the upper part of your ear. - Page 21 (3) Completely insert the ear (4) Refine the position of the cap into your ear canal. receiver wire to ensure a comfortable fit. Left: Blue Left: Blue Note: Initially, the ear caps might feel unusual or cause slight itchiness in your ear canal. If discomfort arises, replace the ear caps in other sizes which fits your ear better.
-
Page 22: On/ Off
4.5 ON/ OFF Press the volume up button for 3s Power On: Open the charging case, and the hearing aids will turn on when taken out. Or, press and hold the volume up button for 3 seconds. Power Off: To turn off the hearing aids, put them in the charging case and close the lid. -
Page 23: Adjusting Volume
4.6 ADJUSTING VOLUME volume up button make sounds louder volume down button make sounds quieter The volume buttons are situated on the rear of each hearing aid. You can effortlessly adjust the volume to increase or decrease the sound level. When the volume reaches its highest or lowest point, you will hear a 'dingding' sound. -
Page 24: Switching Modes
4.7 SWITCHING MODES Press the volume down button To change modes, press and hold the volume down button for 3 seconds. You'll hear a sound indicating the new mode. General Restaurant Outdoor Mode Mode (Default) Mode Mode Mode General Restaurant Outdoor Beep Mode... -
Page 25: Restoring To Factory Settings
4.8 RESTORING TO FACTORY SETTINGS Reset button To restore the ELEHEAR Alpha Pro to factory settings, press and hold the reset button on the charging case for 7 seconds. The white light will flash and then turn off after 5 seconds. -
Page 26: Charging
4.9 CHARGING 4.9.1 CHARGING THE HEARING AIDS Insert the hearing aids into the charging case and securely close the lid. This will initiate automatic charging of the hearing aids. A complete charging cycle for the hearing aids requires 1.5 hours. Under default settings, the battery lasts for up to 20 hours. -
Page 27: Charging The Charging Case
4.9.2 CHARGING THE CHARGING CASE To achieve a complete charge, connect the charging case to a power source. This process requires a maximum of 2.5 hours to charge both the hearing aids and the charging case. -
Page 28: Charging Status
4.9.3 CHARGING STATUS Hearing Aids LED Status Power Power Indicator 1 light is always on, and 1% ≤ power < 33 % then turns off after 10s 2 lights are always on, and 33 % ≤ power < 66 % then turn off after 10s 3 lights are always on, and Power ≥66 %... - Page 29 Charging Case Charging Indicator LED Status Power (charging) 1 % ≤ power ≤ 97% Green light breathing Power > 97% Green light is always on The charging case is capable of providing power for an additional 7 charges to the hearing aids. Note: Use the specified power adapter (DC 5V/1A) and charging cable (3A).
-
Page 30: Maintenance And Cleaning
MAINTENANCE AND CLEANING... -
Page 31: Replacing Ear Caps
5.1 REPLACING EAR CAPS To ensure the best sound, wear hearing aids properly with the right-sized ear cap. Try different sizes if it feels uncomfortable or the sound is not clear. Follow these steps: (1) Hold one end of the receiver and gently remove the ear cap. - Page 32 (2) Take a new ear cap and place the receiver at the center of it. (3) Slide the ear cap onto the receiver outlet. The receiver and ear cap should fit snugly together.
-
Page 33: Replacing Wax Cap
5.2 REPLACING WAX CAP (1) Take off the ear cap from the receiver. (2) The wax cap tool has two ends: one for removing the old wax cap and the other for putting on the new one. - Page 34 (3) Insert the empty end into the old wax cap on the hearing aid, take out and dispose of the old wax cap. (4) Use the other end with the new wax cap and put the white part into the receiver's end. Press it firmly, remove the tool, and dispose of it.
-
Page 35: Cleaning
5.3 CLEANING (1) Maintaining the hearing aid's cleanliness and dryness is crucial. Be cautious to prevent water and liquids from entering the hearing aid during daily use. (2) Clean the hearing aid's surface daily by wiping it with a dry cloth or paper towel. - Page 36 (3) Over time, earwax might accumulate on the ear cap. Use a cleaning brush to remove it or gently wipe it with a damp, soft cloth. Do not directly wash it with water or liquid detergent.
-
Page 37: Troubleshooting Guide
TROUBLESHOOTING GUIDE... - Page 38 Fault Reason Loose ear caps The ear caps are not the right size Excessive earwax Howling Hearing aid volume is too loud Receiver wire cracked or damaged When the hearing aid is placed in the charging compartment,the charging contacts are not in good contact The charging case is out of power Power off...
- Page 39 Solution Take off the ear caps and put them back on Replace ear caps with appropriate size Clean ears Turn down the volume or consult an audiologist Consult an audiologist Cleaning the charging contacts of the hearing aids and charging case Charge the charging case Power on Timely charging...
- Page 40 Fault Reason Volume set too low Battery is low Ear caps are too loose Low Volume Clogged ear caps Excessive earwax Changes in hearing loss Hearing aids are not placed correctly The Indicator Light Is Not The charging case is out of battery Phone bluetooth turning off Previous Bluetooth pairing records not cleared...
- Page 41 Solution Volume adjustment Charge or replace the battery in time Replace ear caps Cleaning ear caps Clean the ear canal or seek medical support Consult an audiologist Reposition so that the charging contacts make full contact Charge the charging case Turn on the bluetooth Long-pressing the button on the charging case for 7s and reconnect the device...
-
Page 42: Technical Param
TECHNICAL PARAM... - Page 43 Alpha Pro Parameter Name Hearing Aid Values Max-OSPL90 ≤ 112dB + 3dB HFA-OSPL90 106 ± 4dB HFA-FOG50 32 ± 5dB Frequency Range 300Hz ≤ F ≤ 6000Hz 500/800/1600Hz ≤ 2%+3% The actual measured EQ Input Noise value should be < 32dB+3dB Battery Current 2.8mA The technical characteristics according to IEC 60118-0.
- Page 44 Maximum Output(OSPL90) 1000 8000 Frequency(HZ) Figure 1: Nominal OSPL90 curve as measured in a 2 cc coupler. Full-On Gain(F0G50) 1000 8000 Frequency(HZ) Figure 2: Nominal frequency response curve as measured in a 2 cc coupler.
- Page 45 TECHNICAL INFORMATION Electrical Safety Classification: Protection against electric shock: Internal power supply Applied parts: Type B Mode of operation: Continuous operation External Connection Device: If an external device connected to this product uses mains power, it must adhere to lEC60601-1 or equivalent safety standards.
-
Page 46: Important Information
IMPORTANT INFORMATION... - Page 47 PRODUCT APPLICABLE ENVIRONMENT (1) Hearing aids work best in: Temperature: 5°C to 40°C Humidity: ≤80% Pressure: 86 kPa to 106 kPa (2)For transport or storage: Transport: 5°C to 45°C Storage: -20°C to 45°C Humidity: ≤80% Pressure: 86 kPa to 106 kPa (3) Handle with care, avoid impacts.
- Page 48 MEDICAL DEVICE IMAGES Points out a situation that could lead to serious, moderate, or minor injuries. According to IEC 60601-1, the applied parts of this device are classified as type B. Do not dispose of the device with general domestic waste. Read more in section 'Disposal information'.
-
Page 49: Wearing Guidelines
WEARING GUIDELINES... - Page 50 WEARING GUIDELINES 1. This product is not suitable for individuals with the following conditions: (1) Absolute Contraindications: - Loss of auditory nerve - Sudden or rapidly progressing hearing loss - Recent sudden tinnitus or tinnitus in one ear - Unexplained deafness in one ear or noticeable uneven deafness - Pain in either ear (2) Relative Contraindications: - Poor general health...
- Page 51 OTHERS: 1. Unauthorized repairs can harm equipment and repair personnel. Do not replace parts yourself. If issues arise, send it to the manufacturer for repair. 2. Use only authorized accessories to avoid damaging the unit or risking harm. 3. Unattended parts during patient use are meant for the operator. 4.
- Page 52 10. Don't wear hearing aids during X-rays, scans, or surgery due to electromagnetic fields. Loud sounds over 132dB could harm hearing. Take off aids when near strong fields or loud noise. 11. Avoid extreme heat like leaving aids in a hot car. 12.
-
Page 53: Important Fcc Compliance Information
IMPORTANT FCC COMPLIANCE INFORMATION 5050... - Page 54 Modifications not approved by the responsible party may void the user's authority to operate the equipment. This device complies with part 15 of the FCC Rules. Its operation must adhere to two conditions: (1) The device must not cause harmful interference. (2) The device must accept all received interference, including that which might lead to undesired operation.
- Page 55 Interference Solutions: If this equipment disrupts radio or TV reception (determined by turning it off and on), try these steps: 1. Adjust the receiving antenna's position. 2. Increase space between equipment and receiver. 3. Plug the equipment into a different circuit than the receiver. 4.
-
Page 56: Product Warranty
PRODUCT WARRANTY... - Page 57 12-month free warranty for non-human failure from purchase date. Exclusions: Damage from incorrect/improper use. Damage from self-disassembly or part assembly. Damage from force majeure (flood, fire, earthquake, etc.). Need more help? ELEHEAR support is here for you. Months Warranty support@elehear.com...
- Page 58 (888) 669-1099 Elevoc Technology Co.,Ltd. Shenzhen Bay Tech-Eco Park, Nanshan, Shenzhen Guangdong, China V 1.0...
Need help?
Do you have a question about the Alpha Pro OTC and is the answer not in the manual?
Questions and answers
open the case