Download Print this page
Delta B2510LF Series Manual

Delta B2510LF Series Manual

Two handle centerset bathroom faucet
Hide thumbs Also See for B2510LF Series:

Advertisement

Quick Links

Model/Modelo/Modèle
B2510LF / B2510LF-PPU
B2512LF / B2512LF-PPU
B2511LF-PPU / B2514LF-PPU-ECO
B2515LF-PPU
Series/Series/Seria
Write purchased model number here.
Escriba aquí el número del modelo comprado.
Inscrivez le numéro de modèle ici.
p Specify Finish / Especifíque el Acabado / Précisez le Fini
Register Online
Regístrese en línea
S'enregistrer en ligne
www.deltafaucet.com/registerme
To reference replacement parts and access additional
technical documents and product info,
visit www.deltafaucet.com
Para referencia sobre las piezas de repuesto y acceder
a documentos técnicos adicionales e información del
producto, visite www.deltafaucet.com
Pour obtenir la référence des pièces de rechange ainsi
que pour avoir accès à d'autres documents techniques et
renseignements sur le produit, allez à www.deltafaucet.com
?
www.deltafaucet.com
1-800-345-DELTA (3358)
customerservice@deltafaucet.com
Read all instructions prior to installation.
CAUTION
!
Failure to read these instructions prior to installation may result in personal
injury, property damage, or product failure. Manufacturer assumes no
responsibility for product failure due to improper installation.
Lea todas las instrucciones antes de hacer la instalación.
ADVERTENCIA
!
El no leer estas instrucciones de instalación puede resultar en lesiones
personales, daños a la propiedad, o falla en el funcionamiento del producto.
El fabricante no asume ninguna responsabilidad por la falla del producto
debido a una instalación incorrecta.
Veuillez lire toutes les instructions avant l'installation.
AVERTISSEMENT
!
L'omission de lire les présentes instructions avant l'installation peut
entraîner des blessures, des dommages matériels ou le bris du produit. Le
fabricant se dégage de toute responsabilité à l'égard d'un bris du produit
causé par une mauvaise installation.
You may need:
Usted puede necesitar:
Articles dont vous pouvez avoir besoin :
12/06/2023
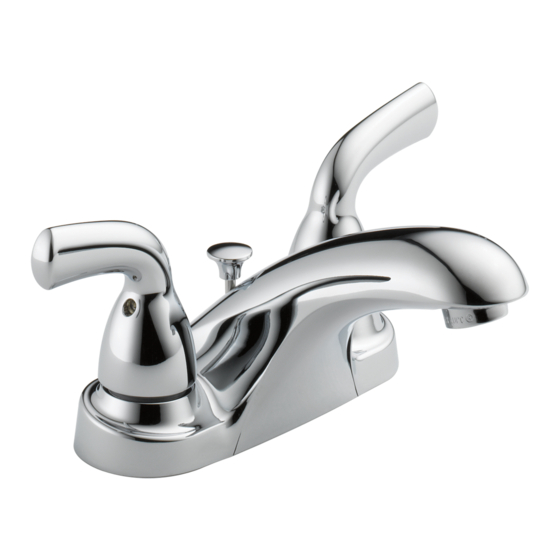
TWO HANDLE CENTERSET
86600
BATHROOM FAUCET
LLAVE DE AGUA DE DOS MANIJAS
MONOBLOC PARA LAVAMANOS
ROBINET DE LAVABO À DEUX
MANETTES CENTRALES
B2510LF
B2510LF-PPU
B2511LF-PPU
B2514LF-PPU-ECO
1
B2512LF
B2512LF-PPU
B2515LF-PPU
3/32" (2.38mm)
86600 Rev. G

Advertisement

loading

Summary of Contents for Delta B2510LF Series

  • Page 1 Pour obtenir la référence des pièces de rechange ainsi que pour avoir accès à d’autres documents techniques et renseignements sur le produit, allez à www.deltafaucet.com www.deltafaucet.com 1-800-345-DELTA (3358) customerservice@deltafaucet.com Read all instructions prior to installation. CAUTION Failure to read these instructions prior to installation may result in personal injury, property damage, or product failure.
  • Page 2: Cleaning And Care

    Cleaning and Care Care should be given to the cleaning of this product. Although its finish is extremely durable, it can be damaged by harsh abrasives or polish. To clean, simply wipe gently with a damp cloth and blot dry with a soft towel. Limpieza y Cuidado de su Llave Tenga cuidado al limpiar este producto.
  • Page 3 SHUT OFF WATER SUPPLIES. Secure faucet to sink using locknuts provided (1). Continue to either step 3 metal pop-up installation or step 4 plastic Remove old faucet. Place gasket (1) on bottom of new faucet. Place pop-up installation. If your model does not have a pop-up skip to step 5. faucet through mounting holes in sink.
  • Page 4 Metal Pop-Up installation Apply silicone to underside of flange (1). Insert body (2) into sink. Remove stopper (1) and flange (2). Screw nut (3) all the way down. B. Push washer (4) and gasket (5) down. Remove tailpiece (6) from Screw flange (1) into body (2).
  • Page 5 Install Pop-Up Assembly Apply silicone to underside of flange (1). Insert body (2) into sink. Remove stopper (1) and flange (2). Screw nut (3) all the way down. Push Screw flange onto body. Pivot hole (3) must face back of sink. black gasket (4) down.
  • Page 6 CONNECT TO WATER SUPPLIES. FLUSH SYSTEM/CHECK FOR LEAKS. (HOOK-UPS NOT PROVIDED). Remove aerator (1) and turn faucet handles (2) all the way on. Turn on Determine which type of connection you will be making. hot and cold water supplies (3) and flush water lines for one minute. (1) Ball nose risers (3/8"...
  • Page 7 Maintenance If faucet exhibits very low flow: A. Remove and clean Aerator (3) (page 3), or SHUT OFFWATER SUPPLIES B. Clean Seats and Springs (2) of any debris. If faucet leaks from spout: *Install stems (1) correctly for proper handle rotation: Replace Stem Unit Assembly (1) and Seats and Springs (2).
  • Page 8 86600 Rev. G...
  • Page 9 86600 Rev. G...
  • Page 10 Any labor charges incurred by the purchaser to repair, replace, install or remove this product are not covered by this warranty. Delta Faucet Company shall not be liable for any damage to the faucet resulting from reasonable wear and tear, outdoor use, misuse (including use of the product for an unintended application), freezing water, abuse, neglect or improper or incorrectly performed installation, maintenance or repair, including failure to follow the applicable care and cleaning instructions.
  • Page 11 Delta por parte de un comprador que es propietario pero no vive en la vivienda residencial en la que se instaló...
  • Page 12 La preuve d’achat (original du reçu du premier acheteur montrant la date d’achat) et la documentation attestant la date de réception du produit par le premier acheteur ou son représentant autorisé (installateur, etc.) doivent être présentées à Delta Faucet Company pour toutes les demandes en vertu de la garantie, sauf si le produit a été enregistré auprès de Delta Faucet Company ou si le produit est un produit recertifié Delta®...