Advertisement
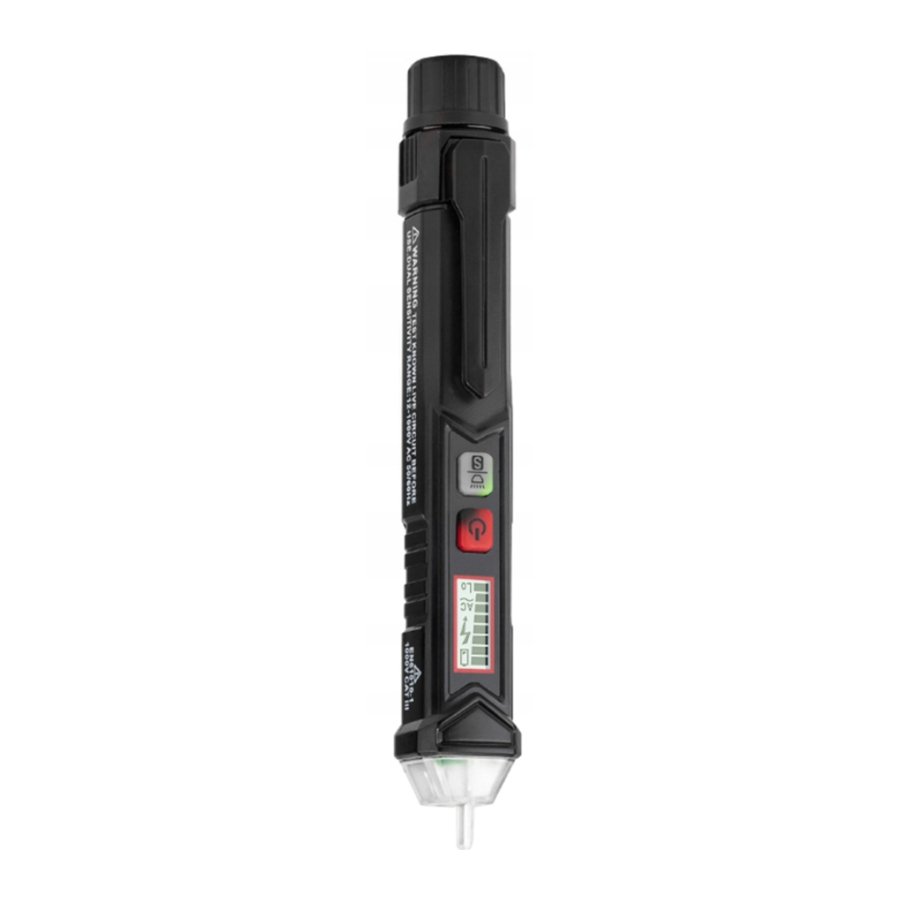
Product Overview

- Probe (NCV sensor)
- Flashlight
- Signal indicator
- LCD screen
- Power button(red)
- S button (green)
Sensitivity (short press)
LED light (long press) - Battery cover
Operation
Turning on/off
Press and hold the power key for more than 2 seconds. A beep sounds and the display lights up.
Press the power button again and the tester will turn Off. After 3 minutes Of non-use, the tester automatically powers off to conserve battery life. The tester is now deactivated and is not operational,
Checking for the presence of AC voltage
 Prior to each use, test on known live circuit to verify tester functionality!

Keep the testers tip near the AC voltage. When a voltage is detected, a beep sounds and the tip lights up red.
As the intensity of the voltage signal changes, the bar graph on the screen ![]() becomes higher or lower and the frequency of blinking and beeping becomes faster or slower with the signal intensity.
becomes higher or lower and the frequency of blinking and beeping becomes faster or slower with the signal intensity.

The signal intensity is affected by the distance from the voltage. The further the tester is from the circuit the weaker the signal becomes.
Dual range
When the tester is turned on, it is in low-sensitivity mode (48 ~ 1000V). Briefly press the green button to enter the high sensitivity mode (12 ~ 1000V). Refer to the following table for each mode.

| Low-Sensitivity Mode | ||
| Signale | 12V-48V AC | 48V-1000V AC |
| Audible | No Beep | High-frequency beep |
| Visual | Green Screen | The red tip illuminates continuously, red screen |
| High-Sensitivity Mode | ||
| 12V-48V AC | 48V-1000V AC | |
| Audible | Low-frequency | High-frequency beep |
| Visual | The red tip illuminates continuously | The red tip illuminates continuously, red screen |
Identify the wiring
Activate the high sensitivity mode. Keep the individual cables as far away from each other as possible and read the signals.
Live wire: Up to 8 bar charts
Fast beeps
Red screen

Neutral wire: Below 3 bar graphs
Slow beeps
Green screen

The screen turns red and shows a high voltage symbol when the voltage is higher than GOV.
The neutral wire and live wire should not be distinguished by the screen color, but by the detected signal intensity. The live wire causes stronger signals and the neutral causes weaker signals. It is recommended to activate the high sensitivity mode during identification.
Breakpoint testing

Activate the high sensitivity mode, move the tester's NCV tip along the cable, the voltage alarm disappears when detected a breakpoint, as shown in Figure 2.
Attention: Do NOT use on armored cables or on cables in a cable duct, behind ![]() panels or in metallic cladding.
panels or in metallic cladding.
LED flashlight
Press and hold the green button for more than 2 seconds to turn the LED light on and off. If no button is pressed and no voltage signal is detected, After 3 minutes, it will automatically shut down to save power.
Low battery indicator
If the battery voltage is less than 2.5 volts, the display will show the "  " symbol.
If the battery voltage is less than 2.3 volts, the tester automatically tums off.
Technical specifications
| Voltage: | AC 12~1000V,50/60Hz |
| Operating temperature: | 0~40°C |
| Storage temperature: | -10~50°C |
| Humidity: | <95% |
| Operating altitude: | ≤2000m |
| Security level: | CE, CAT IIl 1000V, CAT IV 600V |
| Batteries: | 2x1.5V AAA |
Battery replacement

Rotate the battery cover off body, remove the batteries, and insert the positive terminal of the new battery toward the tip of the tester. Rotate cap to the body until it is fully seated, Before locking, do not use the tester to test the electricity to avoid electric shock.
Cleaning
Use only a soft, slightly damp cloth to clean the device, never use chemicals or abrasives, alcohol, ammonia or cleaners containing solvents to clean tester, Make sure that the device is completely dry before use,
WARNINGS
With this device, life-threatening voltages are tested, so special care is required!
- Always first test the voltage tester on a known circuit to make sure it works!
![shock hazard]() When checking uninsulated contacts, wear safety shoes to prevent electric shock.
When checking uninsulated contacts, wear safety shoes to prevent electric shock.- When checking uninsulated contacts, hold the tester and make sure your fingers are behind the anti-slip guard.
- Do not use the device if:
- The screen is not lit;
- Damage is evident;
- The tip is not intact.
- Do not put the device in more than 1000V.
- This equipment can only be used indoors and should be protected from water, high air humidity and heat.
- ATTENTION: Even without indication, the voltage could still be present.
![]() The voltage detector indicates the effective voltage when a supply voltage generates enough intensive electrostatic field. If the field is very weak, the voltage detector can't detect the existence of voltage.
The voltage detector indicates the effective voltage when a supply voltage generates enough intensive electrostatic field. If the field is very weak, the voltage detector can't detect the existence of voltage. - We do not accept any liability for property damage or personal injury caused by incorrect operation or failure to follow safety instructions. In this cases any warranty claim will lapse.
After-sale: support@kaiweets.com

Documents / ResourcesDownload manual
Here you can download full pdf version of manual, it may contain additional safety instructions, warranty information, FCC rules, etc.
Download KAIWEETS HT106B, HT100, HT105B, HT113B - Non-contact Voltage Tester Manual
Advertisement


Need help?
Do you have a question about the HT106B and is the answer not in the manual?
Questions and answers