Gaggia Anima Prestige - Superautomatic Coffee Machine Manual
- Operating instructions manual (92 pages) ,
- Operating instructions manual (72 pages) ,
- Operating instructions manual (88 pages)
Advertisement
- 1 Symbols
- 2 Product overview
- 3 Preliminary operations
- 4 Activation and deactivation
- 5 Use
- 6 Cleaning and maintenance
- 7 Default settings
- 8 Troubleshooting
- 9 Maintenance accessories and products
- 10 Technical specifications
- 11 Service
- 12 IMPORTANT SAFEGUARDS
- 13 Safety
- 14 Documents / Resources
Symbols
The following symbols are used in some parts of the booklet:
 | Indicates actions that should on no account be carried out. |
 | Indicates actions that require some caution. |
| > | Requests the specified action. |
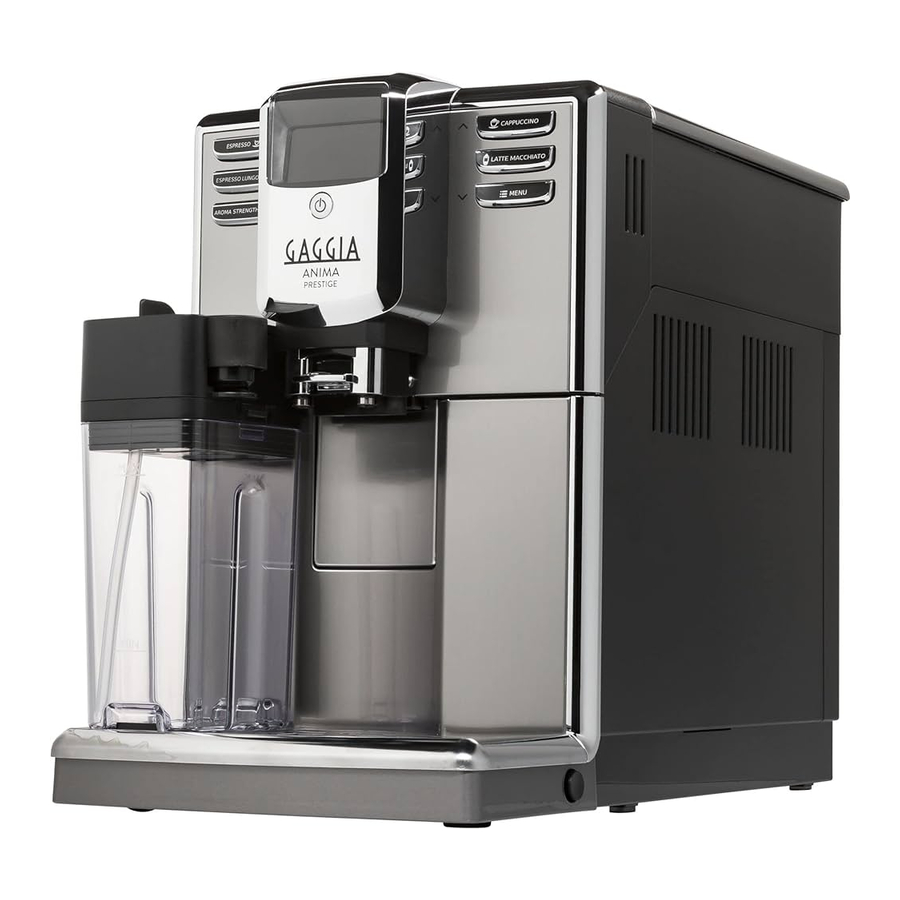
Product overview
The product
The machine can be used to brew coffee from whole beans and is equipped with a milk carafe to prepare the perfect cappuccino easily and quickly.
These are the machine's special features:
GaggiaAdapting System
Coffee is a natural product and characteristics may vary according to origin, blend and roasting. The machine is equipped With a self-adjustment system that allows it to valorise your favourite coffee beans. It regulates itself after brewing a few coffees.
Coffee intensity adjustment
You can choose your favourlte coffee blend and adjust the quantity of coffee to be ground according to your personal taste. It is possible to use pre-ground coffee.
Ceramic coffee grinder
The ceramc grinding wheels guarantee consistently excellent grinding, and allow you to adjust the grinder to completely suit your taste. This technology provides absolute aroma preservation, thus guaranteeing that each cup has the true taste of Italian coffee.
Energy saving function
The fully automatic Gaggia espresso machine is designed as an energy saving device, as shown by the A rating. After a preset idle time, the machine goes into stand-by mode automatically.
Accessories

- Power cord
- Instruction manual
- Disposable strip for water hardness test
- Multifunction tool
- Coffee grinder adjustment key
- Powder coffee outlet duct cleaning tool
- Pre-ground coffee measuring scoop
- Cleaning brush (optional)
- Brew group grease (optional)
Main components

- STAND-BY button
- Water tank seat
- Coffee bean hopper
- Pre-ground coffee compartment
- Removable water tank
- Main switch
- OFF
- ON
- Power cord socket
- Coffee grounds drawer
- Drip tray
- Drip tray grill
- Coffee dispensing spout
- Hot water dispensing spout
- Milk carafe
Main removable parts

- Water tank lid
- Coffee bean hopper lid
- Pre-ground coffee compartment lid
- Service door
- Coffee residues drawer
- Brew group
- Coffee dispensing spout
- Drip tray
- Coffee grounds drawer
- 'Drip tray full' indicator
- Hot water dispensing spout
- Milk carafe lid
- Milk carafe top
- Milk frother dispensing spout
- Milk container
Control buttons and display

![]() ESPRESSO button
ESPRESSO button
![]() ESC button
ESC button![]() ESPRESSO LUNGO button
ESPRESSO LUNGO button![]() AROMA STRENGTH button
AROMA STRENGTH button
![]() OK button
OK button![]() CAPPUCCINO button
CAPPUCCINO button
![]() UP button
UP button![]() LATTE MACCHIATO button
LATTE MACCHIATO button![]() MENU button
MENU button
![]() DOWN button
DOWN button![]() STAND-BY button
STAND-BY button- Display
In the example:
Main menu; ready for brewing
 ESPRESSO button
 ESC button
 ESPRESSO LUNGO button
 AROMA STRENGTH button
 OK button
 CAPPUCCINO button
 UP button
 LATTE MACCHIATO button
 MENU button
 DOWN button
 STAND-BY button
Preliminary operations
Make sure to read the "Safety" chapter.
Positioning
To facilitate the use of the machine, should be placed in an appropriate location that provides adequate space to operate.

Working spaces
| L1 | L2 | W1 | W2 | H1 |
| 150 mm | 221 mm | 430 mm | 150 mm | 340 mm |
Unpacking and placement
The orignal packaging was designed and produced to protect the machine while being moved; is recommended to keep in case the machine needs to be moved again.
- Remove the machine from packaging.
- Choose a secure and horizontal surface away from heat sources and out of the weather, in a sufficiently lit and hygienic room, next to an easily accessed power socket.
- Position the machine allowing for working spaces.
Water tank filling
- Lift the lid of the water tank.
- Lift the water tank by handle.
- Rinse the water tank with cold water
![]() Do not fill the water tank with hot, boiling or carbonated water or with other liquids that might damage the tank and the machine. Use fresh water every time you use the machine.
Do not fill the water tank with hot, boiling or carbonated water or with other liquids that might damage the tank and the machine. Use fresh water every time you use the machine. - Fill the water tank with fresh cold water to the MAX level.
![]()
- Put the tank back into the machine, checking that is fully settled.

Coffee bean hopper filling
- Lift the coffee bean hopper lid.
![]()

 Do not place too many coffee beans in the coffee bean hopper; so as to avoid damaging grinding performance.
Coffee powder, soluble coffee, raw coffee and other substances, if placed in the coffee bean hopper, may damage the machine. AIways fill the coffee bean hopper with roasted coffee beans only. Do not fill it with green, caramelised or flavoured coffee beans.
- Pour the coffee beans slowly in the coffee bean hopper and close the lid.
Plug in and start
- Insert the plug into the socket located on the back of the machine.
![]()
- Insert the plug at the other end of the power cord into a wall socket with suitable power voltage, as shown in the tag inside the service door
- Turn the man switch to the ON position to tum the machine on.
![]() The STAND-BY button is flashing. Press the button to turn on the machine. The display shows that is necessary to prime the circuit: proceed as described in the "First start" chapter.
The STAND-BY button is flashing. Press the button to turn on the machine. The display shows that is necessary to prime the circuit: proceed as described in the "First start" chapter.

 The STAND-BY button is flashing. Press the button to turn on the machine. The display shows that is necessary to prime the circuit: proceed as described in the "First start" chapter.
 Keeping the STAND-BY button pressed for over 8 seconds causes the DEMO MODE function to start. To exit the demo mode, turn the machine OFF and ON using the main switch.
Activation and deactivation
Make sure to read the "Safety" chapter.
Using the selection buttons
Some function buttons can be used to navigate through functions / menus:
 The OK button is used to select / confirm / stop the function.
 The ESC button is used to return to the main menu, one level at a time.
 The UP button is used to move upwards.
 The DOWN button is used to move downwards.
First start
Before first use the following operations must be carried out:
- Water circuit priming.
- One automatic rinse/self-cleaning cycle.
- One manual rinse cycle.
Water circuit priming
During this process fresh water flows through the internal circuit and the machine heats up. The process requires a few minutes.
- Check that the water dispensing spout is installed. Otherwise, follow the instructions in the "Hot water dispensing spout" chapter; "Inserting phase".
- Place a container under the water dispensing spout.
![]() Press the OK button to start the water circuit priming cycle. The machine is waiting to start the water dispensing process. The water dispensing spout must be installed.
Press the OK button to start the water circuit priming cycle. The machine is waiting to start the water dispensing process. The water dispensing spout must be installed.
![]()
![]() Press the OK button to enter. The machine starts dispensing hot water. The progress bar on the display shows the status of the operation. The machine automatically stops dispensing water at the end of the process. The d splay shows that the machine is heating. At the end of the heating phase, the machine launches an automatic clean water rinse/self-cleaning cycle of the internal circuits.
Press the OK button to enter. The machine starts dispensing hot water. The progress bar on the display shows the status of the operation. The machine automatically stops dispensing water at the end of the process. The d splay shows that the machine is heating. At the end of the heating phase, the machine launches an automatic clean water rinse/self-cleaning cycle of the internal circuits.

Automatic rinse/self-cleaning cycle
- Place a container under the coffee dispensing spout.
![]()
Be careful of hot water or steam sprays.
![]() The operation lasts less than a minute. Wait for the cycle to end automatically. If necessary, the cycle can be interrupted by pressing the OK button.
The operation lasts less than a minute. Wait for the cycle to end automatically. If necessary, the cycle can be interrupted by pressing the OK button.
![]()
- Empty the container. The machine goes back to the main menu. Now is possible to launch the manual rinse cycle.

Manual rinse cycle
The complete manual rinse cycle comprises two consecutive phases:
- One "Coffee brewing circuit rinsing phase", to be repeated twice.
- One "Hot water dispensing circuit rinsing phase'
![]()
Coffee brewing circuit rinsing phase
Dunning this phase, the coffee brewing cycle is started.
- Place a container under the coffee dispensing spout.
![]() Press the ESPRESSO LUNGO button. The machine starts brewing coffee:
Press the ESPRESSO LUNGO button. The machine starts brewing coffee:
Repeat the previous operations, then proceed.
![]()
- After the product has been brewed, empty the container.
![]() If necessary, the cycle can be interrupted by pressing the OK button.
If necessary, the cycle can be interrupted by pressing the OK button.
 Press the ESPRESSO LUNGO button. The machine starts brewing coffee:
Hot water circuit rinsing phase
- Follow the instructions in the "Water tank filling" chapter and fill the water tank up to the CALC CLEAN level.
![]()
- Follow the instructions in the "Hot water dispensing" chapter and dispense water until the 'Water tank empty' symbol is displayed. Empty the container
![]()
- Follow the instructions in the "Water tank filling" chapter and fill the water tank up to the MAX level. The machine is ready for brewing.


Adjustments
The machine is supplied with standard brewing default settings. To enhance the quality and taste of the coffee, it is recommended to adjust the settings. In particular; to obtain a stronger taste, set the brewing temperature, aroma and grinding fineness to the top of the scale.
Water hardness measurement and setting
It is essential to measure water hardness to:
- Determine the descaling schedule for the machine.
- Use correctly the INTENZA+ water filter. Please, refer to the "INTENZA+ water filter' chapter
- Dip the disposable strip in water for second, to test the water hardness (strip supplied with the machine).
- Remove the disposable strip and wait for minute.
- Check how many squares change color, then refer to the table.
![]()

| number of red squares | value to be set | water hardness ver soft water |
| 1 | 1 | very soft water |
| 2 | 2 | soft water |
| 3 | 3 | hard water |
| 4 | 4 | very hard water |
Refer to the "Changing the default settings" chapter to change the water hardness default.
Aroma intensity adjustment
![]() Every time the AROMA STRENGTH button is pressed, the aroma of your coffee changes by one degree. The display changes with the chosen aroma.
Every time the AROMA STRENGTH button is pressed, the aroma of your coffee changes by one degree. The display changes with the chosen aroma.
![]()


 | extra light aroma | The machine will automatically dose the right quantity of coffee. |
 | light aroma | |
 | medium strength aroma | |
 | strong aroma | |
 | extra strong aroma | |
 | pre-ground coffee | The right quantity of coffee will be dosed by using the supplied measuring scoop. |
Ceramic coffee grinder adjustment
Adjustments to the coffee grinder must be made exclusively when the machine is grinding coffee beans.
- Lift the coffee bean hopper lid.
- Identify the grinder adjustment knob. Reference marks placed around the knob show the grinding settings. It is possible to set the machine to one of five different grinding fineness levels: from the leftmost position, for coarse grinding and a lighter taste (minimum setting) to the rightmost one, for fine grinding and a stronger taste (maximum setting).
![]()
- Place a small cup under the coffee dispensing spout.
![]() Press the ESPRESSO button.
Press the ESPRESSO button.- While the machine is grinding, press and rotate the knob by one unit at a time. Use the special coffee grinder adjustment key supplied. The taste difference will be detectable after brewing 2-3 coffee cups.


Brewing temperature adjustment
Refer to the "Changing the default settings' chapter to change the coffee temperature default.

Coffee dispensing spout adjustment
The height of the coffee dispensing spout can be adjusted to adapt to the size of the cup one wishes to use.
- To adjust the settings, lift or lower the coffee dispensing spout with your fingers.
![]()

Deactivation and reactivation
After 15 minutes in idle mode, the machine goes automatically in stand-by mode. The start time of the stand-by mode can be changed. To know how, read the "Default settings" chapter
 In this phase the STAND-BY button is flashing.
The machine might launch an automatic rinse/self-cleaning cycle, as described in the "Automatic rinse/self-cleaning cycle" chapter.
Shutdown
- To turn the machine off completely, the main switch at the back of the machine must be in the OFF position.
![]()

Reactivation
- The man switch at the back of the machine must be in the ON position.
![]() To restart the machine, press the STAND-BY button.
To restart the machine, press the STAND-BY button.
The machine might request a "Water circuit priming", or simply go through an automatic rinse/self-cleaning cycle as described in the "Automatic rinse/self-cleaning cycle" chapter.
Use
Make sure to read the "Safety" chapter.
In order to preserve product quality, every time the machine is turned on, the "Automatic rinse/self-cleaning cycle" will be launched. When the machine is started after remaining unused for a long period of time, we recommend running a "Manual rinse cycle'![]()
Coffee-based preparations
The quantity of brewed product in the cup is set by default. To change this value refer to the "Adjustment of coffee length in the cup during preparation" chapter. The machine can brew one or two coffee-based drinks.
Use of pre-ground coffee
(one specialty only)
It is possible to select the function that uses pre-ground coffee. It brews only one product.
Placing anything other than pre-ground coffee may seriously damage the machine. These damages are NOT covered by the warranty.
Use only the measuring scoop supplied with the machine. If the dose is more than one, or excessive, the machine does not brew the product and the coffee will be discharged in the coffee grounds drawer.
- Lift the compartment lid and add one measuring scoop of pre-ground coffee. If no dose is added, the machine will dispense water only.
![]()
- Close the pre-ground coffee compartment lid.
![]() Press the AROMA STRENGTH button repeatedly, to select the pre-ground coffee brewing function.
Press the AROMA STRENGTH button repeatedly, to select the pre-ground coffee brewing function.
Proceed by following the further instructions on the preparation of the desired specialty.
![]()

 Press the AROMA STRENGTH button repeatedly, to select the pre-ground coffee brewing function.
Brewing a product with one button
- Place one cup under the coffee dispensing spout.
One espresso/one espresso lungo
![]() To brew one espresso, press the ESPRESSO button.
To brew one espresso, press the ESPRESSO button.
![]()
![]() Otherwise, to brew one espresso lungo, press the ESPRESSO LUNGO button.
Otherwise, to brew one espresso lungo, press the ESPRESSO LUNGO button.
After the pre-infusion cycle, coffee starts pouring from the coffee dispensing spout.
![]() Coffee will be brewed to a preset level; is possible, however; to stop brewing it before this level is reached, by pressing the OK button.
Coffee will be brewed to a preset level; is possible, however; to stop brewing it before this level is reached, by pressing the OK button.
After the product has been brewed, the machine goes back to the main menu.
 To brew one espresso, press the ESPRESSO button.
 Otherwise, to brew one espresso lungo, press the ESPRESSO LUNGO button.
Brewing two products with one button
(possible only when using coffee beans)
- Place two cups under the coffee dispensing spout.
Two espresso/two espresso lungo
![]() To brew two espresso, press the ESPRESSO button twice.
To brew two espresso, press the ESPRESSO button twice.
![]()
![]() Otherwise, to brew two espresso lungo, press the ESPRESSO LUNGO button twice.
Otherwise, to brew two espresso lungo, press the ESPRESSO LUNGO button twice.
After the pre-infusion cycle, coffee starts pouring from the coffee dispensing spout.
The machine carries out two grinding cycles in sequence.
![]() Coffee will be brewed to a preset level; is possible, however; to stop brewing
Coffee will be brewed to a preset level; is possible, however; to stop brewing ![]() before this level is reached, by pressing the OK button.
before this level is reached, by pressing the OK button.
After the product has been brewed, the machine goes back to the main menu.

Adjustment of coffee length in the cup during preparation
It is possible to adjust the quantity of product brewed according to one's taste and the size of the cups. This function makes possible to change the default setting for the quantity of product brewed in the cup. For a stronger taste, reduce the brewed quantity. Prepare the machine for one espresso / espresso lungo and place a cup under the coffee dispensing spout.
Espresso length/espresso lungo length
![]() To adjust the espresso length, keep the ESPRESSO button pressed until the MEMO symbol is displayed, then release the button.
To adjust the espresso length, keep the ESPRESSO button pressed until the MEMO symbol is displayed, then release the button.
![]()
![]() Otherwise, to adjust the espresso lungo length, keep the ESPRESSO LUNGO button pressed until the MEMO symbol is displayed, then release the button.
Otherwise, to adjust the espresso lungo length, keep the ESPRESSO LUNGO button pressed until the MEMO symbol is displayed, then release the button.
The machine is in the programming stage and is starting to brew the chosen product.
![]()
![]() Press the OK button as soon as the desired quantity has been reached.
Press the OK button as soon as the desired quantity has been reached.
Now the button is programmed: every time is pressed, the machine will brew the product in the quantity just set. After the product has been brewed, the machine goes back to the main menu.


Milk carafe
This chapter explains how to use the milk carafe to prepare cappuccino, latte macchiato or frothed milk. When using the machine for the first time, clean accurately as described in the "Milk carafe cleaning cycle" chapter.
Disassembly phase
- Press one of the release buttons to remove the top of the carafe.
![]()
- Lift the milk carafe top.

Filling phase
- Remove the lid.
- Pour the milk in the carafe: the milk level must be kept between the MIN and MAX levels marked on the carafe. The milk carafe is ready for use.
![]()

Reassembly phase
- Assemble the top part of the milk carafe checking that is well secured.
- Place the lid back on the milk carafe.
Inserting phase
If Installed, remove the water dispensing spout as shown in the "Hot water dispensing spout" chapter, "Removing phase'.
- Slightly tilt the milk carafe.
![]()
- Place completely on the machine tracks.

- Press and rotate the carafe downwards to lock to the drip tray.
![]()
![]() Do not force the carafe in.
Do not force the carafe in.

 Do not force the carafe in.
Start up phase
![]() Pull out the milk frother dispensing spout to the dispensing spout open symbol.
Pull out the milk frother dispensing spout to the dispensing spout open symbol.
![warning]() If the milk dispensing spout is not taken out completely, is possible that the milk will not be frothed correctly.
If the milk dispensing spout is not taken out completely, is possible that the milk will not be frothed correctly.
Proceed by following the instructions on cleaning or on the desired coffee- or milk-based preparation.
![]()
 Pull out the milk frother dispensing spout to the dispensing spout open symbol.
Removing phase
![]() When finished, slide the dispensing spout to bring back to the dispensing spout closed symbol.
When finished, slide the dispensing spout to bring back to the dispensing spout closed symbol.
![]()
- Rotate the carafe upwards until it disengages from the drip tray.
- Then remove
![]()
 When finished, slide the dispensing spout to bring back to the dispensing spout closed symbol.
Emptying phase
Perform the operations described in the "Milk carafe" chapter; "Disassembly phase'.
- Empty the milk carafe and clean appropriately as described in the "Milk carafe cleaning cycle" chapter.
Milk and coffee-based preparations
To prepare a good cappuccino, use cold milk (~5°C / 41°F) with a protein content of at least 3%. It is possible to use whole and skimmed milk soy milk and lactose free milk, according to personal taste.
- Fill the milk carafe following the instructions of the "Milk carafe" chapter until "Start up phase" is done.
The quantity of brewed product in the cup is set by default. To change this value refer to the "Adjustment of milk/coffee length in the cup during preparation" chapter.
Proceed by following the further instructions on the preparation of the desired specialty.
When finished, proceed as described in the "Milk carafe" chapter; "Removing phase" and "Emptying phase'.
Brewing a milk-based product
- Place a cup under the milk frother dispensing spout.

At the beginning of each product brewing, milk or steam sprays might be present.
The carafe must be installed and the milk frother dispensing spout open.
One cappuccino / latte macchiato
![]() To brew one cappuccino, press the CAPPUCCINO button.
To brew one cappuccino, press the CAPPUCCINO button.
![]()
![]() Otherwise, to brew one latte macchiato, press the LATTE MACCHIATO button. The machine displays the necessary sequence of operations: carafe insertion, milk frother dispensing spout extraction. Wait for the necessary pre-heating time. The machine dispenses a preset quantity of frothed milk to the cup.
Otherwise, to brew one latte macchiato, press the LATTE MACCHIATO button. The machine displays the necessary sequence of operations: carafe insertion, milk frother dispensing spout extraction. Wait for the necessary pre-heating time. The machine dispenses a preset quantity of frothed milk to the cup.![]() To stop dispensing, press the OK button. The machine brews a preset quantity of coffee to the cup.
To stop dispensing, press the OK button. The machine brews a preset quantity of coffee to the cup.![]() To stop brewing, press the OK button. After the product has been brewed, the machine allows for a quick cleaning of the carafe ducts. Please refer to the "Quick milk carafe ducts rinse cycle" chapter.
To stop brewing, press the OK button. After the product has been brewed, the machine allows for a quick cleaning of the carafe ducts. Please refer to the "Quick milk carafe ducts rinse cycle" chapter.


One frothed milk
![]() Press the MENU button.
Press the MENU button.
![]()
![]() Select the DRINKS function and confirm by pressing the OK button.
Select the DRINKS function and confirm by pressing the OK button.![]() Scroll the menu to select the MILK FROTH function and confirm by pressing the OK button.
Scroll the menu to select the MILK FROTH function and confirm by pressing the OK button.
The machine displays the necessary sequence of operations: carafe insertion, milk frother dispensing spout extraction.
![]()


Wait for the necessary pre-heating time. The machine dispenses a preset quantity of frothed milk to the cup.
![]() To stop dispensing, press the OK button. After the product has been brewed, the machine allows for a quick cleaning of the carafe ducts. Please refer to the "Quick milk carafe ducts rinse cycle" chapter.
To stop dispensing, press the OK button. After the product has been brewed, the machine allows for a quick cleaning of the carafe ducts. Please refer to the "Quick milk carafe ducts rinse cycle" chapter.
![]()

Adjustment of milk/coffee length in the cup during preparation
It is possible to adjust the quantity of product brewed according to one's taste and the size of the cups. This function makes it possible to change the default setting for the quantity of milk / coffee brewed in the cup.
The carafe must be installed and the milk frother dispensing spout open.
Cappuccino / latte macchiato length
![]() To adjust the cappuccino length, keep the CAPPUCCINO button pressed until the MEMO symbol is displayed, then release the button.
To adjust the cappuccino length, keep the CAPPUCCINO button pressed until the MEMO symbol is displayed, then release the button.
![]()
![]() Otherwise, to adjust the latte macchiato length, keep the LATTE MACCHIATO button pressed a few seconds, and release the button when the machine displays the necessary sequence of operations: carafe insertion, milk frother dispensing spout extraction. Wait for the necessary pre-heating time. The machine is in the programming stage and is starting to dispense the frothed milk.
Otherwise, to adjust the latte macchiato length, keep the LATTE MACCHIATO button pressed a few seconds, and release the button when the machine displays the necessary sequence of operations: carafe insertion, milk frother dispensing spout extraction. Wait for the necessary pre-heating time. The machine is in the programming stage and is starting to dispense the frothed milk.
![]()
![]() Press the OK button as soon as the desired quantity has been reached. The machine is in the programming stage and is starting to brew coffee.
Press the OK button as soon as the desired quantity has been reached. The machine is in the programming stage and is starting to brew coffee.![]() Press the OK button as soon as the desired quantity has been reached.
Press the OK button as soon as the desired quantity has been reached.
Now the button is programmed: every time it is pressed, the machine will brew the product in the quantity just set. After the product has been brewed, the machine allows for a quick cleaning of the carafe ducts. Please refer to the "Quick milk carafe ducts rinse cycle" chapter.


Frothed milk length
Follows the previous instructions in the "Brewing a milk-based product" chapter, "One frothed milk", until the MILK FROTH function is selected.
![]() Keep the OK button pressed a few seconds, and release the button when the machine displays the necessary sequence of operations: carafe insertion, milk frother dispensing spout extraction.
Keep the OK button pressed a few seconds, and release the button when the machine displays the necessary sequence of operations: carafe insertion, milk frother dispensing spout extraction.
Wait for the necessary pre-heating time. The machine is in the programming stage and is starting to dispense the frothed milk.
![]()
![]() Press the OK button as soon as the desired quantity has been reached.
Press the OK button as soon as the desired quantity has been reached.
Now the button is programmed: every time it is pressed, the machine will brew the product in the quantity just set. After the product has been brewed, the machine allows for a quick cleaning of the carafe ducts. Please refer to the "Quick milk carafe ducts rinse cycle" chapter.
![]()


Hot water dispensing spout
Inserting phase
- Tilt the water dispensing spout slightly and insert it completely on the machine tracks.
![]()
- Press and rotate the water dispensing spout downwards to lock it to the machine.

Removing phase
- Press the two side buttons to unlock the dispensing spout and lift it slightly.
- Pull the water dispensing spout to remove it.
Hot water-based preparations
Hot water dispensing
Check that the water dispensing spout is installed. Otherwise, follow the instructions in the "Hot water dispensing spout" chapter, "Inserting phase". Place a container under the hot water dispensing spout.
At the beginning of each product brewing, hot water or steam sprays might be present. Wait until the end of the cycle before removing the water dispensing spout.
![]() Press the MENU button.
Press the MENU button.
![]()
![]() Select the DRINKS function and confirm by pressing the OK button.
Select the DRINKS function and confirm by pressing the OK button.![]() Select the HOT WATER function and confirm by pressing the OK button. The machine is waiting to start the water dispensing process.
Select the HOT WATER function and confirm by pressing the OK button. The machine is waiting to start the water dispensing process.
![]()
![warning]() The water dispensing spout must be installed.
The water dispensing spout must be installed. ![]() Press the OK button to confirm. Wait for the necessary pre-heating time. The machine starts dispensing hot water.
Press the OK button to confirm. Wait for the necessary pre-heating time. The machine starts dispensing hot water.
Dispense the desired hot water quantity.
![]()
![]() To stop dispensing, press the OK button. After the product has been brewed, the machine goes back to the main menu.
To stop dispensing, press the OK button. After the product has been brewed, the machine goes back to the main menu.


Cleaning and maintenance
Regular cleaning and maintenance of the machine are fundamental to prolong its life cycle. Otherwise, the machine will stop working correctly. This chapter describes the details of the operations to be carried out and their schedule.
Make sure to read the "Safety" chapter.
All cleaning operations must be carried out when the machine has cooled.
To clean the machine use a wet soft cloth: do not use alcohol, solvents and/or abrasive objects. Only the drip tray grill and those parts of the carafe indicated in the "Weekly cleaning of the milk carafe components" section can be washed in the dishwasher. All other components must be washed in lukewarm water.
Damages or improper use caused by cleaning and maintenance activities are NOT covered by the warranty.
| Maintenance schedule | Machine | Water tank | Coffee compartments | Brew group | Carafe | |
| When needed | chapter | Machine cleaning when needed; Descaling cycle | Cleaning of the water tank | Quick milk carafe ducts rinse cycle | ||
| Daily | chapter | Daily cleaning of the milk carafe | ||||
| Weekly | chapter | Weekly cleaning of the machine | Weekly brew group cleaning cycle | Weekly cleaning of the milk carafe components | ||
| Monthly | chapter | Monthly cleaning of the coffee compartments | Monthly lubrication of the brew group Monthly degreasing of the brew group | Monthly cleaning of the milk carafe (three cleaning cycles) | ||
Machine cleaning
Machine cleaning when needed
When the 'Coffee grounds drawer full' symbol is displayed, proceed as follows.

Before cleaning the machine, check that the machine, the grounds and the water in the tank have cooled.
These processes must be launched every time the 'drip tray full' indicator raises. If the indicator is completely raised, this means that the tray is full: be careful when you remove it.
With the machine turned on, empty and clean the coffee grounds drawer and the drip tray.

If the machine is turned off, once turned on the 'Coffee grounds drawer full' signal is still on. Please refer to the "Troubleshooting table".
- Press the side buttons.
![]()
- Remove the drip tray.
- Remove the coffee grounds drawer and empty it.
- Empty and wash the drip tray.
- Put the coffee grounds drawer in the drip tray and put the latter back into the machine.

Further maintenance operations can be carried out only when the machine is turned off and disconnected from the power grid.
Weekly cleaning of the machine
- Follow the step-by-step instructions in the "Machine cleaning when needed" chapter until you reach the seat of the drip tray. Now clean the drip tray seat.
- Place the components back.
![]()

Brew group cleaning
Weekly brew group cleaning cycle
The brew group must be cleaned at least once a week.
Weekly cleaning of the brew group is a cleaning cycle with water (accurate rinsing).
Disassembly and cleaning phase
![]() Turn the machine off with the STAND-BY button. Wait for the STAND-BY button to start flashing and disconnect the power cord plug.
Turn the machine off with the STAND-BY button. Wait for the STAND-BY button to start flashing and disconnect the power cord plug.- Press the side buttons.
- Remove the drip tray.
- Open the service door.
- To remove the brew group:
- Place the thumb on the PUSH button and then the other fingers, on the handle.
- Press the PUSH button and pull the handle.
- Remove horizontally without rotating it.
![]()
- Clean the coffee outlet duct thoroughly with the appropriate cleaning tool, supplied together with the machine.
![]()
- Remove the coffee residues drawer and wash it thoroughly.
Wash the brew group accurately with lukewarm water and clean the upper filter accurately.
![]() Do not use detergents or soap to clean the brew group.
Do not use detergents or soap to clean the brew group.
![]()
- Let the brew group air dry completely.
- Clean the inside of the machine accurately with a wet soft cloth.


Reassembly phase
- Insert the coffee residues drawer in its seat and check that it is placed correctly.
![warning]() If the coffee residues drawer is not placed correctly, it might be impossible to place the brew group in the machine.
If the coffee residues drawer is not placed correctly, it might be impossible to place the brew group in the machine. - Make sure that the brew group is in the idle position: the two reference marks on the side of the brew group must match.
![]()
- If they do not match, press the lever slightly downwards until it touches the base of the brew group, so that the two check reference marks match.
![]()
- Press the PUSH button hard.
![]()
- Make sure that the brew group lock is in the correct position.
![]()
- If it is still lowered, raise it until it locks in place.
- Put the brew group back in place until it locks, without pressing the PUSH button.
- Put back the coffee grounds drawer with the drip tray inside the machine and close the service door.


Monthly lubrication of the brew group
One cleaning cycle using a lubricant
Lubricate the brew group after about 500 coffee cups brewed or at least once a month. The lubricating grease for the brew group can be bought separately. For further details please refer to the "Maintenance products" chapter. Perform the "Disassembly and cleaning phase" of the "Weekly brew group cleaning cycle" procedure
- Apply the grease uniformly on both side guides.
![]()
- Lubricate the shaft too. Perform the "Reassembly phase" of the "Weekly brew group cleaning cycle" procedure.
![]()


Monthly degreasing of the brew group
One cleaning cycle using a degreaser
Launch this cleaning cycle with degreasing tablets after brewing 500 coffees or at least once a month. This operation completes the brew group maintenance process. The degreasing tablets are sold separately. For further details please refer to the "Maintenance products" chapter.
Degreasing tablets are recommended only for cleaning purposes, they have no descaling properties. For descaling, use the Gaggia descaling product and follow the procedure described in the "Descaling cycle" chapter.
- Place a large container (1.5 l) under the dispensing spout.
![]()
![]()
Be careful of hot water or steam sprays. - Make sure to fill the water tank with fresh water to the MAX level.
![]()
![]() Do not place pre-ground coffee in the pre-ground coffee compartment.
Do not place pre-ground coffee in the pre-ground coffee compartment. - Place a degreasing tablet in the pre-ground coffee compartment.
![]() Select the pre-ground coffee brewing function by pressing the AROMA STRENGTH button. The machine is ready for brewing.
Select the pre-ground coffee brewing function by pressing the AROMA STRENGTH button. The machine is ready for brewing.
![]()
![]() Press the ESPRESSO LUNGO button. The machine starts dispensing water from the coffee dispensing spout.
Press the ESPRESSO LUNGO button. The machine starts dispensing water from the coffee dispensing spout.- As soon as the progress bar has reached the middle, put the main switch to the OFF position to turn the machine off. Let the degreasing solution work for about 15 minutes.
![]()
- Turn the main switch to the ON position to turn the machine on.
![]() Press the STAND-BY button. Wait for the end of the "Automatic rinse/selfcleaning cycle".
Press the STAND-BY button. Wait for the end of the "Automatic rinse/selfcleaning cycle".
Perform a complete "Weekly brew group cleaning cycle".
The machine is ready for brewing.


Containers cleaning
Cleaning of the water tank
- Remove the water filter from the tank and wash it with fresh water.
- Restore the water filter to its seat, pressing lightly and with a slight rotation.
- Fill the water tank with fresh water.
Monthly cleaning of the coffee compartments
- Once a month, empty and clean the coffee bean hopper with a wet cloth.
- Fill it again with the coffee beans.
- If necessary, clean the pre-ground coffee compartment with a dry cloth.
Milk carafe cleaning
Quick milk carafe ducts rinse cycle
After one or more milk-based products have been prepared, the machine allows for a quick cleaning of the carafe ducts. The CLEAN symbol is displayed.
If you decide to start the cycle, perform the next phase. The machine automatically exits the function if no button is pressed for 10 seconds.

Ducts rinse cycle phase
![]() When the CLEAN symbol is displayed, press OK button.
When the CLEAN symbol is displayed, press OK button.- Pull out the milk carafe dispensing spout as detailed in the "Milk carafe" chapter, "Start up phase".
- Place a container under the dispensing spout.
![]() Press the OK button to start dispensing hot water.
Press the OK button to start dispensing hot water.
![]()
At the beginning of each product brewing, milk or steam sprays might be present. Wait until the end of the cycle before removing the milk carafe.- Remove and empty the container with dispensed water.

Daily cleaning of the milk carafe
It is important to clean the milk carafe every day, in order to promote hygiene and guarantee the perfect thickness of the frothed milk.
- At least once a day, perform the "Quick milk carafe ducts rinse cycle" chapter.
- Disassemble the top of the carafe as shown in the "Milk carafe" chapter, "Disassembly phase".
- Remove the milk carafe lid.
- Lift the milk frother dispensing spout (1) to extract it from the top of the carafe.
![]()
- Remove the suction tube (2) from the dispensing spout (1).
- Clean the suction tube (2) thoroughly with lukewarm water.

Weekly cleaning of the milk carafe components
- Disassemble the top of the carafe as shown in the "Milk carafe" chapter, "Disassembly phase".
- Remove the milk carafe lid.
- Lift the milk frother dispensing spout to extract it from the top of the carafe.
![warning]() The dispensing spout must be closed.
The dispensing spout must be closed.
Milk frother dispensing spout disassembly phase
The milk frother dispensing spout comprises five parts that must be disassembled:
- Dispensing spout lid
- Suction tube
- Rubber support
- Milk frother
- Milk frother connection
- To disengage the dispensing spout lid (1):
![]()
- Turn the lid (1) from top to bottom
- Hold the lid (1) firmly in one hand.
- Place the thumb of the other hand on the release button.
- Press the thumb outward.
- Remove the suction tube (2) from the rubber support (3).
- Disassemble the milk frother (4) from the rubber support (3).
![]()
- Extract the milk frother connection (5) pulling it outwards.
![]()
- Clean all the components thoroughly with lukewarm water.


All the individual components, except the milk container, can be washed in the dishwasher.
Reassembly phase
- Perform the sequence of operations described in the previous "Milk frother dispensing spout disassembly phase" in reverse order and reassemble all the components of the carafe.
- Before assembling the dispensing spout, move the pin inside the carafe lid manually to the correct position.
![]()

If you cannot assemble the dispensing spout on top of the carafe, it means that the pin is in the wrong position.
Monthly cleaning of the milk carafe
Three cleaning cycles
Monthly cleaning of the milk carafe comprises three cleaning cycles carried out in a sequence: the first cycle requires the use of a specific detergent and water, the second and third cycles use water alone (simple rinsing).
Perform the sequence of operations described in the "Milk carafe cleaning cycle" chapter three times in a row, adding the specific detergent to the water the first time and using water alone the second and third time (two consecutive rinsing phases). Finally, proceed as described in the "Weekly cleaning of the milk carafe components" chapter.
Milk carafe cleaning cycle
The cleaning of the milk carafe entails a cleaning cycle with water alone (simple rinsing). Disassemble the top of the carafe as shown in the "Milk carafe" chapter, "Disassembly phase".
- Rinse all the components with lukewarm water. Remove all milk residue.
- Reassemble the milk carafe top.
- Remove the lid and fill the carafe with fresh water to the MAX level.
![]()
- During the first cleaning cycle add the Gaggia milk circuit cleaner and wait for it to dissolve completely.
- Place the lid back on the milk carafe.
- Insert the carafe in the machine as shown in the "Milk carafe" chapter, "Inserting phase".
- Start the milk carafe dispensing spout as detailed in the "Milk carafe" chapter, "Start up phase".
- Place a large container (1.5 l) under the dispensing spout.
![]() Do not drink the solution resulting from the process.
Do not drink the solution resulting from the process.

Dispensing phase
- Perform the sequence of operations described in the "Brewing a milk-based product", "One frothed milk" chapter.
-
![]()
At the beginning of each product brewing, milk or steam sprays might be present. Wait until the end of the cycle before removing the milk carafe. - Repeat the "Dispensing phase" until the carafe is completely empty.
- Remove the carafe as shown in the "Milk carafe" chapter, "Removing phase".
Descaling cycle
When the CALC CLEAN symbol is displayed, it is necessary to descale the machine. If this is not done, the machine may stop working correctly: in this case, repairs are NOT covered by the warranty.
The descaling cycle has a duration of roughly 30 minutes. It consists of a proper cleaning cycle, with the Gaggia descaling product, followed by a rinse cycle.

 Do not remove the brew group during the descaling process.
Do not drink the descaling solution or the products resulting from the descaling cycle.
Use exclusively the Gaggia descaling solution. The use of other products may damage the machine and leave residue in the water. The Gaggia descaling solution is sold separately. For further details please refer to the "Maintenance products" chapter.
Preparation phase
- Press the side buttons.
![]()
- Remove the drip tray.
- Remove the coffee grounds drawer and empty it.
- Empty and wash the drip tray.
- Restore all the components.
- Fill the milk carafe following the instructions of the "Milk carafe" chapter until "Start up phase" is done, taking into account that the carafe should be filled with water, not milk, to the MIN level.
- Place a large container (1.5 l) under the dispensing spout.

Descaling phase
If the INTENZA+ water filter is present, extract the filter from the water tank and replace it with the original small white filter.
- Pour all the descaling solution in the water tank.
- Then fill the tank with fresh water to the CALC CLEAN level.
![]()
- Put the water tank back in the machine.
![]() Press the MENU button, confirm by pressing the OK button and scroll the menu to go to the descaling function.
Press the MENU button, confirm by pressing the OK button and scroll the menu to go to the descaling function.
![]()
![]() Press the OK button to select the descaling function.
Press the OK button to select the descaling function.
The machine displays the necessary sequence of operations: carafe insertion, milk frother dispensing spout extraction.
![]()
![]() Press the OK button to launch the descaling cycle. The machine starts dispensing the descaling solution at intervals. The bar shows the cycle progress status.
Press the OK button to launch the descaling cycle. The machine starts dispensing the descaling solution at intervals. The bar shows the cycle progress status.
![]()
![warning]() The cycle can be paused by pressing the ESC button and restarted by pressing the OK button. This makes it possible for the user to empty the container or leave for a while.
The cycle can be paused by pressing the ESC button and restarted by pressing the OK button. This makes it possible for the user to empty the container or leave for a while.
Let the water be discharged until the tank is empty.- Remove the water tank and rinse it.
- Fill it with fresh water to the MAX level and return it to its proper place.
![]()
- Remove and empty the container.
- Remove the milk carafe as shown in the "Milk carafe" chapter, "Removing phase" and empty it.
Repeat the entire sequence of operations described in the "Preparation phase" above and proceed with the "Rinsing phase".


Rinsing phase
![]() Press the OK button to launch the rinse cycle.
Press the OK button to launch the rinse cycle.
![]()
![warning]() The cycle can be paused by pressing the ESC button and restarted by pressing the OK button. This makes it possible for the user to empty the container or leave for a while.
The cycle can be paused by pressing the ESC button and restarted by pressing the OK button. This makes it possible for the user to empty the container or leave for a while.
![warning]() If the water tank was not filled to the MAX level, the machine might require another rinse cycle. In this case, fill the water tank to the MAX level, put it back in the machine and repeat the "Rinsing phase".
If the water tank was not filled to the MAX level, the machine might require another rinse cycle. In this case, fill the water tank to the MAX level, put it back in the machine and repeat the "Rinsing phase".
Let the product be dispensed until the process stops automatically.![]() Press the OK button to exit the descaling cycle. The machine goes through the heating and automatic rinse process.
Press the OK button to exit the descaling cycle. The machine goes through the heating and automatic rinse process.
![]()
- Remove and empty the container with dispensed water.
Perform the "Weekly cleaning of the milk carafe components" procedure.
Perform the "Weekly brew group cleaning cycle" procedure.


If supplied, remove the small white filter and replace it with the INTENZA+ filter.
At the end, the machine goes back to the main menu. It is recommended to perform a "Manual rinse cycle".
Interruption of the descaling cycle
Once the descaling cycle has started, you must complete it till the very end without turning off the machine.
![]() In case you get stuck during the cycle you can exit by pressing the STAND-BY button.
In case you get stuck during the cycle you can exit by pressing the STAND-BY button.
![]()
- If this occurs, or in case of power failure or accidental disconnection of the power cord, empty and rinse carefully the water tank, then fill it up to the CALC CLEAN level. Follow the instructions provided in the "Manual rinse cycle" chapter before brewing any product. If the cycle was not completed, the machine will require another descaling cycle to be performed at your earliest convenience.


Default settings
List of default settings
| Display | Setting | Value | Description |
 | Coffee temperature | average | Coffee brewing temperature setting. |
 | Stand-by time | 15 minutes | Stand-by time setting. |
 | Contrast | average | Display contrast setting. |
 | Water hardness | 4 (very hard water) | Water hardness setting. For further details, please refer to the "Water hardness measurement and setting" chapter. |
 | INTENZA+ water filter | OFF (not installed) | INTENZA+ settings. For further details, please refer to the "INTENZA+ water filter" chapter. |
Changing the default settings
It is possible to customize the machine functions through the programming menu. The machine must be turned on and ready to work.
If necessary, refer to the "List of default settings" chapter.
![]() Press the MENU button, confirm by pressing the OK button and scroll through functions list to select the function whose settings are to be modified.
Press the MENU button, confirm by pressing the OK button and scroll through functions list to select the function whose settings are to be modified.
Note: the images at the side refer to a sample function.
![]()
![]() Press the OK button to select the desired function.
Press the OK button to select the desired function.
Once selected:![]() Press the UP button to increase the value.
Press the UP button to increase the value.
![]()
![]() Press the DOWN button to decrease the value.
Press the DOWN button to decrease the value.![]() Press the OK button to confirm the change.
Press the OK button to confirm the change.
When the change has been implemented, the OK message will be displayed.
![warning]() The modified but unconfirmed values will not be stored.
The modified but unconfirmed values will not be stored.![]() Press the ESC button to exit the programming function. The machine automatically exits the programming mode if no button is pressed for 3 minutes.
Press the ESC button to exit the programming function. The machine automatically exits the programming mode if no button is pressed for 3 minutes.


Reset to the default settings
It is possible to restore the default settings through the programming menu. The machine must be turned on and ready to work.
![]() Press the MENU button, confirm by pressing the OK button and scroll through functions list to select the RESET function.
Press the MENU button, confirm by pressing the OK button and scroll through functions list to select the RESET function.
![]()
![]() Press the OK button to select the function.
Press the OK button to select the function.
When the change has been implemented, the OK message will be displayed.![]() Press the ESC button to exit the programming function.
Press the ESC button to exit the programming function.
The machine automatically exits the programming mode if no button is pressed for 3 minutes.


Troubleshooting
This chapter summarises the most common issues that might concern your machine. If the following information is insufficient to solve the problem, please refer to the FAQ page of the www.gaggia.com website, or contact the Gaggia hotline. Contacts are included in the warranty booklet supplied separately or can be found at www.gaggia.com. The machine is colour coded for easier interpretation of the display signals. The colour code of the symbols is based on the traffic light concept.
Alarm signals summary: red display
| Display | Description | Action |
 | Put back the drip tray and coffee grounds drawer; close the service door. | Read the "Machine cleaning when needed" chapter to restore the components to their proper places. |
 | Coffee bean hopper empty. | Follow the relevant instructions in the Coffee bean hopper filling" chapter. |
 | Brew group not inserted. | Close the service door. Turn the machine off and back on again. The brew group automatically returns to the starting position. |
 | Coffee grounds drawer full. | Empty the coffee grounds drawer as described in the "Machine cleaning when needed" chapter. |
 | Water tank empty. | Follow the relevant instructions in the "Water tank filling" chapter. |
 | A beverage has been selected with the coffee been hopper lid open. | Close the coffee bean hopper lid on the machine within 30 seconds to complete brewing. (Only for 120V machines) |
 | The machine is out of service. | Follow the relevant instructions in the "The machine is out of service" chapter. |
Warnings signals summary
| Display | Description | Action |
 | The machine is ready to brew products: coffee bean hopper empty. | Follow the relevant instructions in the "Coffee bean hopper filling" chapter. |
 | The machine is ready to brew products: replace the INTENZA+ water filter. | Follow the relevant instructions in the "INTENZA+ replacement" chapter. |
 | The machine is waiting to start the water circuit priming process. | Follow the relevant instructions in the "Water circuit priming" chapter. |
 | The milk carafe ducts should be cleaned. | Follow the relevant instructions in the "Quick milk carafe ducts rinse cycle" chapter. |
 | The machine must be descaled. | Follow the relevant instructions in the "Descaling cycle" chapter. |
 | The machine is heating up. | Wait. |
 | The machine is rinsing. | Wait. |
 | Brew group rebooting | Wait. |
The machine is out of service
If the machine error alarm signal is triggered, the error code is displayed in the bottom right corner of the display.
Please, consult the following table.

| Error code | Behaviour | Cause | Action |
| 1 | Coffee grinder blocked | Coffee outlet duct clogged | Clean the coffee outlet duct thoroughly as described in the "Weekly brew group cleaning cycle" chapter. |
| 3 - 4 | Brew group locked, cannot be taken out | The brew group is incorrectly positioned. | Close the service door. Turn the machine off and back on again. Wait for the 'Ready for brewing' signal and then remove the brew group. |
| 5 | Water circuit error | Air in the water circuit | Remove and restore the water tank a couple of times, making sure to position it correctly. Check that the water tank seat is clean. |
For any other error code:
- Turn the machine off and then back on again after 30 seconds.
- Try 2 or 3 times.
If the machine does not start, contact the Gaggia hotline and mention the error code shown on the display. Contacts are included in the warranty booklet supplied separately or can be found at www.gaggia.com.
Troubleshooting table
| Behaviour | Cause | Action |
| The machine does not turn on. | The machine is disconnected or the main switch is in the OFF position. | Plug in the machine and place the main switch in the ON position. |
| The machine is in simulated working mode. | The STAND-BY button has been pressed for more than 8 seconds. | Turn the machine OFF and ON using the main switch. |
| The drip tray fills up quickly. | To guarantee a perfect coffee at every brewing, the machine rinses and warms itself by flushing water in the drip tray. | Empty the drip tray. To avoid that rinsing water ends in the drip tray, place a cup below the dispensing spouts. |
| The 'Coffee grounds drawer full' signal is still on, even if it's emptied or with only few coffee grounds in it. | The coffee grounds drawer has been emptied while the machine was off. | After emptying drip tray and coffee grounds drawer, wait for the 'Close service door' signal to be displayed. Place the components back. |
| It is impossible to remove the brew group. | The brew group is incorrectly positioned. | Close the service door. Turn the machine off and back on again. Wait for the 'Ready for brewing' signal and then remove the brew group. |
| The coffee grounds drawer is in place. | Remove the coffee grounds drawer before removing the brew group. | |
| It is impossible to insert the brew group. | The brew group is not in the idle position. | Make sure that the brew group is in the idle position as described in the "Weekly brew group cleaning cycle" chapter, "Reassembly phase". |
| The gearbox is incorrectly positioned. | Place the drip tray and coffee grounds drawer in their proper seats. Close the service door. Turn the machine on without the brew group. The gearbox goes back to the correct position. Turn the machine off and put the brew group in place following the instructions in the "Weekly brew group cleaning cycle" chapter, "Reassembly phase". | |
| Coffee has too little cream or is watery. | Grinders are set to a coarse position. | Adjust the grinding fineness as described in the "Ceramic coffee grinder adjustment" chapter. |
| The blend is not right, coffee is not freshly roasted or is ground too coarse. | Change coffee blend or adjust the grinding fineness as described in the "Ceramic coffee grinder adjustment" chapter. | |
| The machine must perform the self adjustment. | Brew a few cups of coffee. | |
| Coffee is leaking from the coffee dispensing spout. | The coffee dispensing spout is clogged. | Clean the coffee dispensing spout and its holes using a toothpick. |
| Coffee is not hot enough. | Cups are cold. | Warm the cups with hot water. |
| The temperature is incorrectly regulated. | Adjust the temperature as described in the "Brewing temperature adjustment" chapter. | |
| The machine circuit is clogged by limescale. | Descale the machine as described in the "Descaling cycle" chapter. | |
| The machine grinds the coffee beans, but coffee does not come out. | Water empty. | Fill the water tank and prime the circuit again as described in the "Water circuit priming" chapter. |
| The brew group is dirty. | Clean the brew group as described in the "Weekly brew group cleaning cycle" chapter. | |
| The circuit is not primed. | Prime the circuit as described in the "Water circuit priming" chapter. | |
| The coffee dispensing spout is dirty. | Clean the coffee dispensing spout and its holes using a toothpick. | |
| The machine must perform the self adjustment. | Brew a few cups of coffee. | |
| Coffee comes out slowly. | Coffee is ground too finely. | Change coffee blend or adjust the grinding as described in the "Ceramic coffee grinder adjustment" chapter. |
| The circuit is not primed. | Prime the circuit as described in the "Water circuit priming" chapter. | |
| The brew group is dirty. | Clean the brew group as described in the "Weekly brew group cleaning cycle" chapter. | |
| The machine must perform the self adjustment. | Brew a few cups of coffee. | |
| The machine takes too much time to heat up or the quantity of water dispensed is insufficient. | The machine circuit is clogged by limescale. | Descale the machine as described in the "Descaling cycle" chapter. |
| The frothed milk is too cold. | Cups are cold. | Warm the cups with hot water. |
| Milk does not froth. | The milk carafe is dirty or incorrectly placed. | Clean the carafe as described in the "Weekly cleaning of the milk carafe components" chapter, and insert it in the machine as shown in the "Milk carafe" chapter, "Inserting phase" |
| The milk carafe dispensing spout has not been opened correctly. | Check that the milk dispensing spout has been correctly removed as described in the "Milk carafe" chapter, "Start up phase". | |
| The milk carafe is incompletely assembled. | Check that all the components have been assembled correctly, as described in the "Weekly cleaning of the milk carafe components" chapter, "Reassembly phase". | |
| The type of milk used is not suitable for frothing. | Read the "Milk- and coffee-based preparations" chapter. |
Maintenance accessories and products
Maintenance products
To clean and descale the machine use exclusively Gaggia maintenance products. Should it prove difficult to find the machine maintenance products, please contact the nearest Gaggia hotline in your country. Contacts are included in the warranty booklet supplied separately or can be found at www.gaggia.com.
| MAINTENANCE PRODUCTS | |
| Product | |
| |
| |
| |
| |
| |
|
INTENZA+ water filter
It is recommended to install the INTENZA+ water filter that limits limescale formation inside the machine and improves the aroma of your coffee.
Water is a fundamental component of coffee brewing: this is why it is essential to filter it professionally. The INTENZA+ water filter can prevent the formation of mineral deposits and improve water quality. It is sold separately.
INTENZA+ installation
- Remove the small white filter in the water tank and store it in a dry place.
Filter setting phase
- Remove the INTENZA+ water filter from its packaging, immerse it vertically in cold water, with the opening upwards, and slightly press the sides to let air bubbles out.
![warning]() In order to use the filter correctly, it is necessary to measure the water hardness as shown in the "Water hardness measurement and setting" chapter.
In order to use the filter correctly, it is necessary to measure the water hardness as shown in the "Water hardness measurement and setting" chapter. - Set the INTENZA+ water filter according to the results of the test, operating on the filter base:
![]()

| Letter on the filter | Water hardness | Test strip squares |
| A | soft water | 1 - 2 |
| B | hard water (standard) | 3 |
| C | very hard water | 4 |
- Insert the INTENZA+ water filter in the empty water tank.
- Push it to the lowest possible point.
- Fill the water tank with fresh water and restore it to the machine.
Dispense all the water contained in the tank as detailed in the "Hot water dispensing" chapter. - Fill the water tank again.
Machine setting phase during the installation
![]() Press the MENU button, confirm by pressing the OK button and scroll the menu to go to the 'INTENZA+ Filter function. ' The default setting is OFF (inactive filter).
Press the MENU button, confirm by pressing the OK button and scroll the menu to go to the 'INTENZA+ Filter function. ' The default setting is OFF (inactive filter).![]() Press the UP button to select the ON value.
Press the UP button to select the ON value.
![]()
![]() Press the OK button to confirm the change.
Press the OK button to confirm the change.
![warning]() The modified but unconfirmed values will not be stored.
The modified but unconfirmed values will not be stored.
With the ON value the machine is programmed to inform the user that the INTENZA+ water filter must be replaced.
Once the INTENZA+ filter has been activated, no icon appears on the display.![]() Press the ESC button to exit the programming function. The machine automatically exits the programming mode if no button is pressed for 3 minutes. At the end, the machine goes back to the main menu.
Press the ESC button to exit the programming function. The machine automatically exits the programming mode if no button is pressed for 3 minutes. At the end, the machine goes back to the main menu.


INTENZA+ replacement
The 'INTENZA+ water filter to be replaced' signal is displayed.
Replace the INTENZA+ water filter as described in the "INTENZA+ installation" chapter, performing only the "Filter setting phase" section, and then proceed as follows.

Machine setting phase during the replacement
![]() Press the MENU button, confirm by pressing the OK button and scroll the menu to go to the 'INTENZA+ Filter function. ' The value is ON (active filter).
Press the MENU button, confirm by pressing the OK button and scroll the menu to go to the 'INTENZA+ Filter function. ' The value is ON (active filter).
![]()
![]() If you wish to replace the INTENZA+ water filter with a new INTENZA+ filter, press the DOWN button until the RESET value can be selected. Alternatively, if you wish to remove the INTENZA+ filter without replacing it, select the OFF value.
If you wish to replace the INTENZA+ water filter with a new INTENZA+ filter, press the DOWN button until the RESET value can be selected. Alternatively, if you wish to remove the INTENZA+ filter without replacing it, select the OFF value.
![]()
![]() Press the OK button to confirm the change.
Press the OK button to confirm the change.
![warning]() The modified but unconfirmed values will not be stored.
The modified but unconfirmed values will not be stored.
Selecting RESET, the machine is programmed to manage a new INTENZA+ water filter, otherwise, selecting OFF, replace the supplied white filter in the tank.![]() Press the ESC button to exit the programming function.
Press the ESC button to exit the programming function.
The machine automatically exits the programming mode if no button is pressed for 3 minutes. At the end, the machine goes back to the main menu.
![]()


Technical specifications
The manufacturer reserves the right to improve the technical specifications of the product. All the preset quantities are approximate.
| Description | Value | |||
| Housing material | Thermoplastic type | |||
| Size (w x h x d) | 221 x 340 x 430 mm | |||
| Weight | 7,5 kg | |||
| Power cord length | 800 - 1200 mm | |||
| Control panel | Front type | |||
| Cup size | Up to 152 mm | |||
| Water tank | 1.8 litres - Removable type | |||
| Coffee bean hopper capacity | 250 g | |||
| Coffee grounds drawer capacity | 15 | |||
| Milk carafe capacity | 0,5 l | |||
| Pump pressure | 15 bar | |||
| Boiler | Stainless steel boiler | |||
| Safety devices | Thermal fuse | |||
| Energy saving mode | < 1 Wh | |||
| Nominal voltage - Power rating - Power supply | Read the data plate placed inside the service door | |||
| Preset quantities | default | min | max | |
| ESPRESSO | 40 ml | 10 ml | 230 ml | |
| ESPRESSO LUNGO | 120 ml | 10 ml | 230 ml | |
| CAPPUCCINO | Coffee | 50 ml | 10 ml | 230 ml |
| Milk | 34 seconds | 10 seconds | 75 seconds | |
| LATTE MACCHIATO | Coffee | 30 ml | 10 ml | 230 ml |
| Milk | 40 seconds | 10 seconds | 75 seconds | |
| MILK FROTH | 34 seconds | 10 seconds | 75 seconds | |
Electromagnetic fields (EMF)
This Gaggia appliance complies with all the applicable standards and regulations relating to the exposure to electromagnetic fields.
Service
We wish to make sure that you are enjoying your machine.
If you need help or assistance, please visit the Gaggia website at www.gaggia.com or contact the nearest Gaggia hotline in your Country.
How to contact Gaggia
Contacts are included in the warranty booklet supplied separately or can be found at www.gaggia.com.
IMPORTANT SAFEGUARDS
When using electrical appliances, basic safety precautions should always be followed, including the following:
- Read all instructions.
- Do not touch hot surfaces. Use handles or knobs.
![burn hazard]()
![shock hazard]()
To protect against fire, electric shock and injury to persons do not immerse cord, plugs, or appliance in water or other liquid.- Close supervision is necessary when the appliance is used by or near children.
- Unplug from outlet when not in use and before cleaning. Allow to cool before putting on or taking offparts, and before cleaning the appliance.
- Do not operate any appliance with a damaged cord or plug or after the appliance malfunctions, or has been damaged in any mannen Return appliance to the nearest authorized service facility for examination, repair or adjustment.
![burn hazard]()
![shock hazard]()
The use of accessory attachments not recommended by the appliance manufacturer may result in fire, electric shock or injury to persons.- Do not use outdoors.
- Do not let cord hang over edge of table or counter, or touch hot surfaces.
- Do not place on or near a hot gas or electric burner; or in a heated oven.
- Always attach plug to appliance first, then plug cord into wall outlet. To disconnect, turn any control to "off", then remove plug from wall outlet.
- Do not use appliance for other than intended use.
- Save these instructions.
SAVE THESE INSTRUCTIONS

This appliance is for household use only. Any servicing, other than cleaning and user maintenance, should be performed by an authorized service center.


Do not immerse machine in water. To reduce the risk of fire or electric shock do not disassemble the machine. There are no parts inside the machine serviceable by the user. Repair should be done by authorized service personnel only.
- Check voltage to be sure that the voltage indicated on the nameplate corresponds with your voltage.
- Never use warm or hot water to fill the water tank Use cold water only.
- Keep your hands and the cord away from hot parts of the appliance during operation.
- Never clean with scrubbing powders or harsh cleaners. Simply use a soft cloth dampened with water.
- For optimal taste of your coffee, use purified or bottled water. Periodic descaling is still recommended every 2-3 months.
- Do not use caramelized or flavored coffee beans.
INSTRUCTIONS FOR THE POWER SUPPLY CORD
- A short power-supply cord (or detachable power-supply cord) is to be provided to reduce risks resulting from becoming entangled in or tripping over a longer cord.
- Longer detachable power-supply cords or extension cords are available and may used if care is exercised in their use.
- If a long detachable power-supply cord or extension cord is used,
- The marked electrical rating of the detachable power-supply cord or extension cord should be at least as great as the electrical rating of the appliance.
- If the appliance is of the grounded type, the extension cord should be a grounding-type 3-wire cord, and
- The longer cord should be arranged so that it will not drape over the counter top or table top where it can be pulled on by children or tripped over.
Safety
This machine is equipped with safety features. Nevertheless, read and follow the "Safety instructions" chapter carefully, and only use the machine as described in these instructions to avoid accidental injury or damage due to improper use of the machine. Keep this user manual for future reference.
Safety instructions
- The "Warnings" section warns against possible severe injuries, danger to life and/or damage to the machine.
- The "Cautions" section warns against slight injuries and/or damage to the machine.
It's necessary a careful reading of the manual before performing any operation or maintenance.
Warnings
Connect the machine to a wall socket With a voltage matching the technical specifications of the machine.
Connect the machine to an earthed wall socket.
 Do not let the power cord hang over the edge of a table or counter, or touch hot surfaces.
Never immerse the machine, mains plug or power cord in water (danger of electrical shock').
Do not pour liquids on the power cord connector.
Never direct the hot water jet towards body parts: danger of burns!
Do not touch hot surfaces. Use handles and knobs.
Turn off the machine from the main switch located on the back before removing the plug from the socket
- If a malfunction occurs.
- If the machine will not be used fora long time.
- Before cleaning the machine.
Pull on the plug, not on the power cord.
Do not touch the mains plug with wet hands.
Do not use the machine if the mains plug, the power cord or the machine itself is damaged.
Do not make any modifications to the machine or its power cord.
Only have repairs carried out by a service centre authorized by Gagga to avoid a hazard.
The machine should not be used by children younger than 8 years old.
The machine can be used by children of 8 years and upwards if they have previously been instructed on the correct use of the machine and made aware of the associated dangers or if they are supervised by an adult
Cleaning and maintenance should not be carried out by children unless they are more than 8 years old and supervised by an adult.
Keep the machine and its power cord out of reach of children under 8 years old.
The machine may be used by persons with reduced physical, sensory or mental capabilities or lacking sufficient experience and/or skills if they have previously been instructed on the correct use of the machine and made aware of the associated dangers or if they are supervised by an adult
Children should be supervised to ensure that they do not play with the machine.
Never insert fingers or other objects into the coffee grinder
Cautions
The machine is for household use only. It is not intended for use in environments such as canteens, staff kitchens of shops, offices, farms or other work environments.
Always put the machine on a flat and stable surface.
Do not place the machine on hot surfaces, directly next to a hot oven, heater or similar sources of heat.
Only put roasted coffee beans into the coffee bean hopper. If ground coffee, instant coffee, raw coffee beans or any other substance is put in the coffee bean hopper, it may damage the machine.
Let the machine cool down before inserting or removing any parts. The heating surfaces may retain residual heat qter use.
Never use warm or hot water to fill the water tank Use only cold non sparkling drinking water
Never clean with scrubbing powders or harsh cleaners. Simply use a soft cloth dampened with water.
Descale your machine regularly. The machine indicates when descaling is needed. Not doing this will make your appliance stop working properly. In this case repair is not covered under your warranty!
Do not keep the machine at temperature below 0°C. Residue water in the heating system may freeze and cause damage.
Do not leave water in the water tank when the machine is not used over a long period of time. The water can be contaminated. Use fresh water every time you use the machine.

Documents / Resources
References
Download manual
Here you can download full pdf version of manual, it may contain additional safety instructions, warranty information, FCC rules, etc.
Download Gaggia Anima Prestige - Superautomatic Coffee Machine Manual
Advertisement


Need help?
Do you have a question about the Anima Prestige and is the answer not in the manual?
Questions and answers