Table of Contents
Advertisement
Available languages
Available languages
Quick Links
INcjd089_IT_EN
820-271
Heater Instruction Manual
Please read all instructions carefully before use, and keep the instruction
manual safely
Manuale di istruzioni del riscaldatore
Si prega di leggere attentamente tutte le istruzioni prima dell'uso e di
conservare il manuale di istruzioni in modo sicuro
IMPORTANT, RETAIN FOR FUTURE REFERENCE: READ CAREFULLY
ASSEMBLY INSTRUCTION
Advertisement
Table of Contents

Related Manuals for HOMCOM 820-271


Summary of Contents for HOMCOM 820-271
- Page 1 INcjd089_IT_EN 820-271 Heater Instruction Manual Please read all instructions carefully before use, and keep the instruction manual safely Manuale di istruzioni del riscaldatore Si prega di leggere attentamente tutte le istruzioni prima dell'uso e di conservare il manuale di istruzioni in modo sicuro...
-
Page 2: Table Of Contents
Catalogo Regole di Sicurezza----------------------------------------------------------------------2 Introduzione al Prodotto-----------------------------------------------------------------2 Caratteristiche di Funzionamento-----------------------------------------------------3 Riepilogo Struttura-----------------------------------------------------------------------3 Parametri Tecnici-------------------------------------------------------------------------3 Metodo di Utilizzo del Riscaldatore---------------------------------------------------4 Metodo di Posizionamento--------------------------------------------------------------4 Come Assemblare------------------------------------------------------------------------4 Istruzioni per l'Uso------------------------------------------------------------------------5 Avvertenze---------------------------------------------------------------------------------7 Descrizione del circuito elettrico-------------------------------------------------------8 Metodi di Pulizia e Manutenzione------------------------------------------------------8 Controllo dei Guasti e Risoluzione-----------------------------------------------------9 Catalogue Safety Rules------------------------------------------------------------------------------10 Product Introduction--------------------------------------------------------------------10... -
Page 3: Regole Di Sicurezza
Regole di Sicurezza Funzionamento e Manutenzione 1. Il personale non specializzato o un manutentore non autorizzato non devono riparare o ripristinare il dispositivo senza previa autorizzazione. 2. Non utilizzare il riscaldatore se il cavo di alimentazione è danneggiato. Se così fosse, dovrebbe essere sostituito da un agente di servizio autorizzato o da altro personale qualificata. -
Page 4: Caratteristiche Di Funzionamento
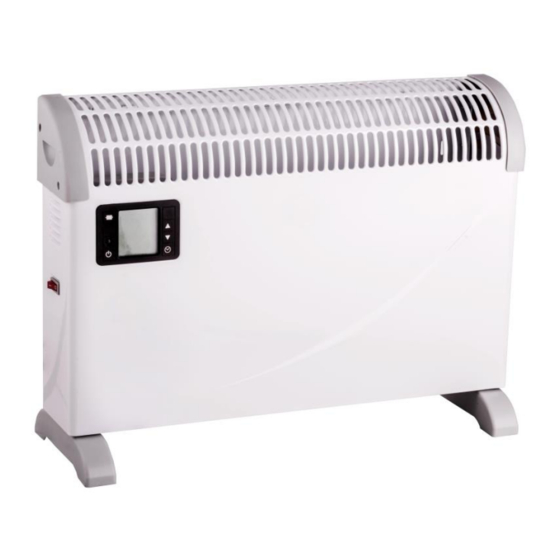
Parametri delle Performance 1. Riscalda velocemente 2. Protezione dal surriscaldamento 3. Temperatura regolabile da 5 a 50℃ 4. Quattro modalità tra cui scegliere Riepilogo Struttura A. Involucro anteriore B. Display C. Interruttore D. Piedi Parametri Tecnici Modello Prodotto NO. Voltaggio Frequenza Tensione Nella tabella sopra vengono indicati i parametri di prestazione misurati prima della... -
Page 5: Metodo Di Utilizzo Del Riscaldatore
Metodo di Utilizzo del Riscaldatore Metodo di Posizionamento Come Assemblare i Piedi 1. Capovolgere il prodotto, capovolgere la parte inferiore, estrarre le quattro viti ST4 * 12 e il piede già installato sul dispositivo. 2. Allineare il foro della vite sul piede alla parte inferiore del foro, fa passare la vite attraverso il foro rotondo del piede, stringere le viti. -
Page 6: Istruzioni Per L'uso
Istruzioni per l'Uso 1.Pannello di controllo 2.Display... - Page 7 3.Istruzioni d'uso 1) Tensione in ingresso/uscita: CA 230/50 HZ 2) Carica elettrica di riscaldamento: la carica in output dei due set è 1200W e 800W. 3) Funzione di spegnimento con timer: può essere impostato su un timer di 24 ore (la modalità...
-
Page 8: Avvertenze
3. 2000 W: questa modalità deve essere usata con un cavo di alimentazione da 2000 W, l'icona del display mostrerà il valore 2000 W. Il dispositivo inizia a riscaldarsi quando la temperatura ambiente è inferiore a 4 ℃, smetterà di riscaldarsi non appena raggiunge la temperatura impostata. -
Page 9: Descrizione Del Circuito Elettrico
14.Se il cavo di alimentazione è danneggiato, deve essere sostituito con i tipi di cavi forniti dalla nostra azienda e dedicati alla manutenzione o sostituzione come indicato dal produttore. 15.Non utilizzare il dispositivo se collegato ad una fonte di alimentazione automatica o con timer, o con qualsiasi altro dispositivo per utilizzare questo riscaldatore. -
Page 10: Controllo Dei Guasti E Risoluzione
Controllo dei Guasti e Risoluzione Se il prodotto non funziona o funziona in modo anomalo, controllare le casistiche seguenti. Se il caso specifico non rientrasse nel seguente elenco, il prodotto potrebbe guastarsi, consegnare il prodotto al centro assistenza. Problema Causa Soluzione Controllare se la spina è... -
Page 11: Safety Rules
Safety Rules Operation and Maintenance 1. Non-specialists or unauthorized maintenance personnel, shouldn't repair or rebuild the machine without authorization. 2. Don't use the heater if the power cord is damaged. If the power cord is damaged it must be replaced by a recognized service agent or other qualified person. If the plug is damaged, see Plug Replacement details below. -
Page 12: Performance Feature
Performance Feature 1. Heat quickly 2. Over heat protect 3. Adjustable temp from 5 ℃ to 50℃ 4. Four patterns to choose Structure Brief A. Front Cover B. Display C. Switch D. Feet Technical Parameters In the above form show performance parameters measured before delivery, for reference only. -
Page 13: Usage Method Of Box
Usage Method of Box Method of Placement How to Assemble Feet 1.Overturn the body, Upturn the bottom, Take the four ST4 * 12 screws and foot out which the machine attached. 2.let the screw hole on the foot installed at the bottom of the hole, the screw through the round hole of the foot, screw down the screws. -
Page 14: Operation Instruction
Operation Instruction 1.control panel 2.Display... - Page 15 3. Using Instruction 1)Input/Output voltage: AC 230/50HZ 2)Heating load: two sets heating load output are 1200W and 800W. 3)Timing shutdown function: could be set 24 hours timing hut down (prevent under frost mode not support timing shutdown, and timing shutdown could be set under other mode.
-
Page 16: Warnings
3. 2000W: this mode is corresponding to the power of 2000W heat wire, screen display 2000W icon. It starts to heat when the environment temperature below 4℃, it will stop heating as soon as reach the setting temperature. The setting temperature range is 5-50℃. -
Page 17: Electrical Principle Drawing
15. Do not use automatically connected to the power supply with program, timer, or any other device to use this heater. Must be installed two feet firstly, and with a screw. 16. Fixing the foot with peg Electrical Principle Drawing Clean and maintenance method 1. -
Page 18: Failure Checking And Exclude
Failure checking and exclude If the product cannot work or work abnormally, please check as following list. If the situation without the following list, product might break down, hand the product to agency in advice. CAUTION: ALWAYS UN-PULG THE HEATER BEFORE CLEANING.
Need help?
Do you have a question about the 820-271 and is the answer not in the manual?
Questions and answers