Table of Contents
Advertisement
Quick Links
Pump series NHM
Magnetically coupled
centrifugal pump
Original operating manual
Version
Print-No.
12375/1222
SCHMITT-Kreiselpumpen GmbH & Co. KG
Einsteinstraße 33
76275 Ettlingen
Germany
Phone: + 49 (0) 7243 / 54 53 - 0
Fax: + 49 (0) 7243 / 54 53 - 22
E-mail:
info@schmitt-pumpen.de
Internet:
www.schmitt-pumpen.de
Subject to technical modifications.
Read carefully before use.
Save for future use.
Advertisement
Table of Contents

Related Manuals for SCHMITT NHM Series


Summary of Contents for SCHMITT NHM Series
- Page 1 Pump series NHM Magnetically coupled centrifugal pump Original operating manual Version SCHMITT-Kreiselpumpen GmbH & Co. KG Print-No. 12375/1222 Einsteinstraße 33 76275 Ettlingen Germany Phone: + 49 (0) 7243 / 54 53 - 0 Fax: + 49 (0) 7243 / 54 53 - 22 E-mail: info@schmitt-pumpen.de...
-
Page 2: Table Of Contents
Table of contents Table of contents About this document ....... 4 5.4.3 Installing the pressure pipe . - Page 3 Table of contents List of figures List of tables Fig. 1 Name plate (example) ..... . . 9 Tab. 1 Other application documents, purpose and where found .
-
Page 4: About This Document
• Responsibilities: dimensions – Always keep this manual accessible where the device • www.schmitt-pumpen.de/en/ is used on the system. services/downloads – Ensure that employees read and observe this docu- ment, particularly the safety instructions and warnings, Spare parts list Documentation and the documents which also apply. -
Page 5: Warnings And Symbols
About this document Warnings and symbols Warning sign Level of risk Consequences if disregarded immediate acute risk Death, serious bodily harm DANGER potentially acute risk Death, serious bodily harm potentially hazardous situation Minor injury CAUTION potentially hazardous situation Material damage NOTE Tab. -
Page 6: General Safety Instructions
General safety instructions General safety instructions • When conveying fluids containing solids, observe the limit values for proportions of solid particles and particle size: – Particle size Ø ≤ 0.5 mm – Proportion of solid particles ≤ 5 % Vol. The manufacturer accepts no liability for damages caused by disregarding any of the documentation. -
Page 7: Obligations Of The Operating Company
Observe ATEX additional manual Electrical work Qualified electrician • Additional instructions for use in explosive atmospheres (electrical installation) • (→ www.schmitt-pumpen.de/sites/default/files/2020-10/ Instruction by the All further work ATEX-Zusatzanleitung-en.pdf) user/owner Safety equipment • Provide the following safety equipment and verify its func- tionality: –... -
Page 8: Hazardous Pumped Media Sprayed Out
General safety instructions 2.3.3 Hazardous pumped media sprayed out Pumped media can be toxic and hot and can be sprayed out. In the event of contact, there is a risk of burns and skin rashes. • When handling hazardous fluids (e.g. hot, flammable, explosive, toxic, hazardous to health or the environment), observe the safety regulations for the handling of haz-... -
Page 9: Layout And Function
Layout and Function Layout and Function Marking 3.1.1 Name plate SCHMITT Kreiselpumpen GmbH & Co. KG SCHMITT Kreiselpumpen GmbH & Co. KG D-76275 Ettlingen, Germany D-76275 Ettlingen, Germany Artikel Nr./item no.: l Nr./item no.: 1234567 1234567 Serien Nr./serial no.: Serien Nr./serial no.:... -
Page 10: Description
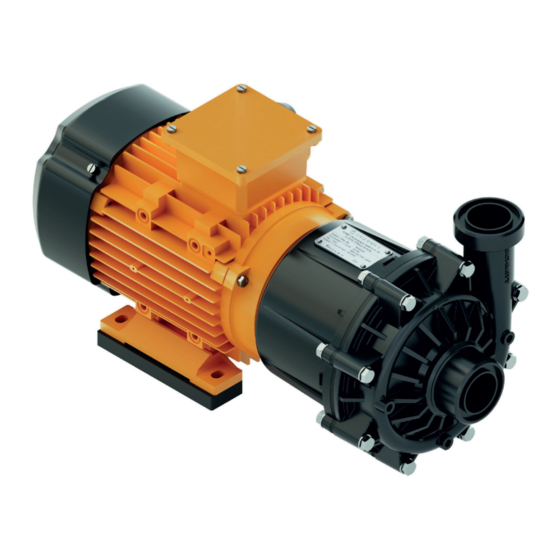
Layout and Function Description Non self-priming and magnetically coupled centrifugal pump in modular design: • Media-lubricated plain bearings • Horizontal installation • Direction of conveying – Suction flange, axial – Discharge flange, vertical Assembly Fig. 3 NHM layout Suction branch Lantern Motor foot Housing... -
Page 11: Transport, Storage And Disposal
Transport, Storage and Disposal Transport, Storage and Storage Disposal NOTE Material damage due to inappropriate storage! Transport Store the pump properly. The user/owner is responsible for the transport of the 1. Seal all openings with blind plugs or plastic covers. pump. -
Page 12: Installation And Connection
Installation and connection Installation and connection Planning pipelines Water hammer may damage the pump or the system. Plan the pipes and fittings as far as possible to prevent water For pumps in potentially explosive atmospheres (→ ATEX hammer occurring. additional manual). 5.3.1 Designing pipelines NOTE... -
Page 13: Specifying Pipe Lengths
Installation and connection 5.3.4 Specifying pipe lengths Make provisions for isolating and shutting off the pipes For maintenance and repair work. Provide shut-off devices in the suction pipe and pressure line. Dry run protection by measuring the operating conditions Provide monitoring sensors for both pressure and flow rate, to protect the pump against dry running and consequential damage. -
Page 14: Electrical Connection
Installation and connection Electrical connection DANGER Risk of electrocution! All electrical work must be carried out by qualified electri- cians only. Before all work on the electrical system, disconnect the motor from the mains and secure against being switched back on again. 5.5.1 Connecting the motor Follow the instructions of the motor manufacturer. -
Page 15: Operation
Operation Operation Commissioning The pump achieves its final rated capacity only after a certain running-in period. For pumps in potentially explosive atmospheres (→ ATEX additional manual). 6.2.1 Switching on Pump set up and connected properly Preparing for commissioning Motor set up and connected properly All connections stress-free and sealed 6.1.1 Check downtimes... -
Page 16: Shutting Down The Pump
Operation Shutting down the pump Operating the stand-by pump Take the following measures whenever the pump is shut Stand-by pump filled and bled down: Operate the stand-by pump at least once a week. Pump is Measure shut down Take measures appropriate for 1. -
Page 17: Maintenance
Maintenance and repair work should be undertaken in consul- tation with Schmitt. The chapter describes maintenance not Regularly clean the pump to remove heavy dirt. within the warranty period. For pumps in potentially explosive atmospheres (→ ATEX Dismounting additional manual). -
Page 18: Disassembling And Checking The Pump
Maintenance 7.3.2 Disassembling and checking the pump Prepared for disassembly. Following the drawings for disassembly (→ 9.1.2 Drawin- gs, Page 25). NOTE Request spare parts from manufacturer (→ 7.4 Replacement parts and return, Page 19). Material damage, fragile components! Perform disassembly carefully, and do not strike or knock During disassembly, stressed parts are checked for damage the fragile parts of the plain bearing. -
Page 19: Replacement Parts And Return
If only the stressed parts were disassembled and tested, steps 5...10 can be omitted. Prepared for installation 3. Use only spare parts from SCHMITT Preparing the impeller for installation (E-Mail: sales@schmitt-pumpen.de). The impeller, magnet assembly, housing seal and rear cover... -
Page 20: Install The Pump Into The System
Maintenance WARNING Strong magnetic field! Hands can be crushed when mounting the magnetic cou- pling. Carefully insert the unit (04...07) into the magnet bell (08). Use sturdy gloves. 11. Carefully insert the unit (04...07) into the magnet bell (08). 12. Assemble the housing (02) on to the rear cover (07) and the impeller (04). -
Page 21: Troubleshooting
Troubleshooting Troubleshooting For pumps in potentially explosive atmospheres (→ ATEX additional manual). If faults occur which are not specified in the following table or cannot be traced back to the specified causes, please consult the manufacturer. Possible faults are identified by a fault number in the table below. - Page 22 Troubleshooting Fault number Cause Remedy – – – – – – – Intake/suction pipe and pump not correctly Completely fill and vent pump and/or vented or not completely filled pipe. – – – – – – – Intake / suction pipe contains trapped air Install fitting for venting.
- Page 23 Troubleshooting Fault number Cause Remedy – – – – – Motor speed too high Compare the required motor speed with the specifications on the pump type plate. Replace the motor if necessary. Reduce the motor speed if speed control is available. –...
-
Page 24: Appendix
Appendix Appendix Replacement parts 9.1.1 Part numbers and designations Part no. Designation O-ring Housing O-ring Impeller Magnet assembly Housing seal Rear cover Magnet bell Lantern Motor Base plate Hexagon socket screw Headless setscrew Hex-head bolt, washer, nut Tab. 8 Designation of components according to part numbers. -
Page 25: Drawings
Appendix 9.1.2 Drawings Sectional drawing Fig. 7 Parts (sectional drawing) 12375/1222... -
Page 26: Fig. 8 Parts (Exploded Drawing)
Appendix Exploded drawing Fig. 8 Parts (exploded drawing) 12375/1222... -
Page 27: Technical Specifications
Appendix Technical specifications 9.2.3 Tightening torques Further technical data (→ data sheet). Comply with the following tightening torques and use a torque wrench: 9.2.1 Ambient conditions Part Torque [Nm] Operation under any other ambient conditions should be Hexagon head bolt agreed with the manufacturer. -
Page 28: Maintenance Schedule
Appendix Maintenance schedule The manufacture recommends shorter maintenance inter- vals if the medium being conveyed contains solid matter. The operating company should choose the maintenance intervals appropriate to the medium being conveyed. Interval Designation Action Daily Conveyed fluid Check temperature. Check discharge pressure. -
Page 29: Declaration Of Conformity In Accordance With Ec Machinery Directive
Appendix Declaration of conformity in accordance with EC machinery directive EU Declaration of Conformity Manufacturer SCHMITT-Kreiselpumpen GmbH & Co. KG Einsteinstrasse 33 D-76275 Ettlingen Type of pump Centrifugal pump Pump type NHM 200 We declare that the design of the listed pumps satisfies the provisions of the EU Directives.
Need help?
Do you have a question about the NHM Series and is the answer not in the manual?
Questions and answers