Table of Contents
Advertisement
Quick Links
Advertisement
Table of Contents

Related Manuals for miRider ONE


Summary of Contents for miRider ONE
- Page 1 MIRIDER ONE | MIRIDER ONE GB3 USER MANUAL...
- Page 2 Welcome to the fold Thank you for choosing to join the growing MiRiDER community. We’re sure riding your MiRiDER One (GB3) will create some amazing new experiences and memories to last a lifetime. The MiRiDER One (GB3) is designed with a focus on providing...
-
Page 4: Table Of Contents
5.1.2. CNC foldable pedals* 2.4. Main parts 5.2. Adjusting the handlebar 2.5. Handlebar MiRiDER One stem height 2.6. Handlebar MiRiDER One GB3 16 5.3. Adjusting the brake levers 2.7. Battery and charger 5.4. Adjusting the brake levers for smaller hands* Safety 5.5. - Page 5 8.2.1. Checking your e-bike 6.1. Switching your e-bike on 8.3. Tightening the bolts and off 8.4. Replacing the innertube 6.2. Setting the assistance level 8.5. Lubricating the chain* 6.3. Switching the headlights 8.6. Cleaning your e-bike on and off Storage and security 6.4. Previewing display functions 9.1.
-
Page 6: Preface
ABOUT THIS MANUAL This manual is written for the end user of the MiRiDER One (GB3). This manual is written for the end user of the MiRiDER One (GB3). In this manual you will find all the information you need to correctly use and maintain your e-bike. Please ensure you have read and understood the contents of this manual in full before operation of your e-bike. -
Page 7: Symbols Used In This Manual
· A two-year warranty* on the electronic cabling, display, throttle, and electronic brake cut offs. · A one-year warranty on all other parts. Wear parts such as tyres, the chain or drive belt, pedals, freewheels etc. are exempt from this warranty. -
Page 8: Disclaimer
· Derestricting the bike. *To access the full two-year warranty, you must register your e-bike within 30 days from the date of purchase. Please visit www.mirider.co.uk/warranty to register your e-bike. If your e-bike is not registered within this time, the warranty will be limited to one year. Warranties and complaints are handled by MiRiDER for direct sales. For purchases made via the MiRiDER dealer network, the dealer who you’ve purchased from is always your first... -
Page 9: Assistance
6 km/h. The MiRiDER One (GB3) is driven by a hub motor located at the centre of the rear wheel. The hub motor is powered by a rechargeable, removable battery which is built into the... -
Page 10: Important Specifications
For climbing or riding without assistance. · 2 gear: For typical riding. · 3 gear: For cruising or riding at maximum speed. *Only applicable to the MiRiDER One GB3 2.2. IMPORTANT SPECIFICATIONS Product name MiRiDER One MiRiDER One GB3 1340 × 575 × 400 mm... -
Page 11: Symbols And Labels On The Product
2.3. SYMBOLS AND LABELS ON THE PRODUCT Symbol Description Indicates that the product complies with all relevant European directives. Indicates that the product complies with all relevant United Kingdom directives. Indicates that the product must not be disposed with household waste. Recycle this product in an environmentally friendly manner according to local regulations. -
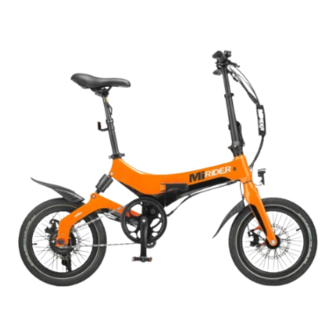
Page 12: Main Parts
2.4. MAIN PARTS... - Page 13 Kickstand Wheel Magnet Motor Chain Rear disk brake Sprocket Crank arm Drive belt Telescopic handlebar stem Gearbox Cables Foldable pedal Handlebar clamp CNC foldable pedal Handlebar stem Only applicable to the MiRiDER One Only applicable to the MiRiDER One GB3...
-
Page 14: Handlebar Mirider One
2.5. HANDLEBAR MIRIDER ONE Q= W CRUISE PAS THROTTLE KM/H APOI... - Page 15 Assistance level Brake indicator Battery capacity Light indicator Cruise control Down button Power-assist start up Power button Single trip time Up button Total trip time Left brake lever (rear brake) Throttle indicator Handlebar clamp Average speed Bell Maximum speed Walk assist / Thumb throttle Total trip distance Right brake lever (front brake) Single trip distance...
-
Page 16: Handlebar Mirider One Gb3
2.6. HANDLEBAR MIRIDER ONE GB3 ¥ ⁄ £ ¢ ¡ ƒ ¤ “ §... - Page 17 ¢ Up button Assistance level £ Power button Throttle indicator ⁄ Down button Riding speed ¥ Battery capacity Average speed/maxiumum speed ƒ Battery voltage Left brake lever (rear brake) § Brake indicator Handlebar clamp ¤ Light indicator Bell Ambient temperature Walk assist / Thumb throttle “...
-
Page 18: Battery And Charger
2.7. BATTERY AND CHARGER « ‹ › fi fl – † « fl Charger port Charger power cable ‹ – Charger Battery lock › † Battery handle Keys fi Battery... -
Page 19: Safety
SAFETY 3.1. INTENDED USE AND FORESEEABLE UNINTENDED USE Your e-bike is intended to be used as an electric bike with pedal assist for single person cycling only. Only use your e-bike as described in this user manual. Any other use of your e-bike than described in this user manual is regarded as unintended use and may cause injury or damage to the product and void the warranty. - Page 20 · Always watch out for cars, pedestrians, and other cyclists. Be careful when cycling past parked cars. Doors may open unexpectedly. · Avoid potholes, soft or low verges that could cause a crash, or debris which may cause damage to your tyres. ·...
- Page 21 · Always tighten the handlebar stem clamp to prevent the handlebar stem from moving during cycling. · Do not adjust the handlebar stem latch yourself without professional advice. Incorrect adjustment may cause the frame to fold unexpectedly during cycling. · Always tighten seatpost height adjustment clamp to prevent the seatpost from moving during cycling.
- Page 22 · Only charge the battery with the provided charger. Ensure the voltage of the charger matches the voltage of the battery. Non-matching voltages may cause a fire or explosion hazard. · Always keep the battery and the charger clean. Use a clean fresh cloth to wipe off any dirt. Dirt may cause an electric shock hazard. · Do not use the battery or charger if there is visible damage. A damaged battery or charger may cause an electric shock hazard.
- Page 23 Do not use the e-bike and have the brake line bled or repaired by an approved MiRiDER dealer. – the tyres and rims are free of damage and the wheels can turn unimpeded.
- Page 24 · Only use your e-bike with both wheels in contact with the ground. · Only use your e-bike for one person cycling. · Always (un)fold your e-bike away from you to prevent entrapment and to make (un) folding easier.
- Page 25 · Always lock the battery in the frame to prevent the battery from falling out. · Always fold down the battery handle so the handle is flush with the battery before unfolding the frame to prevent damage to the battery handle. · When the frame is folded, only move your e-bike forward. Moving your e-bike backwards causes the crank arm to rotate which may damage the frame.
-
Page 26: Installation
4 No rear light is included. It is advised to use a rear light with the e-bike for better visibility for other road users. 4 Your e-bike comes with two keys. We recommend separating the keys and using one as a spare in case one is lost. - Page 27 E-bike Battery Handlebar Charger Keys (2×) Strap Seatpost Rear mudguard Bell Front mudguard Charger power cable...
-
Page 28: Unfolding Your E-Bike Frame
4.2. UNFOLDING YOUR E-BIKE FRAME 1. Remove the strap from the folded e-bike frame. Keep the strap for transport and storage purposes. 2. Separate the wheel magnet from the other wheel to release the two halves of the frame. NOTICE Always fold down the battery handle so the handle is flush with the battery before unfolding the frame to prevent damage to the battery handle. - Page 29 4. Press to release the safety lock. 5. Close the frame latch. WARNING Always fully close the frame latch before cycling. If the frame latch is not closed properly, the frame may fold unexpectedly during cycling. NOTICE Never forcefully close the frame latch. If the frame latch does not close properly, check that the frame safety lock is pressed.
-
Page 30: Unfolding The Handlebar Stem
4.3. UNFOLDING THE HANDLEBAR STEM 1. Place your e-bike on the kickstand. 2. Unfold the handlebar stem. 3. Close the handlebar stem latch. -
Page 31: Mounting The Handlebar
4.4. MOUNTING THE HANDLEBAR 1. Open the handlebar clamp. 2. Hold the clamp of the handlebar clamp and remove the thumbscrew. 3. Remove the washer and slide off the top of the handlebar clamp. - Page 32 4. Place the handlebar on the bottom of the handlebar clamp. 5. Insert the top handlebar clamp and place the washer. 6. Place the clamp of the handlebar clamp upright on the thumbscrew and slightly fasten the thumbscrew.
- Page 33 7. Align the handlebar centred on the handlebar stem. 8. Fasten the thumbscrew. 9. Close the handlebar clamp. 4 If the handlebar can still move, the handlebar clamp is not tight enough. To adjust the clamp force, follow the instructions in chapter 4.9.Adjusting the clamp force. WARNING Always tighten the handlebar clamp to prevent the handlebar from rotating or moving during cycling.
-
Page 34: Mounting The Lcd Screen
4.5. MOUNTING THE LCD SCREEN* *This chapter is only applicable for the MiRiDER One GB3 or any MiRiDER with an upgraded LCD screen. 1. Remove the bolts from the mounting clamps with a M4 Phillips screwdriver. 2. Place the mounting clamps around the handlebar. -
Page 35: Mounting The Bell
4.6. MOUNTING THE BELL 1. Unscrew the bolt with a M5 Phillips screwdriver. 2. Place the bell on the handlebar. 3. Fasten the bolt with a M5 Phillips screwdriver. -
Page 36: Mounting The Mudguards
4.7. MOUNTING THE MUDGUARDS 1. Unscrew the bolt from the rear side of the fork with a M5 Phillips screwdriver. 2. Install the front mudguard on the rear side of the fork using the threaded hole and the bolt. Fasten the bolt with a M5 Phillips screwdriver. - Page 37 3. Unscrew the bolt from the rear side of the swingarm with a M5 Phillips screwdriver. 4. Place the rear mudguard. 5. Install the rear mudguard on the rear side of the swingarm using the threaded hole and the bolt. Fasten the bolt with a M5 Phillips screwdriver.
-
Page 38: Inserting The Seatpost
4.8. INSERTING THE SEATPOST 1. Open the seatpost clamp. 2. Insert the seatpost into the seat tube. WARNING Always insert the seatpost at least up to the minimum marking into the frame. Not inserting the seatpost far enough into the tube may lead to loss of control of your e-bike during cycling and/or irreparable damage to the seatpost or frame. - Page 39 3. Align the saddle with the frame. 4. Close the seatpost clamp. 5. Check that the saddle does not rotate. 4 If the saddle can still rotate, the seatpost clamp is not tight enough. To adjust the clamp force, follow the instructions in chapter 4.9.Adjusting the clamp force. WARNING Always tighten the seatpost clamp to prevent the seatpost from rotating or moving during cycling.
-
Page 40: Adjusting The Clamp Force
4.9. ADJUSTING THE CLAMP FORCE 1. Open the clamp. 2. Tighten the thumbscrew. 3. Close the clamp. 4 If you cannot close the clamp by hand, the clamp is too tight. Open the clamp and slightly loosen the thumbscrew and close the clamp. NOTICE Do not forcefully close the clamps. -
Page 41: Preparation
PREPARATION 5.1. FOLDING AND UNFOLDING THE PEDALS 5.1.1. Foldable pedals* *This chapter is only applicable for the MiRiDER One. 1. Push the pedal inwards. 2. Rotate the pedal 90°. 3. Release the pedal. -
Page 42: Cnc Foldable Pedals
5.1.2. CNC foldable pedals* *This chapter is only applicable for the MiRiDER One GB3. 1. Pull the metal centre of the pedal. 2. Rotate the pedal 90°. 3. Release the metal centre of the pedal. -
Page 43: Adjusting The Handlebar Stem Height
5.2. ADJUSTING THE HANDLEBAR STEM HEIGHT 1. Open the handlebar stem clamp. 2. Place the handlebar at the desired height within the range indicated on the side of the stem. WARNING · Always adjust the height of the handlebar stem within the indicated range markings. Placing the height of the handlebar stem above the minimum insertion marking may lead to loss of control of your e-bike during cycling or failure of the e-bike. -
Page 44: Adjusting The Brake Levers
3. Close the handlebar stem clamp. 4 If the handlebar stem can still move, the handlebar stem clamp is not tight enough. To adjust the clamp force, follow the instructions in chapter 4.9.Adjusting the clamp force. WARNING Always tighten the handlebar stem clamp to prevent the handlebar stem from moving during cycling. -
Page 45: Adjusting The Brake Levers For Smaller Hands
5.4. ADJUSTING THE BRAKE LEVERS FOR SMALLER HANDS* *This chapter is only applicable for the MiRiDER One GB3. Tighten the Allen bolt with a size 2 Allen key to reduce the distance between the brake lever and the grip. -
Page 46: Adjusting The Saddle Height
5.5. ADJUSTING THE SADDLE HEIGHT 1. Open the seatpost height adjustment clamp. 2. Adjust the saddle to the desired height within the range indicated on the side of the post. 3. Close the seatpost height adjustment clamp. WARNING Always tighten seatpost height adjustment clamp to prevent the seatpost from moving during cycling. -
Page 47: Adjusting The Saddle Horizontal Position
5.6. ADJUSTING THE SADDLE HORIZONTAL POSITION 1. Loosen the two Allen bolts under the saddle using a size 5 Allen key. 2. Move the saddle forward or backward as desired. 3. Tighten both Allen bolts. -
Page 48: Adjusting The Saddle Angle
5.7. ADJUSTING THE SADDLE ANGLE · To tilt the saddle forward: Loosen the rear bolt of the saddle and tighten the front bolt of the saddle using a size 5 Allen key. · To tilt the saddle backwards: Tighten the rear bolt of the saddle and loosen the front bolt of the saddle using a size 5 Allen key. -
Page 49: Adjusting The Headlight
5.8. ADJUSTING THE HEADLIGHT Tilt the headlight until the light beam shines on the road ahead of you as far as possible while still fully touching the ground. CAUTION Ensure that the headlight does not shine in the eyes of road users that are facing you. The light can dazzle other road users, which may lead to accidents. -
Page 50: Getting Used To Your E-Bike
5.9. GETTING USED TO YOUR E-BIKE We recommend giving your e-bike a test run in a place with little or no traffic. This allows you to become familiar with the different assistance levels in a controlled environment. Start with the lowest assistance level and increase throughout the trip. CAUTION Always try out the brakes during the test cycle so you know how hard you must squeeze and how powerful the brakes are. Disc brakes are more powerful than traditional brakes. Always keep in mind which brake levers operate the front and the rear brakes. -
Page 51: Previewing Display Functions
6.4. PREVIEWING DISPLAY FUNCTIONS Press the power button to show the different information pages on the display. 6.5. USING THE THROTTLE You can use the throttle for two purposes: · Giving you a power boost from a standing start. · Giving you a power boost, equivalent to the level five power assistance, when pedalling. 1. Push and hold the throttle with your thumb to enable the power boost. 2. -
Page 52: Using The Walk Assist
6.6. USING THE WALK ASSIST You can use walk assist to aid in pushing your e-bike while walking. 1. Press the power button to switch on the display. 2. Push and hold the throttle with your thumb to enable the walk assist. 3. -
Page 53: Shifting Gears
1. Press the up and down button until the trip distance and single trip time indicators flash. 4 Only applicable for the MiRiDER One GB3: If the lines on the display turn yellow, wait until the lines turn white and repeat step 1. -
Page 54: After Use
AFTER USE 7.1. FOLDING YOUR E-BIKE 1. Open the handlebar stem clamp. 2. Collapse the telescopic handlebar stem to the lowest height. 3. Close the handlebar stem clamp. 4. Pull the handlebar stem safety lock up and open the handlebar stem latch. 5. -
Page 55: Transporting Your E-Bike
You can transport your folded e-bike in three ways: · Carrying your e-bike in front of you using both hands. · Carrying your e-bike at your side using one hand. · Using the handlebar to push your e-bike in front of you. -
Page 56: Charging The Battery
7.3. CHARGING THE BATTERY WARNING · Only charge the battery with the provided charger. Ensure the voltage of the charger matches the voltage of the battery. Non-matching voltages may cause a fire or explosion hazard. · Do not use the battery or charger if there is visible damage. A damaged battery or charger may cause an electric shock hazard. -
Page 57: Charging The Battery Via The Frame
7.3.1. Charging the battery via the frame 1. Remove the dust cap from the charging port. 2. Insert the appliance plug of the power cable into the charger. 3. Insert the power plug of the power cable into a power socket. 4. -
Page 58: Charging The Battery Separately
7.3.2. Charging the battery separately 1. Stand on the non-drive side of your e-bike. 2. Press the frame safety lock. 3. Open the frame latch. 4. Fold your e-bike until the front half attaches to the wheel magnet. 5. Unlock the battery lock with the key. 6. - Page 59 7. Insert the appliance plug of the power cable into the charger. 8. Insert the power plug of the power cable into a power socket. 9. Insert the charging plug of the charger into the charger port on the battery. 10.
-
Page 60: Maintenance
It is recommend to have your e-bike checked and serviced by a MiRiDER dealer at least once annually or every six months if you use your e-bike daily. The check-ups and adjustments prevent breakage and costly repairs. -
Page 61: Maintaining Your E-Bike Yourself
6 weeks of use, as some parts take time to bed in and may need adjusting to keep optimised performance It is recommended to have the gearbox of your e-bike serviced every 500 miles, as the gearbox requires adequate lubrication with specialist oil. Visit mirider.co.uk/try-a-mirider for a list of established MiRiDER dealers. Use the maintenance logbook from chapter to record the service history of your e-bike. 8.2. MAINTAINING YOUR E-BIKE YOURSELF 8.2.1. -
Page 62: Tightening The Bolts
Frame Monthly Check the frame for visible damage. Only applicable to the MiRiDER One Only applicable to the MiRiDER One GB3 8.3. TIGHTENING THE BOLTS Your e-bike is not indestructible. You may be required to adjust your e-bike whilst out cycling. -
Page 63: Replacing The Innertube
Always disconnect the power cable and wheel completely from the bike before commencing maintenance. 8.5. LUBRICATING THE CHAIN* *This chapter is only applicable for the MiRiDER One. WARNING Do not lubricate the drive belt. Lubricating the drive belt may cause the drive belt to slip and void warranty. -
Page 64: Cleaning Your E-Bike
8.6. CLEANING YOUR E-BIKE WARNING Always remove the battery from the e-bike before cleaning. Water may cause an electric shock, fire, and/or explosion hazard. NOTICE · Do not use aggressive detergents that may damage the e-bike. · Do not immerse the e-bike in water or clean the e-bike with a high pressure cleaner. Clean your e-bike at least once per month to prolong the life of your e-bike. -
Page 65: Storage And Security
STORAGE AND SECURITY 9.1. STORAGE Store your e-bike in a secure, cool, and dry space. Store the battery and the charger in a dry place at room temperature. NOTICE Always fully charge the battery before storing to prevent diminishing the battery life. 9.2. - Page 66 Problem Cause Solution The battery is not fully Make sure the battery is charged. charged. Check tyre pressure is within the minimum and maximum The battery is range. Underinflated tyres can The tyre pressure is low. not lasting for a cause excess battery drain and sufficient amount premature wear.
-
Page 67: Disposal
Recycle this product in an environmentally friendly manner according to local regulations. If the e-bike is defective, please contact your MiRiDER dealer. It may still be possible to repair the e-bike. If you still need to dispose the e-bike, please follow the local regulations. -
Page 68: Appendices
12. APPENDICES 12.1. TECHNICAL SPECIFICATIONS Mechanical configuration Product name MiRiDER One MiRiDER One GB3 760 – 920 mm Seat height from ground Brake system Front and rear disk brake 16 × 1.75 - 16 × 2.125 inch Tyre dimension Frame material Diecast magnesium Suspension Rear spring shock absorber Battery specifications... - Page 69 Rated input 42 V 2.0 A Rated output 0°C – 45°C Charging temperature Function parameters Product name MiRiDER One MiRiDER One GB3 Maximum motor speed 25 km/h Maximum range 72 km – dependant on rider weight and terrain 120 kg Maximum rider weight >15° Climbing angle...
- Page 70 Motor specifications Product name MiRiDER One MiRiDER One GB3 36 V / 250 W Rated voltage/wattage 40 Nm Torque 120 kg Maximum rider weight >15° Climbing angle IP rating IP54...
-
Page 71: Torque Values
12.2. TORQUE VALUES Take the torque values into account when replacing or adjusting parts, or doing any maintenance. Pedal Axel: 40 – 43 Nm Saddle bolts: 12 Nm Locking grips: 2 – 4 Nm Brake Levers: 4 – 5 Nm Shock eyelet bolts: 8 – 10 Nm Handlebar clamp bolt: 12 Nm Rear brake calliper: 6 –... -
Page 72: Spare Parts And Accessories
· Brake pad set · Pedals · MiRiDER One GB3 oil *The innertubes fitted to your e-bike are Schrader valve and are also available from your local bike store. To purchase spare parts or accessories, please contact your MiRiDER dealer or visit www.mirider.co.uk 12.4. ADDITIONAL RESOURCES For additional instructional and how-to video’s, visit www.mirider.co.uk/videos or visit our YouTube channel www.youtube.com/@MiRiderUK... -
Page 73: Ec Declaration Of Conformity
Declares under our sole responsibility that the product: Product name: MiRiDER Function: Foldable e-bike Type: One, One GB3 Conforms with the provisions of the following EC directives: EMC Directive 2014/30/EU Machinery 2006/42/EC The following Harmonized standard were applied: Cycles - Electrically power assisted cycles - EPAC Bicycles EN15194:2017 This product carries the UKCA and CE Mark, which was first affixed in 2019. -
Page 74: Maintenance Logbook
12.7. MAINTENANCE LOGBOOK 12.7.1. Identification Product code Order number 12.7.2. Maintenance work Maintenance Stamp Repair Comments Date MiRiDER dealer Km cycled... - Page 75 Maintenance Stamp Repair Comments Date MiRiDER dealer Km cycled Maintenance Stamp Repair Comments Date MiRiDER dealer Km cycled...
- Page 76 Maintenance Stamp Repair Comments Date MiRiDER dealer Km cycled Maintenance Stamp Repair Comments Date MiRiDER dealer Km cycled...
- Page 77 Maintenance Stamp Repair Comments Date MiRiDER dealer Km cycled Maintenance Stamp Repair Comments Date MiRiDER dealer Km cycled...
- Page 78 Maintenance Stamp Repair Comments Date MiRiDER dealer Km cycled Maintenance Stamp Repair Comments Date MiRiDER dealer Km cycled...
- Page 79 Maintenance Stamp Repair Comments Date MiRiDER dealer Km cycled Maintenance Stamp Repair Comments Date MiRiDER dealer Km cycled...
- Page 80 Maintenance Stamp Repair Comments Date MiRiDER dealer Km cycled Maintenance Stamp Repair Comments Date MiRiDER dealer Km cycled...
- Page 81 NOTES...
- Page 82 NOTES...
- Page 83 NOTES...
- Page 84 MiRiDER LTD 3 Croftwood Square Wigan WN5 0LG United Kingdom www.mirider.co.uk support@mirider.co.uk Version 00_16 Phone +44 (0)1257 228242 January 2024...
Need help?
Do you have a question about the ONE and is the answer not in the manual?
Questions and answers