Advertisement
Table of Contents
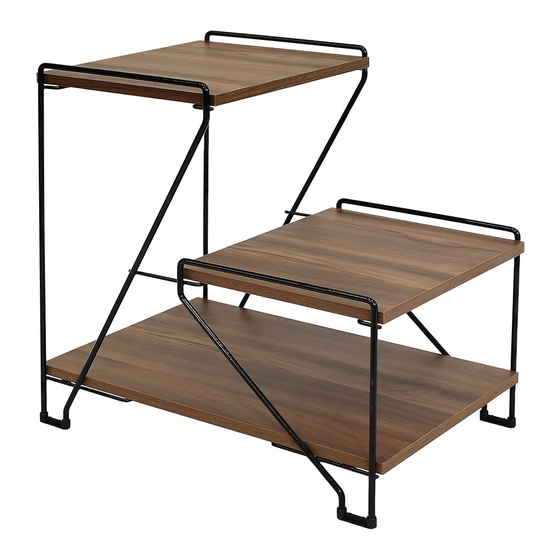
3 - TIER ACCENT TABLE
Carefully review assembly and care instructions before using this product. Save this document for future reference.
Assemble components on a soft, clean surface to avoid scratching or damaging the finish.
Tools Required
Phillips Screwdriver
HELPFUL HINT
Sunnydaze Decor advises reading this manual fully, and assembling the item soon after purchase. Check that
all parts are accounted for and familiarize yourself with the assembly before beginning.
Save this manual for future reference.
23510
Purchase Date:
Thank you for choosing Sunnydaze Decor. We stand behind our brand and the quality of the items we sell.
Replacement parts or products will be sent at our discretion within the 1-year warranty period. Proof of purchase, with
the date of purchase as well as photos of the merchandise defect, must be provided. Photos are used to determine
the cause of defects and for future quality control. Register your warranty at
If you have any questions, comments or concerns, feel free to contact us by phone at 833-982-1977, by email:
customerservice@sunnydazedecor.com, or via our contact us page at
(not included)
/
/
Order/Customer Reference Number:
MTR-508
No.
A
B
C
D
1
2
CHOKING HAZARD — This item contains small parts
that can be swallowed. Keep children and pets away
during assembly.
09/2022
https://tiny.cc/SunnydazeWarranty
https://tiny.cc/SunnydazeContact
Inspect packaging to ensure all
parts are accounted for before
disposing of packing materials.
Components
Left Frame
Right Frame
Small Shelf
Large Shelf
M3.5x9.5mm Screw
Plastic Foot
WARNING
Qty.
1
1
2
1
18
4
Page 1 / 3
Advertisement
Table of Contents

Subscribe to Our Youtube Channel
Related Manuals for Sunnydaze Decor MTR-508


Summary of Contents for Sunnydaze Decor MTR-508
- Page 1 Order/Customer Reference Number: Thank you for choosing Sunnydaze Decor. We stand behind our brand and the quality of the items we sell. Replacement parts or products will be sent at our discretion within the 1-year warranty period. Proof of purchase, with the date of purchase as well as photos of the merchandise defect, must be provided.
- Page 2 ASSEMBLY Review all steps carefully and understand assembly before beginning. STEP 1 STEP 2 Tools Required A: 1 C: 1 B: 1 1: 6 2: 4 As shown, firmly push two Plastic Feet (2) onto the Align one Shelf (C) with the top of Frames (A,B) and bottom of Left Frame (A) and two Plastic Feet (2) secure using six M3.5x9.5mm Screws (1).
- Page 3 Care & Maintenance Use a feather duster or a dry, soft cloth clean Do not clean with harsh cleansers or furniture this product. polish. Remove stains with a slightly damp cloth and Do not push or drag unit as doing so may damage mild soap.
Need help?
Do you have a question about the MTR-508 and is the answer not in the manual?
Questions and answers