Table of Contents
Advertisement
Quick Links
Advertisement
Table of Contents

Subscribe to Our Youtube Channel
Related Manuals for Kromek D5 RIID


Summary of Contents for Kromek D5 RIID
- Page 1 D5 RIID USER MANUAL www.kromek.com...
- Page 2 © Copyright Kromek Limited proprietary rights are included in the information disclosed herein. The recipient, by accepting this document, agrees that neither this document nor the information disclosed herein, nor any part thereof, shall be reproduced or transferred to other...
-
Page 3: Table Of Contents
Contents Contents ..........................3 Introduction ........................6 Device Basics ........................6 2.1. Device Overview ......................6 2.2. Detector Reference Point ..................7 2.3. Powering On/Off .......................8 2.4. Health Check ......................8 2.5. On Screen Messages ....................8 Batteries ..........................8 3.1. Charging ........................8 3.2. Replacing Batteries ....................9 3.3. Battery Indication ......................9 3.4. - Page 4 9.2.2. Power......................28 9.2.3. GPS ........................29 9.2.4. Satellites ......................29 9.2.5. Radiometrics ....................30 9.2.6. WiFi ........................30 9.2.7. Training Mode ....................31 9.3. Covert Mode ......................33 9.4. WiFi .........................33 9.5. Bluetooth ........................34 9.6. Remote Mode ......................35 9.7. Search Mode ID .......................35 9.8. Radionuclide Library ....................36 9.9.
- Page 5 12.6.4. Radionuclide Library ..................60 12.6.5. Thresholds .....................61 12.6.5.1. Dose Rate Threshold ................61 12.6.5.2. Gamma Background Alarm Thresholds ..........61 12.6.5.3. Neutron Background Alarm Thresholds ..........62 12.7. Device ........................63 12.7.1. Security ......................63 12.7.2. Backup ......................64 12.7.3. Update ......................64 12.7.4. Maintainer Settings ..................64 12.7.5.
-
Page 6: Introduction
1. Introduction The D5 RIID can detect radiation from both gamma emitting and neutron emitting sources using its CLLBC detector crystal. Its small form factor and lightweight design make it ideal for one handed operation, with the ability to detect and identify a range of isotopes and categorise them accordingly. -
Page 7: Detector Reference Point
2.2. Detector Reference Point The reference point for the detector crystal is marked on the D5 RIID’s outer case. The detector crystal is cylindrical in shape, meaning that the two crosses on the device outer casing indicate the central point in both orientations. -
Page 8: Powering On/Off
Accessing information on faults is described in Section 14. 2.5. On Screen Messages During use of the D5 RIID, messages can appear on the screen to aid use or to alert the user to a problem. A full list of all messages is given in Section 14. -
Page 9: Replacing Batteries
When the D5 RIID is fully charged, the LED will show as a solid white light. If the D5 RIID is powered off while charging, the indicator light will be white For more information on LED colours and light operation, see Section 4. -
Page 10: Earphone Connection
3.5. Access Modes The D5 RIID has two access modes on the device itself and an additional mode which is accessible via software on a laptop or PC. Routine Mode: Accessible on the device itself and designed to enable the user to perform detection and identification of radionuclides, measure exposure or ambient dose equivalent rate, and if applicable, detect the presence of neutrons. -
Page 11: Calibration
4. LED Indicator The D5 RIID has an LED on the top side of the device, which conveys information through light colours and light operation. The LED is designed to give peripheral information on device performance when the D5 RIID is worn in a holster, thereby removing the need to consistently remove the device to observe the screen. -
Page 12: Combination Leds
LED colours and light operation can be used in conjunction to give full information on device performance. Example: A white LED flashing every five seconds illustrates that the D5 RIID is operating normally and has normal battery levels. 5. Device Modes The D5 RIID operates in three distinct modes: Search Mode without ID, Search Mode with ID, and Confirmation Mode. -
Page 13: Using Search Mode Without Id
ID, then the ID icon in the top left- hand corner will have a line through it. 5.1.2. Using Search Mode without ID The D5 RIID continuously scans the area for threats when the Search Mode screen is shown. The... -
Page 14: Alarms In Search Mode Without Id
From this screen, clicking the left key to select “Confirm” moves the device to Confirmation Mode (Section 5.3). Clicking the right key to select “Show Plot” brings up a view of the real time spectral data, showing counts per second on the y axis and time on the x axis. -
Page 15: High Neutron Alarm
If a high gamma alarm is triggered in Search Mode without ID, the screen on the right will be shown. Using the right key to select “OK” will dismiss the alarm. Using the left key to select “Confirm” will take the device into confirmation mode (Section 5.3). -
Page 16: High Dose Alarm
5.1.3.3. High Dose Alarm A high dose alarm will occur if the dose rate threshold is exceeded. For information on viewing and changing the dose rate alarm threshold, see Section 9.17.1. If a high dose alarm occurs, the screen on the right will be shown. -
Page 17: Using Search Mode With Id
ID, then the ID icon in the top left- hand corner will not have a line through it. 5.2.2. Using Search Mode with ID The D5 RIID continuously scans the area for threats when the Search Mode screen is shown. The gamma dose rate is always shown on the screen and can be displayed in Sv/h or R/h. -
Page 18: Alarms In Search Mode With Id
When first navigating to Search Mode with ID, the unit will initialise for approximately 30 seconds. After this time, the D5 RIID will be in a fully initialised identification mode and can be used to identify isotopes. Once initialisation is complete, the device is ready to use in Search Mode. -
Page 19: High Neutron Alarm
deviations beyond the mean should be used to dictate the alarm threshold. The higher the k value, the lower the chance of a false alarm but the device becomes increasingly insensitive to low counts from true sources. A k value of 5 is recommended to obtain the best balance between false alarm rate and sensitivity. -
Page 20: High Dose Alarm
5.2.3.4. Isotope Identification Alarms If the D5 RIID encounters an isotope which is in its isotope library, an isotope identification alarm will be shown. This alarm identifies the isotope, as shown in the Ba-133 example shown below. Each isotope will be categorised as industrial, medical, NORM or special nuclear material as shown by the associated icon. -
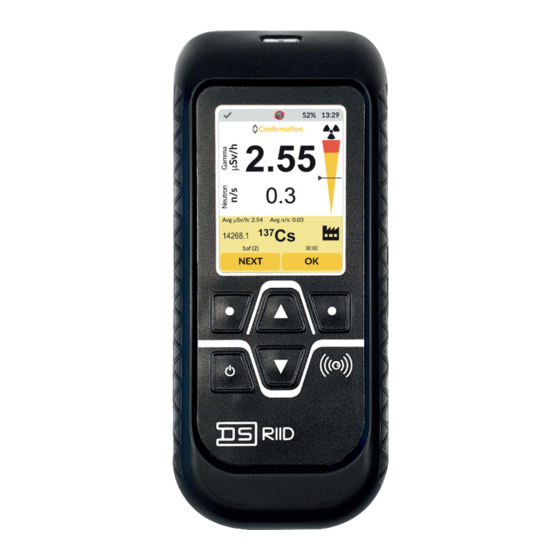
Page 21: Confirmation Mode
It is possible to save Search Mode with ID identification alarms, as shown above, to the alert history of the D5 RIID. Alert history is fully outlined in Section 7. To save a Search Mode with ID identification alarm, as shown above, a user can click “ok” to dismiss the alarm’s accompanying vibrational or audible alerts but should not click to move the device into Confirmation Mode. -
Page 22: Using Confirmation Mode
5.3.1. Using Confirmation Mode The gamma dose rate and neutron rate are still visible Gamma on the screen in this Dose Rate mode and display as they would in Search Mode. Neutron Rate Using the right-hand button to select “Start ID” will start a scan for a user selectable amount of time. - Page 23 The D5 RIID can detect multiple isotopes. If multiple isotopes are detected, then the alarm indication will show “1 of 2”, “1 of 3”, “1 of 4” etc depending on the number of isotopes.
- Page 24 If no isotopes, or an isotope outside of the D5 RIID isotope library, is detected then the indication will show “No ID”. Clicking “OK” on this alarm will prompt the user to take a new background. Selecting “Yes” will start a new scan which matches...
-
Page 25: Reachback Capability
6. Reachback Capability Reachback functionality can be achieved using the D5 RIID in two ways. The first is by transferring files to a computer or other device. It is also possible to use Kromek’s NIRA (Network Interfacing and Reachback App) to provide Reachback capability in addition to allowing the D5 to interface with third party networks. -
Page 26: Over Range Alarm
This allows the exact counts at different energies to be viewed. 8. Over Range Alarm If the D5 RIID encounters radiation levels which are beyond the stated maximum levels, then an over range alarm will appear on the screen. If... -
Page 27: Device Settings
9. Device Settings The device settings can be accessed by pressing the up or down key when in Search Mode or Confirmation Mode to bring up the main menu. The up and down keys can then be used to navigate to “Settings”. From there, individual settings can be selected using the navigation keys. -
Page 28: Device Info
USB connection. Battery State: Shows as “lithium” when the D5 RIID is using the internal rechargeable battery, shows as “AA” when the D5 RIID is using the replaceable batteries and shows as “USB” when the device has a USB connection. -
Page 29: Gps
Lock Start: Current lock start. Lock End: Current lock end. # Satellites: Number of satellites from which the D5 RIID is collecting information. Max Satellites: The maximum number of satellites seen by the detector. If GNSS is enabled and connected, there will be an Earth icon in the top bar. -
Page 30: Radiometrics
9.2.5. Radiometrics Pressing “Next” from the GPS screen shows the radiometric information. Gamma cps: Shows the current gamma counts per second. Neutron cps: Shows the current neutron counts per second. High dose cps: Shows the counts per second which are being recognised by the high dose sensor. -
Page 31: Training Mode
9.2.7. Training Mode Navigating to the training mode setting allows you to enable or disable training mode on the D5 RIID. Training mode gives an option to perform training exercises using more standard lab sources to simulate special nuclear material. - Page 32 Co-57 will display as U-235 Co-60 will display as U-238 Neutron counts are unaffected. To ensure that the training mode is not left on accidentally, training mode will automatically disable when the D5 RIID power cycles. MAL-OPS-1026 v3...
-
Page 33: Covert Mode
Using the right-hand key to select the “toggle” function turns the function on and off. When the WiFi functionality is turned on, the D5 RIID will enter a WiFi initialising mode. The fact that WiFi is initialising is shown by an orange WiFi icon on the screen’s top bar. -
Page 34: Bluetooth
This is immediately below the Bluetooth setting and is only enabled when the Bluetooth setting is turned on. When “Pair” is enabled, the D5 RIID will enter Bluetooth pairing mode for a period of two minutes. This two minute period is shown by a countdown below the setting. -
Page 35: Remote Mode
If Bluetooth is turned on, a white Bluetooth icon will be shown in the top bar. If the device has entered Bluetooth pairing mode, then a purple Bluetooth icon will be shown in the top bar. If Bluetooth connection is successful, then the Bluetooth icon will be blue. -
Page 36: Radionuclide Library
If Search Mode ID is not enabled, then the device will be operating in Search Mode without ID. If Search Mode ID is enabled, then the device will be operating in Search Mode with ID. 9.8. Radionuclide Library Navigating to the Radionuclide Library setting allows the user to access the isotope library. -
Page 37: Confirmation Period
If an isotope is disabled, then the device will not be detected by the D5 RIID in either Search Mode or Confirmation Mode. Doing this will not disable the whole isotope category and will just disable the identification of the specific isotope. -
Page 38: Completion Tone
“select” that duration. A grey check mark indicates the currently selected confirmation scan duration. In the example above, a 30 second duration is chosen, meaning that the D5 RIID will complete a 30 second scan when in confirmation mode. -
Page 39: Alarm Test
9.12. Alarm Test Navigating to the alarm test setting allows for an alarm test to take place. Turning this setting on will sound the alarm as the settings dictate, whether that be audio only, vibration only, both audio and vibration or silent mode. 9.13. -
Page 40: Silent Mode
9.14. Silent Mode Silent mode can be enabled in the D5 Settings App, as described in Section 12. If this setting is enabled, then a user would be able to disable both the sounder and vibration at the same time, thus entering a truly silent mode. A bell icon with a line through it will show in the top bar to indicate that silent mode is enabled. -
Page 41: Snooze
The snooze setting allows a user to dictate the time between an alarm acknowledgement and the next time that the D5 RIID will recognise that same source. 9.17. Alarm Thresholds Navigating to the Alarm Thresholds setting allows the user to change alarm thresholds, including for dose rate and background alarms. -
Page 42: Gamma Background Alarm Thresholds
9.17.2. Gamma Background Alarm Thresholds As background levels of radiation vary as time progresses, so too must the threshold above which an alarm would sound. A high gamma alarm is triggered when the count rate registered by the gamma-ray detector is assessed as being significant (above threshold;... -
Page 43: Neutron Background Alarm Thresholds
9.17.3. Neutron Background Alarm Thresholds As background levels of radiation vary as time progresses, so too must the threshold above which an alarm would sound. A high neutron alarm is triggered when the count rate registered by the neutron detector is assessed as being significant (above threshold;... -
Page 44: Gamma Cps
A new background scan of the radiation levels can be started by selecting restart gamma. 9.18. Gamma CPS Enabling this setting means that counts per second information will be shown on the Search Mode and Confirmation Mode screens. Enabling the setting will be shown as below. MAL-OPS-1026 v3... -
Page 45: Units
The Search and Confirmation Modes will appear as follows. 9.19. Units Units can be changed in settings. Sv/h or R/h can be chosen. 9.20. Brightness The screen brightness can be changed in the brightness setting. MAL-OPS-1026 v3... -
Page 46: Idle Timeout
Brightness can be set at any value between 20 and 100. Brightness cannot be set as 0, as this would make the screen unreadable. If the value is set at a level which is lower than the acceptable level, the numbers will appear red, and the user will not be able to select “OK”. -
Page 47: Set Date/Time
9.22. Set Date/Time The date and time can be set in the D5 RIID on device settings. Enabling the DST setting turns on daylight saving time. All other relevant date and time information can be set. 9.23. Location Settings A user can enable or disable both GPS and GLONASS using the location settings. -
Page 48: Date Format
Enabling the D5 RIID’s File Transfer mode in settings means that the device will essentially behave like a mass storage device. The D5 RIID can be connected to a PC or laptop via USB and will become discoverable by the PC, meaning that files can be easily extracted. -
Page 49: Aa Batteries First
The language for the D5 RIID can be changed in the device settings. An operator can choose between English and Polish. 9.30. Explosive Atmospheres The D5 RIID is not certified for use in explosive environments and has not been tested in accordance with UL 913. MAL-OPS-1026 v3... -
Page 50: Background
Background A user can choose to take a background scan or view the most recent background scan using the background function. This is accessed by pressing either the up or down navigation key when in Search Mode or Confirmation Mode. The setting should be navigated to using the up and down buttons and selected. -
Page 51: Localisation Mode
The alert “beep” which accompanies the localisation mode can be audible, vibrational or both. This can be set in the D5 RIID settings in the same way as described in Section 12. This means that, if both audio and vibration are enabled on the device, then the same alerts will accompany the localisation mode. - Page 52 information is displayed. This is indicated by the word “open”. The chosen device serial number will also be displayed at the top of the settings app screen. Clicking “disconnect” will close the device. When a device is connected, it will be shown in the main menu. MAL-OPS-1026 v3...
- Page 53 Clicking the information icon next to the open device panel will bring up information on the selected device. This includes the product, serial number, firmware version, bootloader version and model number. MAL-OPS-1026 v3...
-
Page 54: About The Settings App
12.2. About the Settings App Clicking the settings tab in the bottom left brings up information on the app, including the app version number. 12.3. Home Screen The home screen separates the settings into four separate categories. These are connectivity, display, alarms, and device. Clicking on any of these settings categories will bring up the settings associated with that category. -
Page 55: Connectivity
12.4. Connectivity MAL-OPS-1026 v3... -
Page 56: Wifi
12.4.1. WiFi In this section of the app, the user can turn WiFi on and off on the device. Expanding the “Show available networks” panel shows the possible networks that the attached D5 RIID can be connected to. MAL-OPS-1026 v3... -
Page 57: Bluetooth
A user can also choose to connect the device via DHCP and define the port. 12.4.2. Bluetooth In this section of the app, the user can enable and disable Bluetooth and pairing mode. Pairing mode cannot be enabled unless Bluetooth is turned on. Turning on Bluetooth or pairing mode will ensure that the device behaves as described in Section 9.5. -
Page 58: Display
In this section of the app, the user can set the device time including any offsets or daylight saving. Pressing “sync”, will ensure that the time and date shown on the computer are shown on the D5 RIID. Enabling daylight saving means that time is added accordingly. An offset can also be applied if required. -
Page 59: Units
12.5.3. Units In this section of the app, the user has a choice of units between Sv/h and R/h. 12.6. Alarms The alarms section of the D5 settings app is split into five sections - alerts, confirmation mode, search mode, radionuclide library, and thresholds. 12.6.1. -
Page 60: Confirmation Mode
ID and search mode with ID. 12.6.4. Radionuclide Library In this section of the app, the user can enable and disable the D5 RIID’s ability to identify specific isotopes. The isotopes cover the full D5 RIID library across four categories, including industrial, medical, NORM and special nuclear material. -
Page 61: Thresholds
Clicking the arrow next to the isotope category will show an expanded view of all available isotopes in that category. Each individual isotope can be enabled and disabled. 12.6.5. Thresholds In this section of the app, the user can make changes to the alarm thresholds. 12.6.5.1. -
Page 62: Neutron Background Alarm Thresholds
A k value of 5 is recommended to obtain the best balance between false alarm rate and sensitivity. It is recommended by Kromek that the values are maintained as shown below to achieve optimum algorithm performance. -
Page 63: Device
It is recommended by Kromek that the values are maintained as shown below to achieve optimum algorithm performance. 12.7. Device The device section of the D5 settings app is split into four sections. These are security, backup, mass deployment and maintainer settings. -
Page 64: Backup
This section of the app allows a user to update the firmware and compute module on the device. The devices should only be updated with firmware or compute module updates which are released by Kromek. Updating the firmware is done by clicking “open file” and selecting the correct .bin.signed file. -
Page 65: Remote Mode
As described in Section 9.6, remote mode can be used to take readings when the D5 RIID is at a distance from the operator. The D5 RIID should be connected to a laptop via USB or Bluetooth and remote mode should be enabled on the device, as shown in Section 9.6. - Page 66 A progress screen will be shown when the scan is in progress. When the scan is completed, the bar turns green. The data from the scan is shown below. MAL-OPS-1026 v3...
- Page 67 A user can copy the data associated with the scan, by clicking the “copy” button. This allows the user to paste the data, for example average dose rate, average neutron counts per second and average gamma counts per second, into a format like Microsoft Excel.
-
Page 68: D5 Explorer App
D5 Explorer App The D5 RIID must be connected to a laptop or computer via USB. When the app is open, it is important that the explorer app is the only application connecting to the D5 RIID via USB. Any other apps capable of communicating with the D5 RIID should be closed. -
Page 69: Fault Codes And On-Screen Messages
Fault Codes and On-Screen Messages 14.1. Detector Status Error Codes Description 0x01 Count or Spectrum Bin Overflow 0x02 Accumulation Timer Overflow 0x04 High Counts Below Software LLD 0x08 Temperature Reading Out of Specification 0x10 Temperature-Bias Feedback Out of Bounds 0x20 Bias Reading Out of Specification 0x40 No Counts Warning... - Page 70 The device has had software "Wrong installed on it not intended for this ID_WRONG_HARDWARE Hardware" model. Device may no longer be calibrated The device has had unauthorised "Unofficial ID_ILLEGAL_BUILD software installed on it. Device may Firmware" no longer be calibrated An internal hardware error has "Storage ID_STORAGE_DRIVER...
-
Page 71: User
14.2.3. User Message Details "Internal The internal battery is low. Plug in ID_INTERNAL_BATT_LOW Battery Low" a charger if possible The internal battery is empty. Plug "Internal ID_INTERNAL_BATT_CRIT in a charger to continue using the Battery Critical" device "External The replaceable batteries are low. ID_EXTERNAL_BATT_LOW Battery Low"... - Page 72 The internal mass storage is "SD Card performing a maintenance task. ID_SD_CARD_BUSY Storage Busy" Please try reopening the History screen. An unexpected message was received from the Nuclide ID ID_FAILED "ID Failed" engine "Screenshot A screenshot was saved and is ID_SCREENSHOT Taken"...
-
Page 73: Radioisotope Library
Radioisotope Library Americium-241 Barium-133 Caesium-137 Cobalt-57 Cobalt-60 Europium-152 Fluorine-18 Gallium-67 Iodine-123 Iodine-131 Iridium-192 Lutetium-177 Lutetium-177m Molybdenum-99 Neptunium-237 Plutonium-239 Plutonium Plutonium reactor grade (RGPu) weapons grade (WGPu) Potassium-40 Radium-226 Sodium-22 Technetium-99m Thallium-201 Thorium-232 Uranium-235 Uranium-238 Uranium - depleted Uranium – highly enriched Yttrium-88 MAL-OPS-1026 v3... -
Page 74: Specification
Specification Detector type CLLBC - Gamma and Neutron detection Detector Size 1.5” diameter x 1.5” long Gamma Energy Range 30 keV to 3 MeV Dose Accuracy ± 10% for Cs137 Maximum Dose Rate 100mSv/h Gamma Resolution Typically 3.5% @ 662 keV Area Efficiency* 1.62 relative to a 2”... - Page 75 MAL-OPS-1026 v3...
- Page 76 | info@kromek.com | +44 (0) 1740 626060 Kromek Group plc, NETPark, County Durham, TS21 3FD, United Kingdom...
Need help?
Do you have a question about the D5 RIID and is the answer not in the manual?
Questions and answers