
Related Manuals for Black & Decker BDUR1


Summary of Contents for Black & Decker BDUR1
- Page 1 INSTRUCTION MANUAL Powerful Upright Vacuum BDUR1 Please read before returning this product for any reason.
-
Page 2: Table Of Contents
3 - 4 Safety 5 - 6 Product Overview 7 - 10 Getting Started 11 - 12 Using Your BDUR1 Storing Your BDUR1 14 - 19 Maintenance Troubleshooting Warranty Please keep this manual for later maintenance of the vacuum and for contacting us. - Page 3 DO NOT operate the appliance with a damaged cord or plug. If the supply cord is damaged, it must be replaced by the manufacturer, its service agent or similarly qualified persons in order to avoid a hazard. DO NOT attempt to modify this product in any way. BDUR1-IB-V1...
-
Page 4: Questions? Contact Customer Service
SAFETY FCC Information 1: This device complies with Part 15 of the FCC Rules. Operation is subject to the following two conditions: (1) This device may not cause harmful interference, and (2) This device must accept any interference received, including interference that may cause undesired operation. -
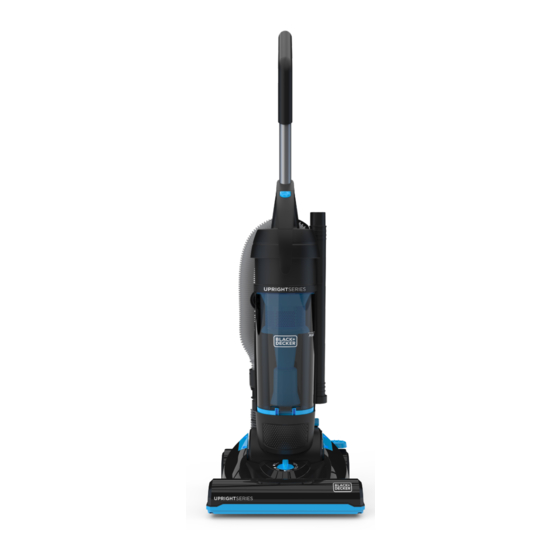
Page 5: Product Overview
PRODUCT OVERVIEW 1 : Handle Assembly 5: Vacuum Tilt Release Pedal 9: Main Hose 13: Top Cord Wrap 2: Dustbin Canister Release 6: Floor Brush Height 10: Crevice Tool 14: Bottom Cord Wrap 3: Dustbin Cover Assembly Adjustment Knob 11: Extension Wand 15: Carry Handle 4: Dustbin 7: Power On/Off Pedal... - Page 6 PRODUCT OVERVIEW 1 : Filter Housing Release 3: Foam Filter Dustbin Canister Release 2: HEPA Filter 4: Dustbin Cover Assembly...
- Page 7 GETTING STARTED SCAN THE QR CODE Scan QR for Setup and Maintenance Videos and to purchase spare parts. Scan for BDUR1 Instructions and Spare Parts...
-
Page 8: Getting Started
GETTING STARTED ASSEMBLY INSTRUCTIONS HANDLE ASSEMBLY Press the Dustbin Canister Release and pull out to release. Insert the handle post into the top of the vacuum. Ensure the screw hole is facing toward the front of the vacuum. Insert the assembly screw (included) and tighten with a philips screwdriver (not included). - Page 9 GETTING STARTED Attach Dustbin Canister onto the vacuum and push back until the Canister Release clicks into place as shown below. USING THE ATTACHMENTS Your vacuum includes a Brush Tool, Crevice Tool, and Extension wand. Each tool attaches to the Hose Adapter and can be used with or without the extension wand.
- Page 10 GETTING STARTED TOOL STORAGE Store the tools as shown (below) when not in use. The Crevice Tool stores inside the extension wand as shown. Crevice Tool Brush Tool Extension Wand...
-
Page 11: Using Your Bdur1
USING YOUR BDUR2 Plug Power Cord into a polarized outlet. Tap the Power Pedal once to Turn Vacuum ON. - Page 12 USING YOUR BDUR2 Tap the Vacuum Tilt release pedal to unlock the vacuum from the upright position. Height Adjustment: Adjustable height control allows you to change the height of the floor brush depending on your floor type. When vacuuming on thick carpet, adjust toward the Tall Carpet setting.
-
Page 13: Storing Your Bdur1
STORING YOUR BDUR2 Press the Power Trigger once to Turn Vacuum OFF. Loop the power cord around the bottom and top cord wrap brackets. Clip the molded plug to the power cord to secure. WARNING: To avoid injury, turn vacuum OFF and unplug cord from wall when not in use. -
Page 14: Maintenance
MAINTENANCE CLEANING DUSTBIN AND FILTERS NOTE: Empty your dustbin and clean filters regularly to ensure optimal performance. WARNING - Always turn off and unplug vacuum cleaner before performing maintenance to the vacuum cleaner. Failure to do so could result in electrical shock or personal injury. Turn Vacuum OFF. - Page 15 MAINTENANCE Lift the Filter Housing Release to gain access to the HEPA and foam filters. Remove the HEPA and foam filter, tap to dislodge fine dust and then rinse under cold water as needed for a deeper clean Allow to FULLY dry (24hrs recommended) before re-assembling.
- Page 16 MAINTENANCE Attach Dustbin Canister onto the vacuum and push back until the Canister Release clicks into place as shown below. NOTE: To maintain suction and cleaning performance, check the hose and filters regularly and ensure they are not clogged. CAUTION: Never operate your vacuum cleaner without the filter in place. Doing so may damage the motor and void the warranty.
- Page 17 MAINTENANCE CLEANING THE FLOOR BRUSH WARNING - Always turn off and unplug vacuum cleaner before performing maintenance to the vacuum cleaner. Failure to do so could result in electrical shock or personal injury. REMOVING THE BRUSH BAR ROLLER Remove the five screws that hold the brush roller base plate in place as shown.
- Page 18 MAINTENANCE Remove the brush bar roller from the belt assembly by pulling the belt towards you and sliding the brush bar out. Remove all debris from the brush bar roller. Reinstall the brush bar roller by inserting the left side of the roller through the belt and into the roller guides.
- Page 19 MAINTENANCE Slide the right side of the brush bar roller into the guides as shown. Replace the brush bar roller base plate as shown. Replace the screws that hold the brush roller base plate in place as shown.
-
Page 20: Troubleshooting
TROUBLESHOOTING Review this table to find do-it-yourself solutions for minor performance problems. Any other serivce needed should be performed by other qualified service agent. WARNING: Always turn off and unplug vacuum before performing maintenance to the appliance. Failure to do so could result in electrical shock or perosonal injury. -
Page 21: Warranty
WARRANTY The One (1) Year Limited Warranty applies to purchases made from authorized retailers of Silver Point Innovations LLC. Warranty coverage applies to the original owner and to the original product only and is not transferable. We recommend registering your product online at www.blackanddecker.com SilverPoint warrants this product to be free from defects in workmanship and materials, under normal household use and conditions, one (1) year from the date of original purchase and maintained according to the requirements out- lined in this User Manual.
Need help?
Do you have a question about the BDUR1 and is the answer not in the manual?
Questions and answers
VacuumBDUR1 handle/wand replacement parts