
Related Manuals for Cytron Technologies SHIELD-ESP-WIFI


Summary of Contents for Cytron Technologies SHIELD-ESP-WIFI
- Page 1 ROBOT . HEAD to TOE Product User’s Manual – ESPWiFi Shield ESPWiFi Shield SHIELD-ESP-WIFI User's Manual V1.0 Nov 2015 Created by Cytron Technologies Sdn. Bhd. – All Right Reserved...
-
Page 2: Table Of Contents
ROBOT . HEAD to TOE Product User’s Manual – ESPWiFi Shield Index Introduction Packing List Board or Product Layout Dimension UART/Serial Communication Hardware Installation Getting Started Warranty Created by Cytron Technologies Sdn. Bhd. – All Right Reserved... -
Page 3: Introduction
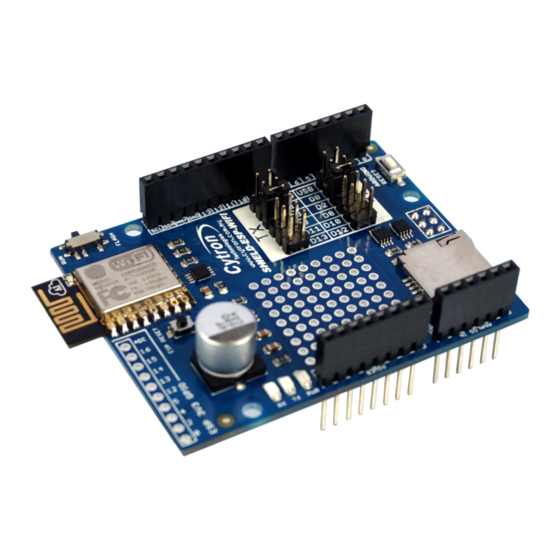
ESP8266 3V3 GPIO pin breakout (including 9 digital I/O pins and 1 analog input pin) ● Prototyping area ● 1 MicroSD card slot. ● Arduino Reset and ESP8266 Module Reset button. ● Created by Cytron Technologies Sdn. Bhd. – All Right Reserved... -
Page 4: Packing List
Please check the parts and components according to the packing lists. If there are any parts missing, please contact us at sales@cytron.com.my immediately. 1. 1 x ESPWiFi Shield 2. 2 x mini jumper Created by Cytron Technologies Sdn. Bhd. – All Right Reserved... -
Page 5: Board Or Product Layout
User may select D0, D2, D8, D10 and D12 as the RX pin from Arduino main board with the mini jumper. 5. TX Pin Selector User may select D1, D3, D9, D11 and D13 as the TX pin from Arduino main board with the mini jumper. Created by Cytron Technologies Sdn. Bhd. – All Right Reserved... - Page 6 12. TX Indicator LED TX LED as indicator for TX signal from ESP8266. 13. RX Indicator LED RX LED as indicator for RX signal from ESP8266. Created by Cytron Technologies Sdn. Bhd. – All Right Reserved...
-
Page 7: Dimension
ROBOT . HEAD to TOE Product User’s Manual – ESPWiFi Shield 4.0 DIMENSION Created by Cytron Technologies Sdn. Bhd. – All Right Reserved... -
Page 8: Uart/Serial Communication
UART software such as Arduino Serial Monitor, Hyperterminal, RealTerm etc. Only applicable if no SPI communication is used because SPI pinouts uses D10-D13 in Arduino Uno. MicroSD card cannot be used as well in this case. Created by Cytron Technologies Sdn. Bhd. – All Right Reserved... -
Page 9: Hardware Installation
TX and RX pins for the communication. We recommend user to use software serial (D3-TX, D2-RX) instead of hardware serial. 3. Stack ESPWiFi Shield on Arduino Uno. Ensure that the pins alignment is correct. Created by Cytron Technologies Sdn. Bhd. – All Right Reserved... -
Page 10: Getting Started
8. Figure below shows sending “AT” using Arduino Serial Monitor. If the result returns “OK”, it means you have successfully communicate with the ESP8266 module on ESPWiFi Shield, AT test is successful. User can also try out other AT commands like AT+GMR, etc. Created by Cytron Technologies Sdn. Bhd. – All Right Reserved... - Page 11 1. Stack ESPWiFi Shield onto compatible Arduino Board. For this example, Arduino Uno is used. 2. Select D2 for RX and D3 for TX pin. 3. Make sure the slide switch is switched to RUN mode. Created by Cytron Technologies Sdn. Bhd. – All Right Reserved...
- Page 12 11. Open Arduino Serial Monitor to view the progress. Setup to 9600 baud. 12. Observe the IP Address shown in Serial monitor. Enter the IP Address using any web browsers (Google Chrome, Mozilla Firefox, etc.) Created by Cytron Technologies Sdn. Bhd. – All Right Reserved...
- Page 13 Product User’s Manual – ESPWiFi Shield 13. If the webpage returns what have shown in the following figure, the program is working. For the example here, IP address shown in Serial monitor is 192.168.1.242. Created by Cytron Technologies Sdn. Bhd. – All Right Reserved...
-
Page 14: Warranty
No. 16, Jalan Industri Ringan Permatang Tinggi 2, Kawasan Industri Ringan Permatang Tinggi, 14100 Simpang Ampat, Penang, Malaysia. Tel: +604 - 504 1878 Fax: +604 - 504 0138 URL: www.cytron.com.my Email: support@cytron.com.my sales@cytron.com.my Created by Cytron Technologies Sdn. Bhd. – All Right Reserved...
Need help?
Do you have a question about the SHIELD-ESP-WIFI and is the answer not in the manual?
Questions and answers