Table of Contents
Advertisement
Available languages
Available languages
Quick Links
Advertisement
Chapters
Table of Contents

Related Manuals for Heat Decor HD-T02


Summary of Contents for Heat Decor HD-T02
- Page 1 Termostat HD-T02 Instrukcja obsługi / User manual...
-
Page 2: Table Of Contents
Spis treści Opis termostatu HD-T02 Parametry techniczne Przygotowanie do instalacji Instalacja czujnika Air Sensor Instalacja czujnika Light Switch Sensor Instalacja termostatu Ekran termostatu Ikony na ekranie termostatu Sterowanie przyciskami Tygodniowy cykl ogrzewania Ustawienia zaawansowane Zgodność z przepisami... -
Page 3: Opis Termostatu Hd-T02
Opis termostatu HD-T02 Programowalny termostat elektroniczny przeznaczony do sterowania elektrycznymi urządzeniami grzewczymi. Termostat HD-T02 może być instalowany wyłącznie w środku budyn- ku, wewnątrz lub poza kontrolowanym pomieszczeniem suchym. W przypadku pomieszczeń wilgotnych musi być instalowany poza nimi ze względów bezpieczeństwa. Aby umieścić termostat poza kontrolowa- nym pomieszczeniem, niezbędny jest dodatkowy zewnętrzny czujnik... -
Page 4: Parametry Techniczne
Parametry techniczne Dokłdność ± 0,5°C Histerez 0,5°C – 5°C Klibrcj wewn. czujnik powietrz -9°C – 9°C Zkres tempertury podłogi 5°C – 60°C Zakres temperatury pomieszczeni 5°C – 95°C Mksymalne obciżenie 16 A Zsilanie 230 V Stopień ochrony IP IP20 Wymiary panelu przedniego 86 x 86 x 15 mm Zpmiętywnie ustwień... -
Page 5: Przygotowanie Do Instalacji
Przygotowanie do instalacji Na zewnątrz pomieszczenia Wewnątrz pomieszczenia (np. wilgotne) 1. Termostat 4. Zewnętrzny czujnik tempera- tury podłogi 2. Puszka podtynkowa 5. Peszel ochronny 3. Zewnętrzny czujnik tempera- tury powietrza... -
Page 6: Instalacja Czujnika Air Sensor
Instalacja czujnika Air Sensor 1. Montaż w puszce instalacyjnej: 2. Wywierć otwór w deklu Przygotuj puszkę podtynkową wiertłem o średnicy Ø 5 mm. z deklem. 3. Wprowadź peszel ochronny 4. Wprowadź czujnik Air Sensor do puszki. do puszki. 5. Wprowadź koniec czujnika do 6. -
Page 7: Instalacja Czujnika Light Switch Sensor
Instalacja czujnika Light Switch Sensor 1. Montaż w ramce włącznika 2. Wywierć w ramce otwór na głów- światła: Doprowadź do puszki kę czujnika temperatury HD-LSS z włącznikiem światła przewód wiertłem o średnicy Ø 5 mm. elektryczny OMY 2 x 0,5 mm do czujnika Light Switch Sensor (HD-LSS). - Page 8 Instalacja czujnika Light Switch Sensor 5. Zainstaluj włącznik światła i wpro- 6. Załóż ramkę wpasowując główkę wadź czujnik temperatury HD-LSS czujnika w przygotowany otwór. przez przygotowany otwór. UWAGA: główka czujnika nie po- winna znacząco wychodzić poza obrys ramki.
-
Page 9: Instalacja Termostatu
Instalacja termostatu 1. Instalację wykonuj na wyłączonym zasilaniu z rozdzielni elektrycznej. 2. Oddziel przedni panel (wyświetlacz) od płyty montażowej przesuwa- jąc ją lekko w dół i odłącz złącze wielopinowe. 3. Podłącz przewody jak na schemacie poniżej. 4. Zamontuj płytę montażową w puszce instalacyjnej za pomocą śru- bokrętu. - Page 10 Instalacja termostatu Termostat powinien być zainstalowany przez doświadczonego elektryka z aktualnymi uprawnieniami SEP. UWAGI: Przy pierwszym uruchomieniu termostatu i systemu grzewcze- go dokładnie sprawdź ustawienia fabryczne termostatu. Dopasuj usta- wienia termostatu do wykonywanej instalacji ogrzewania. W przypadku wykonywania ogrzewania podłogowego ustaw kontrolę temperatury na dwa czujniki w trybie AL1 lub AL2 (Tabela „Ustawienia zaawansowane”, kod: 2sen).
-
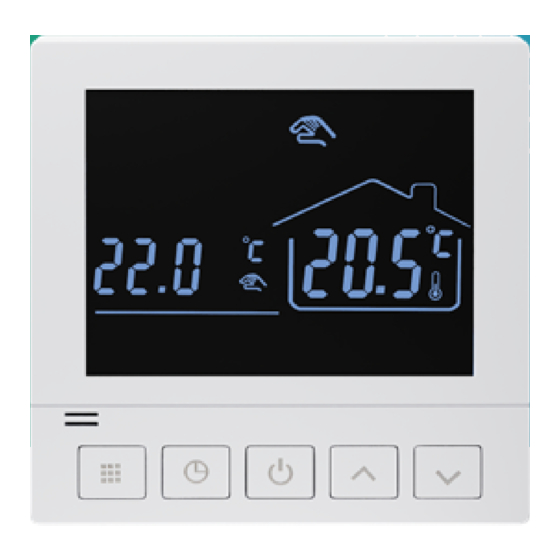
Page 11: Ekran Termostatu
Ekran termostatu Tryb programu Okres Tryb programowania manualny Ochrona przed zamarzaniem Ustawiona Oznaczenie temperatura Zegar grzania Dzień Temperatura pokoju tygodnia Blokada... -
Page 12: Ikony Na Ekranie Termostatu
Ikony na ekranie termostatu Tryb manualny: sterowanie urządzeniem ręcznie. Tryb programowalny: urządzenie może być sterowane automa- tycznie przez ustawienie czasu i temperatury (z sześcioma różny- mi okresami i powiązaną temperaturą), patrz poniżej: 、 Jednoczesne wyświetlanie: w trybie programowalnym, naci- śnij „ ”... -
Page 13: Sterowanie Przyciskami
Sterowanie przyciskami Zasilanie: włączanie/wyłączanie przez krótkie naciśnięcie. Tryb: krótkie naciśnięcie dla manualnego sterowania i programo- walnego trybu. Zegar: krótkie naciśnięcie dla ustawienia czasu: ustawienie minut ustawienie godziny ustawienie dnia tygodnia. Naciśnij „ ” dla następnego parametru, migotanie oznacza aktywny parametr, naciśnij „ ” lub „ ”, aby zmienić ustawienie. Po 10 sekun- dach dane zostaną... -
Page 14: Tygodniowy Cykl Ogrzewania
Tygodniowy cykl ogrzewania Program tygodniowy: W trybie włączonego wyświetlacza naciśnij i przytrzymaj „ ” i „ ” przez 5 sekund; Wciśnij „ ” lub „ ” aby zmienić wartość parametru, a następnie naciśnij „ ” aby przejść do następnego parametru. Sekwencja ustawień jak poniżej: Czas (Okres 1 pon.-pt.) Temp. - Page 15 Zmiana ustawień zaawansowanych Aby wejść w tryb ustawień zaawansowanych, na wyłączonym wyświe- tlaczu naciśnij i przytrzymaj jednocześnie “ ” i “ ” przez 5 sekund. Na ekranie pojawi się pierwszy parametr z listy ustawień zaawanso- wanych “1Adj”. Następnie naciśnij “ ”...
-
Page 16: Ustawienia Zaawansowane
Ustawienia zaawansowane Domyślne Opis opcji ustawienie Szczegóły Kalibracja czujnika 1Adj -9 – 9°C powietrza IN: czujnik wewnętrzny (kontrola i ograniczenie temperatury) OUT: czujnik zewnętrzny NTC (kontrola i ogranicze- Kontrola tempera- nie temperatury) 2Sen AL1: wbudowany czujnik tury - typ czujnika temperatury powietrza + czujnik temperatury podłogi AL2: zewnętrzny czujnik... - Page 17 Ustawienia zaawansowane Domyślne Opis opcji ustawienie Szczegóły Zakres wł./wył. - 4dif 0,5 – 5°C histereza Tryb przeciwza- On: funkcja włączona 5Ltp marzaniowy Off: funkcja wyłączona Ograniczenie 6Hit maks. temp. 35 – 95°C powietrza Funkcja wykry- On: funkcja włączona 7OEN wania otwartego Off: funkcja wyłączona okna OWD Czas wykrywania...
- Page 18 Ustawienia zaawansowane Domyślne Opis opcji ustawienie Szczegóły Wykrycie spadku temp. i wyłączenia 9Otp ogrzewania Zakres: 2 – 4°C (w czasie wykry- wania) OWD Czas opóźnienia (powrót do po- 0Pdt Zakres: 10 – 60 min przedniego stanu roboczego) OWD Gdy widnieje „-” należy przy- Przywrócenie trzymać...
-
Page 19: Zgodność Z Przepisami
Zgodność z przepisami Urządzenie posiada certyfikat CE. Urządzenie jest zgodne z następującymi dyrektywami Unii Europejskiej: Dyrektywa 2014/30/EU w sprawie kompatybilności elektromagnetycznej; Dyrektywa niskonapięciowa 2014/35/EU. Urządzenie ma potwierdzone certyfikatem uprawnienie do oznaczania go znakiem bezpieczeństwa oznaczającym wyrób bezpieczny w użytkowaniu. Urządzenie jest zgodne z dyrektywą Parlamentu Europejskiego i Rady RoHS (Ograniczenie użycia substancji niebezpiecznych) (2011/65/WE). - Page 20 ży, o ile zużyty sprzęt jest tego samego rodzaju i pełnił te same funkcje, co sprzęt sprzedawany. Zużyty sprzęt sprzedawca przyjmuje pod adre- sem: Heat Decor sp. z o.o., ul. Gromadzka 54, 30-719 Kraków. Sprzedawca, dostarczając Klientowi sprzęt przeznaczony dla gospo-...
- Page 21 żaden z zewnętrznych wymiarów nie przekracza 25 cm, bez konieczności zakupu nowego sprzętu przeznaczonego dla gospodarstw domowych. Zużyty sprzęt sprzedawca przyjmuje pod ad- resem: Heat Decor sp. z o.o., ul. Gromadzka 54, 30-719 Kraków.
- Page 22 Table of contents HD-T02 thermostat description Technical specification Preparation for installation Air Sensor installation Light Switch Sensor installation Thermostat installation Thermostat display Icons on the thermostat display Control using buttons Weekly heating schedule Advanced settings Compliance with regulations...
-
Page 23: Hd-T02 Thermostat Description
A programmable electronic thermostat designed for controlling electric heating devices. The HD-T02 thermostat can only be installed inside a building, either inside or outside a controlled dry room. In the case of humid rooms, it must be installed outside of them for safety reasons. To place the thermostat outside the controlled room, an additional external air tem- perature sensor is necessary. -
Page 24: Technical Specification
Technical specification Accuracy ± 0,5°C Histeresis 0,5°C – 5°C Internal air sensor calibration -9°C – 9°C Floor temperature range 5°C – 60°C Room temperature range 5°C – 95°C Maximum load 16 A Power supply 230 V IP Rating IP20 Front panel dimensions 86 x 86 x 15 mm Settings memory Weekly heating schedule... -
Page 25: Preparation For Installation
Preparation for installation Outside the room Inside the room (e.g. humid) 1. Thermostat 4. External floor temperature sensor 2. Installation box 5. Protective conduit 3. External air temperature sensor... -
Page 26: Air Sensor Installation
Air Sensor installation 1. In the installation box: Prepare 2. Drill a hole in the cover using the installation box with a cover. a Ø 5 mm drill bit. 3. Insert the protective conduit 4. Insert the Air Sensor into the into the box. -
Page 27: Light Switch Sensor Installation
Light Switch Sensor installation 1. Installation in the light switch 2. Drill a hole in the frame for the frame: lead an OMY 2 x 0.5 mm temperature sensor head of electrical wire to the light switch HD-LSS using an Ø 5 mm dia- box for the Light Switch Sensor meter drill bit. - Page 28 Light Switch Sensor installation 5. Install the light switch and in- 6. Attach the frame, ensuring that sert the HD-LSS temperature the sensor head fits into the pre- sensor through the prepared pared hole. CAUTION: the sen- hole. sor head should not significantly protrude beyond the outline of the frame.
-
Page 29: Thermostat Installation
Thermostat installation 1. Perform the installation with the power turned off. 2. Separate the front panel (display) from the mounting plate by gently sliding it downward and disconnect the multi-pin connector. 3. Connect the wires as shown in the diagram below. 4. - Page 30 Thermostat installation Thermostat installation The thermostat should be installed by an experienced electrician with appropriate qualifications. NOTES: Upon the initial start-up of the thermostat and heating system, thoroughly check the thermostat’ s factory settings. Adjust the thermo- stat settings to match the heating installation being performed. In the case of underfloor heating, set the temperature control to two sensors in AL1 or AL2 mode (Table “Advanced Settings”, code: 2sen).
-
Page 31: Thermostat Display
Thermostat display Programmable Programming Manual mode mode period Frost protection Heating temperature Clock indicator Day of Room the week Lock temperature... -
Page 32: Icons On The Thermostat Display
Icons on the thermostat display Manual mode: manual control of the device. Programmable mode: automatical control using temperature set- tings and time periods (six periods per day), see below: 、 Simultaneous display: in programmable mode, press “ ” and “ ” to switch the thermostat to manual mode. -
Page 33: Control Using Buttons
Control using buttons Power: on/off. Mode: short press for manual control and programmable mode. Clock: short press to set the time: set minutes set hours set day of the week. Press “ ” for the next parameter, blinking indicates the active parameter, press “ ” or “... -
Page 34: Weekly Heating Schedule
Weekly heating schedule Weekly schedule: to enter the weekly programming mode, press the clock “ ” and power “ ” buttons simultaneously for 5 seconds. Press the “ ” after setting all parameters and proceed to the next step using the up “... - Page 35 Advanced settings setup To enter the advanced settings mode, press and hold both the “ ” and “ ” simultaneously for 5 seconds while the display is turned off. The first parameter from the list of advanced settings, “1Adj”, will appear on the screen.
-
Page 36: Advanced Settings
Advanced settings Code Function Default Description Air Sensor 1Adj -9 – 9°C calibration IN: internal sensor (temper- ature control and limiting) OUT: external NTC sensor (temperature control and limiting) Temperature 2Sen control - sensor AL1: built-in air temperature type sensor + floor temperature sensor AL2: external air tempera- ture sensor + floor tempera-... - Page 37 Advanced settings Code Function Default Description 4dif Hysteresis 0,5 – 5°C On: mode active 5Ltp Anti-freeze mode Off: mode deactivated Limitation of max. 6Hit 35 – 95°C air temperature Open Window On: function active 7OEN Detection (OWD) Off: function deactivated function Open Window 8Otl...
- Page 38 Advanced settings Advanced settings Code Function Default Description Detection of temperature 9Otp drop and heating Range: 2 – 4°C shutdown during OWD detection Delay time (return to previous opera- 0Pdt Range: 10 – 60 min ting state) during When you see “-”, hold down “...
-
Page 39: Compliance With Regulations
Compliance with regulations Compliance with regulations The device is CE certified. The device complies with the following European Union directives: Directive 2014/30/EU on electromag- netic compatibility; Low Voltage Directive 2014/35/EU. The device has been certified with the safety mark indicating it is safe for use. - Page 40 The seller accepts the used equipment at the following address: Heat Decor sp. z o.o., ul. Gromadzka 54, 30-719 Kraków, Poland. The seller in Poland, when delivering equipment intended for house-...
- Page 41 25 cm, without the obligation to purchase new equipment intended for house- holds. The seller accepts the used equipment at the following address: Heat Decor sp. z o.o., ul. Gromadzka 54, 30-719 Kraków.
- Page 42 Poznaj nasze wideoporadniki i odkryj najnowsze innowacje Watch our video tutorials and discover the latest innovations Pozostańmy w kontakcie Let’s stay in touch Heat Decor sp. z o.o. +48 123 576 134 heatdecor.com...
Need help?
Do you have a question about the HD-T02 and is the answer not in the manual?
Questions and answers