Advertisement
Quick Links
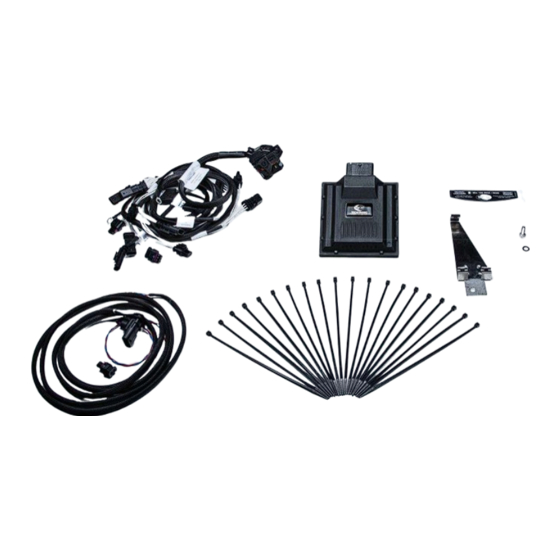
ASSEMBLY INSTRUCTIONS
TECHART Power-Kit 09Y / T1 / T1.1 / S1.1 / T1.3tauchen
Part-no. 09Y.300.640.009
Part-no. 09Y.300.750.009
Part-no. 09Y.300.630.009
Part-no. 09Y.300.690.009
for Cayenne Turbo E3 as of MY18
for Cayenne Turbo S E-Hybrid E3 as of MY19
for Cayenne GTS E3 as of MY20
for Cayenne Turbo GT E3 as of MY22
Assembly instructions 09Y.300.640.099
Version 06 – 03/2022
Advertisement

Related Manuals for Techart 09Y.300.640.009


Summary of Contents for Techart 09Y.300.640.009
- Page 1 ASSEMBLY INSTRUCTIONS TECHART Power-Kit 09Y / T1 / T1.1 / S1.1 / T1.3tauchen Part-no. 09Y.300.640.009 for Cayenne Turbo E3 as of MY18 Part-no. 09Y.300.750.009 for Cayenne Turbo S E-Hybrid E3 as of MY19 Part-no. 09Y.300.630.009 for Cayenne GTS E3 as of MY20 Part-no.
-
Page 2: Table Of Contents
ASSEMBLY INSTRUCTIONS TECHART Power-Kit 09Y / T1 / T1.1 / S1.1 Content Important safety information ........................3 Preparation ..............................4 III. Installation ..............................6 Prepare vehicle ..........................6 Dismantle original parts ........................7 TECHART CAN wiring harness ......................9 TECHART Plug & Play wiring harness ................... 14 Function check .......................... -
Page 3: Important Safety Information
ASSEMBLY INSTRUCTIONS TECHART Power-Kit 09Y / T1 / T1.1 / S1.1 Important safety information All of the necessary work must be performed by qualified persons with an appropriate level of expertise. Vehicle lifts with an insufficient lifting capacity can collapse under the weight of the vehicle and crush any persons standing underneath. -
Page 4: Preparation
ASSEMBLY INSTRUCTIONS TECHART Power-Kit 09Y / T1 / T1.1 / S1.1 I. Preparation Number of people required At least two people are required to install this product. Help and support If you have any technical queries, please contact us immediately: support@techart.de... - Page 5 ASSEMBLY INSTRUCTIONS TECHART Power-Kit 09Y / T1 / T1.1 / S1.1 Please use the table to check whether all of the required parts are present. Once parts have been removed from their original packaging, ensure that they are properly handled and stored.
-
Page 6: Installation
ASSEMBLY INSTRUCTIONS TECHART Power-Kit 09Y / T1 / T1.1 / S1.1 II. Installation 1. Prepare vehicle Before starting to work, check that the vehicle is free of defects. Use the PIWIS system tester to read out all of the fault memories of the individual vehicle components and first rectify any faults displayed. -
Page 7: Dismantle Original Parts
ASSEMBLY INSTRUCTIONS TECHART Power-Kit 09Y / T1 / T1.1 / S1.1 2. Dismantle original parts 1. Set the vehicle on a service lift. (turn off the level regulation) 2. On Hybrid vehicles, de-energize the Hybrid system according to the manufacturer’s instructions. - Page 8 ASSEMBLY INSTRUCTIONS TECHART Power-Kit 09Y / T1 / T1.1 / S1.1 8. Dismantle the engine compartment cover entirely. Fig. 03 9. Dismantle the door entry guards entirely. Fig.04 10. Remove the A-pillar panel and unplug the green compact plug. Fig. 05 TECHART Version 06 dated March 28, 2022 Assembly Instructions 09Y.300.640.099...
-
Page 9: Techart Can Wiring Harness
ASSEMBLY INSTRUCTIONS TECHART Power-Kit 09Y / T1 / T1.1 / S1.1 3. TECHART CAN wiring harness 1. The TECHART PIN-Set Cayenne 071.300.100.200-02 will be pinned into the green compact plug. For this remove the lock (violet) at the green plug. - Page 10 ASSEMBLY INSTRUCTIONS TECHART Power-Kit 09Y / T1 / T1.1 / S1.1 8. Wiring diagram Bushing R Pin P Fig. 07 Bushing O Fig. 07 TECHART Version 06 dated March 28, 2022 Assembly Instructions 09Y.300.640.099 Page 10 of 24...
- Page 11 ASSEMBLY INSTRUCTIONS TECHART Power-Kit 09Y / T1 / T1.1 / S1.1 9. Create a breakthrough (Ø = 5mm) at the dismantled rubber stop. Fig. 08 10. Route the TECHART wiring harness through the A-pillar and through the breakthrough at the rubber stop from the inside to the outside.
- Page 12 ASSEMBLY INSTRUCTIONS TECHART Power-Kit 09Y / T1 / T1.1 / S1.1 11. Route the TECHART wiring harness into the wheel house. Fig. 10 12. Route the TECHART wiring harness parallel to the original wiring harness up to the engine control unit (DME) and fix it with cable ties.
- Page 13 ASSEMBLY INSTRUCTIONS TECHART Power-Kit 09Y / T1 / T1.1 / S1.1 13. Pin both cable endings into the 3-pole plug. Pin 1 = blue Pin 2 = red Fig. 12 TECHART Version 06 dated March 28, 2022 Assembly Instructions 09Y.300.640.099...
-
Page 14: Techart Plug & Play Wiring Harness
ASSEMBLY INSTRUCTIONS TECHART Power-Kit 09Y / T1 / T1.1 / S1.1 4. TECHART Plug & Play wiring harness 1. Install the Plug & Play wiring harness. Fig. 13 2. Route the TECHART wiring harness starting with the big compact plug from the front left along the engine’s front... - Page 15 ASSEMBLY INSTRUCTIONS TECHART Power-Kit 09Y / T1 / T1.1 / S1.1 3. Remove the compact plug of the boost pressure in front of the throttle and insert it at the TECHART wiring harness into the mating plug, which is marked with “boost pressure in front of throttle valve”.
- Page 16 ASSEMBLY INSTRUCTIONS TECHART Power-Kit 09Y / T1 / T1.1 / S1.1 4. Remove the compact plug of the boost pressure sensor after the throttle and insert it at the TECHART wiring harness into the mating plug, which is marked with “boost pressure behind throttle valve”.
- Page 17 ASSEMBLY INSTRUCTIONS TECHART Power-Kit 09Y / T1 / T1.1 / S1.1 5. Remove the compact plug of the rail pressure sensor and insert it at the TECHART wiring harness into the mating plug, which is marked with “rail pressure”. Then attach the compact plug “rail pressure”...
- Page 18 ASSEMBLY INSTRUCTIONS TECHART Power-Kit 09Y / T1 / T1.1 / S1.1 6. On bank 2 work according to point 3 to 5. In front of throttle valve Fig. 20 Behind throttle valve Fig. 21 Rail pressure Fig. 22 TECHART Version 06 dated March 28, 2022 Assembly Instructions 09Y.300.640.099...
- Page 19 ASSEMBLY INSTRUCTIONS TECHART Power-Kit 09Y / T1 / T1.1 / S1.1 7. Mount the positive-cable with the fuse holder to the positive-distributor. From there route it to the Techtronic and insert into the 3-pole plug, Pin 3. Fig. 23 Fig. 24 TECHART Version 06 dated March 28, 2022 Assembly Instructions 09Y.300.640.099...
- Page 20 ASSEMBLY INSTRUCTIONS TECHART Power-Kit 09Y / T1 / T1.1 / S1.1 8. Fasten the TECHART Techtronic module with the supplied bracket as shown in fig. 26 (1). Fig. 25 9. Attach the ground cable to the connection of the engine control unit bracket.
- Page 21 ASSEMBLY INSTRUCTIONS TECHART Power-Kit 09Y / T1 / T1.1 / S1.1 11. Attach the supplied 100-Octane-decal to the fuel cap in exchange of the original octane decal. Fig. 28 TECHART Version 06 dated March 28, 2022 Assembly Instructions 09Y.300.640.099 Page 21 of 24...
-
Page 22: Function Check
ASSEMBLY INSTRUCTIONS TECHART Power-Kit 09Y / T1 / T1.1 / S1.1 5. Function check 1. Check if all components are carefully installed and reliable fastened. Fig. 29 2. Turn the ignition on. 3. With the different colors of the LEDs... - Page 23 ASSEMBLY INSTRUCTIONS TECHART Power-Kit 09Y / T1 / T1.1 / S1.1 Fig. 31 The activation of the power increase will be effected by the travel mode-switch at the steering wheel. If the sport-/sport plus mode is not chosen or the sport response button at the normal mode was not pressed then the engine will run with the standard power.
- Page 24 ASSEMBLY INSTRUCTIONS TECHART Power-Kit 09Y / T1 / T1.1 / S1.1 TECHART AUTOMOBILDESIGN GMBH RÖNTGENSTRASSE 47 71229 LEONBERG / GERMANY TEL +49 7152 / 9339- 0 FAX +49 7152 / 9339-33 info@techart.de www.techart.de Subject to change at any time without prior notice.
Need help?
Do you have a question about the 09Y.300.640.009 and is the answer not in the manual?
Questions and answers