Table of Contents
Advertisement
Quick Links
Advertisement
Table of Contents

Subscribe to Our Youtube Channel
Related Manuals for horiba LAQUAtwin-F-11


Summary of Contents for horiba LAQUAtwin-F-11
- Page 1 Instruction Manual COMPACT Fluoride ion meter LAQUAtwin-F-11 CODE:GZ0000704975A...
- Page 2 HORIBA Advanced Techno Co., Ltd., any malfunctioning or damaged Product attributable to responsibility of HORIBA Advanced Techno Co., Ltd. for a period of two (2) years from the delivery. However, the warranty period of sensor is 6 months.
- Page 3 Company names and brand names are either registered trademarks or trademarks of the respective companies. (R), (TM) symbols may be omitted in this manual. Patent marking This product is protected under one or more of the patents found at the following address: http://www.horiba.com/patent...
- Page 4 Regulations EU and UK regulations Conformable standards This equipment conforms to the following standards: Warning: EMC: EN 61326-1 This product is not intended for use in industrial Class B, Portable test and measurement equipment environments. In an industrial environment, elec- RoHS: EN IEC 63000 tromagnetic environmental effects may cause the 9.
- Page 5 Contact your supplier for information on applicable disposal methods. Authorised representative in EU and UK HORIBA Europe GmbH Hans-Mess-Str.6, D-61440 Oberursel, Germany HORIBA UK Limited...
- Page 6 FCC rules Any changes or modifications not expressly approved by the party responsible for compliance shall void the user's authority to operate the equipment. Warning This equipment has been tested and found to comply with the limits for a Class A digital device, pursuant to part 15 of the FCC Rules.
- Page 7 China regurlation (Pb) (Hg) (Cd) (Cr (VI)) (PBB) (PBDE) SJ/T 11364 GB /T 26572 GB/T 26572 California regulations CR Coin Lithium Battery contains Perchlorate Material - special handling may apply. See http://www.dtsc.ca.gov/hazardouswaste/perchlorate...
- Page 8 For Your Safety Hazard classification and warning symbols Warning messages are described in the following manner. Read the messages and follow the instructions carefully. Hazard classification This indicates an imminently hazardous situation which, if not avoided, will result in death or DANGER serious injury.
- Page 9 Safety precautions WARNING THIS PRODUCT CONTAINS A BUTTON BATTERY If swallowed, a lithium button battery can cause severe or fatal injuries within 2 hours. Keep batteries out of reach of children. If you think batteries may have been swallowed or placed inside any part of the body, seek immediate medical attention.
- Page 10 CAUTION Incorrect use of batteries may cause leakage or bursting of the butteries and result in product damage or burn injury. • Connect the positive and negative terminals of the battery correctly. • Do not mix different battery types in the same device. •...
- Page 11 Handling precautions Meter and sensor The sensor is a consumable part. If it becomes damaged or its performance deteriorates, replace it with a new one (the sensor cannot be repaired). Do not swing the meter and sensor using a strap. ...
- Page 12 Do not measure samples such as the following, since they may damage the sensor or shorten its life. ・Organic solvents ・Oils ・Adhesives ・Cement ・Alcohols ・Surfactants ・Concentrated acid (0 pH to 2 pH) ・Concentrated alkaline (12 pH to 14 pH) If the sensor is damaged physically or chemically, stop using the sensor. ...
-
Page 13: Table Of Contents
Table of Contents Product Overview ..........1 Storage ............. 14 Components ..........1 Setup・Initialization ......... 15 Consumable parts sold separately ..... 2 Setup ............15 Part Names and Functions ........ 3 Initialization of calibration data ....17 Initialization of the settings ....... 18 Basic Handling ........... -
Page 14: Product Overview
The COMPACT F METER, LAQUAtwin-F-11 incorporates HORIBA Product Overview original flat sensor and enables accurate measurement of Fluoride ion (F ) concentrations from a single drop of a sample. 1.1 Components Parts name Quantity Parts name Quantity Sensor S060-F 1 ppm F... -
Page 15: Consumable Parts Sold Separately
1.2 Consumable parts sold separately Specifications Model Part No. Specifications Model Part No. 1 ppm F Standard solution Sensor S060-F 3200934450 514-F-1 3200991628 (6 bottles) 10 ppm F Standard solution 514-F-10 3200991630 Sampling sheet B (6 bottles) Y046 3200053858 (100 sheets) TISAB solution (6 bottles) 514-F-TISAB 3200991632... -
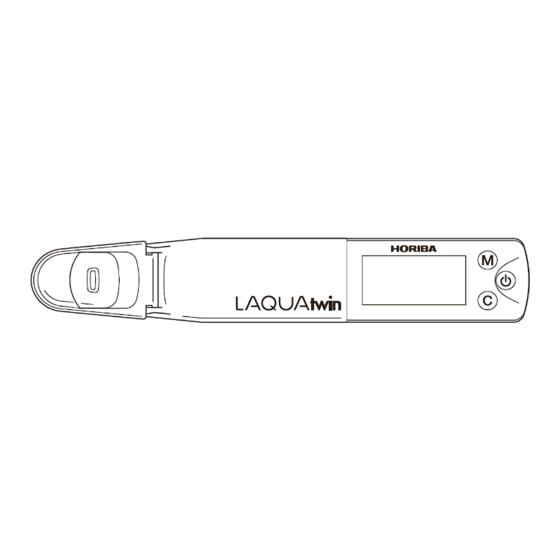
Page 16: Part Names And Functions
Part Names and Functions * It will not respond to the press if the button is pressed for a short time. Press buttons seconds or more unless otherwise specified. * ( ) are listed for reference at time of disposal. ON/OFF button Meter Sensor Strap eyelet... - Page 17 Battery alarm icon * Lights up when the batteries are low CAL icon and need to be changed. * Notifies that it is the Temperature alarm icon calibration screen. * Notifies that the temperature is outside the operating temperature range (5°C to 40°C). MEAS icon Stability icon *...
-
Page 18: Basic Handling
Basic Handling 3.1 Inserting batteries / sensor Inserting the batteries Inserting the sensor Gasket for waterproof Slide the sensor onto the meter so that catch the projection part on the back of the meter fits into the indentation part on the ②... -
Page 19: Power On / Off
。 3.2 Power ON / OFF Power ON Power OFF Press the ON/OFF button. Press the ON/OFF button. The power is turned ON, and The power is turned OFF. the meter type is displayed on the LCD. -
Page 20: Sensor Conditioning
3.3 Sensor conditioning Note Befor using the sensor for the first time or after several days of disuse, perform sensor conditioning. Perform calibration after sensor conditioning. Place some drops of 1 ppm standard solution to the measurement part of sensor. Wait 5 minutes before use. -
Page 21: Removing Sensor / Batteries
3.4 Removing sensor / batteries Turn off the meter and remove sensor / batteries. Removing sensor Removing batteries ① Lift the indentation part on Use a thin non-metallic the back of the sensor and stick or other tool to pry the the sensor a little away batteries out from the bat- from the meter. -
Page 22: Calibration
Calibration is required before measurement. Flow these steps to calibrate. Calibration A [Sample containing Fe , Al , Si or highly concentrated ions] B [Not contained] Sample containing Fe , Al , Si or highly concentrated ions. Recommend calibrating with 1:1 mixture of TISAB solution and standard solution. After adding TISAB solution up to the first scale (1 mL) with cup, add the standard solution up to the second scale (1 mL). - Page 23 Recommend calibrating 2 points for accurate measurement. Repeat steps 1 to 5 with the second standard solution. Use TISAB solution for the second calibration as well when use first calibration with it. ③ Press the CAL button to transi- ④ Press CAL button to ⑤...
-
Page 24: Measurement
Four methods of sample measurement are available. Measurement Although this product is waterproof, avoid immersing it completely. Drop Suitable for measurements The case of measuring sample containing Fe , Al , Si or highly with small sample volume. concentrated ions. Recommend measuring with a 1:1 mixture of TISAB solution and sample after cali- brate with a 1:1 mixture of TISAB solution and standard solution. - Page 25 Scooping Immersion Sampling sheet Suitable for measurements that scoop Suitable for measurements Suitable for measurements of a out a sample such as in the field. with large sample volume. minute samples as small as 100 μL. Open the sliding cap on the light Absorb the sample on a sampling Open the sliding cap on the light shield cover and immerse the...
-
Page 26: Maintenance・Storage
Cleaning the sensor promptly after measurement Maintenance・Storage will prevent deterioration of the sensor. 6.1 Maintenance Neither the meter nor sensor is waterproof by itself. The sensor must be securely mounted on the meter before use. Do not measure samples such as the following, since they may damage ... -
Page 27: Storage
6.2 Storage Store the meter and sensor in the case with the meter and sensor connected. Store in a non-condensing location with 5°C to 40°C and a relative humidity 85% or less. Do not leave the meter in areas of direct sunlight. ... -
Page 28: Setup・Initialization
The setup mode allows the operator to customize the meter to specific Setup・Initialization needs. To enter the setup mode, press and hold the MEAS and ON/ OFF buttons for over 3 seconds when the meter is switched OFF. 7.1 Setup ... - Page 29 AS (Auto Stable) The measurement value is fixed when it is stable. The fixed measurement value is released and the instantaneous Measurement mode setting value is displayed. AH (Auto Hold) The measurement value is always displayed as instanta- AS mode* (default) AH mode neous value.
-
Page 30: Initialization Of Calibration Data
7.2 Initialization of calibration data Calibration data is erased. The meter is reset to the factory default calibration setting value. ① Initialization of calibration data mode entry To enter the Initialization of calibration data mode, press and hold the CAL and ON/OFF buttons for over 3 seconds when the meter is switched OFF. -
Page 31: Initialization Of The Settings
7.3 Initialization of the settings All setup choices are erased. The meter is reset to the factory default values. ① Initialization of the settings mode entry To enter the initialization of the settings mode, press and hold the MEAS, CAL and ON/OFF buttons for over 3 seconds when the meter is switched OFF. -
Page 32: What To Do If
Check the cause of the issue and try the recommended action. If the What to do if... issue is still unresolved, replace the sensor or meter with a new one. 8.1 Calibration issue Issue Cause Recommended action There is a possibility that the sen- If there is too much variation from the previous calibration sor state has changed since the data, calibration may not e performed. -
Page 33: Measurement Issue
8.2 Measurement issue Issue Cause Recommended action Measurement value remains Measurement value remains fixed Press MEAS button and release the hold. the same on display. in AH measurement mode. Measuring outside the Measurement value shows Recommend diluting the sample and measure it if a high measurement range of the Or or Ur. -
Page 34: Other Issue
8.3 Other issue Issue Cause Recommended action Replace 2 batteries both with new ones at the same time. Dead batteries. No display on screen. [Page 8, Page 5] (Power is not turned on.) Batteries not in contact with metal Remove batteries [Page 8] and gently press the metal fit- Display disappears midway. - Page 35 Issue Cause Recommended action Initialize the meter [Page 18]. If initialization does not The internal IC in the meter may Er1, Er2 or Er3 is displayed. improve the issue, replace the meter with a new one (The be defective. meter cannot be repaired). The display item is performing cal- Err is displayed the Press MEAS button to change to the Ion concentration...
-
Page 36: Specifications
Specifications Model LAQUAtwin-F-11 Target Fluoride ion (F Minimum sample volume 0.3 mL or more (0.1 mL or more if sampling sheet is used.) Measurement range 0.1 to 990 [ppm or mg/L] Resolution 0.1 to 9.9 : 0.1, 10 to 99 : 1,... -
Page 37: Reference Information
Reference information Effect of interfering ions The ions which interfere the target ion measurement are called “interfering ion”. There is no interference with the operation of the electrode as long as Cl , Br , SO , HCO , NO , CH do not exist at a proportion of 1% or more. - Page 38 2 Miyanohigashi-cho, Kisshoin, Minami-ku, Kyoto, 601-8551, Japan http://www.horiba-adt.jp For any questions regarding this product, please contact your local agency, or inquire from the following website. http://global.horiba.com/contact_e/index.htm...
Need help?
Do you have a question about the LAQUAtwin-F-11 and is the answer not in the manual?
Questions and answers