Table of Contents
Advertisement
Quick Links
Advertisement
Table of Contents

Related Manuals for ALTA LABS S16-POE


Summary of Contents for ALTA LABS S16-POE
- Page 1 QUICK START GUIDE MODEL: S16-POE...
-
Page 2: Before You Begin
Before You Begin Download the Alta app on your mobile device, and create your free Alta account. You may also visit manage.alta.inc to manage your Alta devices. manage.alta.inc... -
Page 3: Package Contents
1 0 0 0 P o E + 1 0 / 1 0 0 O F F D O W N P o E L I N K S16-POE Rack Ears Rack Ear Screws Rackstud ™ (Qty. 2) (M4x8.5mm, Qty. 8) Studs (Qty. -
Page 4: Hardware Overview
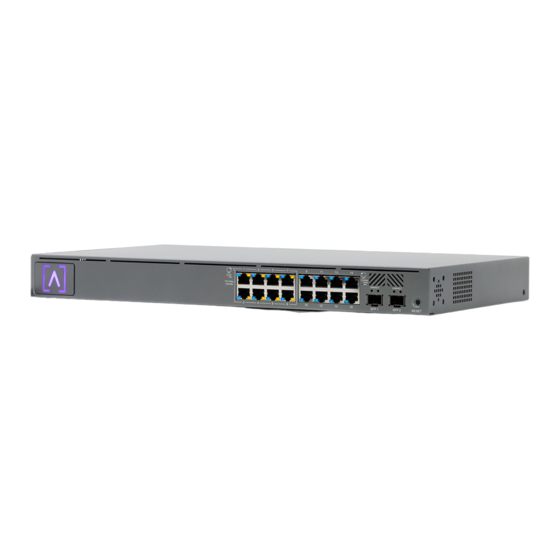
P o E L I N K Alta Labs LED The Alta Labs LED flashes as the unit is powered up. Once fully booted, the LED will remain lit unless turned off in the UI. The LED color can also be changed in the management... - Page 5 Ports and LEDs LINK DOWN PoE+ 10/100 1000 57V⎓Max, 0.6A Max LINK/A S F P Ports 1-8 support 802.3at PoE+ with up to 30W per port and a L I N K / A 0 . 6 A M a x 5 7 V ⎓...
- Page 6 LINK DOWN 10/100 1000 LINK/ACT LINK/ACT SFP 1 SFP 2 RESET R E S E T S F P 1 S F P 2 The SFP Ports support fiber optic LINK/ACT and Ethernet transceivers with 1 L I N K / A C T L I N K / A C T Gbps connections.
-
Page 7: Hardware Installation
Hardware Installation Rackmount Installation 1. Connect the two Rack Ears to both sides of the switch using the eight Rack Ear Screws. PoE+ 57V⎓Ma x, 0.6A Max SFP 2 Note the cooling vents remain exposed with the Rack Ears connected. 2. - Page 8 3. Insert the Rackstud DUO stud at the beginning of the RU space just below the thin area. Thin Area Thick Area Thick Area Thin Area 4. Compress the spring and insert the Rackstud DUO stud from behind the rail. 5.
- Page 9 6. Slide the switch over the Rackstud DUO stud and apply pressure to the front face while installing the Rackstud DUO nuts to the bottom on both sides of the switch. 7. Connect the top Rackstud DUO nuts on both sides of the switch.
-
Page 10: Mounting On A Wall
Mounting On A Wall 1. Connect the two Rack Ears to both sides of the switch using the eight Rack Ear Screws. Be sure to orient the Rack Ears so the openings face the wall. - Page 11 2. Use wall screws and anchors (not included) to secure both sides of the switch to the wall.
-
Page 12: Connecting Devices
Connecting Devices 1. Connect devices that need Power over Ethernet to any of the first eight ports. The ports are autosensing. Devices that do not require power can be connected to any of the 16 ports. PoE+ 57V⎓M ax, 0.6A Max SFP 2 2. - Page 13 S16-POE Specifications Mechanical 44 x 254 x 441.5 mm Dimensions (1.7 x 10 x 17.4") Weight 3.6 kg (7.9 lbs) Material Type SGCC Material Finish Powder coat - Matte Color Metallic gray Ports Interface Ports (16) 10/100/1000 Mbps SFP/SFP+ (2) SFP...
- Page 14 Hardware Packet Buffer 4.1 Mbit Mac Table Size Energy Effecient Ethernet Management Factory reset button Bluetooth Yes, Setup Power Max Power Consumption 23 Watts w/o PoE Max Power Consumption 143 Watts Full PoE Universal AC, 100 - 240VAC Power Supply 50/60Hz Internal RJ45 Port Surge 12kV for ESD - contact, 25kV...
- Page 15 Compliance Federal Communication Commission Interference Statement This product has been tested and found to comply with the limits for a Class A digital device pursuant to Part 15 of the FCC Rules. These limits are designed to provide reasonable protection against harmful interference when the equipment is operated in a commercial environment.
- Page 16 FCC Radiation Statement This equipment complies with FCC radiation exposure limits set forth for an uncontrolled environment. This equipment should be installed and operated with minimum distance 20cm between the radiator and your body. CAN ICES-003(A) / NMB-003(A) This device contains licence-exempt transmitter(s)/ receiver(s) that comply with Innovation, Science and Economic Development Canada’s licence-exempt RSS(s).
-
Page 17: Community Forum
Community Forum forum.alta.inc Technical Support help.alta.inc All specifications are subject to change without notice. Alta Labs products are sold with a limited warranty: alta.inc/warranty © 2023 Soundvision Technologies. All rights reserved. Alta Labs is a trademark of Soundvision Technologies.
Need help?
Do you have a question about the S16-POE and is the answer not in the manual?
Questions and answers