Advertisement
Quick Links
1800 WATT 254 MM SLIDE COMPOUND
SPECIFICATIONS :
Power Input .................................1800 watt
No Load Speed............................4500 min -
Blade Diameter............................254 mm
Blade Arbor .................................16 mm
Weight .....................................
Cutting Capacity
Mitre 90˚ x Bevel 90˚ ...................64 mm x 294 mm
Mitre 45˚(R) x Bevel 90˚ ..............64 mm x 190 mm
Mitre 45˚(L) x Bevel 90˚ ...............64 mm x 190 mm
Mitre 90˚ x Bevel 45˚ ...................43 mm x 260 mm
Mitre 45˚(R)x Bevel 45˚ ...............40 mm x 202 mm
Mitre 45˚(L) x Bevel 45˚ ...............35 mm x 148 mm
THANK YOU FOR BUYING A RYOBI SLIDE COMPOUND MITRE SAW
Your new mitre saw has been engineered and manufactured to Ryobi's high standard for
dependability, ease of operation, and operator safety. Properly cared for, it will give you years of rugged,
trouble free performance.
CAUTION: Carefully read through this entire owner's manual before using your
Pay close attention to the Rules for Safe Operation, Warnings, and Cautions.
If you use your saw properly and only for what it is intended, you will enjoy years of safe, reliable
service.
Thank You again for buying Ryobi tools.
OWNER'S OPERATING MANUAL
MITRE SAW WITH LASER
MODEL EMS1825SCL
1
21.5 kg
SLIDE COMPOUND MITRE SAW.
SAVE THIS MANUAL FOR FUTURE REFERENCE.
D O U B L E
D O U B L E
D O U B L E
D O U B L E
D O U B L E
I N S U L A T E D
I N S U L A T E D
I N S U L A T E D
I N S U L A T E D
I N S U L A T E D
N197
Advertisement

Related Manuals for Ryobi EMS1825SCL


Summary of Contents for Ryobi EMS1825SCL
- Page 1 THANK YOU FOR BUYING A RYOBI SLIDE COMPOUND MITRE SAW Your new mitre saw has been engineered and manufactured to Ryobi's high standard for dependability, ease of operation, and operator safety. Properly cared for, it will give you years of rugged, trouble free performance.
-
Page 2: Rules For Safe Operation
RULES FOR SAFE OPERATION 9. DRESS PROPERLY. Do not wear loose clothing or The purpose of safety rules is to attract your attention to jewellery. They can be caught in moving parts. Rubber possible dangers. The safety symbols and the explanations gloves and non-skid footwear are recommended when with them, require your careful attention and understanding. - Page 3 • Do not change the laser light assembly with a different type. have reparied by authorised service centre. Stay con- Repairs must be carried out by authorized Ryobi service stantly aware of cord location and keep it well away centre.
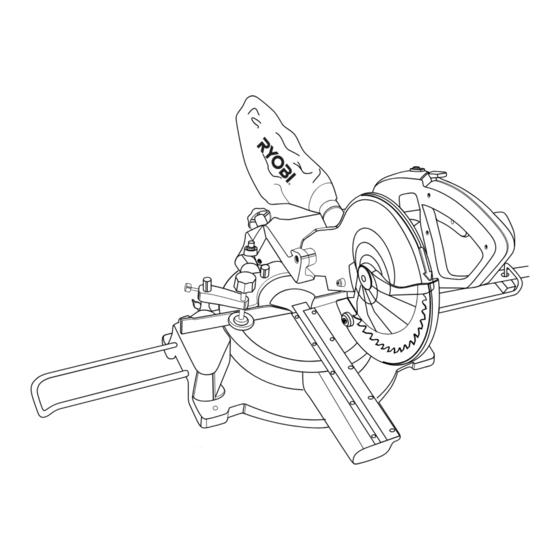
- Page 4 FEATURES 1. Laser on/off switch 2. Laser 3. Trigger switch 4. Lower blade guard 5. Mitre table lock nob 6. Throat plate 7. Repetition cut stop 8. Material support arm 9. Mitre adjustment handle 10. Mitre scale 11. Mitre table 12.
-
Page 5: Tools Needed
TOOLS NEEDED Blade Wrench 12 mm COMBINATION WRENCH Combination Square LOOSE PARTS LIST Vice 254 mm Saw Blade Dust Bag Blade Wrench Material Support Arm Page 5... - Page 6 ASSEMBLY LOCK DOWN PIN WARNING: Your EMS1825SCL features a lock down pin for easier To prevent accidental starting that could cause possible se- transportation.To unlock the head pull the pin out and pull the rious personal injury, assemble all parts, make sure all ad- saw arm to the upright position.
- Page 7 ASSEMBLY ADJUSTMENTS FENCE Your compound mitre saw has been adjusted at the factory for making very accurate cuts. However, some of the components The rear fence on your slide compound mitre saw has been might have been jarred out of alignment during shipping. Also, provided to hold your workpiece securely against when mak- over a period of time, readjustment will probably become nec- ing all cuts.
- Page 8 ADJUSTMENTS Depress the blade lock button while rotating the blade. The Lay the set square on the mitre table and against the blade blade lock button will move into the blade lock posititon. (Fig. and if the blade and mitre table do not align adjust as follows. (Fig.
- Page 9 ADJUSTMENTS OPERATION SQUARING THE BLADE TO THE MITRE TABLE AT 45 APPLICATIONS Move the saw arm to the 45 bevel position.(Fig.19) (Use only for the purposes listed below) • Cross Cutting wood & plastic • Cross Cutting mitres, joints, etc., for picture frames, moldings, door casings and fine joinery.
- Page 10 OPERATION • Place the workpiece flat on the mitre table with one edge TO BEVEL CUT WITH YOUR MITRE SAW securely against the fence. If the board is warped, place the • Pull out the lock pin and lift the saw arm to its full height. convex side against the fence and clamp the vice.
- Page 11 • Before turning on the saw, perform a dry run of the cutting WARNING: To avoid serious personal injury, operation just to make sure that no problems will occur keep your hands outside the no hands zone; when the cut is made. at least 75mm from the blade.
- Page 12 SUPPORT LONG WORKPIECES (Fig.26) The two material supports are designed to support timber so it does not sag. The material supports should let the workpiece lay flat on the base of the saw and the work table during the cutting operations. Use the vice of clamp the workpiece.
- Page 13 OPERATION Page 13...
- Page 14 OPERATION Fig.31 Page 14...
- Page 15 OPERATION Fig.33 Fig.32 Fig.34 Page 15...
-
Page 16: Maintenance
If the supply cord is damaged, it shall be replaced by the au- Avoid using solvents when cleaning plastic parts. Most plas- thorized Ryobi service centre in order ot avoid a hazard. tics are susceptible to damage from various types of commer- Disconnect form the supply immediately, if the suply cable is cial solvents and may be damaged by their use. - Page 17 RYOBI NEW ZEALAND PTY. LTD. AUCKLAND: 503 Mt Wellington Highway, Mt Wellington, N.Z. Tel: (09) 573 0230 - Free Call: 0800 279 624 - Fax: (09) 573 0231 - www.ryobi.co.nz Contact during normal business hours. This Guarantee Form Should Be Retained By The Customer At All Times For your record and to assist in establishing date of purchase (necessary for in-guarantee service) please keep your purchase docket and this form completed with the following particulars.
Need help?
Do you have a question about the EMS1825SCL and is the answer not in the manual?
Questions and answers