Table of Contents
Advertisement
Quick Links
Advertisement
Table of Contents

Related Manuals for Nukeproof MEGAWATT


Summary of Contents for Nukeproof MEGAWATT
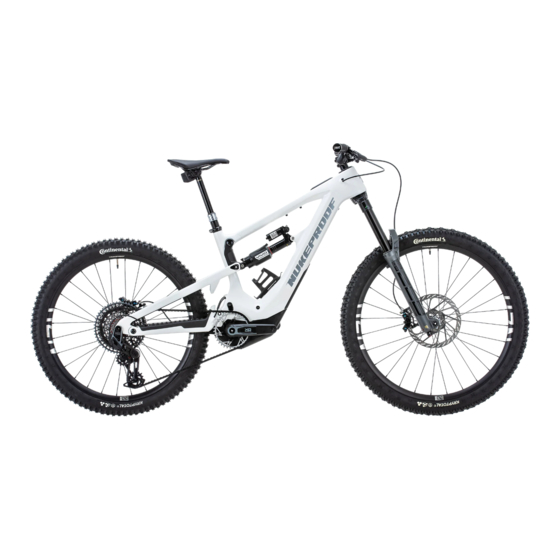
- Page 1 M E G A W A T T C A R B O N B I K E M A N U A L...
- Page 2 — the latest and greatest in eMTB technology wrapped in a carbon frame designed to wallop the nastiest trails on the planet. Developed in collaboration with the team at SRAM, the Megawatt was used as the testbed for the first-of-its-kind Eagle Powertrain as it was prototyped over two years.
- Page 3 C O N T E N T S S e c t i o n 1 - U n b o x i n g Y o u r B i k e S e c t i o n 2 – A s s e m b l i n g Y o u r B i k e S e c t i o n 3 –...
- Page 4 S E C T I O N 1 - U N B O X I N G Y O U R B I K E For mail order customers your new Megawatt Carbon will be delivered in a specifically designed bike box, the type and size of box will vary between retailers.
- Page 5 3. Remove cardboard front wheel support from box, this 4. Carefully pull bike out of box, we would advise help at will now allow you to remove the bike. this point from another person to hold the box. If your dealer has stapled the box, please ensure staples are removed to prevent paint damage.
- Page 6 This section details how to get your bike ready for setting up and riding out of the box, this will be relevant for mail order bikes, generally the following will be done already if purchased and collected through a local authorised Nukeproof dealer.
- Page 7 FIT PEDALS All Nukeproof pedals are standard 9/16” x 20 tpi so are compatible with all modern cranks. TOOLS REQUIRED • 8mm Hex Key (All pedals) Or 15mm Spanner (Alloy pedals only) • Torque Wrench • Grease HOW TO DETERMINE THE DIFFERENCE BETWEEN THE LEFT AND RIGHT PEDAL This step is very important, failure to install the pedals on the correct side of the bike will cause irreparable damage your crank and pedal.
- Page 8 FITTING 1. Check the threads on your crankarm are clean and have 2. Take your RIGHT pedal and grease the axle. no damage. 3. Line the pedal up to the driveside crank, place your 4. Take your LEFT pedal and grease the axle. 8mm hex key through the driveside crank and into the back of the pedal axle.
-
Page 9: Adjust Saddle Height
ADJUST SADDLE HEIGHT 1. To adjust the height of the saddle, loosen the seat 2. To get a starting point for your saddle height, stand clamp bolt with a 5mm Hex Key, once height is adjusted, beside your bike and adjust the height to your hip bone retighten 3. - Page 10 ADJUST SADDLE ANGLE AND POSITION To ensure comfort when seated pedalling, the saddle To adjust the saddle angle, forward and back. Loosen the position can be adjusted. A Torx 25 (T25) wrench is T25 bolt, position the saddle and retighten the T25 bolt. required.
- Page 11 Do not add too many additional spacers under the stem, as both stem bolts must be clamping fork steerer. If you are unsure on this process, please consult with your authorised Nukeproof dealer to complete the work. 1. Loosen and remove top cap bolt and cover with a 5mm 2.
-
Page 12: Items Required
CONVERT TO TUBELESS All of our adult complete bike’s are supplied with tubeless tape installed, tubeless valves and tubeless compatible tyres to make tubeless conversation fast and simple. This guide will take you through the steps to make your bike tubeless. ITEMS REQUIRED •... - Page 13 3. Loosen presta value nut and push to deflate the inner 4. When the tube is deflated, remove the nut holding the tube. valve in place. 5. Unseat tyre by pushing the bead to the centre of the 6. Remove one side of the tyre by taking the bead over rim.
- Page 14 9. Push the valve through the valve hole. 10. Put the o-ring on the valve. 11. Fit the tubeless valve nut and tighten. 12. Start to refit the tyre, leave 1⁄ 4 open. 13. Add tubeless sealant as per sealant manufacturer 14.
- Page 15 17. Pump tyre until it is correctly seated. There is a moulded line in most tyres which must be visible and uniform the whole way round the tyre. 18. Reinstall valve cap. 19. Lift your wheel and shake it to get the sealant all round the tyre.
- Page 16 A COUPLE OF POINTS TO NOTE It can take a couple of rides for the sealant to get fully around the tyre settle. Don’t be alarmed if you need to top up the air pressure a couple of times between rides. The tyre shouldn’t lose pressure during your ride. Some tyres will seep sealant from the sidewalls.
- Page 17 Apply a little grease to the axle and threads and push through the dropouts and hubs until axle cannot be pushed further. Tighten the Through Axle clockwise to the Nm found on the axle, if no Nm is displayed, please consult with your Nukeproof Dealer.
- Page 18 STORAGE Your new Megawatt Carbon will be supplied with an accessory strap. This can be placed under the bikes top tube or inside the Battery Door. Within the Battery Door of your Megawatt Carbon the accessory strap can be located. This allows internal storage of spares and tools.
- Page 19 SWITCHING ON YOUR MEGAWATT CARBON FOR THE FIRST TIME Before you turn on your Megawatt Carbon for the first time you will need to fully charge the battery to wake it from sleep mode. Full charge takes approximately 5 hours for the supplied 720Wh battery.
- Page 20 HOW TO REMOVE AND FIT THE MEGAWATT CARBON BATTERY The Megawatt Carbon’s internal battery can be easily removed. This process is outlined in the images below. 1. To remove or install the battery you will need 5mm Hex 2. If you do not have a work stand lay the bike on the floor Key and a torque wrench.
- Page 21 7. Now, slide the battery out of the down tube. Please ensure a secure grip as the battery is heavy. M E G A W A T T C A R B O N B I K E M A N U A L |...
-
Page 22: Installing The Battery
INSTALLING THE BATTERY To refit the battery simply reverse the removal process. 1. Slide the battery up into down tube. There are guides in 2. Install the battery bolt into the battery and tighten the the frame to align the battery correctly. bolt with a 5mm Hex Key. -
Page 23: Battery Charge Status
Megawatt Carbon. PLEASE NOTE Your Megawatt Carbon will not power on when the charger is attached and battery in 100% charged. The charger must be unplugged from the charging port before bike powering on. M E G A W A T T C A R B O N B I K E M A N U A L |... - Page 24 DRIDGE DISPLAY BATTERY Charge status can be monitored on the battery when it is removed from the bike. Battery is fully charged when all lights are green with no flashing. CHARGING AXS DROPPER POST BATTERY Your bike will be supplied with a Single Base AXS charger and USB Cable. This is for the Reverb AXS Dropper post battery. Typically, a full charge will take 1 hour.
-
Page 25: Controller Functions
GETTING FAMILIAR WITH YOUR MEGAWATT CARBON POWERTRAIN CONTROLS POWERTRAIN CONTROLS AND BRIDGE Remember to fully charge your Megawatt before the first time you power on. BRIDGE DISPLAY FUNCTIONS A – POWER BUTTON: Press and hold for startup/shutdown. When bike is on, a short press enters maintenance mode (motor &... - Page 26 EAGLE POWERTRAIN COMPONENT PAIRING PROCEDURE Your bike will likely come with its wireless components paired. If your bike’s AXS components need pairing, the following is the pairing procedure sequence must be followed. Please ensure components are paired before connecting the SRAM AXS app.
- Page 27 Sag is the amount the rear shock will compress under the rider’s weight while kitted. This is the base setting for the rear shock to ensure the rear suspension is neither too stiff nor too soft. It’s recommended the Megawatt Carbon’s sag be set with the rider seated.
- Page 28 Bounce on the bike to cycle the shock through its Once sag is correctly set, re-fit the valve cap to the rear travel a few times to balance the positive and negative shock. air chambers. Once the desired pressure is achieved, unscrew the shock pump.
- Page 29 HOW TO SET UP YOUR FRONT SAG You will need to set-up front sag to balance the bikes suspension with the rear sag. Front sag will be your base setting and with use you can adjust the sag to suit rider preference, riding style and terrain. For Front suspension, consult the chart on the back of the To add or remove air, remove the valve cap from the fork fork leg to find your recommended air pressure settings,...
- Page 30 FRAME SERIAL NUMBER LOCATION The unique frame number for your Megawatt Carbon is found inside the down tube of the frame. You will need to remove the battery from the frame and the serial number will be found above the battery bolt entry hole. Your dealer and Nukeproof bikes do not have an obligation to keep a record of this number.
- Page 31 GETTING FAMILIAR WITH POWERTRAIN AUTO SHIFT, COAST SHIFTING, MANUAL SHIFTING AND PUSH MODE Now your bike is ready to ride, you will need to familiarise yourself with shifting and Push Mode. The Megawatt Carbon Eagle Powertrain has an Auto Shift feature. The Auto Shift setting will automatically shift the Megawatt Carbon into the appropriate gear when pedalling and coasting.
-
Page 32: Push Mode
COAST SHIFTING Powertrain will Auto Shift gears when you are not pedalling, this is to ensure the bike is in the correct gear relative to the speed of the bike. This is beneficial when riding through rough terrain and pedalling to change gears poses a risk of pedal strikes. - Page 33 GETTING FAMILIAR WITH YOUR BIKE BEFORE HITTING THE TRAILS Nukeproof Megawatt Carbon bikes are equipped with powerful hydraulic disc brake systems. Disc brake systems offer exceptional control and power. Please note power will improve with some use once the pads and discs have bedded in.
- Page 34 Updates for component firmware are performed through the app. Please note: Your AXS rear derailleur is hardwired to the Megawatt Carbon’s main battery. Ensure the bike is powered on before performing derailleur firmware updates. If the bike is powered off during firmware updates, the update may fail, and the update process will need restarted.
- Page 35 SRAM GUIDES SRAM have comprehensive guides for a deep dive into the AXS App. For further reading and knowledge please familiarise yourself with SRAMs literature. SRAM POWERTRAIN GUIDES M E G A W A T T C A R B O N B I K E M A N U A L |...
- Page 36 S E C T I O N 5 – S U S P E N S I O N I N M O R E D E TA I L To get the most out of your Megawatt Carbon you will need to set-up and maintain your suspension. Suspension maintenance is specialist work that we recommend only be performed by official service centres.
- Page 37 If you wish to change your shock for an upgrade or a different model to your preference, please consult with your suspension supplier to ensure the shock is the correct size and the tune suits the kinematics of the Megawatt Carbon. The following...
- Page 38 TUNE When purchasing a new shock, the provider will need a tune to suit the Megawatt Carbon suspension kinematics, the charts provided below will need to be referenced by your suspension provider. The Megawatt Carbon has a progressive layout, which ensures more support the further you push through the travel for a stable and predictable ride.
- Page 39 The Megawatt Carbon is an evolution of the current proven Megawatt and Mega platforms. we have increased the starting rate a little to help with beginning to Mid- Stroke suppleness, Mid-Stroke to End-Stroke has increased in progression to help with Mid-Stroke and End-Stroke support and improve the lively poppy feel.
- Page 40 We have increased the Megawatt Carbon Anti-Squat to 102%. Higher Anti-Squat in the climbing gears, which drops off to 52% in the descending gears. The Megawatt remains true to our belief that a low Anti-Squat, but good Mid-Stroke support is a winning combo for climbing traction.
- Page 41 Anti-rise is how much the bike resists the rear-end rise that occurs when we pull the brakes. The Megawatt Carbon has a balanced amount of Anti-Rise that tails off for bigger hits on the trail. This allows some squat in the suspension when breaking hard into a corner allowing the rider to maintain their position. This allows the rider to put pressure through the tyres and into the ground for excellent traction under hard braking.
- Page 42 Axle path is the line the rear axle takes as the suspension moves, measured relative to the mainframe. The new suspension layout of the Megawatt Carbon has affected the Axle path to give a more rearward movement of 65mm. This helps prevent the rear wheel from hooking on square edges and ultimately enable you to carry more speed in rougher terrain.
- Page 43 SUSPENSION FORK LIMITATIONS The fork length also detailed as axle to crown (A-C) cannot be exceeded. Maximum axle-to-crown (A-C) for the Megawatt Carbon is 596mm. Using a fork that exceeds the listed axle-to-crown (A-C) may lead to frame failure and injury and will void the bike’s warranty.
-
Page 44: Before You Ride
S E C T I O N 6 - M A I N T E N A N C E A N D C A R E Nukeproof bikes and components are designed to be hardwearing and corrosion resistant, but to ensure the bike looks and runs its best some general maintenance will be required. -
Page 45: Wheels And Tyres
Wheel bearings are a perishable part and will need changed occasionally. Please consult with a mechanic or authorised Nukeproof dealer to replace bearings and ensure spoke tension. If the rim is damaged/cracked, please refrain from riding your bike and consult with an authorised dealer for a replacement. - Page 46 • Powertrain compatible rotors must be used. Rotors must be 2mm thick and installed with 15mm rotor bolts. If you are unsure on the correct rotor to use, please consult with your Nukeproof Dealer or a SRAM Dealer. Using an unsuitable rotor may lead to brake failure and injury.
-
Page 47: Service Life
All available Megawatt Carbon frame spares and Nukeproof components spare parts are available through any authorised dealer, first port of call will be your dealer, but any authorised Nukeproof dealer can assist. Third-party components and spares can be found through respective dealer networks and your Nukeproof Dealer. -
Page 48: Frame Specification
S E C T I O N 7 - S P E C I F I C AT I O N / S I Z I N G / G E O M E T R Y/ F E AT U R E S / S T O R A G E FRAME SPECIFICATION The following are available after market frame spares for the Megawatt, if any part you need is not listed, please consult with an authorised Nukeproof Dealer. - Page 49 GEOMETRY (A) Reach (B) Stack 624.29 633.25 642.19 651.14 660.09 (C) Effective Top Tube 573.4 595.39 611.5 633.4 655.31 (D) Seat Tube Length (E) Effective Seat Tube Angle 77.5° 77.5° 78° 78° 78° (F) Seat Tube Angle 71° 71° 72° 72°...
-
Page 50: Frame Details
FRAME DETAILS 1 - T700/800 full carbon fibre frame 6 - Loads of mud clearance for 2.5” tyres protection for DT, CS, SS 2 - Removable battery 7 - Integrated storage within bash guard 11 - 148mm hub spacing 3 A/B - Internally sleeved cable routing 8 - TT accessory mounting points 12 - Clear protection kit to protect paint 4 - Integrated AXS Bridge Display... - Page 51 S E C T I O N 8 - A S S E M B LY A N D S PA R E S Shock Bolt Kit Swing Link Bearing Kit Motor Protector Kit Horst Link Kit Non-Drive Motor Cover Main Pivot Kit Upper Motor Mount Kit Upper Swing Link Kit...
- Page 52 NUKEPROOF PART # Brake Hose Grommet Front Triangle Derailleur Cable Grommet Seat Stay Main Pivot Axle Chain Stay Motor Protector Swing Link Motor Cradle Drive-Side Cover 6802 Llu Max None-Drive Motor Cover 6901 Llu Max Motor Bolt Spacer Round...
- Page 53 DRAWING # PART # PART NAME NPB9-RBT Lower Swing Link Bolt Lower Swing Link Lock Ring IR-28 Megawatt Carbon Lower Swing Link Kit Drive Side NPC-WS27-15-4T Lower Swing Link Washer NPB9-SPT-R Drive Side Seat Stay Chip NPB9-RBT Lower Swing Link Bolt...
- Page 54 TORQUE, GREASE AND DIAGRAMS Thread Lock Recommended Torque Values Drawing Number Part Number Drawing Number Part Number Torque Lower Swing Link Bolt Swing Link Pivot Bolt 14Nm Horst Link Bolt Lower Swing Link Bolt 19Nm Main Pivot Axle Horst Link Pivot Axle 12Nm Upper Battery Bolts Horst Link Bolt...
- Page 55 USA BRAKE & DROPPER CABLE ROUTING GUIDE * 1 - Rear brake routing 2 - AXS display unit wire routing 3 - Dropper post routing 4 - Rear derailleur routing *Please note bikes supplied with wireless dropper post and derailleurs, routing for reference proposes if components changed to cabled items ENTRANCE PORT POSITION...
- Page 56 UK BRAKE & DROPPER CABLE ROUTING GUIDE* 1 - Rear brake routing 2 - AXS display unit wire routing 3 - Dropper post routing 4 - Rear derailleur routing *Please note bikes supplied with wireless dropper post and derailleurs, routing for reference proposes if components changed to cabled items ENTRANCE PORT POSITION...
- Page 57 D R AWING # PART LOWER MOTO R MOUN T U P P ER MOTOR MO UN T MOTO R BO LT SPAC E R R OUN D MOTO R BO LT SPACE R SQUAR E MOTOR B O LT N UT LOWER MOTOR MOUN T BOLT N ON -D R IVE SID E 25MM LOW ER MOTOR M OUN T BOLT D R IVE -SID E 30MM MOTOR B O LT 35MM...
- Page 58 D R AWING # PART LOWER MOTO R MOUN T U P P ER MOTOR MO UN T MOTO R BO LT SPAC E R R OUN D MOTO R BO LT SPACE R SQUAR E MOTOR B O LT N UT LOWER MOTOR MOUN T BOLT N ON -D R IVE SID E 25MM LOW ER MOTOR M OUN T BOLT D R IVE -SID E 30MM MOTOR B O LT 35MM...
- Page 59 M E G A W A T T C A R B O N B I K E M A N U A L |...
- Page 60 The following is the SRAM Powertrain components installed to the Megawatt Carbon bike and available Aftermarket spares. If any of the parts installed to your bike develop an unlikely fault, please contact an authorised Nukeproof Dealer for warranty assistance. If any parts are damaged accidentally or the result of a crash, a SRAM dealer can assist with replacement parts as well as a Nukeproof Dealer.
- Page 61 Parts can be sourced via SRAM Dealers. PLEASE NOTE Transmission T-Type parts regardless of model are cross compatible, this allows a mix of GX/XO/XX AXS T-Type transmission parts to be used on your Megawatt Carbon. • Drive System: SRAM Eagle Powertrain Drive Unit, 250W, 90NM •...
- Page 62 Transmission T-Type parts regardless of model are cross compatible, this allows a mix of GX/XO/XX AXS T-Type transmission parts to be used on your Megawatt Carbon. M E G A W A T T C A R B O N B I K E M A N U A L |...
- Page 63 LED Flash 2 Per Second - Immediately stop riding or charging. For a Safety Protection period of 30 minutes please let the battery rest. Contact your Nukeproof Dealer for a Battery Health Check if fault returns after rest period. LED Flash 2 Per Second -...
-
Page 64: Low Power Mode
ERROR MESSAGES The Powertrain Bridge Display on the Megawatt Carbon top tube will also display error messages. Follow the instructions on the Bridge Display or connect your SRAM AXS app to view errors and follow the AXS app instructions to remedy the fault. If the displayed fault persists, please contact your Nukeproof Dealer for further assistance. - Page 65 MAXIMUM AXLE TO CROWN AND TRAVEL OF FORK The fork length also detailed as axle-to-crown (A-C) cannot be exceeded. Maximum A-C for the Megawatt Carbon is 596mm. Using a fork that exceeds the A-C may lead to frame failure and injury. Using a longer axle to crown fork will void warranty.
- Page 66 LOOK AFTER YOURSELF Always wear a helmet that meets legal safety standards when riding your Megawatt and additional protective equipment when required. Ensure you are riding your bike in accordance with local laws, with protective equipment, reflectors and lights installed when and where required.
-
Page 67: Battery Recycling
BATTERY SAFETY If there are any doubts with the handling of the battery or bikes electronic systems, immediately cease and contact your Nukeproof Dealer. HANDLING THE BATTERY • Use the specified SRAM battery charger for charging. Doing otherwise may cause overheating, bursting, reduced lifespan, or ignition. -
Page 68: Transporting Your Bike
• If the charger has become wet, do not touch, or hold the charger. Do not touch the charger with wet hands. An electric shock may occur. • Do not use wrap or cover the battery charger in any material. Doing so may cause excessive heat to accumulate, causing failure of parts, deformation, fire, ignition, or overheating. - Page 69 CONSEQUENTIAL LOSS Nukeproof is not responsible for direct, incidental or consequential damages resulting from any breach of warranty or condition or under any other legal theory, including but not limited to loss of use, loss of revenue, loss of actual or anticipated profits (including contracts) loss of the use of money, loss of anticipated savings, loss of business, opportunity, goodwill, reputation, any indirect or consequential loss.
- Page 70 S E C T I O N 1 3 - L O G B O O K...
Need help?
Do you have a question about the MEGAWATT and is the answer not in the manual?
Questions and answers
How do i remove my battery