Bella PRO Series Instruction Manual
20 bar espresso maker
Hide thumbs
Also See for PRO Series:
- User manual ,
- Instruction manual (44 pages) ,
- Instruction manual (28 pages)

Related Manuals for Bella PRO Series


Summary of Contents for Bella PRO Series
- Page 1 20 BAR ESPRESSO MAKER Instruction Manual 90196_Bella Pro_BestBuy_20 Bar Espresso Maker SS_IM_R10.indd 1 90196_Bella Pro_BestBuy_20 Bar Espresso Maker SS_IM_R10.indd 1 2023-08-08 5:02 PM 2023-08-08 5:02 PM...
- Page 2 Thank You for your purchase Register & sign up for special announcements and trendy recipes! Tell us what you think! Rate, review or ask us a question. @bellahousewares.com #getinspired BellaLife BellaLifestyle 90196_Bella Pro_BestBuy_20 Bar Espresso Maker SS_IM_R10.indd 2 90196_Bella Pro_BestBuy_20 Bar Espresso Maker SS_IM_R10.indd 2 2023-08-08 5:02 PM 2023-08-08 5:02 PM...
-
Page 3: Table Of Contents
Table of Contents Important Safeguards ....................2-3 Additional Important Safeguards ................4-5 Notes on the Plug ......................5 Notes on the Cord ......................5-6 Plasticizer Warning ......................6 Electric Power ........................6 The Art of Extracting Espresso ..................7 Getting to Know Your 20 Bar Espresso Maker ............8-9 Safety Warnings ...................... -
Page 4: Important Safeguards
IMPORTANT SAFEGUARDS When using electrical appliances, basic safety precautions should always be followed including the following: 1. Read all instructions. 2. Do not touch hot surface. Use handles or knobs. 3. When in use, the appliance is under pressure and should never be left unattended. - Page 5 NOTE: DO NOT ATTEMPT TO REPAIR THE UNIT YOURSELF. THIS WILL VOID THE WARRANTY. 11. Do not use outdoors. 12. Do not let cord hang over edge of table or counter, or touch hot surfaces. 13. Do not place on or near a hot gas or electric burner, or in a heated oven.
-
Page 6: Additional Important Safeguards
FOR HOUSEHOLD USE ONLY ADDITIONAL IMPORTANT SAFEGUARDS WARNING: This appliance generates heat and escaping steam during use. Proper precautions must be taken to prevent the risk of burns, fires, or other injury to persons or damage to property. CAUTION: The Espresso Maker must be allowed to cool down sufficiently before adding more water to avoid splattering. -
Page 7: Notes On The Plug
8. If this appliance falls or accidentally becomes immersed in water or any other liquid, unplug it immediately. Do not reach into the water! Do not use this appliance after it has fallen into or has become immersed in water. Contact Consumer Service for examination and repair. -
Page 8: Plasticizer Warning
3. The longer cord should be arranged so that it will not drape over the counter top or tabletop where it can be pulled on by children or tripped over unintentionally. PLASTICIZER WARNING CAUTION: To prevent Plasticizers from migrating to the finish of the counter top or table top or other furniture, place NON-PLASTIC coasters or place mats between the appliance and the finish of the counter top or table top. -
Page 9: The Art Of Extracting Espresso
THE ART OF EXTRACTING ESPRESSO Consistency is key when it comes to a great shot of espresso. Optimal flavor is achieved as the brewing temperature is maintained. Grounds are pre-infused with low, steady water pressure before extraction. Shot volumes are automatically dispensed and can be adjusted to taste. -
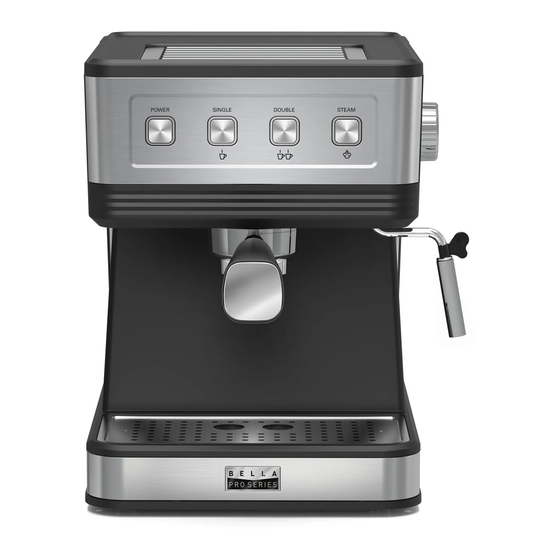
Page 10: Getting To Know Your 20 Bar Espresso Maker
GETTING TO KNOW YOUR 20 BAR ESPRESSO MAKER Product may vary slightly from illustration Figure 1 Heated Warming Plate 2. 57 oz Removable Water Tank 3. Function Control Dial 4. Control Panel 5. Steam Wand with Silicone Tab 6. 2 Spouted Portafilter Brew Head 8. - Page 11 POWER SINGLE DOUBLE STEAM POWER Button. Press the power button to turn the unit on. The single shot ( ) and double shot ( ) buttons will begin to flash. When the system is up to temperature, all 4 buttons on the control panel will illuminate.
-
Page 12: Safety Warnings
SAFETY WARNINGS • Proper precautions must be made to avoid burns from sprays of hot water or steam. • Always use the silicone covers and tabs installed on both the steam wand and the water dispenser to rotate and swing either wand to the perfect position. •... -
Page 13: Pull The Perfect Espresso Shot
Place any empty (do not add coffee) 2-cup filter basket into the portafilter. Insert and lock into the brew head following the detailed description in the section: “Pulling the Perfect Espresso Shot.” (See Figures 6 and 7.) Center a wide-mouth spouted container or cup under the 2-spout portafilter. Place the steam wand’s tip into the frothing jug. - Page 14 Insert either the 1 or 2 cup filter basket into the portafilter. (See Figure 5.) Align the portafilter handle with the INSERT symbol on the brew head. (See Figure 6.) Turn handle counter-clockwise (to the right) until the portafilter handle is facing front and lined up with the LOCK.
- Page 15 12. Use the 2-in-1 tamper spoon (and scale if desired) to dose ground espresso coffee and add to the filter basket. Use the 1 cup filter basket for a single espresso; the 2 cup filter for a double espresso or 2 single espressos at the same time. (See Figure 10.) Figure 10 13.
-
Page 16: Dial In Single Or Double Shot Volume
Dial In Single or Double Shot Volume The Espresso Maker consistently dials in the perfect brew water temperature and measures the perfect volume for every shot. To adjust volumes for future shots, press and hold the single or double shot programmable button for 3 seconds to adjust and to dial in future single or double shot volume. - Page 17 Quickly place the tip of the steam wand at the surface of the milk and turn the function control dial to STEAM. Place the frothing pitcher on an angle, and make sure the wand is approximately 1/3-inch from either edge of the frothing pitcher. The steam wand should barely break the milk’s surface to create fine micro-bubbles.
-
Page 18: User Maintenance Instructions
return to standby mode (the max volume for the SINGLE shot is 100ml and 150ml for the DOUBLE shot. 12. To reset the coffee volume to factory settings: During standby mode press and hold both the SINGLE shot and DOUBLE shot buttons for 3 seconds, then the SINGLE and DOUBLE indicator lights will flash 5 times. -
Page 19: Care & Cleaning Instructions
CARE & CLEANING INSTRUCTIONS CAUTION: NEVER IMMERSE THE ESPRESSO MAKER IN WATER OR ANY OTHER LIQUID. When espresso making is complete, press the POWER button; turn the function control to STANDBY. Unplug the Espresso Maker from the electrical outlet and allow to cool completely before cleaning. -
Page 20: Descaling
DESCALING Minerals and calcium found in hard-water areas can accumulate and affect the operation of your machine. Depending on water conditions and frequency of use, your Espresso Maker should be cleaned with distilled vinegar approximately every 3 months to remove scale. Before cleaning your Espresso Maker, make sure the function control dial is in the STANDBY position and the appliance has been disconnected from the wall outlet. - Page 21 Make sure unit is unplugged and fully cooled before storing. WARNING: Never store Espresso Maker while it is hot or still plugged in. Do not put any stress on cord where it enters unit, as this could cause cord to fray and break. Store the Espresso Maker in its box, in a clean, dry area.
- Page 22 90196_Bella Pro_BestBuy_20 Bar Espresso Maker SS_IM_R10.indd 20 90196_Bella Pro_BestBuy_20 Bar Espresso Maker SS_IM_R10.indd 20 2023-08-08 5:02 PM 2023-08-08 5:02 PM...
-
Page 23: Troubleshooting
TROUBLESHOOTING Problem Possible Cause Solution Re-insert the portafilter into the Portafilter is not attached correctly, or brew head. Make sure the handle has not been tightened sufficiently. is facing outward and is firmly engaged on the brew head. Make sure that no part of the coffee Coffee pod is not properly fitted in pod filter hangs over the lip of the thefilter basket. - Page 24 TROUBLESHOOTING Problem Possible Cause Solution Use freshly roasted and ground Coffee is old or dry. coffee. Always store in an airtight container. Espresso does Tamp coffee grounds with more Coffee not compacted firmly enough. not have any pressure. or enough Use a finer grind of pre-ground cream.
- Page 25 TROUBLESHOOTING Problem Possible Cause Solution Make sure coffee is tamped evenly Cups are Uneven tamping or obstruction in the and check that both pouring spouts unevenly filled. pouring spouts. on the portafilter are unobstructed. See “Care & Cleaning Instructions.” Experiment with various types and Change the type of coffee being used.
-
Page 26: Espresso Recipes
Espresso Recipes Short Black A single shot of espresso topped with a stable layer of crema. Flat White A single shot of espresso topped with a steamed milk, 1/3 coffee and 2/3 steamed milk. Yuan Yang (Coffee with Tea) Yuan Yang is made by making strong black tea in a pot, stirring in evaporated or sweetened condensed milk and coffee, then sweetening to taste. - Page 27 Café Mocha Prepared similarly to a cappuccino but with the addition of drinking chocolate. Stir chocolate into the espresso prior to adding the steamed milk and microbubbles. Top with whipped cream. Macchiato Traditionally served as a short or long espresso with a dash of milk or a small dollop of froth in the center of the crema.
- Page 28 How To Obtain Warranty Service: You must contact Customer Service at Also, include a copy of the original sales our toll-free number: 1-866-832-4843. receipt. Carefully package the tagged A Customer Service Representative product with the sales receipt, and send will attempt to resolve warranty issues it (with shipping and insurance prepaid) over the phone.
-
Page 29: Warranty
Limited Two-Year Warranty Limited Two-Year Warranty SENSIO Inc. hereby warrants that for SENSIO Inc. hereby warrants that for The warranty is only valid for the The warranty is only valid for the a period of TWO YEARS from the date a period of TWO YEARS from the date original retail purchaser from the date original retail purchaser from the date... - Page 30 90196_Bella Pro_BestBuy_20 Bar Espresso Maker SS_IM_R10.indd 28 90196_Bella Pro_BestBuy_20 Bar Espresso Maker SS_IM_R10.indd 28 2023-08-08 5:02 PM 2023-08-08 5:02 PM...
- Page 31 90196_Bella Pro_BestBuy_20 Bar Espresso Maker SS_IM_R10.indd 29 90196_Bella Pro_BestBuy_20 Bar Espresso Maker SS_IM_R10.indd 29 2023-08-08 5:02 PM 2023-08-08 5:02 PM...
- Page 32 For customer service questions or comments 1-866-832-4843 bellahousewares.com Sensio Inc. New York, NY 10016/USA 90196_Bella Pro_BestBuy_20 Bar Espresso Maker SS_IM_R10.indd 30 90196_Bella Pro_BestBuy_20 Bar Espresso Maker SS_IM_R10.indd 30 2023-08-08 5:02 PM 2023-08-08 5:02 PM...
Need help?
Do you have a question about the PRO Series and is the answer not in the manual?
Questions and answers
I have a Bella Pro Series 20 Bar Slim Espresso Maker The filter baskets are clogged. What kind of cleaning solution is to be used for soaking the filter baskets, per step 4 under Care and Cleaning Instructions on page 18 of your Manual
The filter baskets should be rinsed under water to clean. Use the cleaning pin to clear holes in the base of the filter basket. No specific cleaning solution is mentioned for soaking.
This answer is automatically generated