Bella PRO Series Instruction Manual
6 slice french door toaster oven with air fry technology
Hide thumbs
Also See for PRO Series:
- User manual ,
- Instruction manual (44 pages) ,
- Instruction manual (36 pages)

Related Manuals for Bella PRO Series


Summary of Contents for Bella PRO Series
- Page 1 6 SLICE FRENCH DOOR TOASTER OVEN WITH AIR FRY TECHNOLOGY Instruction Manual 90134_BELLA PRO_French Door TOV_IM R4.indd 1 90134_BELLA PRO_French Door TOV_IM R4.indd 1 2021-07-28 3:51 PM 2021-07-28 3:51 PM...
- Page 2 Thank You for your purchase Register & sign up for special announcements and trendy recipes! Tell us what you think! Rate, review or ask us a question. @bellahousewares.com #getinspired BellaLife BellaLifestyle 90134_BELLA PRO_French Door TOV_IM R4.indd 2 90134_BELLA PRO_French Door TOV_IM R4.indd 2 2021-07-28 3:51 PM 2021-07-28 3:51 PM...
-
Page 3: Table Of Contents
Table of Contents Important Safeguards ..................... 2-4 Additional Important Safeguards .................. 4-5 Notes on the Plug ........................5 Notes on the Cord ........................6 Plasticizer Warning ......................6 Electric Power ........................6 Getting to Know Your 6 Slice Toaster Oven ..............7 Getting to Know your Backlit Display ................8 Operating Instruction (Except Rotisserie) ................9 Using The Rotisserie Spit ....................9-10 Function Chart ........................ -
Page 4: Important Safeguards
IMPORTANT SAFEGUARDS When using electrical appliances, basic safety precautions should always be followed, including the following: 1. READ ALL INSTRUCTIONS. 2. Do not touch hot surfaces. Use handles or knobs. 3. To protect against electrical shock do not immerse cord, plugs, or appliance in water or other liquid. - Page 5 11. Do not place on or near a hot gas or electric burner, or in a heated oven. 12. Extreme caution must be used when moving an appliance containing hot oil or other liquids. 13. To disconnect, press STOP to turn the Toaster Oven OFF. 14.
-
Page 6: Additional Important Safeguards
23. Use extreme caution when removing the crumb tray or disposing of hot grease. 24. Do not cover the Toaster Oven with anything that would prevent steam from escaping. This may cause warping, discoloration, malfunction or even fire. FOR HOUSEHOLD USE ONLY SAVE THESE INSTRUCTIONS ADDITIONAL IMPORTANT SAFEGUARDS... -
Page 7: Notes On The Plug
4. To reduce the risk of fire, do not leave this appliance unattended during use. 5. If this appliance begins to malfunction during use, press <STOP>. Remove the plug from the wall outlet. Do not use or attempt to repair a malfunctioning appliance! 6. -
Page 8: Notes On The Cord
NOTES ON THE CORD a) A short power-supply cord (or detachable power-supply cord) is to be provided to reduce risks resulting from becoming entangled in or tripping over a longer cord. b) Longer detachable power-supply cords or extension cords are available and may be used if care is exercised in their use. c) If a long detachable power-supply cord or extension cord is used: The marked electrical rating of the detachable power-supply cord or extension cord should be at least as great as the electrical... -
Page 9: Getting To Know Your 6 Slice Toaster Oven
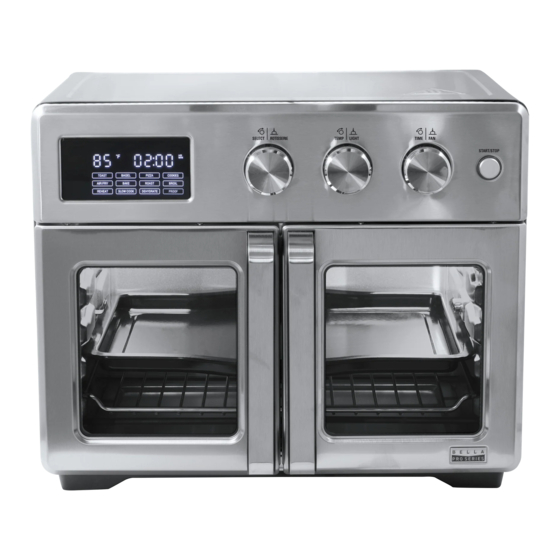
Getting to Know Your 6 Slice Toaster Oven Product may vary slightly from illustration Screen START/STOP Button Oven Lamp Cabinet Rotisserie Inrest Glass door Handle Heater Crumb Trey Oven Feet rotisserie set tray handle pizza stone air fry basket wire rack bake/broil pan crumb tray 90134_BELLA PRO_French Door TOV_IM R4.indd 7... -
Page 10: Getting To Know Your Backlit Display
Getting to Know your Backlit Display Available Functions: TOAST BAGEL PIZZA COOKIES AIR FRY BAKE ROAST BROIL REHEAT SLOW COOK DEHYDRATE PROOF First Knob/Button Second Knob/Button Third Knob/Button Rotate to select recipes Rotate to adjust temperature Rotate to adjust time Press for rotisserie function Press for inner light Press for fan speed... -
Page 11: Operating Instruction (Except Rotisserie)
Operating Instruction (Except Rotisserie) Plug unit in to power on unit First, rotate the left knob to the desired preset recipe. This will pre-program the unit with time and temperature. Using the middle knob, rotate left or right to adjust the temperature if needed Using the right knob, rotate left or right to adjust cooking time Once TIME and TEMP are adjusted, press START/STOP button to begin cooking NOTE: To turn on the internal light during the cooking process, you can press the middle... - Page 12 Using the middle knob, rotate left or right to adjust the TEMP if needed Using the right knob, rotate left or right to adjust cooking TIME Once TIME and TEMP are adjusted, press START/STOP button to begin Cooking NOTE: To turn on the internal light during the cooking process, you can press the middle knob to turn on Once cooking is complete, press START/STOP to stop cooking process.
-
Page 13: Function Chart
Function Chart Recipe Description Temperature Time Fan level Rotisserie range range TOAST Default with 6 slices and 450°F various darkness level 4 Adjustable BAGEL Default with 6 slices and 450°F various OFF Not darkness level 4 Adjust BROIL Default temperature 450F. 450°F 1-30mins Default... -
Page 14: Shelf Positions
Shelf Positions NOTE: Certain foods may require different shelf positions depending on the recipe, size, amount of food to be cooked and personal taste. Use the following informationas a guide only. There are 3 height positions that the air fryer/dehydrator basket, wire rack or the bake/ broil pan may be inserted. - Page 15 Wash the air fryer/dehydrator basket, bake/broil pan, wire rack, and crumb tray in warm, soapy water. Rinse and dry thoroughly before placing in the Toaster Oven. Do not use abrasive cleaners. To ensure that the Toaster Oven is free from oils used in manufacturing, it is necessary to operate the unit once, empty.
-
Page 16: Care & Cleaning Instructions
Care & Cleaning Instructions Unplug the Toaster Oven and allow the Toaster Oven and all accessories to cool completely before cleaning. Clean the outside of the Toaster Oven with a damp cloth and dry thoroughly. A non-abrasive liquid cleaner may be used for stubborn stains. Rinse and dry thoroughly. Do not use metal scouring pads or abrasive cleaners that will scratch the surface. -
Page 17: Storing Instructions
Storing Instructions Unplug unit, allow to cool, and clean before storing. Slide the bake/broil assembly (wire rack and bake/broil pan) into the lower shelf position. Store Toaster Oven in its box in a clean, dry place. Never store appliance while it is hot or still plugged in. Never wrap cord tightly around the appliance. - Page 18 FOOD TEMP AIR FRY TIME* ACTION Mushrooms, sliced 400°F 5 minutes Turn & rotate air fryer basket halfway through air frying. Peppers, bell, 1-inch chunks 380°F 10 minutes Turn & rotate air fryer basket halfway through air frying. Peppers, jalapeno, poblano 380°F 10 minutes Turn &...
- Page 19 FOOD TEMP AIR FRY TIME* ACTION Chicken Chicken Breast, boneless, 360°F 10 – 15 minutes Turn and rotate halfway through air frying. skinless Chicken Pieces 360°F 20 - 30 minutes Turn & rotate air fryer basket halfway through air frying. Chicken Tenders/Fingers, 360°F 13 - 15 minutes...
- Page 20 FOOD TEMP AIR FRY TIME* ACTION Fish and Seafood Catfish Fingers (thawed, 400°F 10 - 15 minutes Turn & rotate air fryer basket halfway through air battered) frying. Shrimp (thawed, battered) 320°F 12 minutes Turn & rotate air fryer basket halfway through air frying.
-
Page 21: Warranty
Limited Two-Year Warranty SENSIO Inc. hereby warrants that for The warranty is only valid for the a period of TWO YEARS from the date original retail purchaser from the date of purchase, this product will be free of initial retail purchase and is not from mechanical defects in material transferable. - Page 22 How To Obtain Warranty Service: You must contact Customer Service at Also, include a copy of the original sales our toll-free number: 1-866-832-4843. receipt. Carefully package the tagged A Customer Service Representative product with the sales receipt, and send will attempt to resolve warranty issues it (with shipping and insurance prepaid) over the phone.
- Page 23 90134_BELLA PRO_French Door TOV_IM R4.indd 21 90134_BELLA PRO_French Door TOV_IM R4.indd 21 2021-07-28 3:51 PM 2021-07-28 3:51 PM...
- Page 24 For customer service questions or comments 1-866-832-4843 bellahousewares.com Sensio Inc. New York, NY 10016/USA 90134_BELLA PRO_French Door TOV_IM R4.indd 22 90134_BELLA PRO_French Door TOV_IM R4.indd 22 2021-07-28 3:51 PM 2021-07-28 3:51 PM...
Need help?
Do you have a question about the PRO Series and is the answer not in the manual?
Questions and answers