Advertisement
Quick Links
Advertisement

Related Manuals for XLOCK 220


Summary of Contents for XLOCK 220
- Page 1 XLOCK 220 Installation Guide MTA_9 344 301 00...
-
Page 2: Packaging Contents
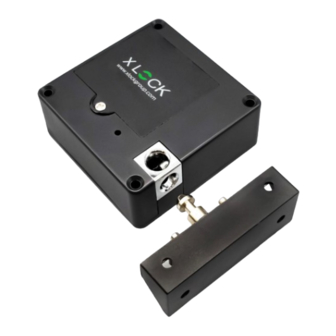
PACKAGING CONTENTS Always use lithium Lock XL220 batteries! Closing part XL220 4 x AAA Lithium batteries Sticker Attention: Please order batteries 2 x screws for closing part 4 x screws for lock countersunk separately. Lens head 4.0 x 12 mm. head 3.0 x 45 mm. - Page 3 DIMENSIONS Lock Closing part XL220 XL220...
- Page 4 TRANSPONDER Optional ! Please order separately. KEY FOB ISO ID-Card KEY FOB XL-AUMIFCL-2 XL-SAMIFCL XL-AUMIFCL Encapsulated housing with stainless steel ring Ultraviolet welded case with stainless RFID card transponder ISO14443a RFID transponder ISO14443a type Mifare steel ring RFID transponder type Mifare Classic reading range Classic reading range up to 3cm ISO14443a type Mifare Classic reading up to 2,5cm...
- Page 5 PREPARATION FROM THE LOCK 4 pieces AAA lithium Close the battery Open the battery compartment Your lock is now ready batteries. compartment cover and fix it cover and insert the batteries for use. For error-free operation, with the screw. with the correct polarity (+/-). please always use lithium batteries!
- Page 6 Simply scan the QR code with your camera: After installation, create your XLOCK account and confirm in the e-mail - > done. For the commissioning of an XLOCK lock, the location Bluetooth must be activated...
-
Page 7: Create Account
3. Verify your account by clicking on the 4. Congratulate! You 2. Enter your email address and 1. Tap the button above. confirmation link in the XLOCK e-mail in have successfully choose a password. To confirm, your e-mail inbox installed the... - Page 8 1. Tap the button at the 2. Tap New Lock. 4. The lock is displayed 5. Give the lock a . The XLOCK lock has now bottom right corner. with its ID number. Tap name and tap ADD. been successfully linked to...
- Page 9 ADD TRANSPONDERS 6) The lock signals when it is ready. Then, as shown in the photo, hold the transponder to the antenna from the lock. 4) Select Bluetooth 1. Tap the lock. The lock 2. Tap the NFC Tags 3) Tap that in the 5) Give the 7) Your transponder and tap...
-
Page 10: Unlock And Lock
UNLOCK and LOCK Unlocking with the smartphone and the app is very Hold a programmed transponder against the lock's simple. A swipe to the right unlocks the lock for 5 antenna. The reading distance depends on the installation seconds. The reading distance is up to 15 meters. and the medium. - Page 11 XLOCK220 MOUNTING OPTIONS LOCK on the door LOCK on the corpus Attention: In the case of corpus mounting, the RFID antenna signal is on the side of the corpus. In the case of corpus mounting, cabling is easier to implement.
- Page 12 DOORS MOUNTING LEFT The RFID reader direction is The RFID reader direction is at the at the door. door. Door 39,5 65,5 10,25...
- Page 13 DOORS MOUNTING RIGHT The RFID reader direction is The RFID reader direction is at the door. at the door. 65,5 39,5 10,25 Door Door...
- Page 14 CORPUS MOUNTING LEFT The RFID reader direction is The RFID reader direction is on on the side of the corpus. the side of the corpus. Door Door 65,5 24,75...
- Page 15 CORPUS MOUNTING RIGHT The RFID reader direction is on the The RFID reader direction is on side of the corpus. the side of the corpus. Door Door 65,5 24,75...
- Page 16 XLOCK GATEWAYS Optional! Please order separately. XLOCK Gateway G2-WIFI incl. XLOCK Gateway G3-Ethernet incl. XLOCK Gateway G3 POE-Ethernet USB C charging cable. USB C charging cable. incl. USB C charging cable. 2.4 GHz WIFI compatible USB USB power supply required...
-
Page 17: Bluetooth Accessories
20 Wireless key meters - cable-free. XLOCK BLE Wireless keyboard The wireless keypad can be used to program all XLOCK pin code functions such as fixed, time and one-time code. - Page 18 More information and support at www.xlockgroup.com XLOCK by data mobile Landstrasse 35-39 AUT – 6911 Lochau info@xlockgroup.com www.xlockgroup.com...
Need help?
Do you have a question about the 220 and is the answer not in the manual?
Questions and answers