MIR Spirobank II Service Manual
Hide thumbs
Also See for Spirobank II:
- User manual (57 pages) ,
- User manual (34 pages) ,
- User manual (35 pages)

Related Manuals for MIR Spirobank II


Summary of Contents for MIR Spirobank II
- Page 1 Spirobank II Service Guide Service manual Rev. 1.0 Date issued 21.05.2014 Date of approval 21.05.2014 Rev.1.0 Page 1 of 35...
-
Page 2: Table Of Contents
Additional Information ........................................5 1.2.7. Installation ............................................5 1.3. GENERAL ............................................... 5 1.3.1. Technical Data ........................................... 5 1.3.1.1. spirobank II unit ..........................................5 1.3.1.2. Battery charger ........................................... 6 1.4. STANDARDS APPLIED ........................................6 HARDWARE DESCRIPTION ......................................6 2.1. MAIN BOARD MODULE ........................................ -
Page 3: Introduction
The spirometers from the product group MIR056 are marketed under the label spirobank II. This manual has been written for technicians involved in the service of the spirobank II. Service can be carried out by the service organization of the manufacturer or by any other technician authorized by MIR srl. -
Page 4: Data Registration
Product documentation 1.2.3. The documentation set for the spirobank II includes a User Manual. The User Manual is a recommended item for all service engineers. The user manual is available in the following languages: ... -
Page 5: Additional Information
the slow Vital Capacity test (VC/IVC) the Maximum Voluntary Ventilation test (MVV) spirobank II has been designed and manufactured to ensure the highest level of safety and the unit fully complies with the stringent international EN 60601-1 and EN 60601-1-2 standards. -
Page 6: Battery Charger
SANS 451:2008 Spirometry — Generation of acceptable and repeatable spirograms FDA Regulations Japanese MHLW Ministerial Ordinance 169: 2004 2. HARDWARE DESCRIPTION Because of the modular design of the spirobank II, the description is on a block diagram level. BLOCK DIAGRAM Rev.1.0 Page 6 of 35... -
Page 7: Main Board Module
Charging controller for battery (IC1 LTC 4067) 2.1.1. The charging controlling circuit used in the Spirobank II ensures a charge and optimum condition of the battery providing that the battery temperature and voltage are within the preset limits. Temperature, voltage and time are all monitored throughout the charge process. -
Page 8: Room Temperature Sensor
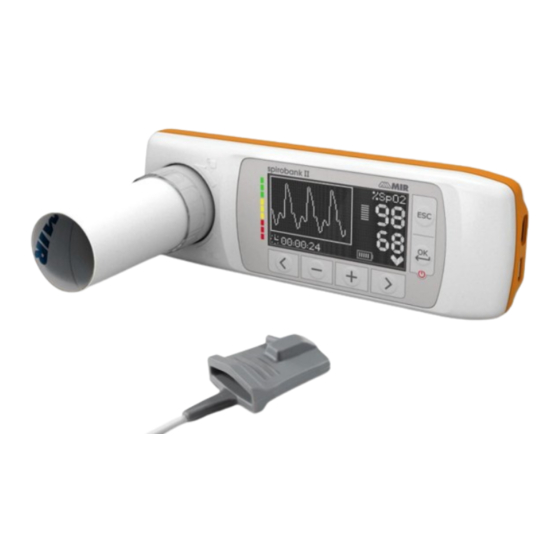
The connector beside the USB ports is used to connect the oximetry sensor, where this function is enabled on the device. Many sensors can be used on spirobank II based on the type of test to be performed and on the patient characteristics. -
Page 9: Maintenance
For cleaning of the spirobank II and the accessories please see the User Manual. 3.2. TEST EQUIPMENT For the repair and maintenance procedures of the spirobank II the following test equipment and accessories are required: Complete set of precision engineering tools (including 2.5 mm allen key and cross-screwdriver) Calibration syringe (3L is recommended) Case opener Digital multimeter, at least 3½... -
Page 10: Checklist
Self test 3.3.1.1. Switch on the equipment. spirobank II will carry out the so-called self-test for approx 3 seconds. It is assumed that when the self-test is passed all functions of spirobank II are okay. Any severe malfunction (if any) will be reported on the display. -
Page 11: Cover
If any soldering (especially on SMD-parts) is to be made, make sure that your tools are suitable for such precision work. 4.2. Cover The spirobank II case consists of several parts as illustrated in the image beside. The display is housed inside its casing which is made up of two parts held together with three screws. -
Page 12: Pcbs And Components
4.3. PCBs and components Removing and replacing the display 4.3.1. Open spirobank II as described in Paragraph 4.2.1; once the PCB is separated from the case, remove the damaged display from the upper casing. Enlarge the two pins in the red circles of the image alongside, until to hear the release of the display from its housing. -
Page 13: Removing And Replacing The Keyboard
Removing and replacing the keyboard 4.3.2. Open spirobank II as described in Paragraph 4.2.1 up to point 5. Detach the keyboard from the upper case. Check if any adhesive part remains on the case, if so clean it with alcohol to remove the excess part. - Page 14 For proper use of the battery please read carefully the warning below. WARNING Use only batteries supplied by MIR. Improper use of the battery may cause acid leakage, overheating, smoke, breakage, an explosion and/or fire. Consequently the battery may be damaged or suffer a drop in overall performance. The internal battery safety sensor could also be damaged as well by any of the above events.
- Page 15 Spirobank II Service Guide Do not puncture the battery with sharp objects such as a nail. Do not hammer, step-on, throw or cause a forceful impact to the battery. A damaged or deformed battery may cause internal short-circuits thus creating the possibility for acid leakage, overheating, smoke, breakage and/or fire.
-
Page 16: Turbine
The battery may be stored within a temperature range between -20°C and approximately 60°C. Turbine 4.3.4. There are two types of flow and volume measurement sensors used on spirobank II, single-patient disposable and reusable. Note The spirobank II turbine measurement system is calibrated in the factory and does not require any adjustments or calibrations. -
Page 17: Calibration Of The Reusable Turbine
To clean the reusable turbine, first remove it by pulling it gently from the spirobank II turning it anti-clockwise and pressing lightly. It can be helpful to push it gently from underneath with one finger from the bottom of the turbine to lift it out of its housing. -
Page 18: Oximeter Module
.tsk file and then click on Next. From the “Select file .tsk” search window select the firmware of your device; click on the spirobank II folder and then on the selected file to automatically launch the upgrading procedure of the internal software of the spirometer. -
Page 19: Testing Procedures
Spirobank II Service Guide Open the device as described in point 4.2.1 up to point 5. The visible face of the PCB shows near the connectors the housing of the oximetry module. Remove the oximetry module using the hand. CAUTION The module is fixed to the PCB so move gently until the module is completely removed. - Page 20 Spirobank II Service Guide Table 1 TESTS ON PCB MIR056 WITH OXIMETER Test Procedure Test method Instrument Expected result Check that the oximetry module has been correctly The doubled sided adhesives must be applied between Blocking of oximetry module Visual...
- Page 21 Spirobank II Service Guide CHECKS ON MAIN CASING OF THE ASSEMBLED DEVICE Table 2 Test Procedure Test method Instrument Expected results Check that the temperature corresponds to the BTPS* Temperature equal to thermometer Temperature Instrument Thermometer reading +/- 1 °C...
- Page 22 Launch the oximetry test on the MIR device (see Table 3 User Manual). FIVC min/max values, temperature or BTPS function e) Read the value given by the spirobank II (it must be between 83 and 87%). Page 22 of 35 Rev.1.2...
-
Page 23: Testing Procedures For Devices Without Oximeter
Repeat the same procedure for the saturation level set on the simulator at 95% and PBM at 80. i) Read the value given by the spirobank II (it must be between 93 and 97%). j) Read the heart beat rate on the spirobank II (it must be between 78 e 82). - Page 24 Spirobank II Service Guide Table 4 TESTS ON PCB MIR056 WITHOUT OXIMETER Test Procedure Test method Instrument Expected result Visual The battery must be completely connected and the cable Battery connection to the PCB Check correct procedure described in point 4.3.3 must be bended as shown in image at point 4.3.3...
-
Page 25: Spare Parts
Warranty claims 5.2.2. Warranty claims must be provided with the MIR invoice number, the type of products and serial number of the equipment in question. The defective item must be returned back to MIR. The customer is responsible for the transportation and for all transport and customs charges for the delivery of the goods both to and from the service centre. -
Page 26: Troubleshooting
Spirobank II Service Guide The unit must be returned in its original packaging. MIR reserves the right to modify the instrument if required, and a description of any modification made will be sent along with the returned goods. Note Any instrument of accessory returned must be accompanied by a clear and detailed explanation of the defect or issue found. -
Page 27: The Device Does Not Measure Spirometry At All
Spirobank II Service Guide 6.4. The device does not measure spirometry at all Check if any obstacle is blocking the free rotation of the turbine For information about maintenance cleaning please refer to paragraph 4.3.4.1 of this manual. -
Page 28: Index Of Components
Spirobank II Service Guide Check the cables, if there is any visible damage. – Replace the cable – If after changing the cable the problem persists, then send the device to the manufacturer Verify the correct installation of the winspiroPRO software –... -
Page 29: Appendix A: Spare Parts List
919210_INV Extension cable Extension cable to be used with BCI standard compatible finger probes(50 cm)with orange arrow 301114 Key board Key board for new MIR spirobank II 532367 Micro USB cable Micro USB cable for the PC connection 001080 Module... - Page 30 919020 Oximetry finger sensor Reusable,ADULT,MIR connector with orange arrow 919025 Oximetry Finger Sensor Reusable, PEDIATRIC 5-45 Kg, MIR connector with orange arrow 919017 Oximetry Finger Sensor (ORIGINAL BCI-REF-3044) Reusable, ADULT, to be used with extention cable 919090, 919200_INV, 919090_INV,919210_INV 919015 Oximetry Wrap Sensor (ORIGINAL BCI -REF-3043) Reusable, INFANT 3-15 Kg "Y"...
- Page 31 Spirobank II Service Guide Picture Spare part Q.ty 910700 1 pc Detergent solution PeraSafe detergent solution (162g) for reusable turbine 910300 Box of 100 Disposable mouthpiece Disposable paper adult mouthpiece, external diameter: 30 mm. To be used only with Reusable Turbine.
-
Page 32: Appendix B: Service Info's (Product Change Notes)
APPENDIX B: SERVICE INFO'S (Product Change Notes) General The technical information in the service manuals of MIR srl is up to date at the date of issue. Necessary additional information (of any kind) will be provided in the following way:... - Page 33 Antenna Bluetooth 431111500245 351302 Filtro LC x RF 2450 MHz SOSHIN - MDR741F taping 450155 Chiedere a Paolo modifiche Ditec - PCB MIR 056 Rev2 spirobank II 560023 Buzzer SMD 5x5 3h mm SMT-G5030A Kepo 600060 Diodo RB715 SMD 2/3 A UMD...
- Page 34 Spirobank II Service Guide Code Description PCB identification Quarzo CX3225SB (CX-101F) 26 MHz 3.2x2.5mm 7ppm 19pF CL 680216 KYOCERA 680400 Quarzo SMD 32,768KHz Q13FC1353276800 Epson X1, X2 680519 Quarzo 7M12000137 12,00000MHz 3,2x2,5 712600_1_0603 Resistenza SMD 0603 0,1W 1% 0 712604_1_0402...
-
Page 35: Annex
Spirobank II Service Guide Code Description PCB identification 832135_0402 Capacitor CER SMD 0402 50V 22nF X5R C70, C71, C72, C74, C75, C79 832137_0603 Capacitor CER SMD 0603 50V X7R 33nF C30, C37, C39, C42, C46, C49, C51, C52, C54, C56, C58, C61, C63, C65...
Need help?
Do you have a question about the Spirobank II and is the answer not in the manual?
Questions and answers