Advertisement
Quick Links
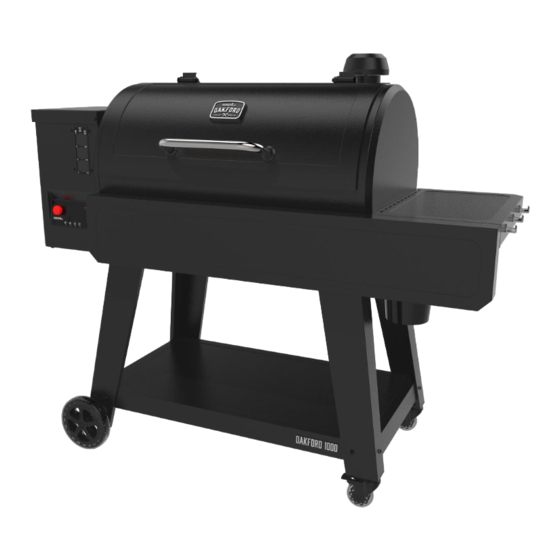
Oakford 1000
Pellet Grill
Model: 910-05003AU
A MAJOR CAUSE OF FIRES IS FAILURE TO MAINTAIN
REQUIRED CLEARANCES (AIR SPACES) TO
COMBUSTIBLE MATERIALS. IT IS OF UTMOST
IMPORTANCE THAT THIS PRODUCT BE INSTALLED
ONLY IN ACCORDANCE WITH THESE INSTRUCTIONS.
Owner's Guide
IMPORTA NT INFORMA TION.
MUST READ BEFORE
OPERATING. KEEP FOR FUTURE
REFERENCE.
DO NOT USE INDOORS!
Not for commercial use.
910-05003AU-062723
Advertisement

Related Manuals for Nexgrill Oakford 1000


Summary of Contents for Nexgrill Oakford 1000
- Page 1 Oakford 1000 Pellet Grill Model: 910-05003AU Owner’s Guide IMPORTA NT INFORMA TION. MUST READ BEFORE OPERATING. KEEP FOR FUTURE REFERENCE. A MAJOR CAUSE OF FIRES IS FAILURE TO MAINTAIN REQUIRED CLEARANCES (AIR SPACES) TO COMBUSTIBLE MATERIALS. IT IS OF UTMOST IMPORTANCE THAT THIS PRODUCT BE INSTALLED ONLY IN ACCORDANCE WITH THESE INSTRUCTIONS.
- Page 2 TABLE OF CONTENTS I m p o r t a n t S a f e t y I n f o r m a t i o n T u r n i n g O f f Y o u r G r i l l …...
- Page 3 Important SAFETY INFORMATION WARNING! Follow these guidelines to prevent this colorless, odorless gas from poisoning you, your family or others: Know the symptoms of carbon monoxide poisoning: headache, dizziness, weakness, nausea, vomiting, • sleepiness, and confusion. Carbon monoxide reduces the blood’s ability to carry oxygen. Low blood oxygen levels can result in loss of consciousness and death.
- Page 4 SAFETY PRACTICES TO AVOID INJURY Do not use water to control flare ups or extinguish the • Do not use this grill under any overhead combustible • fire. Turn off the grill, unplug the power cord, and wait construction including ceilings or overhangs. for the grill to cool down.
- Page 5 Pellet GRILL SYSTEM Hopper LARGE COOKING AREA The large capacity hopper is equipped with The porcelain-coated, easy clean, cooking grates rear-access pellet cleanout and can hold will hold plenty of food for all your guests. The enough pellets for an all-day smoking session. top warming rack can be removed to The I-Site pellet fuel indicator shows the...
- Page 6 Package Parts List Cord attached...
- Page 7 Package Parts List...
- Page 8 Package Parts List...
- Page 9 Assembly Instructions PREPARATION: Before beginning assembly, installation or operating the product, make sure all parts are present and undamaged. Compare parts with packaging contents list and diagram above. If any part is missing or damaged, do not attempt to assemble, install or operate the product. Contact our customer service for replacement parts.
- Page 10 A×6 B×6 C×6 A×4 B×4 C×4...
- Page 11 A×6 B×6 C×6 A×4 B×4 C×4...
- Page 12 D×2 E×2 F×2...
- Page 13 A×4 B×4 C×4...
- Page 14 A×2 B×2 C×2 A×6 B×6 C×6...
- Page 15 G×2...
- Page 18 controller GUIDE CONTROL DIAL PLAY/pause Turn this control dial to adjust the values for the Initially used to start the ignition process once a timer, meat probe temperature, grill cooking mode is selected, this can be pressed while temperature. Push the control dial to confirm new cooking to pause the program.
- Page 19 Always plug the power cord into a grounded outlet. Open the grill lid while lighting. Use the Nexgrill app to enhance your grilling experience. LIGHTING YOUR GRILL - AUTOMATICALLY Make sure your grill is properly setup and ready for use.
- Page 20 Operating Instruction OPERATING INSTRUCTION LIGHTING YOUR GRILL - MANUALLY Make sure your grill is properly setup and ready for use. Open the grill lid and remove the grids, grease tray and diffuser. Ensure the hopper does not contain foreign objects and is filled with enough barbecue pellets. Check that that the fire pot is clean and does not contain any foreign objects.
- Page 21 CARE AND MAINTENANCE INSTRUCTIONS CAUTION! MAKE SURE THAT THE GRILL IS COOLED AND PLUG UNPLUGGED FROM THE POWER SOURCE BEFORE PERFORMING ANY CLEANING OR MAINTENANCE. Interior COOKING GRATES After the grill has cooled, scrub both sides of the cooking grates with a wire -bristled grill brush. •...
- Page 22 TROUBLESHOOTING ERROR CODES On a rare occasion, your controller would detect an issue and you may see an error code displayed on the controller. Please refer to the following table for descriptions and solutions: ERROR CODE ERROR DESCRIPTION SOLUTION This error will occur when the thermocouple has lost connection to the Firebox theromocouple controller due to a loose wire connection or failure of the sensor failure...
- Page 23 TROUBLESHOOTING FREQUENTLY ASKED QUESTIONS QUESTION ANSWER Unplug the grill and wait for it to cool down. If the jam cannot be broken up from the pellet hopper opening, the auger and What do I do if the auger jams? motor may need to be removed. Contact customer service for help with removing the auger to clear it.
- Page 24 The manufacturer reserves the right to require photographic evidence of damage, or that de fective parts be returned, postage and/or freight pre-paid by the consumer, for review and examination. Nexgrill’s obligation is limited to repair, replacement, or depreciated value, at the option of Nexgrill.
- Page 25 Replacement Parts...
- Page 26 REPLACEMENT PARTS LIST Replacement Parts WARRANTY PART WARRANTY PART (DESCRIPTION) COVERAGE (DESCRIPTION) COVERAGE Grease Tray Grease Bucket Power Cord Bracket Grease Bucket Liner Drop Chute Plate Handle Side Shelf Drop Chute Plate Screw Hook Glass Window Firebox Glass Window Bracket Cart Leg, Rear Right Glass Window Seal Cart Leg, Front Right...
- Page 27 THIS PAGE INTENTIONALLY LEFT BLANK...
- Page 28 ©2023 NEXGRILL INDUSTRIES, INC. NEXGRILLBBQ.COM.AU...
Need help?
Do you have a question about the Oakford 1000 and is the answer not in the manual?
Questions and answers