Table of Contents
Advertisement
Available languages
Available languages
Quick Links
EN
With your inspiring rating, COSTWAY will be more consistent to offer you EASY
SHOPPING EXPERIENCE, GOOD PRODUCTS and EFFICIENT SERVICE!
DE
Mit Ihrer inspirierenden Bewertung wird COSTWAY konsistenter sein, um Ihnen EIN
SCHÖNES EINKAUFSERLEBNIS, GUTE PRODUKTE und EFFIZIENTEN SERVICE zu
bieten!
FR
Avec votre évaluation inspirante, COSTWAY continuera à fournir une EXPÉRIENCE
D'ACHAT PRATIQUE, des PRODUITS DE QUALITÉ et un SERVICE EFFICACE !
ES
Con su calificación inspiradora, COSTWAY será más consistente para ofrecerle
EXPERIENCIA DE COMPRA FÁCIL, BUENOS PRODUCTOS y SERVICIO EFICIENTE.
IT
Con la tua valutazione incoraggiante, COSTWAY sarà più coerente per offrirti
ESPERIENZA DI ACQUISTO FACILE, BUONI PRODOTTI e SERVIZIO EFFICIENTE!
PL
Dzięki twojej opinii COSTWAY będzie mógł oferować jeszcze WYGODNIEJSZE
ZAKUPY, LEPSZE PRODUKTY i SPRAWNIEJSZĄ OBSŁUGĘ KLIENTA.
US office: Fontana
UK office: Ipswich
DE office: Hamburg
FR office: Saint Vigor d'Ymonville
AU office: Truganina
PL office: Gdańsk
EN
FR
USER'S MANUAL/MANUEL DE L'UTILISATEUR
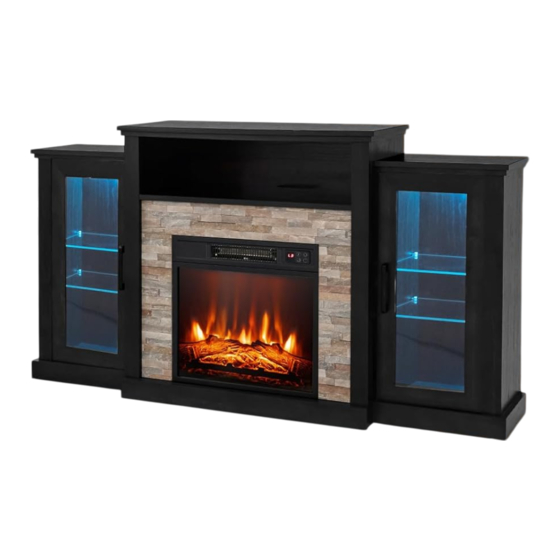
TV Stand with Fireplace / Meuble TV avec Cheminée
THIS INSTRUCTION BOOKLET CONTAINS IMPORTANT SAFETY INFORMATION. PLEASE READ AND KEEP FOR FUTURE REFERENCE.
FP10181
Advertisement
Table of Contents

Subscribe to Our Youtube Channel
Related Manuals for Costway FP10181


Summary of Contents for Costway FP10181
- Page 1 With your inspiring rating, COSTWAY will be more consistent to offer you EASY SHOPPING EXPERIENCE, GOOD PRODUCTS and EFFICIENT SERVICE! Mit Ihrer inspirierenden Bewertung wird COSTWAY konsistenter sein, um Ihnen EIN SCHÖNES EINKAUFSERLEBNIS, GUTE PRODUKTE und EFFIZIENTEN SERVICE zu bieten! Avec votre évaluation inspirante, COSTWAY continuera à...
- Page 2 CODR/ DESRIPTION QTY/QTÉ NUMÉRO Middle cabinet panel / Panneau central de l'armoire Right panel of middle cabinet/ Panneau droit de l'armoire centrale Left panel of middle cabinet/ Panneau gauche de l'armoire centrale Middle cabinet side front stop/ Butée avant latérale de l'armoire centrale Middle cabinet fixed laminat/ Stratifié...
- Page 3 CODR/ Ø8x30mm DESRIPTION QTY/QTÉ NUMÉRO Ø15 Sideboard left side panel/ Panneau latéral gauche du buffet mid back panel/ 59X+1X 59X+1X 54X+1X Panneau arrière central Side cabinet movable shelf/ Étagère mobile pour armoire latérale Ø3.9x15mm Ø3.5x16mm door panel/ Panneau de porte Side Panel/ 52X+1X 29X+1X...
- Page 5 EN: The receiver must be in the semicircular hole. FR: Le récepteur doit être dans le trou semi-circulaire.
- Page 7 EN: Note: The outlet direction of the lamp belt(0) is on the same side as the rubber door stop(D). FR: Remarque : Le sens de sortie de la courroie de la lampe (0) est du même côté que la butée de porte en caoutchouc (D).
- Page 10 EN: Tighten the backplane after installing it FR: Serrez la plaque arrière après l'avoir installée. EN: Each (B) matches an (M) FR: Chaque (B) correspond à un (M).
- Page 11 EN: In order to ensure that the upper and lower spacing of the door seam is consistent, the lower part of the door panel should be installed first, and then the upper part should be installed. FR: Afin de garantir que l'espacement supérieur et inférieur de la couture de porte est cohérent, la partie inférieure du panneau de porte doit être installée en premier, puis la partie supérieure doit être installée.
- Page 13 When using electrical appliances, basic safety precautions should always be followed including the following: READ ALL INSTRUCTIONS BEFORE USE 1. Read all instructions before using this heater. 2. Do not use this heater outdoors. 3. This heater is not intended for use in bathrooms, laundry areas and similar indoor locations.
-
Page 14: Technical Specification
CAUTION: While the heater is in use, the top center of the WARNING: This heater is hot when in use.To avoid burns, fireplace can get hot to the touch, and may cause serious injury do not let bare skin touch hot surfaces. If provided, use or burns.Always supervise small children around the fireplace / handles when moving the heater. -
Page 15: Assembly Instruction
ASSEMBLY INSTRUCTION STEP 2 Attach the top trim to the top of the unit and secure it by tightening 2 screws. Make sure the right angle side faces the front Estimated Time for Assembly of the unit. 20:00 Align and attach two side trims to the sides of the fireplace unit. Identify the right and the left and make sure the right angle side is facing the front of the unit. -
Page 16: User Instruction
USER INSTRUCTION (CONTROL PANEL) USER INSTRUCTION Flame Control Before use Check that the air intake and exhaust is not covered or obstructed in anyway. Keep combustible objects at least 3 ft/ 0.9 m away from the unit. Power Button Display Plug the unit to a grounded power socket. - Page 17 Heater Control USER INSTRUCTION (REMOTE CONTROL) Press the heater control to turn on and off the heater. When the heater is turned on, press and hold the heater control button for 5 seconds to enter temperature adjustment mode. The Power Button LED indicator is red.
-
Page 18: Troubleshooting
TROUBLE SHOOTING To replace the bracket, simply push it into the remote control. Make sure the bracket snaps into position. NOTE: Remove battery from remote control if not use for an Problem Solution extended period of time. The unit does not turn on Make sure the unit is plugged into a standard 120V grounded power source. - Page 19 Lors de l'utilisation d'appareils électriques, des précautions de base doivent toujours être prises, notamment les s uivantes : LISEZ TOUTES LES INSTRUCTIONS AVANT UTILISATION ET CONSERVEZ CES INSTRUCTIONS 1. Lisez toutes les instructions avant d'utiliser cet appareil de chauffage. 2. N'utilisez pas cet appareil de chauffage à l'extérieur. 3.
-
Page 20: Spécification Technique
AVERTISSEMENT: Il n'y a aucune pièce réparable par ATTENTION: Lorsque le foyer est en service, le centre l'utilisateur à l'intérieur du foyer/chauffage. Si l'appareil semble supérieur du foyer peut devenir chaud au toucher et peut mal fonctionner, éteignez-le et débranchez-le immédiatement causer des blessures ou des brûlures graves. -
Page 21: Instruction De Montage
INSTRUCTION DE MONTAGE ÉTAPE 2 Fixez la garniture supérieure sur le dessus de l'appareil et fixez-la en serrant 2 vis. Assurez-vous que le côté à angle droit est orienté Temps estimé pour le montage vers l'avant de l'appareil. 20:00 Alignez et fixez deux garnitures latérales sur les côtés de l'appareil. - Page 22 INSTRUCTION AUX UTILISATEURS INSTRUCTION D'UTILISATION (PANNEAU DE COMMANDE) Contrôle de la Flamme Avant l'utilisation Vérifiez que l'entrée et la sortie d'air ne sont pas couvertes ou obstruées de quelque manière que ce soit. Maintenez les objets combustibles à au moins 0,9 m (3 pieds) de Bouton Affichage l'appareil.
- Page 23 Commande du chauffage INSTRUCTIONS D'UTILISATION (TÉLÉCOMMANDE) Appuyez sur la commande du chauffage pour allumer et éteindre le chauffage. Lorsque le chauffage est allumé, appuyez sur le bouton de Bouton commande du chauffage pendant 5 secondes pour passer en mode d'Alimentation de réglage de la température.
-
Page 24: Dépannage
DÉPANNAGE REMARQUE : Retirez la pile de la télécommande si vous ne l'utilisez pas pendant une période prolongée. Problème Solution L'appareil ne s'allume pas Assurez-vous que l'appareil est branché sur une source d'alimentation standard de 120 V avec mise à la terre. Appuyez sur le bouton d'alimentation du panneau de commande.
Need help?
Do you have a question about the FP10181 and is the answer not in the manual?
Questions and answers